Note: This chapter is a truncated version of book 3’s first perfect clear chapter (it has two). The actual book version is twice as long, containing all the streamlined and researched perfect clear patterns for bags 1 to 8. The second perfect clear chapter lists all true minimal solutions.
This guide contains patterns for perfect clears from the 1st to 7th PC bags.
Why seven bags? If you perfect clear consecutively with 10 pieces per bag (10 pieces are cleared in each bag to leave an empty field), you start afresh with an empty field. Hence, after performing each perfect clear bag, you get a different bag with unique tactics. I illustrate:
| Diagram Set 18-1 | |
| 1 | 2 |

| The 1st perfect clear bag is solved using the standard Perfect Clear Opener (PCO). | You get to the 2nd perfect clear bag. This bag uses different patterns to perfect clear. |
Hence, the perfect clear patterns and solutions for the 1st and 2nd perfect clear bags differ. This applies to all seven bags. After seven bags (of 10 pieces each), you would have placed 70 pieces, resetting the field to the 1st perfect clear pattern (with one exception to be covered later).
I have provided a general method with basic and simple principles to perfect clear. However, I have worked out high-chance and easy-to-learn initial patterns with their solutions for the more initiated.
I once worked with Cosin (one of two Four.lol owners) to research many PC patterns in this chapter. Hence, our patterns may converge, especially for the 5th and 7th PC bags. There are also limited ways to optimize patterns, causing our patterns to coincide independently.
Anyway, here is a general guide to doing PCs for all bags.
A) General Method to Perfect Clear for All Bags
One can adhere to several guidelines to perfect clear each bag. Suppose you are unsure of the solution. In that case, the following guidelines can help you decide how to place 1 or 2 pieces to create a high-chance pattern to solve:
1) Not Dividing the Field Too Much
To make a perfect clear, you must create a rectangle that isn’t too divided. Some patterns cannot be perfect cleared if you have bad placements:
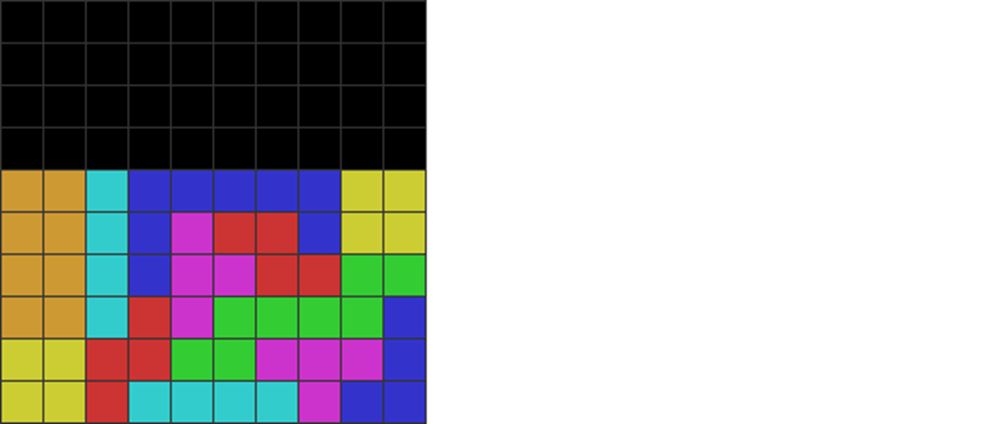
| Diagram Set 18-2 |

| For both fields, the field has divided the rectangle such that the cavities on the left and right sides are not multiples of 4. |
This means you cannot perfect clear it. Therefore, be mindful of such placements.
2) Fillable Blocks Must be a Multiple of 4
A perfect clear is possible only if the number of blocks to be filled (total blocks minus initial blocks) is divisible by 4:
| Diagram Set 18-3 | |
| A | B |

| Five pieces solve a 2×10 rectangle. | Ten pieces solve a 4×10 rectangle. |
| Fifteen pieces solve a 6×10 rectangle. |
Likewise, the number of residues must be precise before one can perfect clear. For instance:
| Diagram Set 18-4 | |
| A | B |

| A 2×10 perfect clear solution is possible. | A 3×10 perfect clear solution is possible. |
| C | D |

| A 4×10 or 6×10 perfect clear solution is possible. | 2, 3, 4, or 6×10 perfect clear is impossible. |
Here, A has four blocks filled. A 2×10 PC pattern has 20 blocks. 20-4=16=4×4. This means four more pieces can be placed to perfect clear it.
For B, a 3×10 PC is possible. This PC has 3×10 = 30 blocks. 30-2=28, which is a multiple of 4. Thus, placing seven pieces will solve it.
A 4×10 PC is possible in C as 40-4=36 is a multiple of 4.
A, B, and C are generally solvable unless the blocks are placed where they excessively divide the stack and prevent proper stacking.
D shows three blocks placed, making a 2×10, 3×10, 4×10, or 6×10 PC impossible. For it to PC, you must have 10N – 3 = a multiple of 4, where N is the field’s height (2, 3, 4, or 6 high). However, no value of N = 2, 3, 4, or 6 makes it a multiple of 4.
Therefore, no solution is possible until one has made line clears to reduce the number of unfilled blocks to a multiple of 4.
In D, you are left with three residues. Skim until you get a residue that enables perfect clearing. However, this is not advised, as it takes too long and is indeterminate.
3) Watching for Piece Dependencies
Another piece dependency trick to note is developing the intuition for incoming pieces. For instance, if you get two Os in a row, the next few pieces may only contain 0 or 1 O piece. Thus, please plan ahead. If you sense there won’t be an incoming O, don’t create an O dependency in the following perfect clear pattern.
The pattern below has an O dependency on the left-most cavity. It should be avoided if there are no extra Os:
4) Ts, Line Skims, and Parity
Without line clears to alter parity, put an even number of T pieces in a rectangle before it can be perfect cleared:

| The central cavity has 2 Ts with even parity. |
Placing just one T will uneven parity — the number of even and odd blocks will be imbalanced. To perfect clear, both must be equal. Thus, it would help if you placed another T to pair up with the first, like the above.
Therefore, if you are unsure how to perfect clear, and if you cannot do a line clear to alter parity, place the Ts so that only an even number of Ts exists.
Line skims can alter parity and make possible a perfect clear even if you only have one T for the above instance.
Here’s an illustration:
| Diagram Set 18-5 | |
| 1 | 2 |

| A T is placed in the stack. It also incurs a line clear. Therefore, the field’s initial parity is imbalanced with the initial T and then rebalanced with the single line clear. It is now neutral. | Since parity is balanced, there is no need to put another T to uneven it. The player puts L and I to fill the rectangle. |
Here, a single, triple, or separate line clear can alter parity by evening out the number of even and odd blocks after you have placed a T in the stack. Let’s analyze the precise even and odd blocks for parity:
| Diagram Set 18-6 | |
| 1 | 2 |

| After the single line clear in the last diagram set’s step 1, you get even parity. | Without needing another T, the player puts I and L to balance out parity. |
The checkerbox easily portrays the even and odd blocks, letting one evaluate parity. Thus, if you have already placed a T and don’t have another T coming, you can forcefully make the above-said line clear to rebalance parity. Then, you will be left with a pattern with a perfect clear solution. More details are in book 2’s Beginner Perfect Clear Methods chapter.
5) Ls, Js, and Parity
In the last book’s parity chapter, I mentioned checkerbox parity, where the number of even and odd blocks can be shown by dissecting a field using a checkerbox pattern. There’s another kind of parity: column parity.
| Diagram Set 18-7 |
| You divide the field into alternating lines. Notice how, for all pieces except L and J, every piece has an equal number of alternating line blocks. However, L and J have an uneven amount. |
The number of Ls and Js (in a rectangle) must be even to perfect clear a rectangle if there are no Ts during the starting placements.
Thus, if you have a pattern that you aren’t sure how to perfect clear, place Ls and Js such that they are even, like this:
| Diagram Set 18-8 | |
| 1 | 2 |

| The first J has already been placed. | It needs either another L or J to even it out. An L is chosen here for a line clear. |
| 3 |

| The rest of the pattern is perfect cleared. |
Therefore, maximize the number of L, J, and T pieces to solve the remaining cavity area after placing the first 4 to 6 initial pieces.
6) The General Rule
The most important general rule of perfect clearing is that the number of (vertical Ts) + (horizontal or vertical Ls) + (horizontal or vertical Js) must add up to an even number.
Thus, you may get the following pattern:

Here, a vertical T has already been placed on the left side. There seems to be no way of combining another L, J, or vertical T with the T on the left. Thus, this leaves only one possibility: an L, J, or vertical T on the right side.
Thus, you can place the next piece like this to solve the pattern:
| Diagram Set 18-9 | |
| 1 | 2 |

| A T is placed vertically at the corner. | Another J is placed, touching the corner. |
| 3 |

| I, O, and Z are placed to finish the perfect clear. |
Some rare exceptions exist to the L + J + vertical T rule. These include solving:

However, these are rare and do not change our method’s applicability.
This neat trick helps you if you cannot see the solution. Placing just one piece will help reduce the number of solutions and make it easier to perfect clear.
Because of the importance of L, J, and T pieces, it is vital to prioritize holding them as the last few pieces of a current perfect clear bag. Using Knewjade’s computer software to analyze perfect clears, I can confirm that holding L, J, and T pieces maximizes the chances of a perfect clear.
7) Using More Ls and Js to Contain ‘Bad’ Pieces
A general rule of freestyle perfect clearing is to use your L and J pieces to contain as many ‘bad’ pieces like S, Z, and O like this at the start of the empty field:


Why so? This is because leaving the S, Z, and O pieces to the end, where you need to place them into the remaining cavity, leads to significantly lower chances of perfect clearing.
Remember the principle where you need vertical Ts and horizontal and vertical L and Js to solve a perfect clear cavity. You would want to keep as many Ls, Js, and Ts for the last parts as possible to solve the pattern and increase the chances of perfect clearing.
Try to use Ls and Js to contain the ‘bad’ pieces as broadly as possible. Here’s an example:
| Diagram Set 18-10 | |
| A | B |

| This uses L and J to contain only one O, which is a waste of pieces sometimes. | This uses only L and J to contain S, Z, and Z, which is economical. |
| C | D |

| Same as A. It is inefficient as L and J contains only one S. | Two Js contain S, and O. I is neutral. Thus, this is less efficient than B but more than A and C. |
B) Principles for Solving Each Bag and Their Traits
Before we can provide the guidelines to solve each PC bag, we must first elaborate on the mechanisms of such.
This game has a seven-bag randomizer, as explained in the last book’s beginner section. This means you can exploit this determinacy to place high-chance perfect clear patterns at the start of each bag. It also means each bag has deterministic residues left behind from the previous bag.
Here’s an illustration.
| Diagram Set 18-11 | |
| 1 | 2 |

| The 1st PC starts from the very beginning of the match’s PCO. Seven of the first randomized bag have been placed. Three out of seven of the second bag have been placed. This solves and empties the 1st PC bag. | The 2nd PC bag starts. Four out of seven of the remaining second randomized bag have been placed. The next six pieces are used to solve it. |
Thus, in step 2, you are left with a residue of 4 pieces from the second bag when you have finished the 1st PC bag. This is because you have already placed 3 of such for the 1st PC. Thus, you place that pattern.
Then, you have six more from the third bag (more precisely, you can choose the next seven pieces because the hold function adds one more) that can be placed to ensure a high perfect clear chance. Thus, one example would be:
| Diagram Set 18-12 | |
| 1 | 2 |

| The last four pieces of the previous bag have been placed. This is the 2nd PC bag. | Thus, the next bag’s seven pieces are next. Because of the hold function, you can freely choose 6 out of 7 to fill the rectangle to solve the perfect clear. |
Only a few solutions exist to place the following seven pieces into the remaining cavity. This 2nd PC bag is solved using T, S, Z, L, I, and O from the next seven pieces.
This ensures a high perfect clear chance while reducing the number of maximum solutions. Mapping out such patterns took the work of many PC experts over many years.
Then, there’s the 3rd PC bag. Below, almost three complete bags have been placed, and you can put only one last piece from the 3rd bag. This lets you place patterns with a repeated piece (J in this case), such as:

Then, you can solve them using simple solutions like this:
| Diagram Set 18-13 | |
| 1 | 2 |

| The 3rd PC bag after placing six pieces. J is repeated. | You can choose four of the next five (instead of four because of hold) incoming pieces to solve the perfect clear. |
All bags have their unique residue leftover count. With this knowledge, you can invent many strategies to perfect clear each bag. With this foundational principle settled, we can move on to each bag’s general traits.
Here is the generalized table for each bag’s residues:
| Bag No. | Hold | Current Bag’s Leftover | Next Bag’s Leftover | Next, Next Bag’s Leftover |
| 1 | 0 | 7 | 4 | 0 |
| 2 | 1 | 3 | 7 | 0 |
| 3 | 1 | 7 | 3 | 0 |
| 4 | 1 | 4 | 6 | 0 |
| 5 | 1 | 1 | 7 | 2 |
| 6 | 1 | 5 | 5 | 0 |
| 7 | 1 | 2 | 7 | 1 |
Quirks of Each Perfect Clear Bag and How to Strategize Clearing Them
The 2nd to 7th perfect clear bags all have unique quirks because of the above residue system. This lets you invent unique strategies to solve each one.
For instance, here is the quirk of the 7th PC bag and its strategy:
The 7th bag shares the common property whereby you will get all seven pieces in the bag after placing the remaining starting bag. This means that you can make deliberate piece dependencies such as the following.
| Diagram Set 18-14 | |
| 1 | 2 |

| The last three pieces of the previous bag have been placed. | You can create an O dependency and another L dependency because you are guaranteed the following seven unique pieces in the next bag. |
This is okay, as you will get the pieces in the second bag of 7 pieces to fill later. The O and L dependencies are guaranteed to be filled.
Do not create too many dependencies, especially double dependencies of a specific piece, as you get only 1 of each seven pieces in the second bag. This trick lets you solve the 2nd and 7th perfect clear bags easily.
Now, let’s consider each bag’s quirks and specific strategies.
1) 2nd, 5th, and 7th PC Bags
Generally, the 2nd, 5th, and 7th PC bags have a common characteristic. They all have one bag inserted somewhere between where you get a guaranteed 1 of each unique seven pieces. This allows you to make some placements that will always be guaranteed to be filled. Let’s consider the 2nd PC bag:
| Diagram Set 18-15 | |
| 1 | Alt. A |

| The starting field of the 2nd PC bag with the starting bag’s 4 remaining pieces placed. | You can combine T and S to fill the top-right. T and S will always come. |
| Alt. B |

| Or use T and Z as an alternative. |
If you put the pattern above, you will always get an ST or ZT pair to fill that top-right cavity. This is because you are guaranteed all seven pieces in the next incoming bag. Here is another example of the 5th PC bag:
| Diagram Set 18-16 | |
| 1 | 2 |

| At the start of an empty 5th PC bag, the player creates a deliberate O dependency in the far left. | An O must be placed here to solve the perfect clear. |
In the above, a pattern like this creates an O-piece dependency. As long as you get the 2nd O (which you will), it will always be filled in the next fresh bag of 7 pieces. The 2nd, 5th, and 7th bags guarantee such initial dependencies will be filled.
The thing about the 2nd, 5th, and 7th PC bags is that you can place the first 2 to 4 pieces, and after that, you will get the confirmed bag of 7 unique pieces.
Thus, please keep track of which PC bag you are in during PC sprints (it is easy once you master it). Suppose it is the 2nd, 5th, or 7th. In that case, you can place the starting 2 or 4 pieces with deliberate confirmed piece dependencies to narrow down the solutions. We will cover these specific patterns later.
2) 1st, 3rd, 4th, and 6th PC Bags
The 1st, 3rd, 4th, and 6th PC bags have a commonality. Once you place the remaining initial bag, all of them will have at least one piece (sometimes two or more) in the following fresh bag, which is a repeat of 1 piece in the initial bag. Only the 6th has a 6/7 chance to spot the repeated piece (with five previews).
Here are two example patterns from the 6th PC bag to illustrate this:
| Diagram Set 18-17 | |
| A | B |

| This has double O. | This has double L. |
Quick Proof of Why the 4th and 6th Perfect Clear Bags are Guaranteed at least One Doubled Piece
Why do the 4th and 6th bags have at least one guaranteed doubled piece? Here’s why:
- We consider just the 4th bag since the reasoning is the same for the 6th bag.
- In the 4th bag, you have five residue leftovers.
- Assume the five residues are of types A, B, C, D, and E.
- We assume the following two pieces are F and G, which differ from A to E.
- Since there are only seven unique pieces, either A to E will repeat after G.
- Therefore, there is at least one doubled piece.
To illustrate more concretely, A, B, C, D, and E can specifically be the S, Z, T, O, and I pieces. F and G can be L and J. After the L and J arrive, you will get a fresh bag after J, which will repeat S, Z, T, O, and I.
In the 6th PC bag, with only five previews in most games (7 with the five preview pieces, the held piece, and the currently falling piece), you can at most see only the 1st of the 2nd bag (and in the 1st PC pattern, you may have to place one piece first to see the first of the 2nd). This dramatically restricts choices, as you can choose only one double-piece pattern after seeing the specific repeating piece:
| Diagram Set 18-18 | |
| 1 | 2 |

| At the start of an empty 6th PC bag, the player spots the doubled O and makes this pattern. | The next bag’s doubled O fills the extreme-right cavity. The player solves the other area. |
The 3rd PC bag also restricts choices as you have only 1 fixed pattern (the double-piece pattern for the specific and only piece in the hold at the start of an empty field):
| Diagram Set 18-19 | |
| 1 | 2 |

| The first piece (held) is S at the start of an empty 3rd PC bag. Thus, you make this fixed pattern. | The S from the next bag goes into the cavity. Thus, there is an extra S. |
With five previews (and another two more from the falling and hold pieces) at the start of an empty bag, the chances to spot the extra, repeated piece for each PC bag are:
1st PC bag: 0% (So you must place one piece first and use hold, then it becomes 100%)
3rd PC bag: 100% (The starting held piece is the repeated piece)
4th PC bag: 95.24% (100% with six previews like in Tetris 99)
6th PC bag: 85.71% (100% with six previews like in Tetris 99)
How is this useful? Well, let’s say if you do, in an instance where you see two confirmed Os, you can do this:


These patterns have a 79.44 to 92.36% chance to solve a PC.
In the diagrams above, I placed two Os on each other. From my experience, single Os gives the lowest chance of perfect clearing. However, putting two on each other gets rid of them, thus reducing the size of the middle cavity to solve the perfect clear. This allows you to situationally place very high chance PC patterns that are also easier to solve!
Do this for the other repeated patterns for all other pieces in the following sections of this chapter.
For the 4th PC bag’s start, place five pieces of the remaining bag of 7, and because you probably have a piece in the hold by now, you have seven previews. This means at the start of the empty bag, you can see seven pieces ahead or 2 of the 2nd ‘fresh’ bag. In games with six previews, you can see 3, like in Tetris 99:
| Diagram Set 18-20 | |
| 1 | 2 |

| At the start of an empty 4th PC bag, you place the last remaining 5 pieces of the 7-piece-randomized bag. This player spots the second, repeated O. | Then, you use the second 7-piece-randomized bag to solve the remaining area. The second repeated O fills the right cavity. |
Some PC bags that use the repeated pattern method have the option of choice. For instance, the 6th PC bag may have the starting sequence (from an empty start):
- First bag (with 6 out of 7 remaining pieces): L, J, S, Z, T, O
- Second bag of next 4 pieces: L, J, T, I
The pieces in clauses (1) and (2) intersect. This means L, T, and J have two repeated pieces each. This gives you three options: a double L, double T, or double J placement.
Assuming five previews, having two choices gives you more ability to choose the high-chance patterns. So, let’s say the two confirmed repeated pieces are O and L (so you have 2 Os and 2Ls). You would want to pick the pattern for the double confirmed Os, as they have a higher chance to PC than the double L ones, so choosing the former over the latter is ideal.
If you wish to freestyle, this general principle applies to all 1st, 3rd, 4th, and 6th PC bags. You would want to see the repeated double piece and make general patterns like the ones below to deal with the extra pieces:
Double L: Low chance

Double O: High chance

Double T: Moderate chance

Double S: Mid-to-high chance

The most troublesome pieces are the S, Z, and O pieces. So, as far as possible, if you see multiple copies of them, use L, J, I, and T pieces to ‘contain’ them. Otherwise, once you have placed your first 4 or 5 pieces, having too many S, Z, and O pieces will reduce your chances to PC.
You would also want to contain as many S, Z, and O pieces with as few L, J, I, and T pieces as far as possible. And thus:
| Diagram Set 18-21 | |
| A | B |
| Two Js contain O, O, and S. | Two Ls contain only one S. |
A is better than B. The latter is terrible; it took 3 (L+L+I) pieces to contain just one problematic S piece. This is not necessarily a given, of course. You may get too many extra L, J, T, and I pieces in some bags, so you must make such patterns. In such cases, go ahead.
This is thus summarised as:
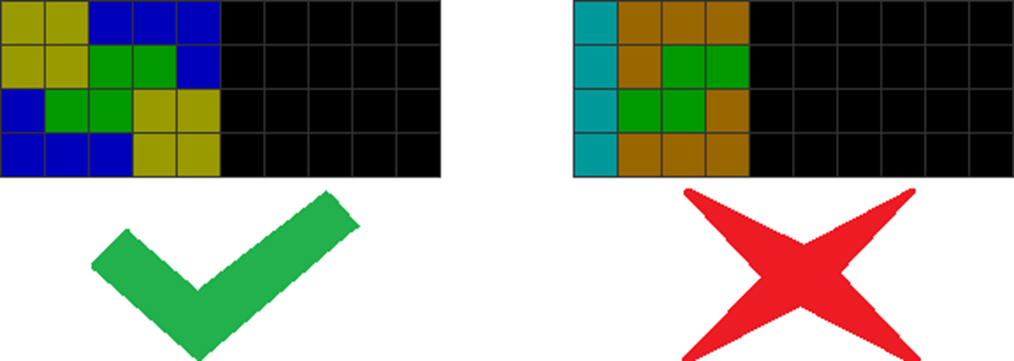
| Diagram Set 18-22 | |
| A | B |

| A deliberate S dependency is created. If it is filled, J and 2 Ts will contain 2 S pieces and one Z. | One J and two Ts contain only one S and Z. |
A is better than B if you have an extra S or Z to fit into the cavity under the T.
Choose patterns containing as many S, Z, and O pieces as possible. Save as many L, J, I, and Ts. But the latter patterns (like B) are more acceptable if you have a ‘flood’ of L, J, I, and T pieces vs a ‘drought’ of S, Z, and O pieces. You must look ahead and try to manage combinations of deadly pieces like S, Z, and Os as far as possible for the 1st, 3rd, 4th, and 6th PC bags.
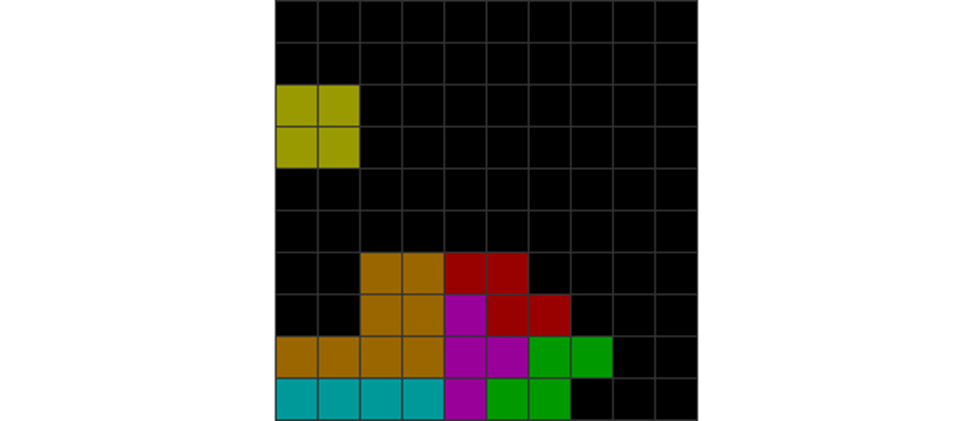
The 6th PC bag also has an additional set of patterns. At the start of an empty 6th PC field, 6 more pieces from the existing bag (out of 7) must be placed. This means one unique piece is missing. This lets you place patterns like these:
| Diagram Set 18-23 | |
| A | B |

| This has a missing Z. | This has a missing J. |
One can then solve the remaining area. The key is to see the first six pieces and see which is the missing one. Then, you place the required pattern. This results in a moderate-chance pattern that can be perfect cleared.
3) 2×10 PC Patterns
Sometimes, at the start of some perfect clear bags, you can get the right pieces to make a 2-blocks-high 2×10 perfect clear pattern:

I will list more solutions later.
4) Some Important Tricks
All these may seem highly complex, but there are a few crucial tricks and shortcuts to reduce the amount of thinking and solutions needed.
i. The Chaos of the 4th and 6th Perfect Clear Bags
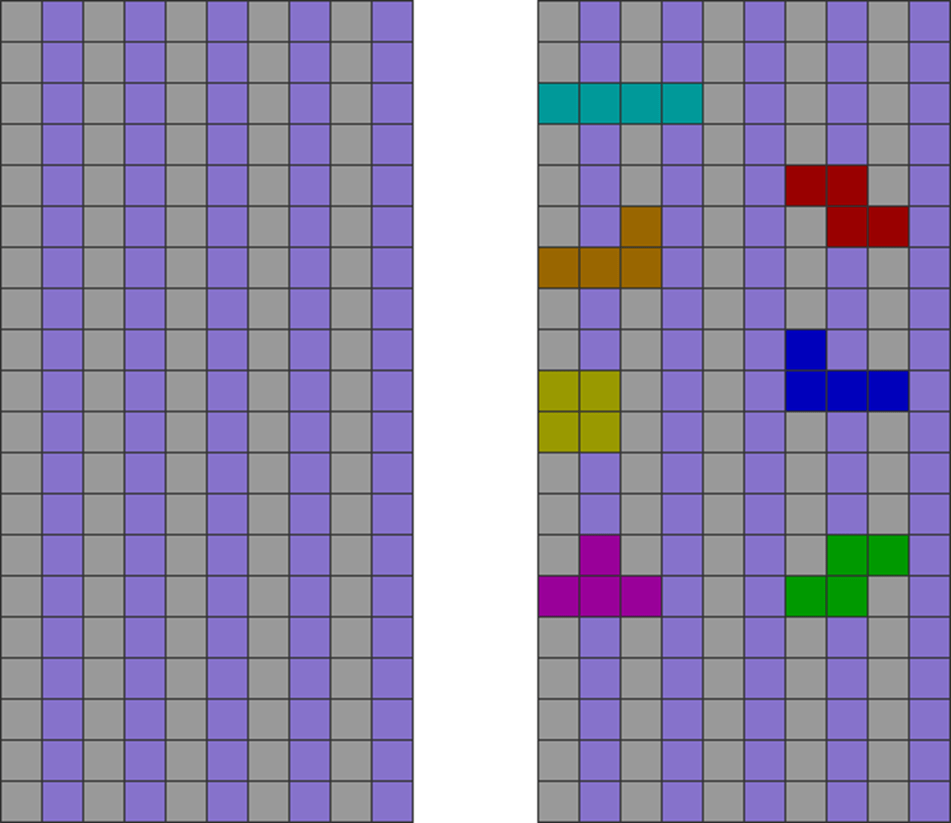
The 4th and 6th bags, unlike the 2nd and 7th, have the most chaos, as they aren’t guaranteed to get all seven pieces in the later bag to solve the placed pattern. This means you can’t create deliberate piece dependencies to fill like the latter two bags. Hence, it’s best to stack with the cavity in an ‘open’ manner like this:

The pieces are stacked to the left and right sides, creating an open middle well.
This expands the range of perfect clear solutions to fill the cavity. The worst that can happen is to divide the field too much, leading to too many piece dependencies, which is a death sentence in the 4th and 6th bags.
ii. Holding on to T, L, J, and I Pieces As Far As Possible
Minimize holding on to S, Z, and O pieces when solving the cavity area for a perfect clear. This is because they yield the lowest perfect clear chances and often get one into dead-ends.
Conversely, T, L, J, and I pieces are the best to hold on to when perfect clearing a cavity area. The reason is partly because of their parity alteration ability and the vast number of orientations you can rotate to place them. Because of the L + J + vertical T equation earlier, Ls, Js, and Ts are essential for solving a rectangle.
iii. Choosing the Best Field Patterns for the 4th and 6th Perfect Clear Bags
After much testing and experience, I have concluded that for the 4th and 6th bags, it’s highly likely that you will get many patterns to choose from. For instance, in the 4th bag (with five residues), you may get a sequence of:
- First bag: SLTOJ
- Second bag: SLTOJZI
This means S, L, T, O, and J are repeated, giving you five patterns to choose from. Of course, this is an extreme example. You will most likely have 2 or 3 patterns to choose from. It’s the same for the 6th bag if you apply the same mechanic — it has many choices.
Therefore, I suggest taking the patterns with the highest chances to perfect clear. As seen in my earlier patterns, avoiding the double L or J ones is best, as they have the lowest chances of doing so. The double O ones work the best.
5) Keeping Track of the PC Bag
To do this, count which PC bag you are in. Let’s say you have done six 4×10 patterns; you will know you are at the start of the 7th and can apply the mechanics of the 7th.
Just note that if you do a 2×10 pattern, you are advanced by +4 from the last. So if you are in the 2nd, and your 2nd PC is 2×10, it is 2+4, meaning you advance to the 6th.
| Diagram Set 18-24 | |
| A | B |

| An L, J, I, and two Os can fill a 2×10 rectangle and solve its perfect clear. | Same with 2 Ls, 2 Is, and 2 Os. |
Also, my guides do not map double initial similar piece sequences. So sometimes, for the 2nd PC bag, you get LLIJ in the first four pieces. There is no pattern for it, and you have to freestyle.
Another example is the 1st PC bag. It is supposed to ‘repeat’ every seven bags, but sometimes you get something like SZTOOIJ instead of SZTOILJ and cannot use the 1st PC patterns.
In that case, freestyle it. This phenomenon is scarce from experience, but it still happens. It usually happens when you ‘borrow’ a piece from the next bag to solve the current one. It is not entirely avoidable.
C) Summarised Practical Best Field Patterns for All Perfect Clear Bags
These patterns will be in the actual full chapter of book 3. The patterns are so many that they span 2 full chapters.
Summary and Conclusion
This chapter provides general heuristics on how to perfect clear each bag:
| Concept | Summarized Rules-of-Thumb |
| Flow | Use more Ls and Js to contain Ss, Zs, and Os. |
| Form | Dividing the stack too much may destroy perfect clear chances. To be perfect-cleared, a rectangle must have a total number of remaining fillable blocks with a multiple of 2 or 4. Without line clears, a rectangle can only be perfect cleared if the number of Ts is zero or even. If the number of Ts in a rectangle is odd, use line clears to compensate for the lack of Ts to solve it. Generally, to perfect clear a rectangular cavity, the no. of (vertical Ts) + (horizontal/vertical Ls) + (horizontal/vertical Js) must be an even number. The 2nd, 5th, and 7th bags can be easily solved through deliberate creations of piece dependencies as at least 1 of each mino appears. The 1st, 3rd, 4th, and 6th bags can be easily solved by creating patterns with repeated pieces to contain other pieces. The 6th PC bag has missing piece patterns. Learn the high-chance patterns for each bag. |
| Balance | Be mindful of creating piece dependencies, as there’s a limited number of each piece in any bag. Track which perfect clear bag you are in so you can use the high-chance patterns for that bag. Hold on to T, I, L, and J pieces to maximize perfect clear chances. |
