A perfect clear occurs when you clear all colored blocks and leave an empty field. For instance:
| Diagram Set 19-1 | |
| 1 | 2 |
| 3 | 4 |

A perfect clear sends ten garbage lines in Puyo Puyo Tetris 1 and 2, and Tetris Effect: Connected to the opponent. In most non-guideline Tetris games, this is ten as well.
Therefore, they are potent in many games, allowing you to send a quick burst to the opponent.
This chapter covers the most tested and reliable ways to solve the first perfect clear from the first 11 minos (+1 because of hold), which is enough to get you started in multiplayer. My next book will cover the methods to solve perfect clears of further bags.
A) First Perfect Clear Patterns
1) The Standard First Perfect Clear Pattern
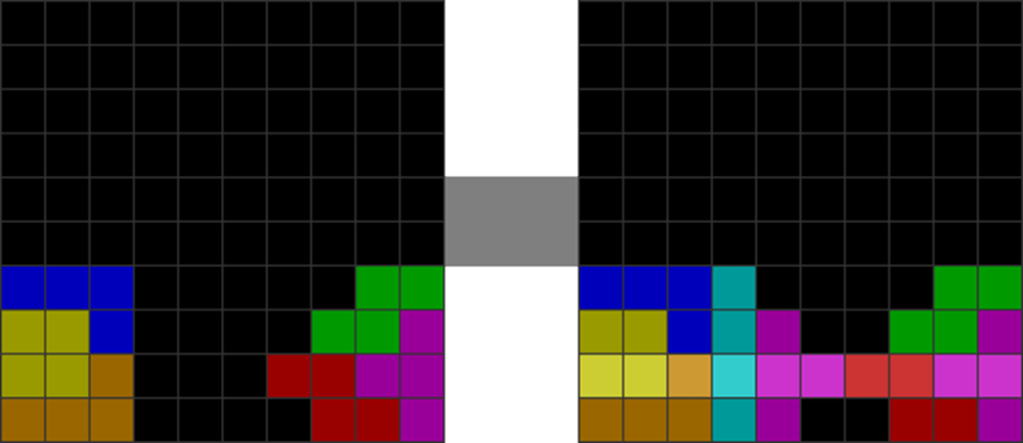
Given the 7-piece randomizer, you can place the first 7 of each guaranteed piece in the following pattern. This is called a perfect clear opener (PCO). This has a 61.2% chance to perfect clear.
| Diagram Set 19-2 |
| Observe the 4×4 rectangle on the left side, made of L, J, O, and I pieces. The four far-right diagrams show these four pieces can be placed in any orientation. The perfect clear will work as long as they make a 4×4 square. |
To create a perfect clear, one must fill the remaining cavity with three pieces so the last line clear clears the entire field, leaving zero blocks behind. Because of hold, you can access an extra fourth mino.
This may be daunting, but I recommend that beginner players experiment with creating the perfect clear opener reliably first. Then, they can experiment with solving it with four pieces and return to this book’s chapter to see the precise solutions.
Sometimes, you wish to hold the I piece and make this pattern instead:

This pattern has a higher chance of perfect clearing: 84.6%
You can complete a perfect clear if you fill the cavity correctly with four pieces. Hold lets you access a fifth. This mandates a far higher skill cap than the 61.2% pattern, pushing the limits of one’s brainpower.
That’s where this chapter comes in: I’ve mapped out all solutions for the 61.2% and 84.6% patterns so you can memorize and solve them quickly!
The patterns for the first perfect clear using the perfect clear opener have been extensively covered on many websites. The major problem with these guides is that they link too many mostly redundant solutions. Therefore, I have arranged and pruned the list of solutions to only the non-redundant ones.
The solutions below have been arranged mnemonically for easy memorization. I have subsumed the 61.2% pattern’s solutions under the 84.6% pattern’s solutions.
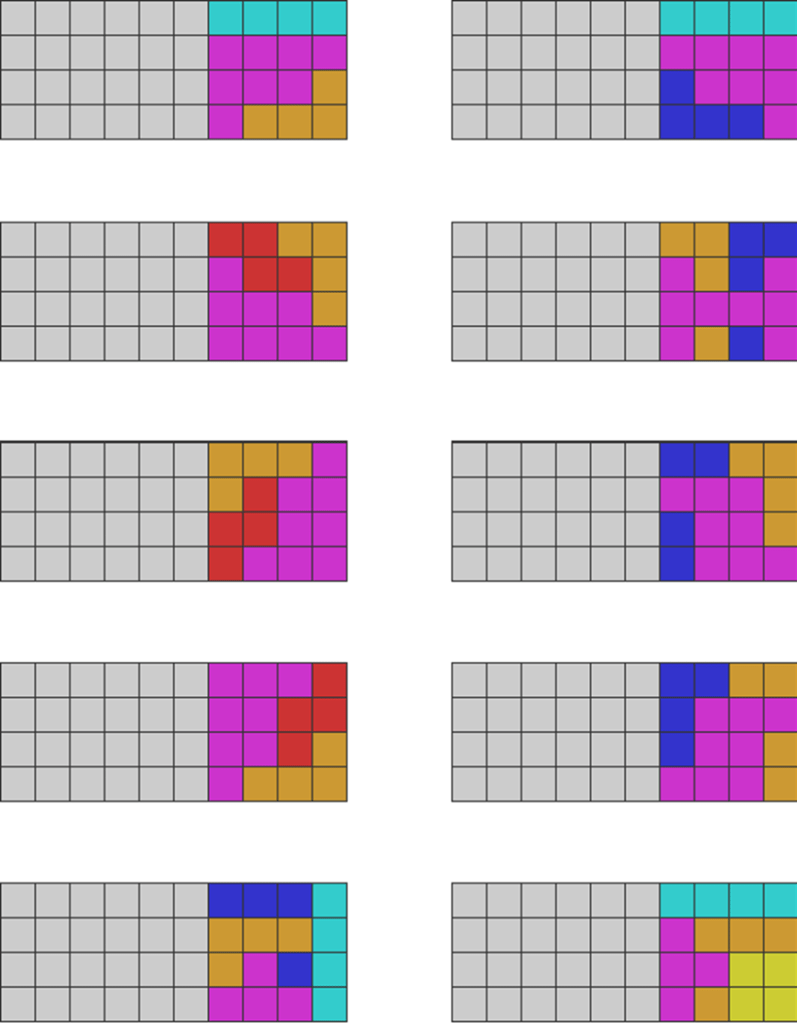
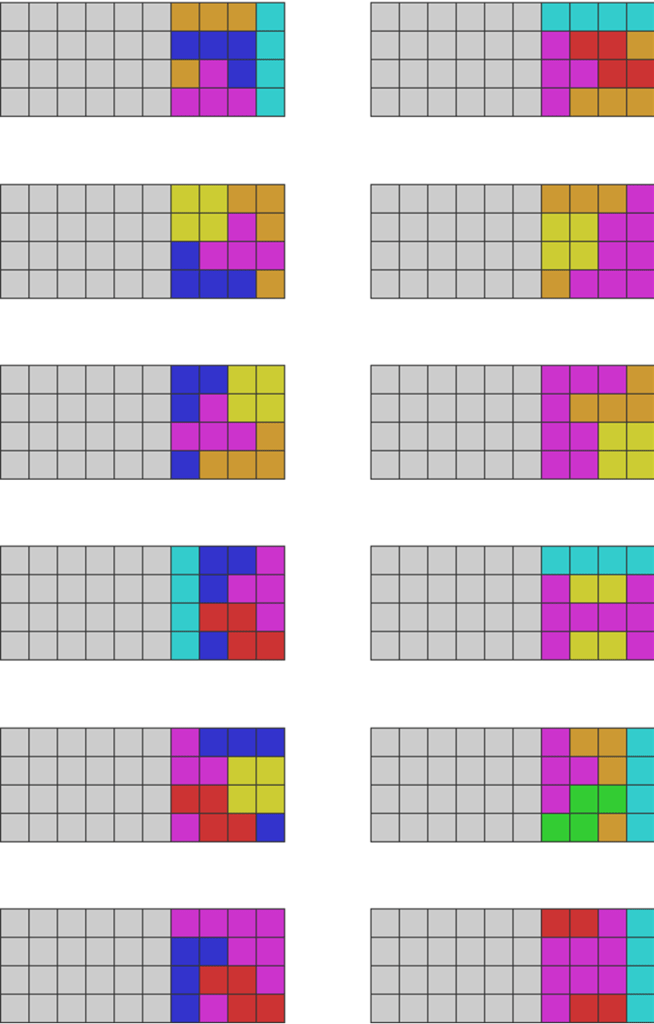
The First Perfect Clear’s Solutions
Case 1a: There is one horizontal and one vertical I placement

.
Case 1b: There are two vertical I placements

.

Case 2: There is one vertical I placement

.

.

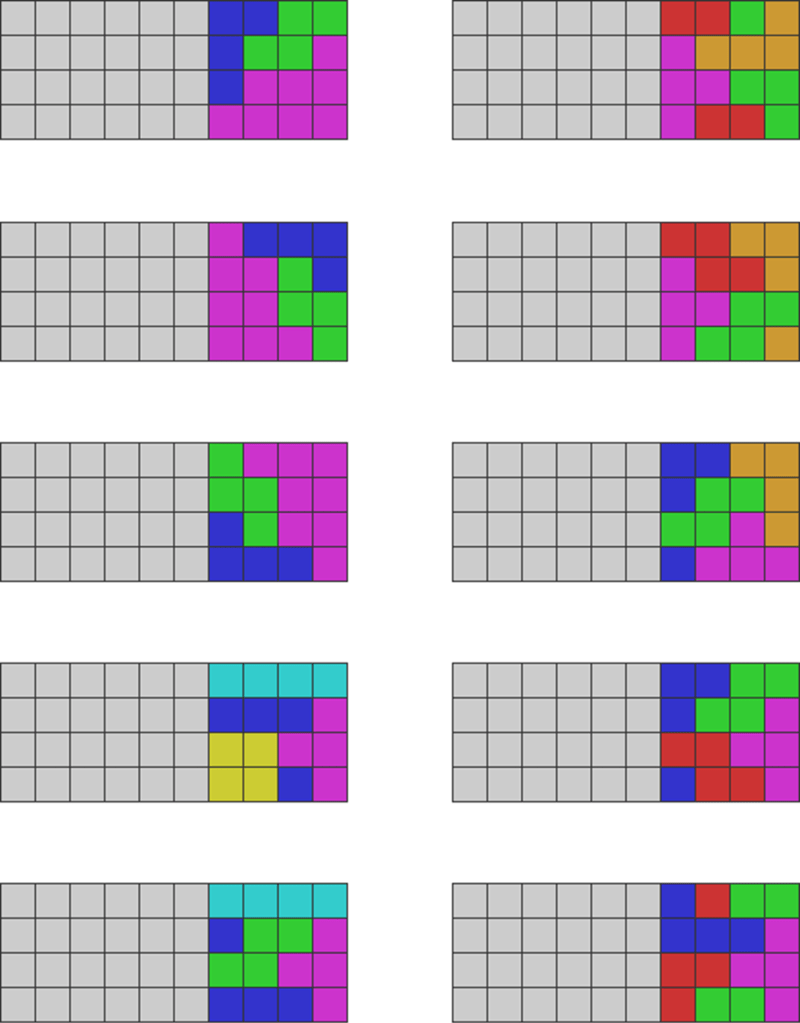
Case 3a: There is one horizontal I placement at the base and one horizontal T placement at the top

.

Case 3b: There is one horizontal I placement at the base and one horizontal S in the upper right

.

.

Case 4a: There is one horizontal I in the third row, and the first L or J eliminates a line

.

Case 4b: Exceptional instances in which there is one horizontal I in the third row

Case 5: All other cases

.

2) The Grace System First Perfect Clear Pattern
Besides the above first perfect clear opener, another alternative pattern has a higher chance to perfect clear. It is called the Grace System.
However, it’s not always constructible with the initial seven pieces. That’s why it’s still vital to learn the former. It involves making the following shape to start a perfect clear:
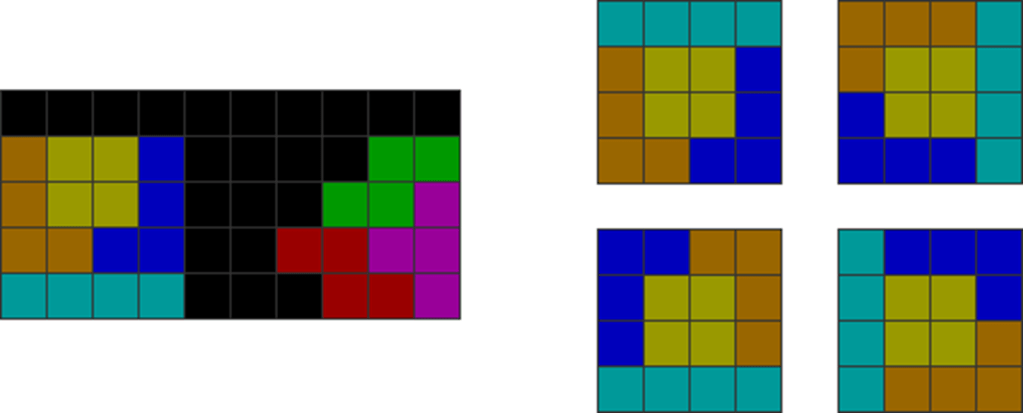
| Diagram Set 19-3 | |
| A | B |

| Ideally, I recommend players hold the T piece as this maximizes the chances of a perfect clear. Make the two patterns above, which don’t have the T placed yet. |
To perfect clear it, you must fill the right side with four pieces until the last line clear clears every block to leave an empty field. Hold lets you access a fifth.
This pattern has an 88.57% chance to perfect clear. It is best used when I and O come as the first two pieces. Another is when L, J, S, and Z all come sequentially in the first four, sometimes making it impossible to make the standard perfect clear opener patterns.
You may sometimes be forced to put the T on the right or left side like this:
| Diagram Set 19-4 |

| Placing the T vertically here essentially makes it the same pattern as the 61.2% chance first perfect clear opener! |
The Grace System’s Solutions
Here are all the solutions to the Grace System. I have pruned all redundancies as I have done with the standard perfect clear opener.
I have organized them into solutions needing a T piece and those that don’t as a memory aid.
Solutions needing Ts:
.
.
.
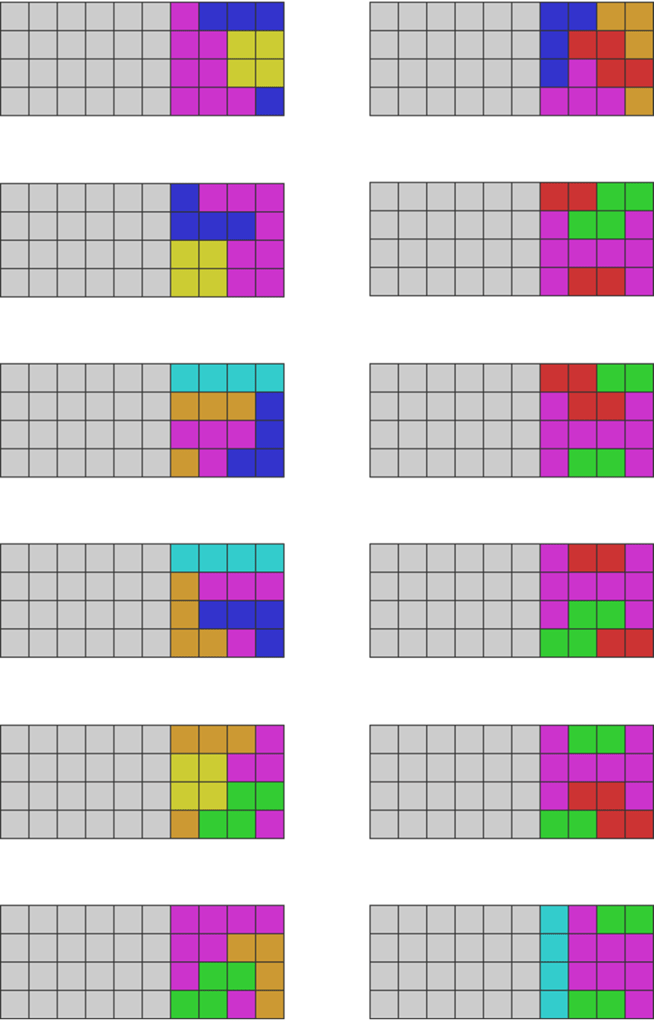
Solutions not needing any Ts:
Some solutions do not require a T piece to solve. They are:
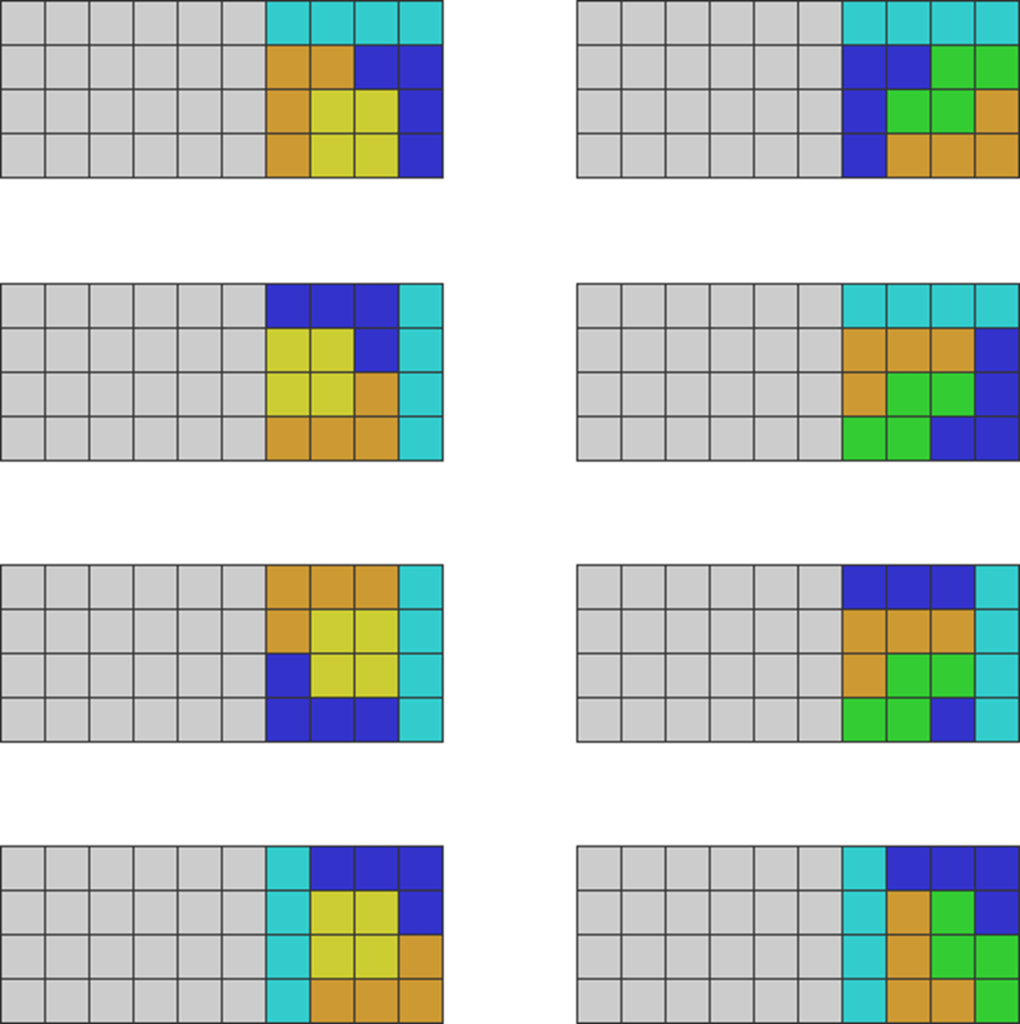
.
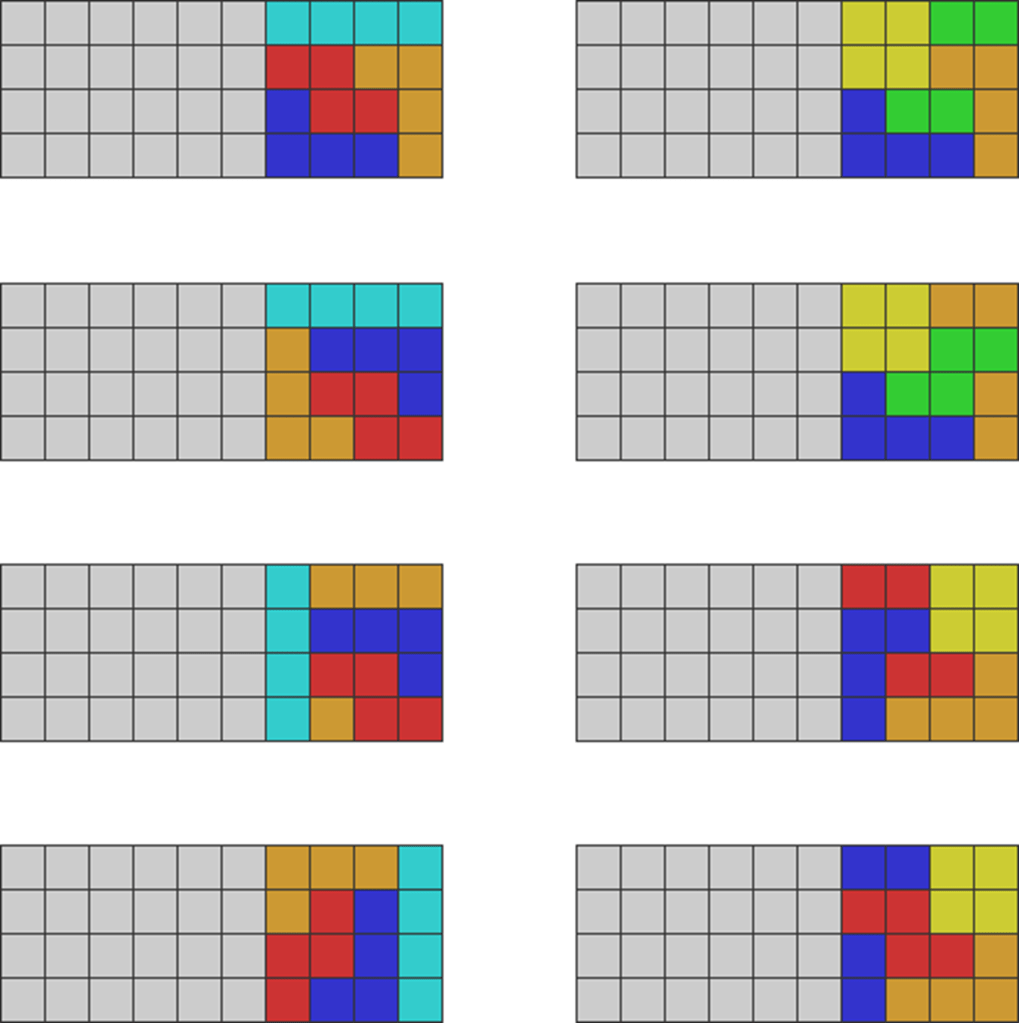
View each column vertically from top to bottom. I have arranged them according to their similar themes.
B) More Tricks to Perfect Clear the First Bag
Memorizing the solutions to the perfect clear opener and Grace System may not be for the faint of heart. Therefore, I have charted more straightforward guidelines for those reluctant to learn them. You can then freestyle the perfect clear solutions.
1) The Simplest Tricks to Freestyle Perfect Clearing
There are two crucial brainy tricks to perfect clearing:
i) Counting the Number of L, J, and Vertical T Placements
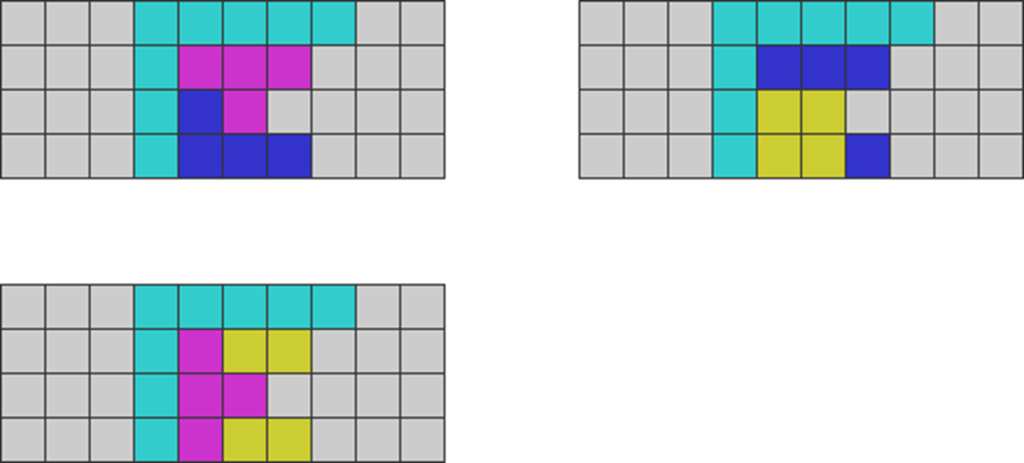
First, the number of L, J, and vertical T placements occupying the corners of a rectangular cavity must be even to create a perfect clear (minus rare exceptions, to be covered in the next book). Here’s an illustration:
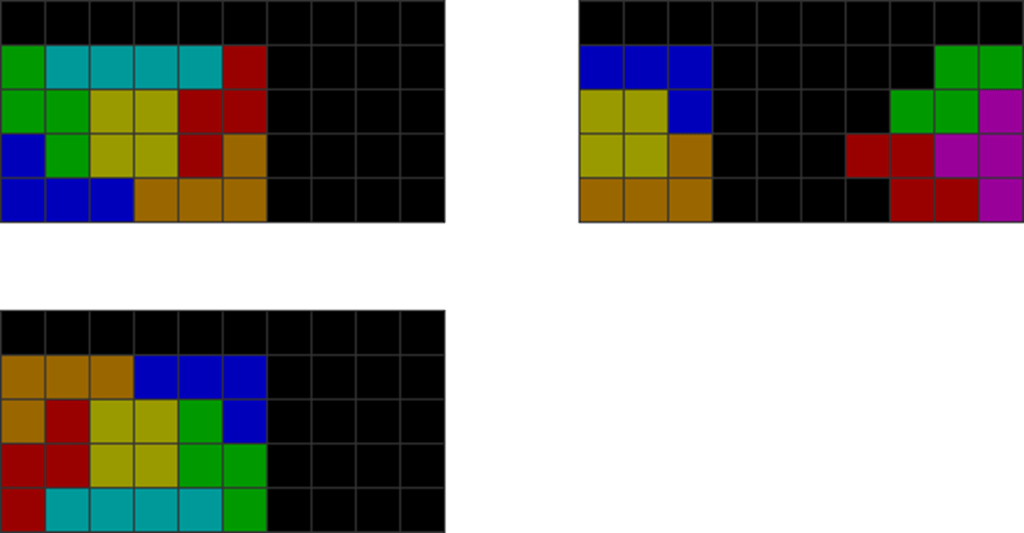
| Diagram Set 19-5 |

| I have put a vertical T here in this rectangular cavity. |
What next?


| See how the 3 sample solutions all have something in common. The number of L + J + vertical T placements is even! |
Thus, if you are unsure of the following pattern’s solution, there’s a trick:
| Diagram Set 19-6 |
| Count the L, J, and vertical T placements at the shape’s corner. The 3×4 rectangle already has one vertical T and one J. Thus, the incoming T can be horizontal. |
This does not mean there’s always a perfect clear. Instead, it streamlines the number of solutions, leading to a potential perfect clear.
Thus, if you are ever doubtful of a solution, applying this trick simplifies the number of solutions for you.
ii) Balancing Parity
The Parity Management chapter’s lessons now apply.
The second trick is the field, often a 2×10 or 4×10 rectangle, must balance its parity to solve a perfect clear. The number of odd and even blocks must be even.
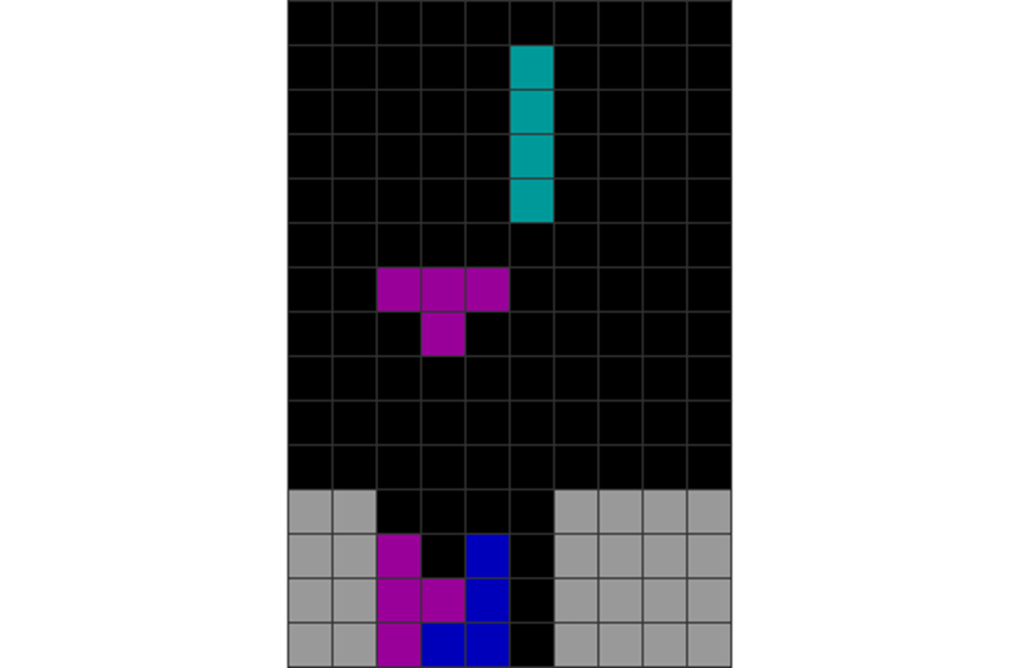
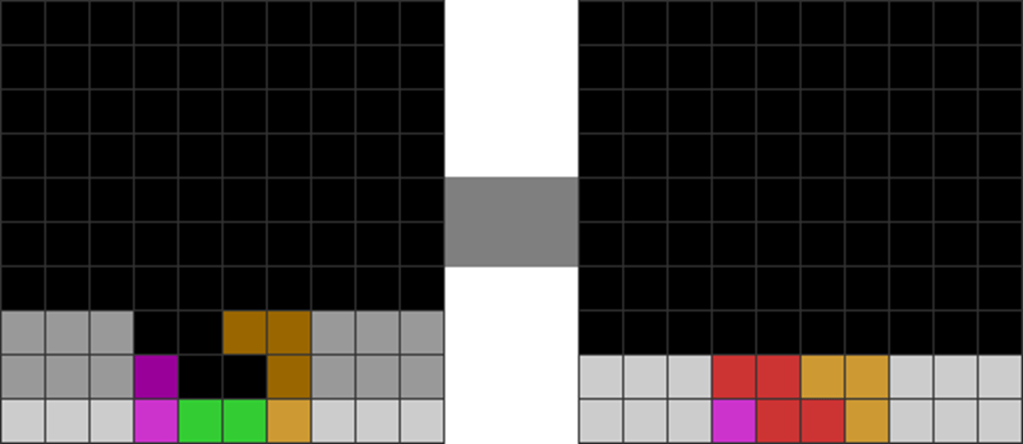
| Diagram Set 19-7 | |
| 1 | 2 |
| There is one T in the cavity in the middle. Parity is uneven if you use a checkerboard pattern (not shown here). | To solve the perfect clear, you can place another touching T in the rectangle to rebalance parity. |
| 3 |

| The pattern becomes solvable. |
When you place one T in the field, you must typically place another touching T in the rectangle. However, without a second T, you must do a single in rows 2 or 3 to reverse the first T’s parity. Some exceptions exist. This neutralizes parity and lets you solve a perfect clear again:
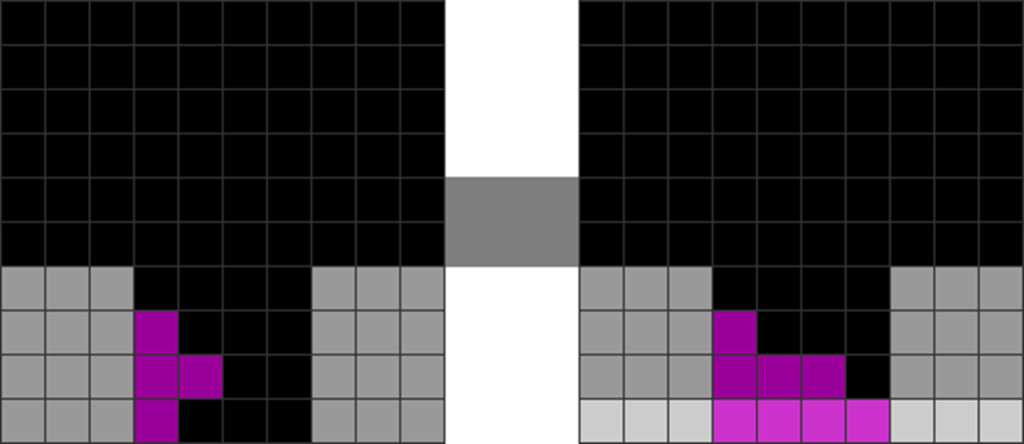
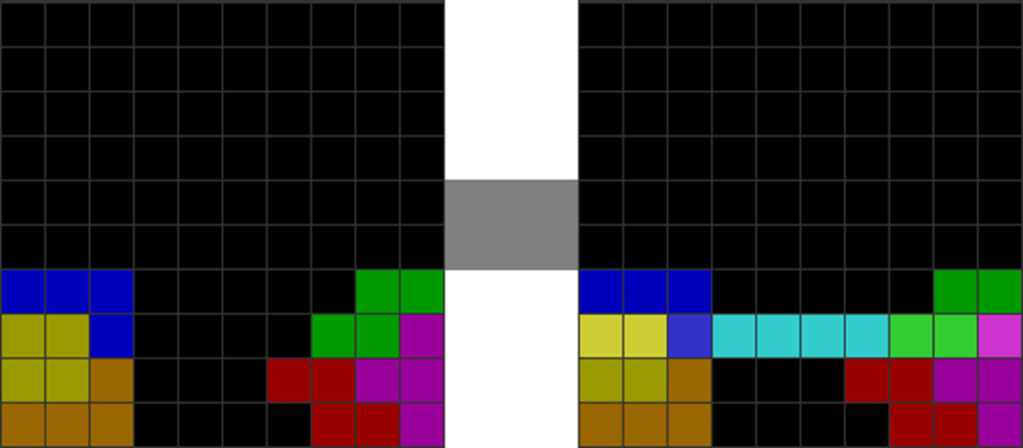
| Diagram Set 19-8 | |
| 1 | 2 |
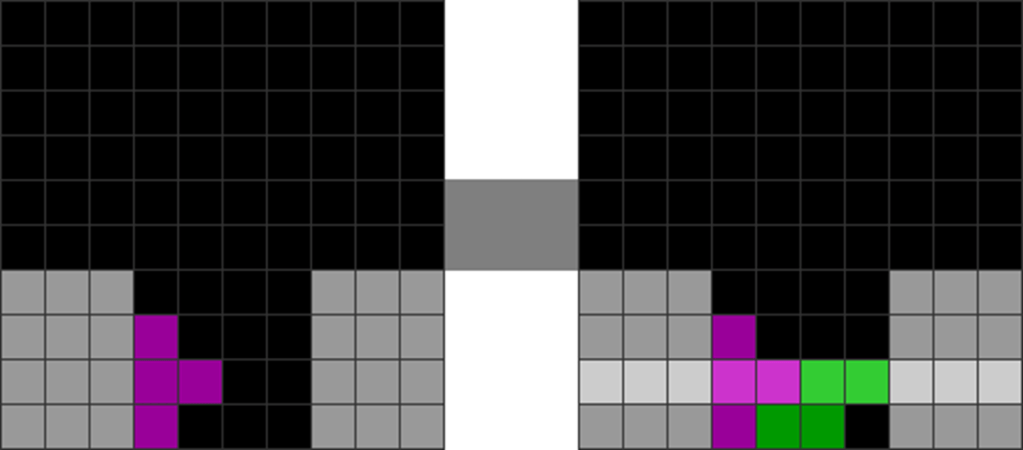
| There is one T in the cavity in the middle. Putting this T unevens parity. | To solve the perfect clear without another T, you must rebalance parity using a single like thisS skim in the middle rows. This act reverses step 1’s parity imbalance. |
| 3 | 4 |
| This single does not occur in the middle. It does not alter functional parity. | With neutral parity, the rectangle is solvable again. |
Step 3’s single causes rows 2 and 3 to cascade by one line, reversing even and odd blocks if you analyze them using a checkerbox. The difference between even and odd blocks is unchanged. Functional parity is not changed. Step 2 evens out parity so that you can make a perfect clear.
If you use a single or separate double, only one single line clear within must clear rows 2 or 3. Joined doubles and triples do not neutralize functional parity. These cases assume there are no Ts within. These generally apply with some exceptions.
Therefore, one shortcut people can use to perfect clear is to apply the T piece’s parity-changing properties to solve a cavity more easily. For instance, you can place 2 Ts together or use skims if there’s only 1 T.
This doesn’t guarantee a perfect clear, but it is a reasonable method that opens up perfect clear solutions. One can also prioritize holding on to the L, J, and T pieces as they open up chances.
2) The Importance of Each Tetromino for the First Perfect Clear Bag
Some pieces are better for perfect clears. L, J, and T pieces are very strategic. A perfect clear can only occur if the number of L, J, and vertical Ts in both rectangular corners of a cavity are even (see earlier).
I piece
I regard the I piece as the most versatile one for perfect clears. Its horizontal skims open up a lot of situations that lead to more perfect clear opportunities:
| Diagram Set 19-9 | |
| 1 | 2 |
| 3 |

| Diagram Set 19-10 | |
| 1 | 2 |
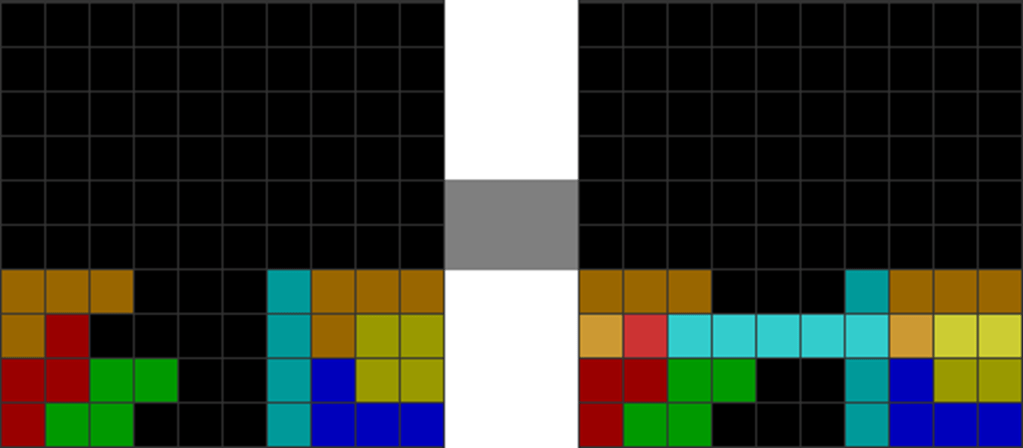
| 3 |

| Last two sets: After the I piece skim, the cavities left behind (each diagram set’s step 3) typically lead to many more perfect clear solutions. |
Suppose the reader doesn’t wish to memorize the perfect clear solutions. In that case, they can do a horizontal I line clear, and solve the remaining shape with fewer pieces. However, this reduces the chances to perfect clear.
L, J, and T pieces
L, J, and T pieces have many orientations, which allow them to be placed. This enlarges the number of perfect clear solutions. However, the T piece alters parity, which helps solve a perfect clear. Per my perfect clear research, holding the first piece as an L, J, or T before solving a cavity substantially increases the chances of perfect clearing.
S, Z, and O pieces
If you wish to freestyle perfect clear, I suggest avoiding holding on to the S, Z, and O pieces as the first piece in the cavity-solving phase! This is because, after using a computer software called the Knewjade solution finder, doing so reduces the chances of a perfect clear.
Like all other situations, the O piece is one of the worst odd-men-out. It only has one orientation and can easily disrupt a perfect clear.
Summary and Conclusion
Because of the abundance of first perfect clear patterns, I have devised a decision pathway to ensure the highest perfect clear chances:
| Diagram Set 19-11 | |
| Plan 1 | Plan 2 |
| Grace System (T in hold): Use this 88.6% PC chance pattern with an early S, Z, I, L, J, or O if allowed. | Perfect clear opener (I in hold): If I and O do not come together too soon, or if I and O do not come in the first two pieces, use this 84.6% PC chance pattern. |
| Plan 3 |

| Grace System (T placed) and perfect clear opener (with I placed): Worst case scenario. If neither plans 1 nor 2 can be constructed, use this 61.2% PC chance pattern. |
Use Plan 1 whenever possible. If not, use 2. If neither 1 and 2 are possible, use 3.
This decision pathway thus maximizes the chances of perfect clearing in the first bag.
Perfect clears are mighty openers for some Tetris versions that have it send ten lines of garbage.
In games with garbage blocking, like Tetris Effect, they are more potent as it is easier to get them off. Once you start a line clear, you won’t receive any interrupting attacks that can disrupt the perfect clear as long as all subsequent line clears are connected.
Games with only garbage cancellation, like Puyo Puyo Tetris, do not block garbage once the first line clear begins, making them more interruptible.
| Concept | Summarized Rules-of-Thumb |
| Flow | Memorize the basic first perfect clear patterns to quickly get them out. |
| Form | Before solving, be aware of the number of Ls, Js, and Ts in the stack. Keep track of parity. |
| Balance | Prioritize holding on to L, J, T, and I pieces before solving a cavity. Minimize holding on to S, Z, and O pieces before solving a cavity. |
