I’ll teach a neat trick to catapult you from a beginner T-spinner to an intermediate one. How? Through the power of T-spin donations and props.
T-spin donations and props can significantly increase a Tetris player’s offensive power and T-spin vision.
Important Definitions
T-spin donations involve making a T-spin by temporarily blocking the next garbage hole.
A prop is a specific supporting structure within a setup, often used to create a pattern for an advanced technique.
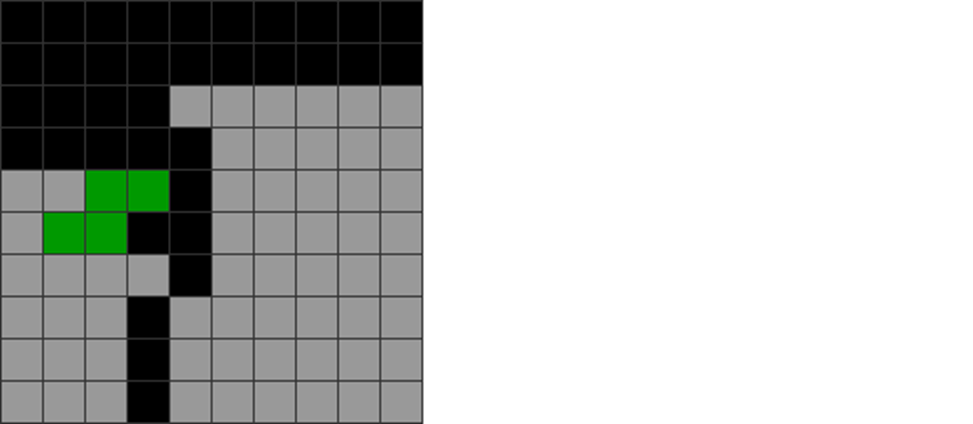
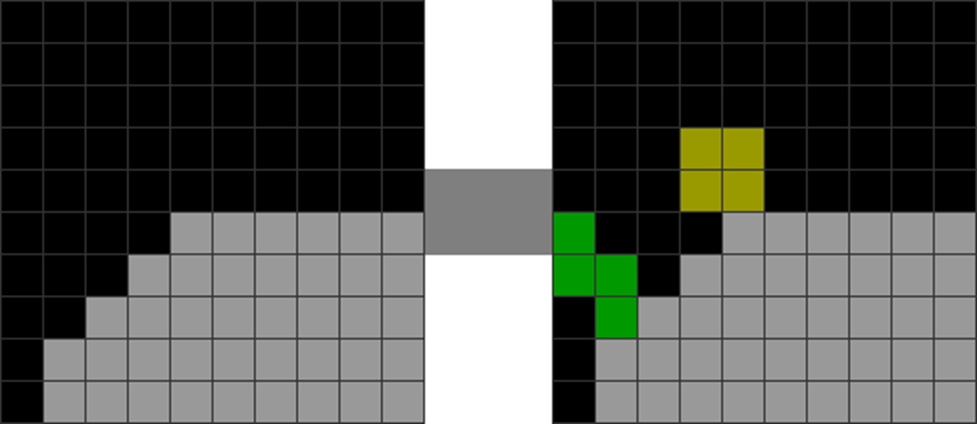
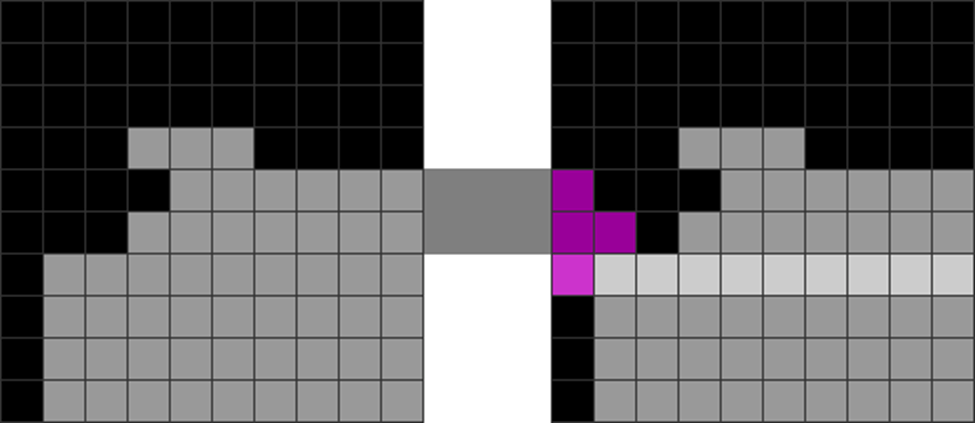
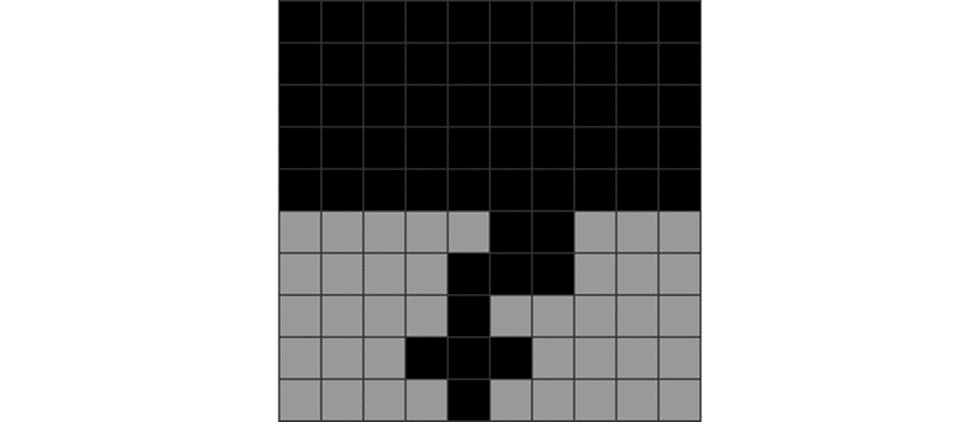
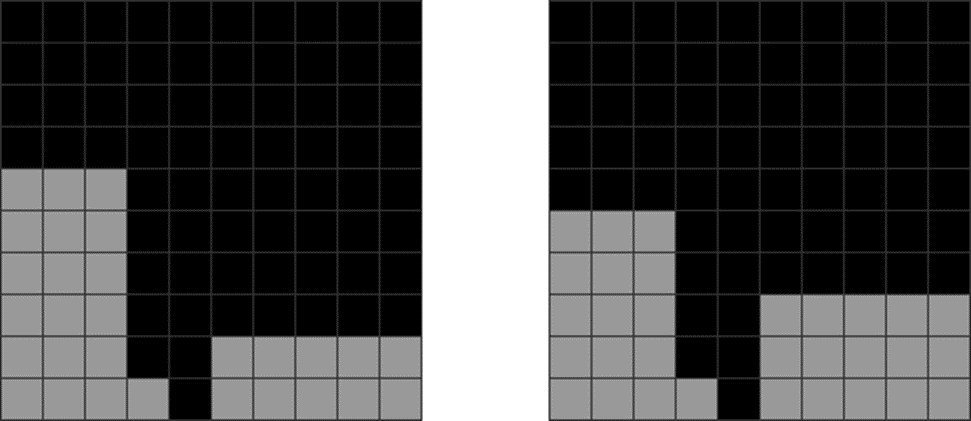
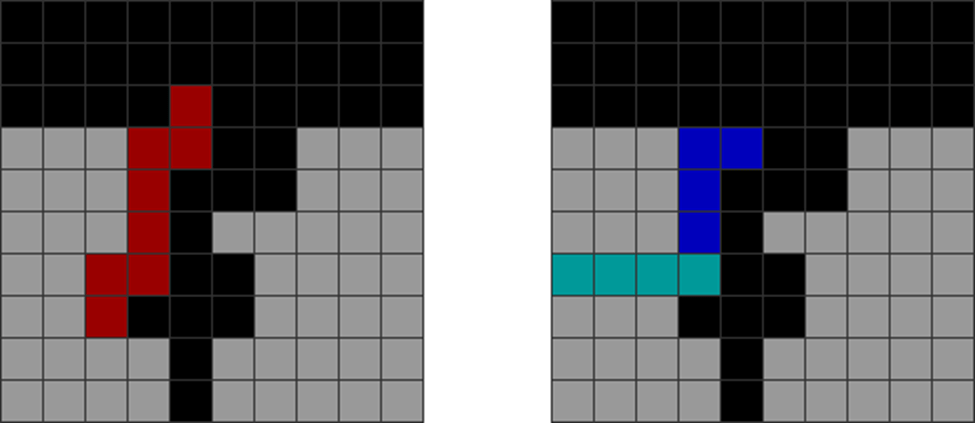
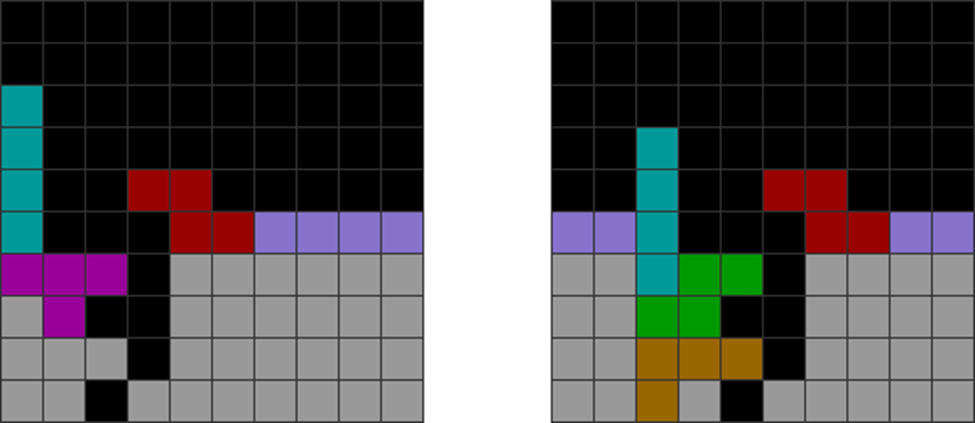
| Diagram Set 12-1 | |
| A | B |
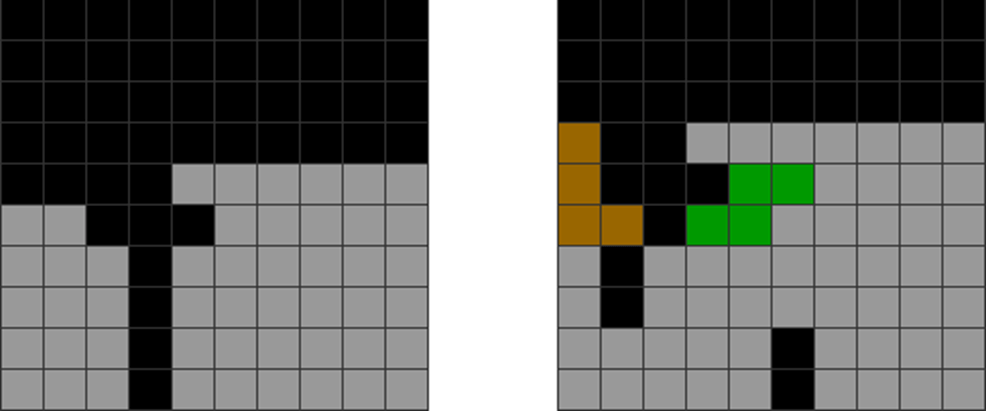
| Not a donation | Is a donation |
| All colored blocks in the pictures above are props. | |
The first diagram is not a donation, as the T-spin double does not block the garbage hole.
The second diagram is a donation, as the L piece blocks the garbage hole (the next hole immediately under the L piece) to make a T-spin.
The Basics of Making T-spin Donations
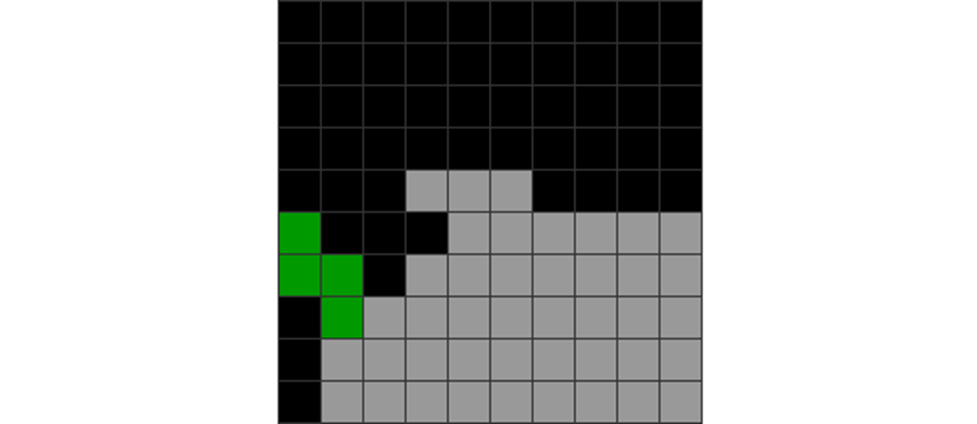
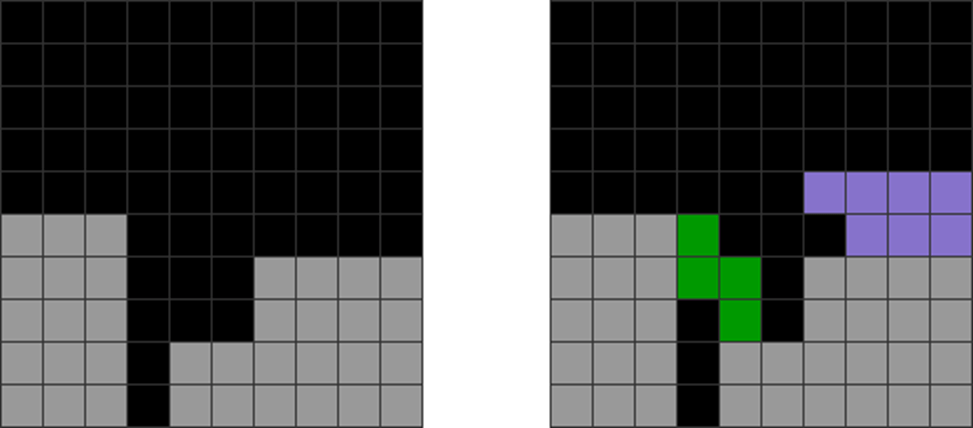
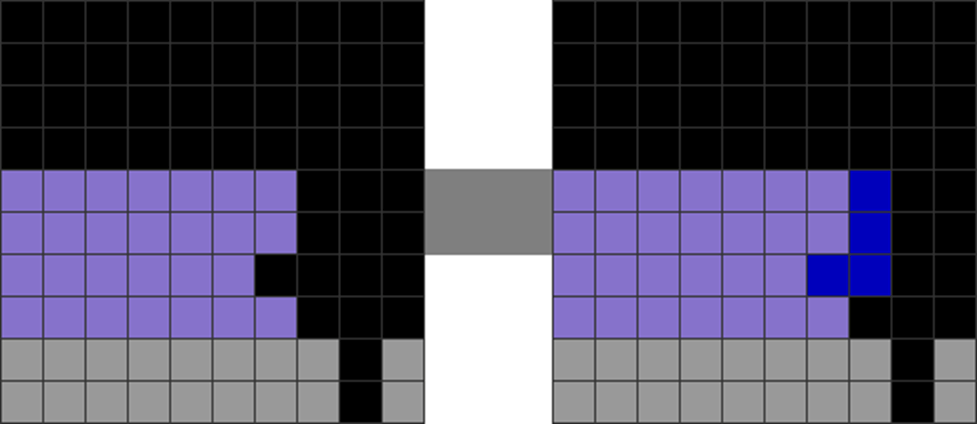
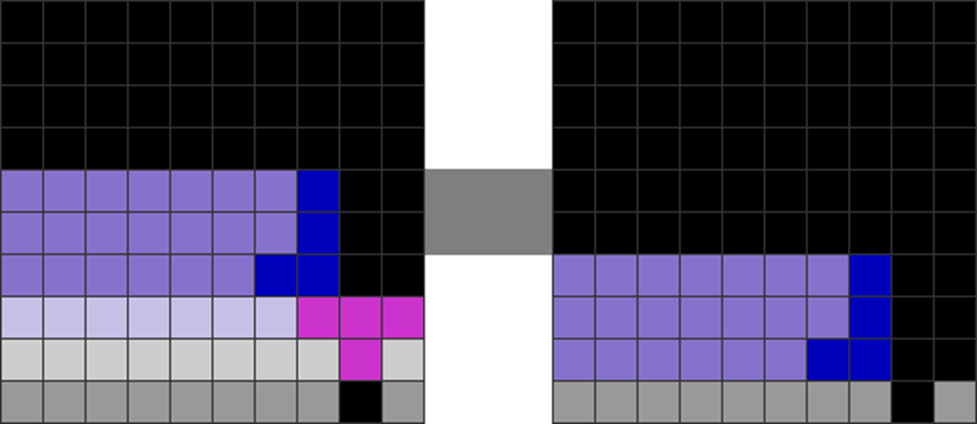
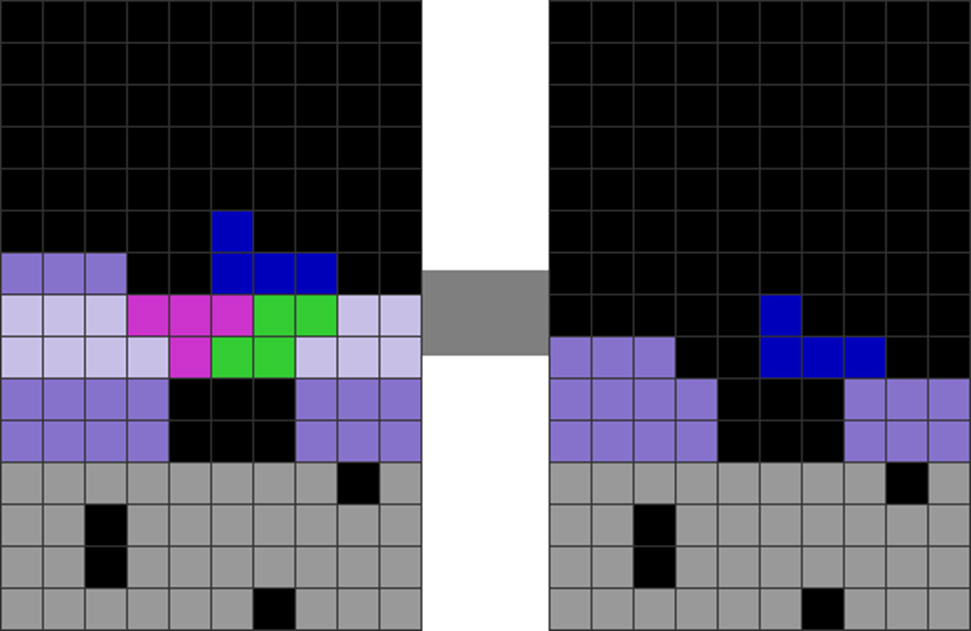
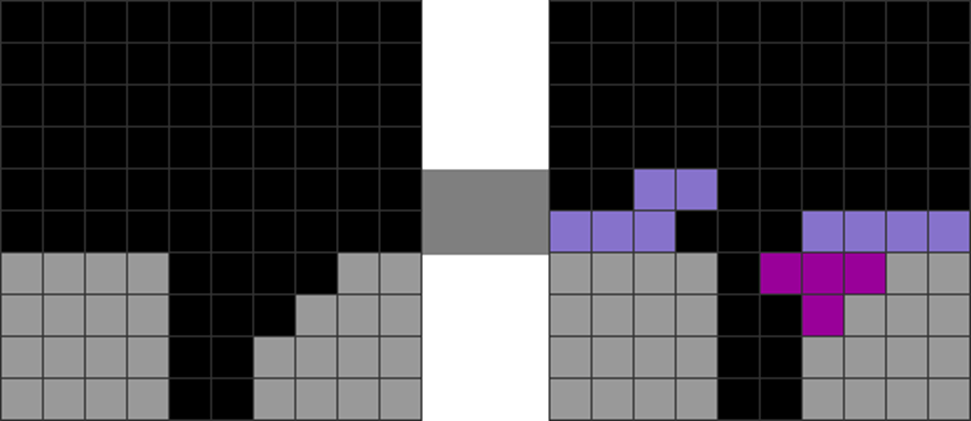
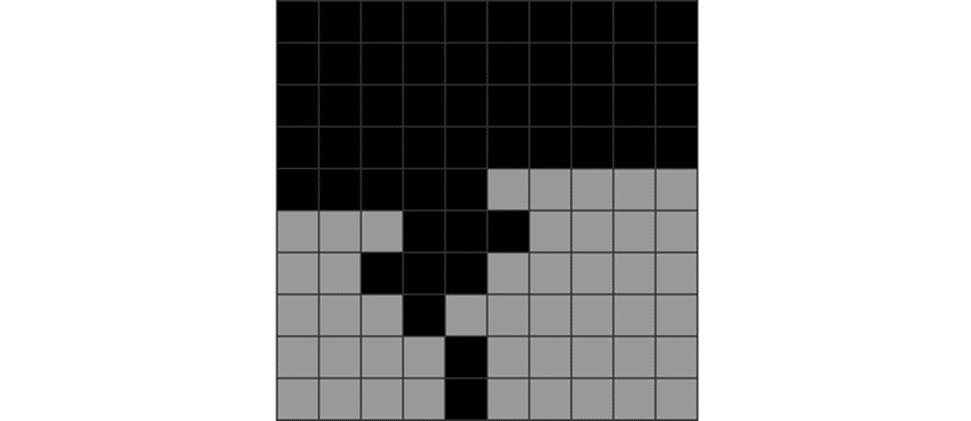
To make T-spin donations, one should create the lavender-colored areas, as shown below:
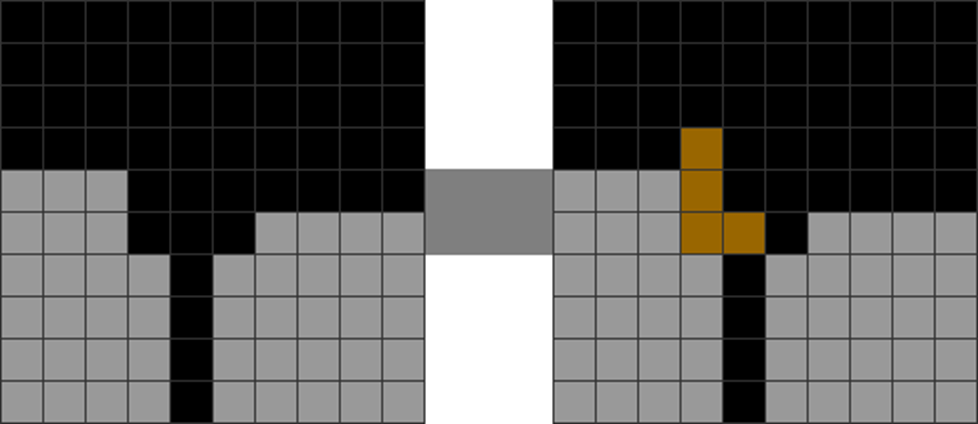
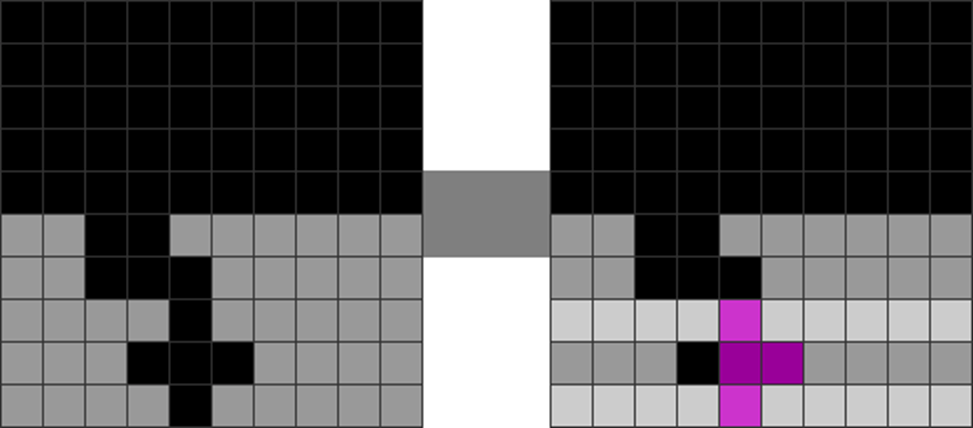
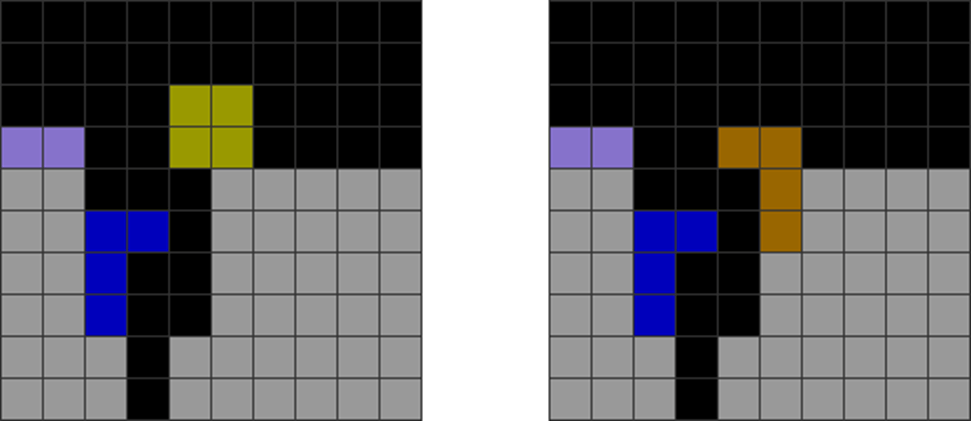
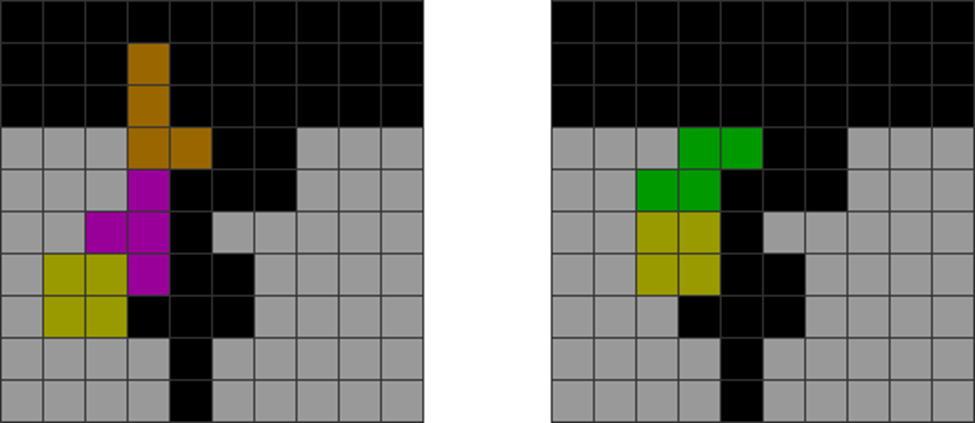
| Diagram Set 12-2 |
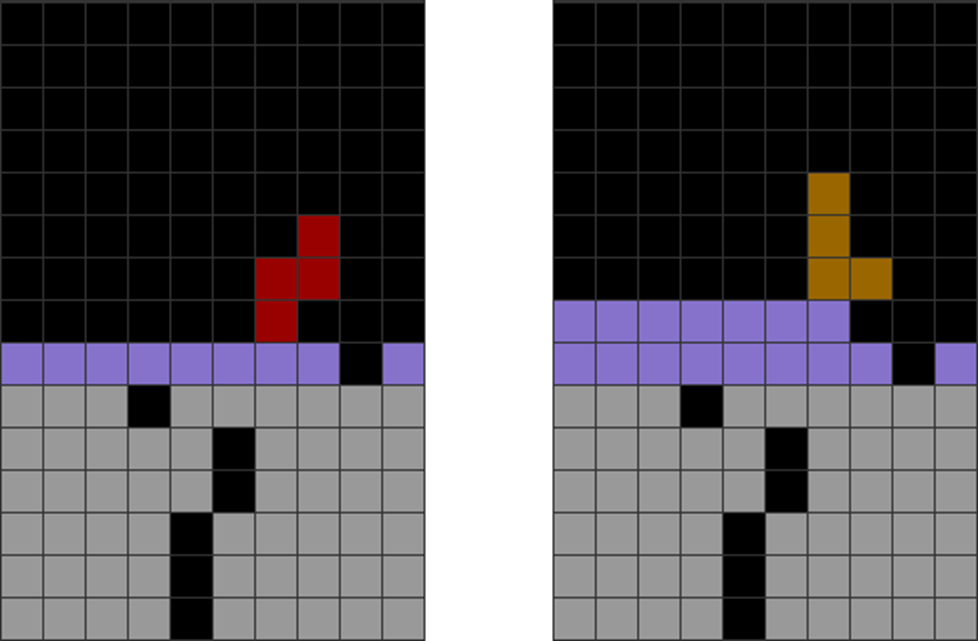
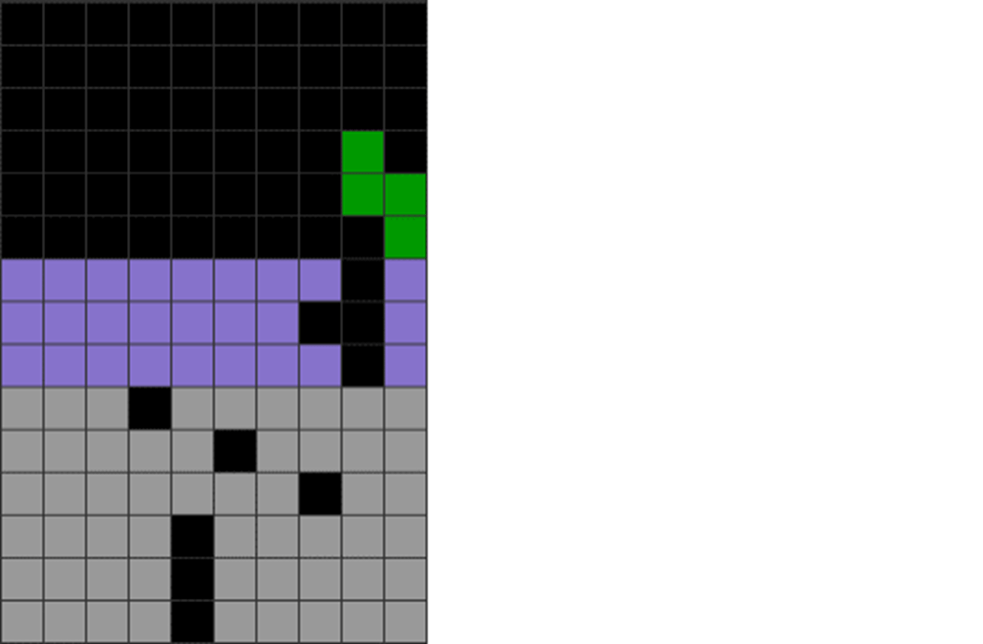
| The above shows examples of, from left to right, a T-spin single donation, a T-spin double donation, and a T-spin triple donation. |
As shown in the first picture above, the lavender area should be one complete row because a T-spin single makes a single line clear. You can generalize this for a T-spin double and triple, which need two and three entire rows, respectively.
A) Principles to use Donations and Props well
It is vital to understand the potential misuse of each method if one cannot grasp the critical principles while using a T-spin donation in the following sections.
There are twofundamental principles to note.
1) Making Clean and Efficient Donations
A good T-spin donation is:
- Clean.
- Rarely or never makes the field too jagged or breaks the stability of the stack.
- Sustains back-to-back bonus for greater efficiency.
A bad one does the opposite for some of the above three factors.
Some examples of bad T-spin donations are below. Please use them only if there are no other choices because of bad incoming piece previews.
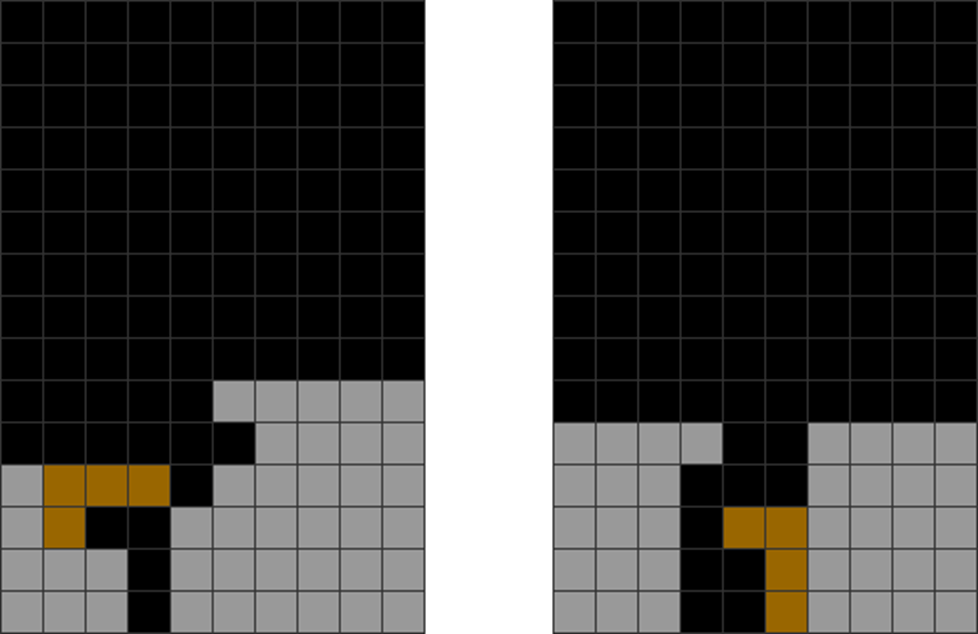
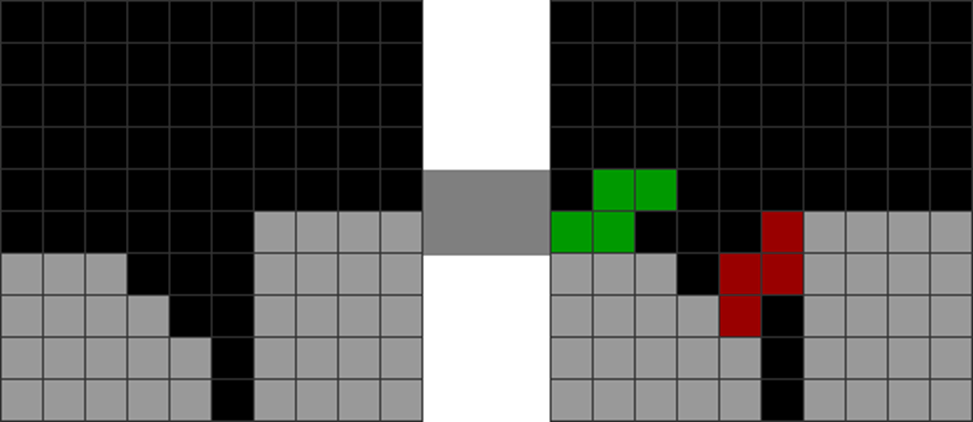
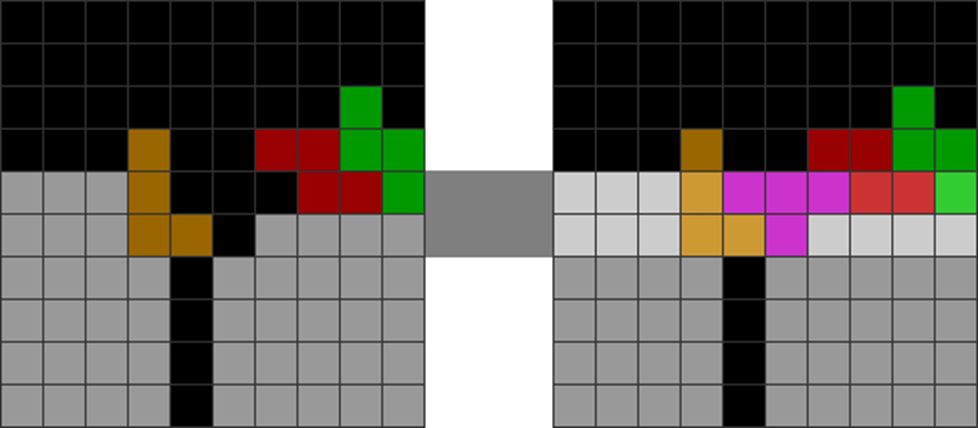
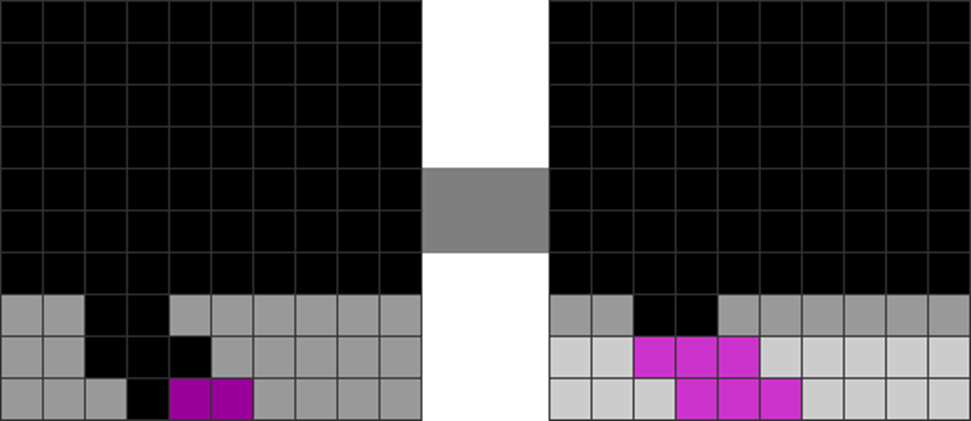
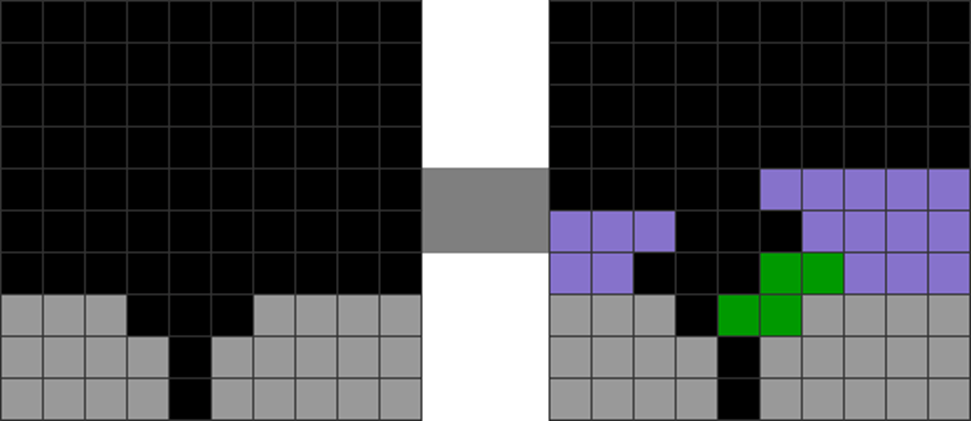
| Diagram Set 12-3 | |
| A | B |
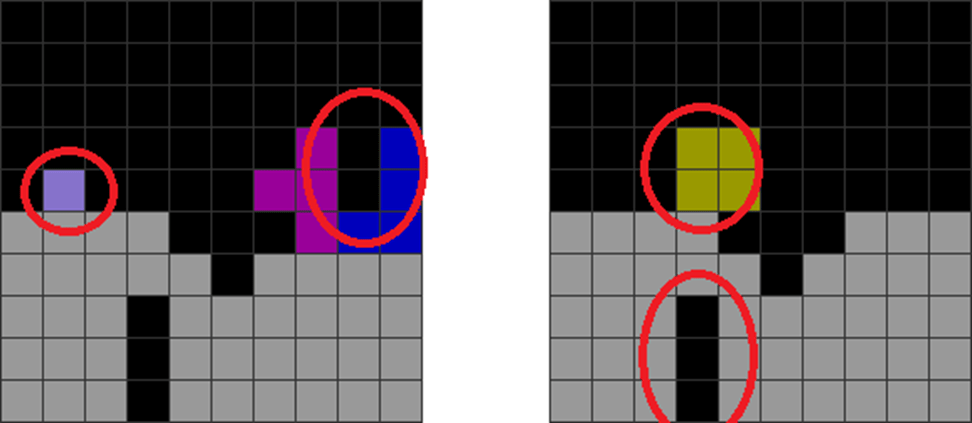
| A T-spin double donation has many jagged red-circled parts, which reduces stacking and downstacking smoothness later. | This case is worse. See the red circles. The O piece blocks the next garbage hole below and is thus unclean. The O overhang must be skimmed off, which breaks back-to-back bonus. This is inefficient. |
Thus, be careful not to stack over future holes you need to downstack through. Likewise, I strongly recommend sustaining back-to-back bonuses to minimize expensive skims.
2) Use Simpler and Safer T-Spins
Please never settle for a more reckless and complex T-spin when a safer and simpler one will do.
The following situation has two choices for a T-spin:
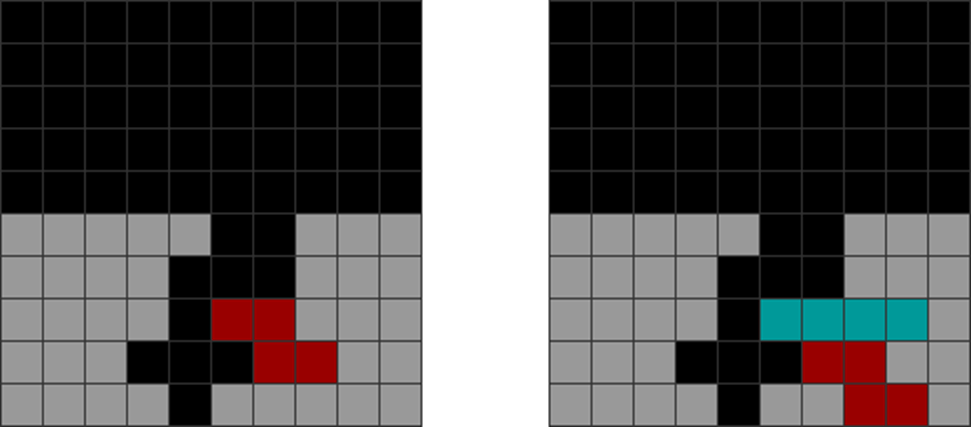
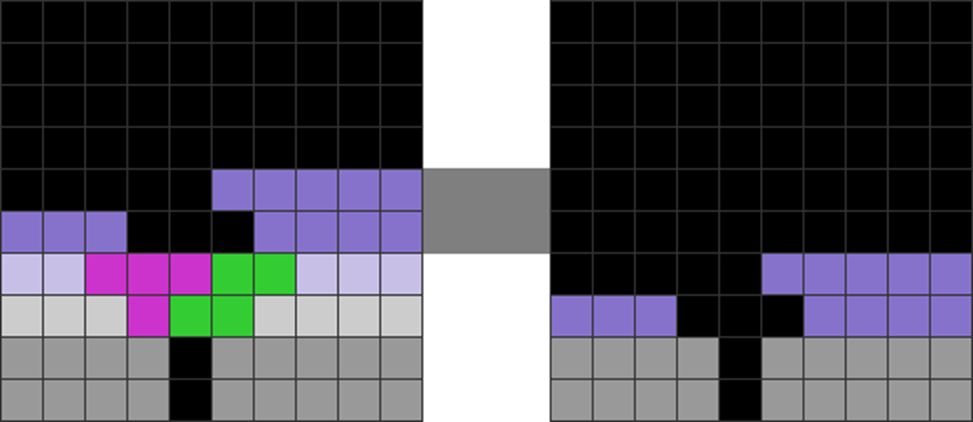
| Diagram Set 12-4 | |
| 1 | 2 |
| 3 | 4 |

| This sequence leads to a string of clean and stable back-to-back T-spin doubles. |
It is also safe, as the garbage hole is easily exposed after the donation for a Tetris. It does not make the field jagged, either.
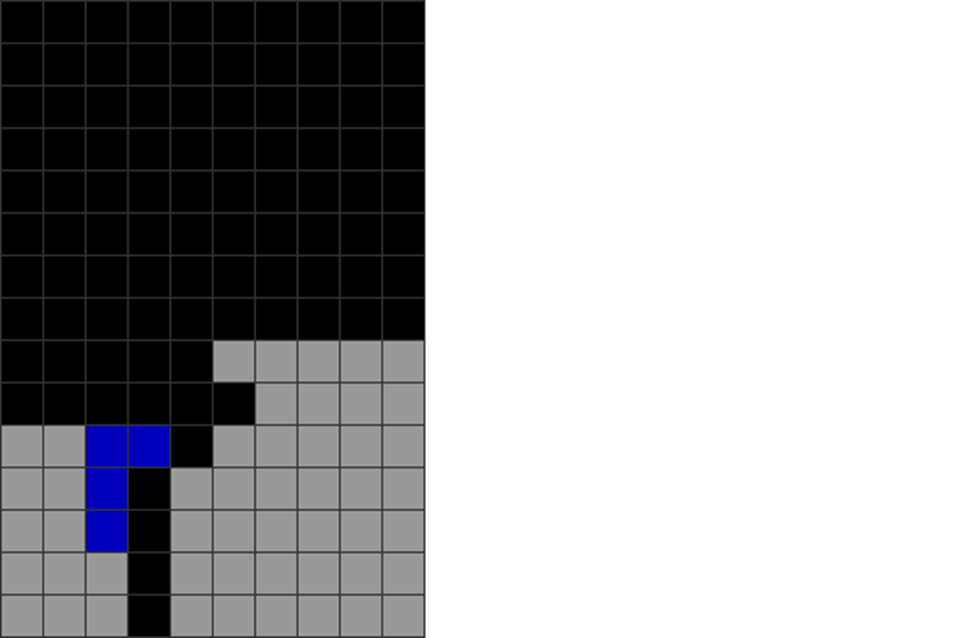
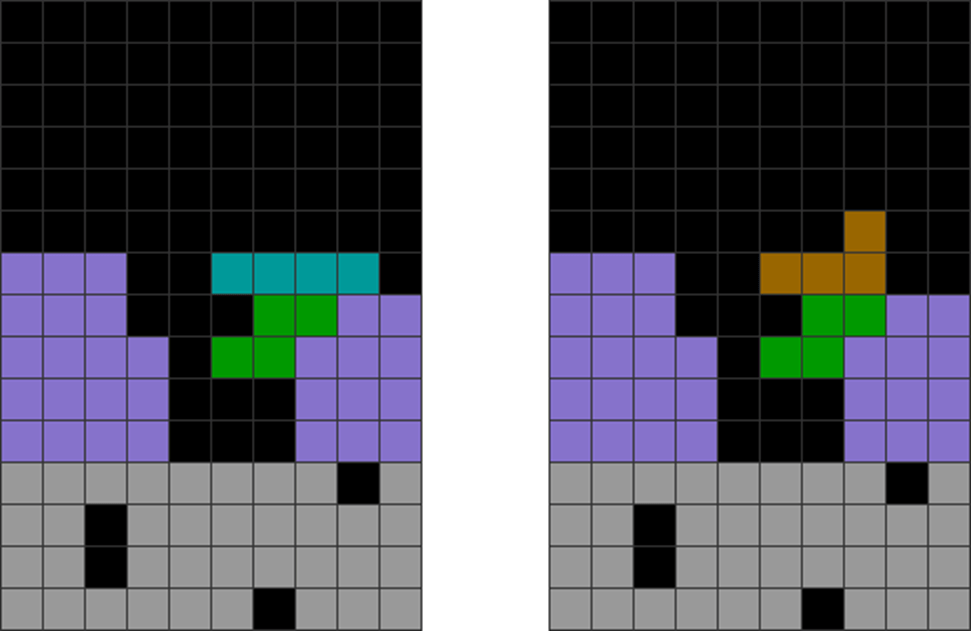
| Diagram Set 12-5 | |
| 1 | 2 |
| 3 | 4 |

| This a semi-donation that blocks the Tetris hole after the line clear. |
However, its follow-up is unclean, with the orange block upstacked over the Tetris hole below in step 4. It also causes field jaggedness. Therefore, using diagram 12-4’s sequence is better.
Hence, give up complex, unclean donations if a more straightforward, safer, non-donation, or easier donation exists.
This will reduce downtime from cleaning up leftover residues or overhangs that block the next garbage hole.
B) Simple and Essential Donations and Props
It is better to master a few essential and simple donations than a thousand complex ones poorly because the former is more commonly used.
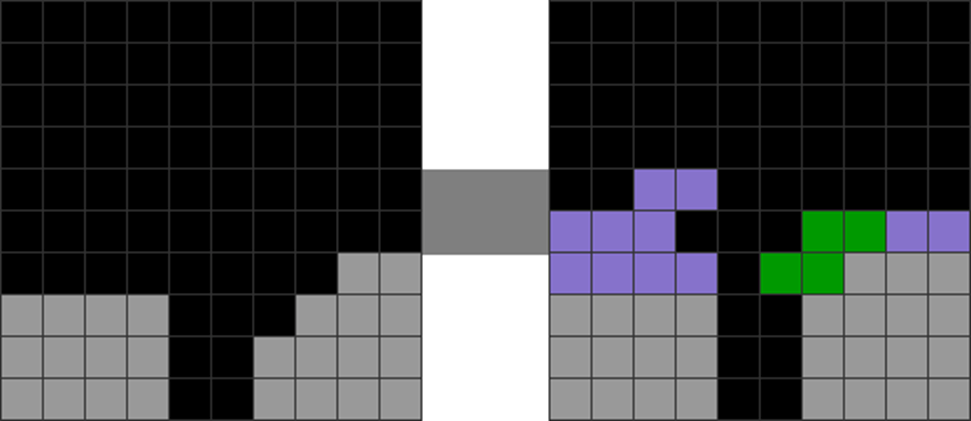
Making T-spin donations is simple. You just have to spot the T-like cavity mid-game, then fill the rest of its required rows. Here are some basic examples:
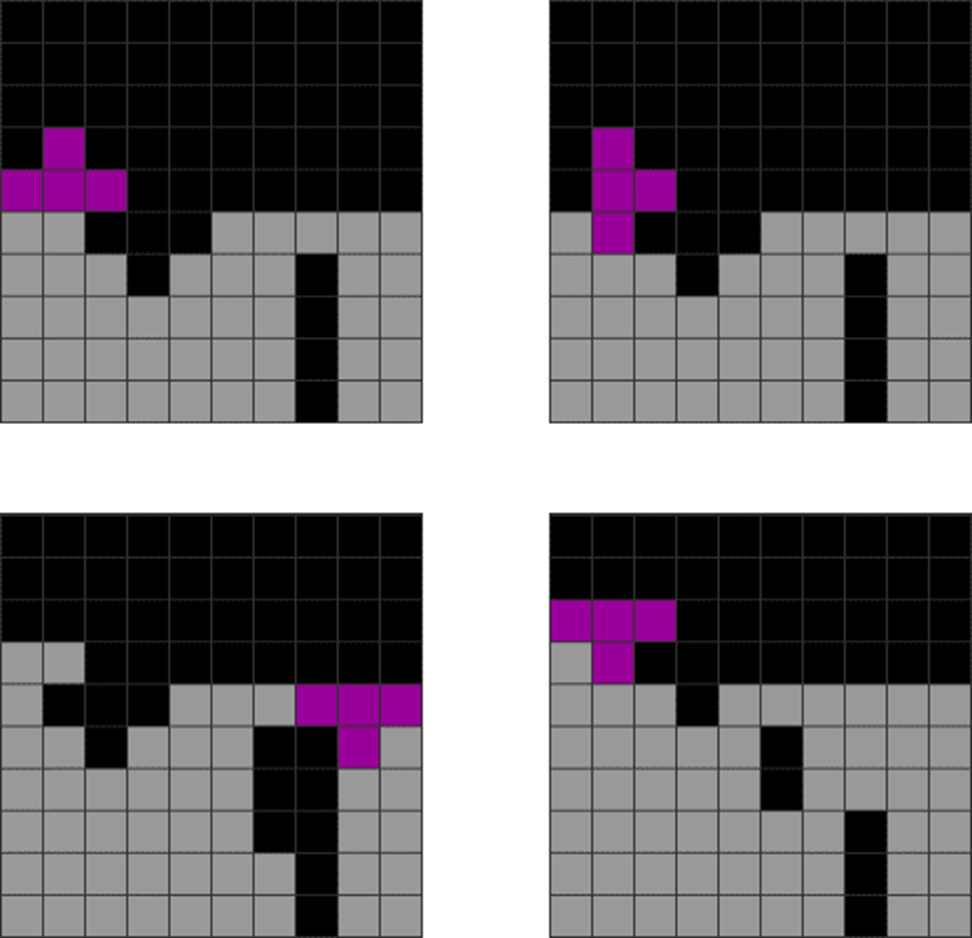
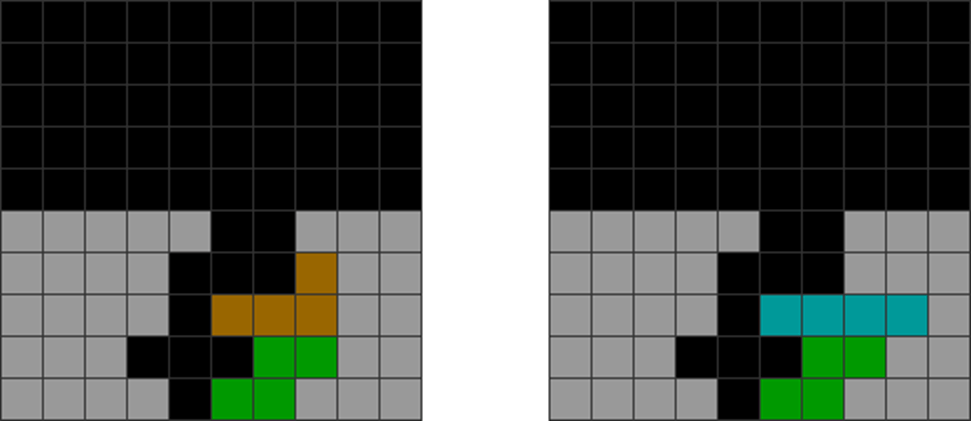
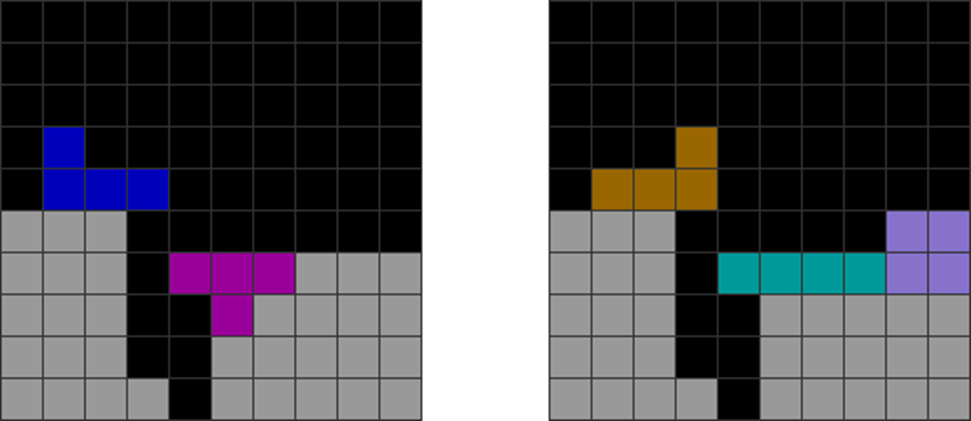
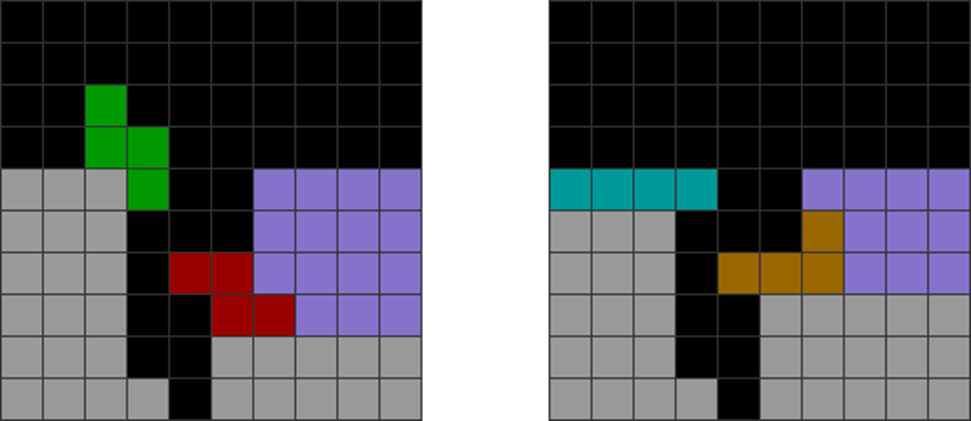
| Diagram Set 12-6 |
| Diagrams 1 and 2 use the J and O pieces to make a perfectly clean T-spin double donation. In diagram 3, the I fills up a single row to make a T-spin single donation. A T-spin triple donation can be easily generalized with three rows. |
1) The Most Basic 1-Piece T-Spin Props
The number of orientations each mino has to make T-spin props as part of a donation is limited. I recommend memorizing them. The props here are not exhaustive but are the most common in the mid-game, from my experience. They are:
S and Z
| Diagram Set 12-7 |

.
O
| Diagram Set 12-8 |

L and J
| Diagram Set 12-9 |
I
| Diagram Set 12-10 |


T
| Diagram Set 12-11 |
.

These placements only require 1 of each tetromino and are, thus, easy to learn.
By knowing these methods at one’s fingertips, one can cut down on slow and deliberate thinking time and increase one’s speed in making such T-spins.
Most Practical Canonical T-Spin Methods
This section’s methods are canonical because they comprise popular named techniques.
A) Common Named, Canonical Basic T-Spin Donation Setups
The methods here are named popular T-spin methods and are the most used.
It is critical to know them all in the intermediate levels of Tetris as they cover around 25 to 30% of T-spin opportunities, from my experience.
1) Kaidan (S/Z Donation)
Kaidan is the most straightforward T-spin donation:
| Diagram Set 12-12 |
| Kaidan is a T-spin double setup created using a vertical S or Z as a prop to make its base. |
To use it, do this:
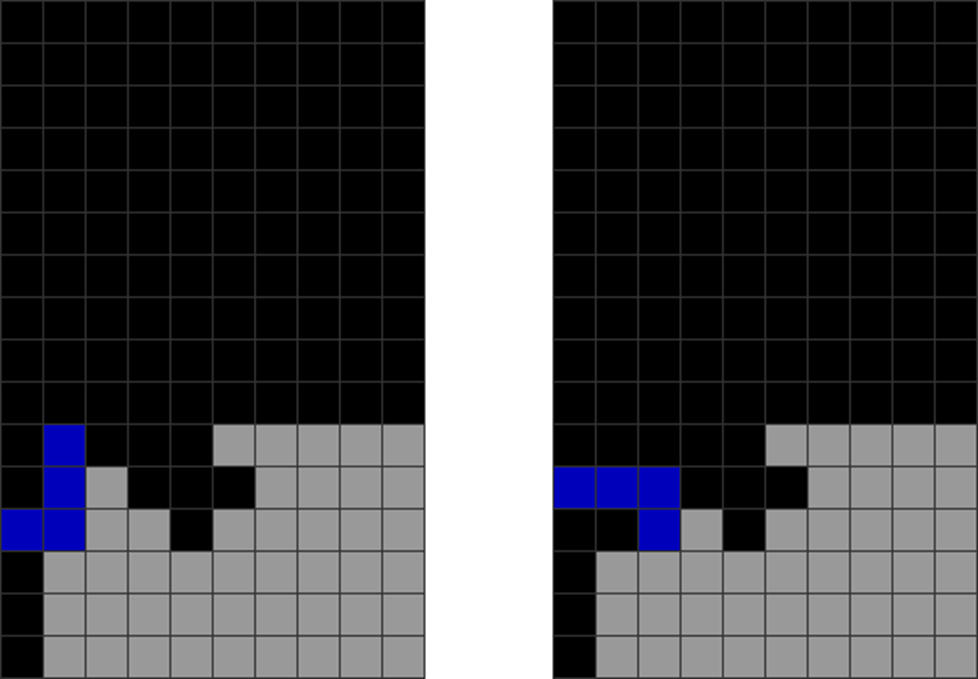
| Diagram Set 12-13 | |
| 1 | 2 |
| The player places a vertical S in the stair-like part to create a T-spin base. He then tops off with an O overhang to complete the Kaidan. |
| Diagram Set 12-14 | |
| 1 | 2 |
| This does the same, except with a mirrored Z vertical piece and an S overhang. |
This method involves seeing a stair-like opportunity.
Common Mid-game S/Z Donation Kaidan Situations
There are more mid-game situations besides stair-like patterns. Here are other common mid-game situations to use Kaidan:
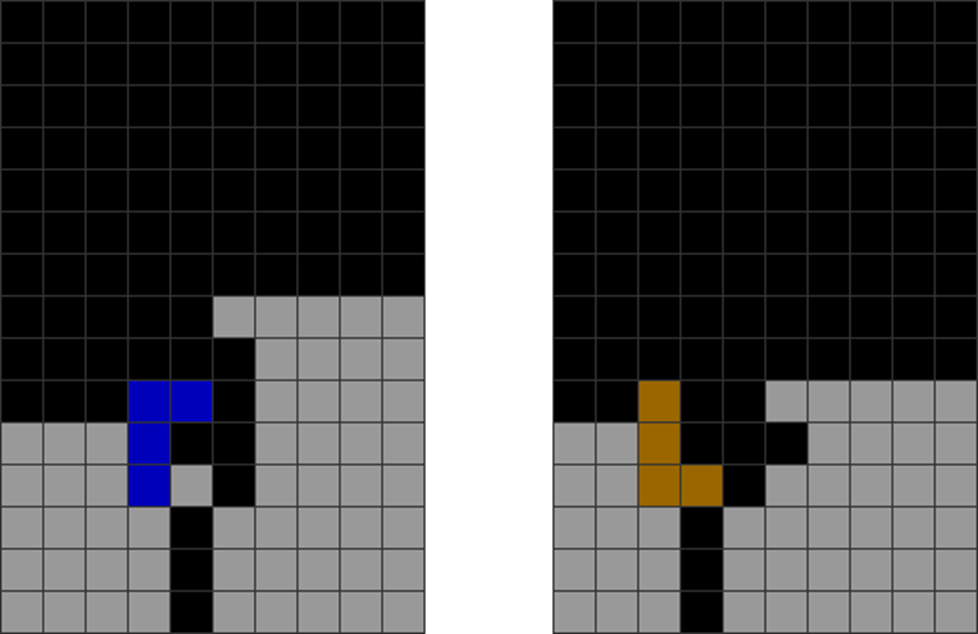
| Diagram Set 12-15 | |
| 1 | Alt. A |
| See how the left and right stacks of column 4’s hole differ in a height of 2 blocks. The player has two choices. | The player can easily put the vertical S to create the Kaidan’s base and then finish it with an overhang. |
| Alt. B |
| The player can make a horizontal Z placement to create a T-spin single! |
2) Yoshihiro
Yoshihiro T-spins involve using a T-spin mini to create a cavity for a T-spin double.
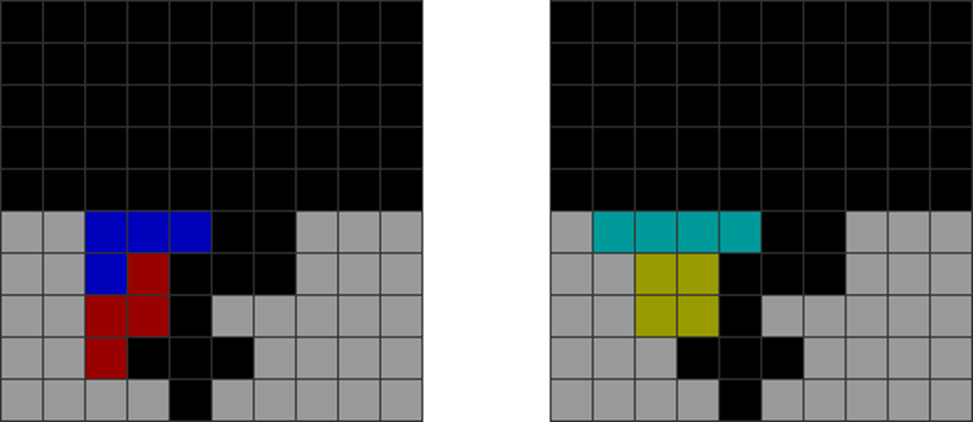
| Diagram Set 12-16 | |
| 1 | 2 |
This method is best used when there are two consecutive Ts. I sometimes give up this method if there are few Ts, as blocking out a hole with a donation can be dangerous. While waiting for a second T-piece, you might have no way to defend yourself against attacks.
Yoshihiro’s first T-spin mini is highly inefficient. Even though it starts and sustains a back-to-back bonus, its long soft drop duration lowers its efficiency. I often give it up and upstack it to a Tetris instead.
3) Parapet

Parapet is a T-spin donation made possible with a horizontal or vertical L or J placement. This often leads to either a T-spin single or a T-spin double.
It is one of the most critical and frequent T-spin continuations, and I suggest mastering it.
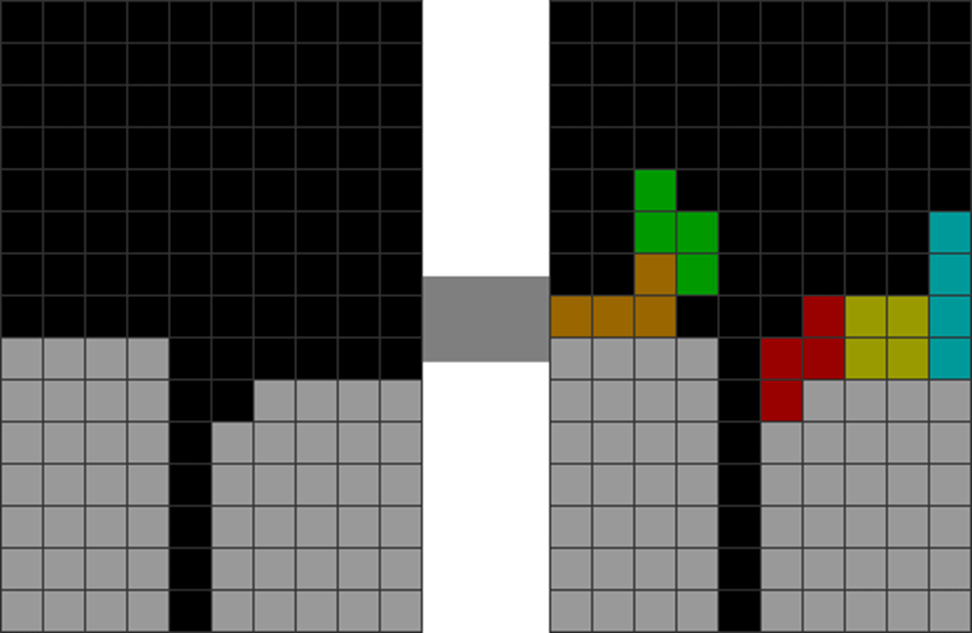
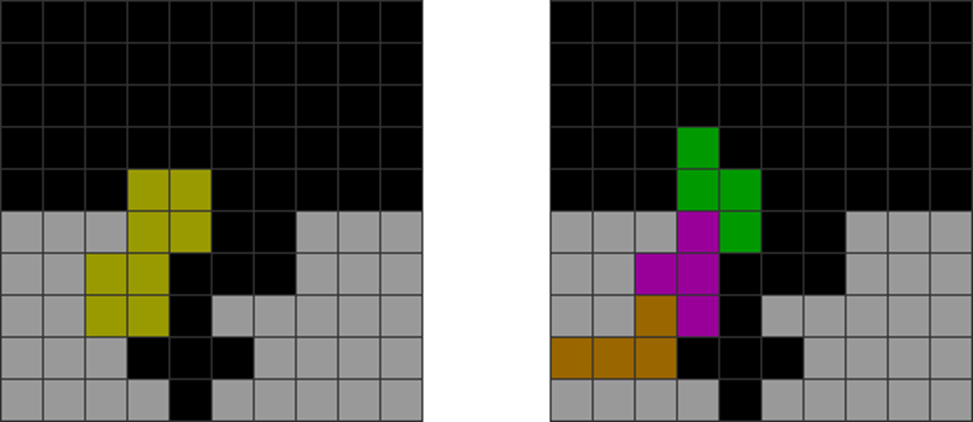
| Diagram Set 12-17 | |
| 1 | 2 |
| Starting field. | You put a vertical L this way. |
| 3 | 4 |
| Then, make overhangs on the far right with S and Z, creating a Parapet T-spin. | T-spin double. |
The player can rotate the T horizontally to take the T-spin double first if one needs to rush out more immediate garbage. This is shown in step 4.
However, one can rotate the T vertically to deny the T-spin double and make a T-spin single instead. This levels out the field on both sides and lets one easily make another back-to-back T-spin double. This is shown in diagram set 12-19 in the following sections.
Why is Parapet such a fantastic method? Consider:
| Diagram Set 12-18 | |
| 1 | 2 |
| A player gets this situation. | The player wastes a J soft drop to make the T-spin overhang. |
| 3 | 4 |
| The T-spin double line clear concludes. | This creates a pattern with bad continuations. There is no immediately visible T-spin opportunity. |
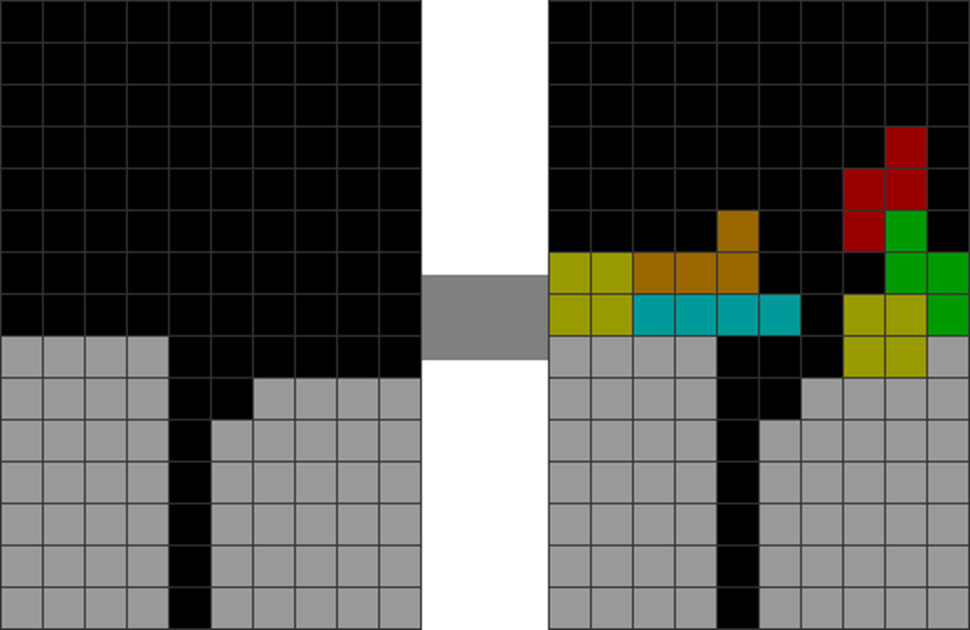
Conversely, do this:
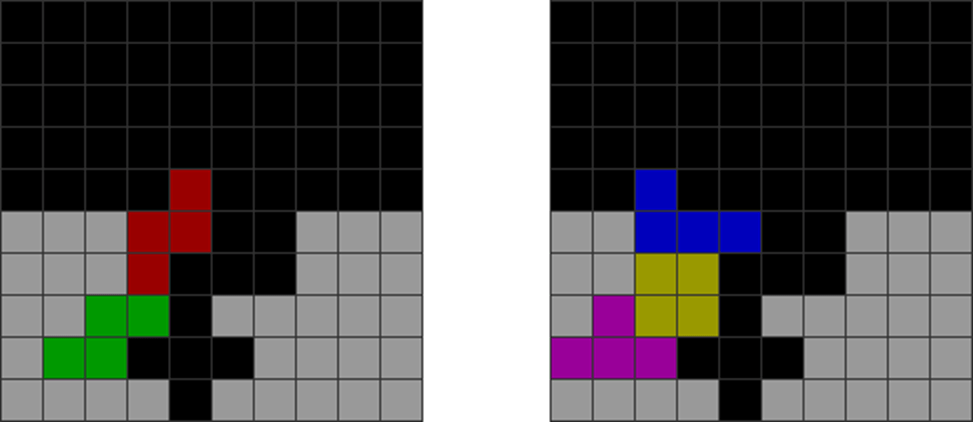
| Diagram Set 12-19 | |
| 1 | 2 |

| Same starting field as the last diagram set. | The player uses Parapet, which prevents a soft drop and leads to a better continuation. The J is placed first as a base. |
| 3 | 4 |

| The player spins in the T into the cavity vertically to make a T-spin single. | The leftover pattern has the stacks left and right of the column being even. It is easy to make a second T-spin using an I overhang. |
4) STMB Cave (Floating T-spin)
STMB Cave is a floating T-spin (often a T-spin double), as the T-spin is suspended above empty blocks.
It is a widespread T-spin double method with many mid-game opportunities.
| Diagram Set 12-20 | |
| 1 | 2 |

| The player spots a 3-wide gap and then places a horizontal S piece. He then builds the overhang, completing the STMB Cave. |
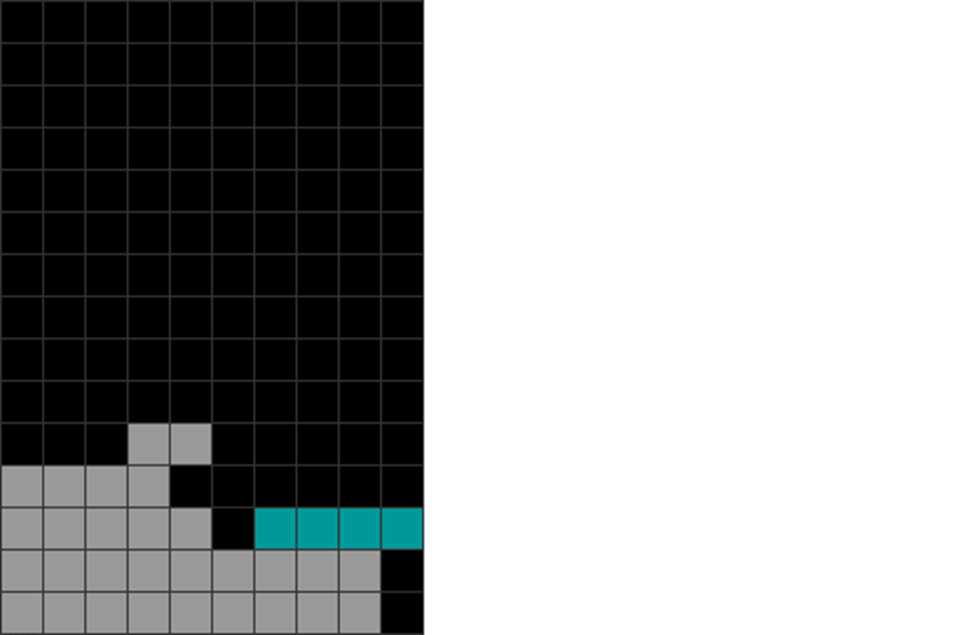
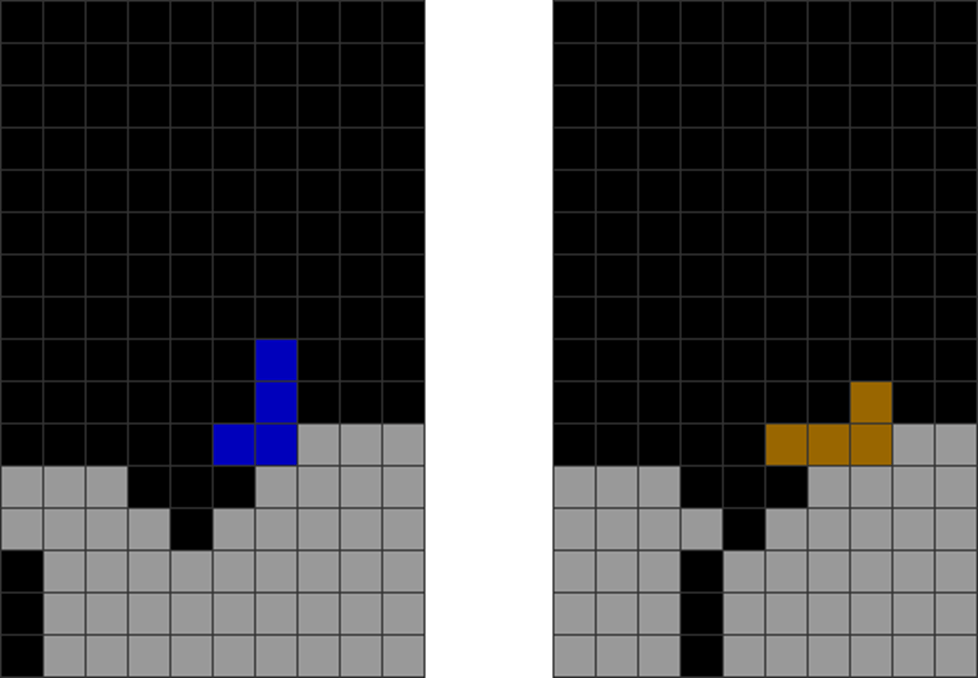
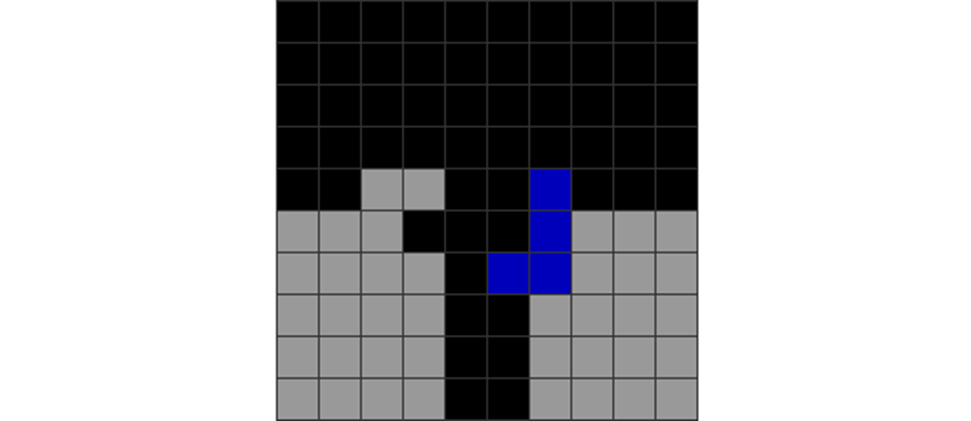
| Diagram Set 12-21 | |
| 1 | 2 |
| You can also do so with a T piece. |
The primary STMB Cave form uses S and Z as a floating base.
Common Mistake
Beginner players often make the STMB Cave mistakes below:
| Diagram Set 12-22 | |
| 1 | 2 |
| Starting field. | The player places the overhang (J piece) on the wrong side. |
| 3 | 4 |
| The T-spin double finishes. | The J overhang dangles over the cavity below. |
This is an unclean STMB Cave and should be avoided.
Other mistakes include:
| Diagram Set 12-23 |
| The player places the I and L pieces (or others) as overhangs on the wrong side. This causes the subsequent pattern to stack messily over the holes or cavities below, requiring expensive skims to clean up. |
Avoiding dirty STMB Caves is preferred as the cleaning up is often tricky. This buys the opponent time to attack you and, thus, makes you vulnerable.
5) Sky Prop
Sky Props use a suspended piece (often a vertical L or J or horizontal S or Z) to create a T-spin double. It’s easy to confuse it with STMB Cave because it is similar.
Here are common mid-game chances to use Sky Prop:
| Diagram Set 12-24 | |
| 1 | 2 |
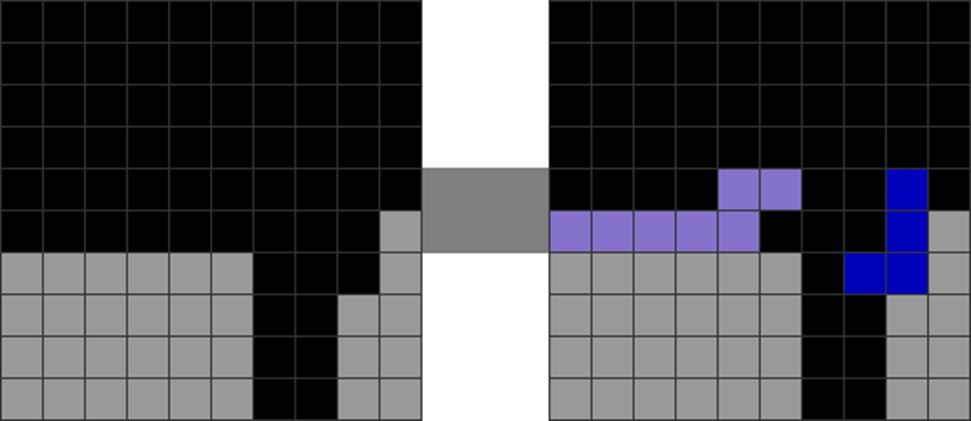
| The player makes a Sky Prop. |
| Diagram Set 12-25 | |
| 1 | 2 |
| This T placement forms the same shape as a Sky Prop. |
| Diagram Set 12-26 | |
| 1 | 2 |
| This Z placement does the same. |
The player can use horizontal T, S, and Z pieces as props to create the Sky Prop. However, the vertical L and J pieces are the most common to make it.
B) Common Named, Canonical Basic T-spin Splicing Setups
This sub-section covers the most popular and common canonical spliced T-spin setups.
Splicing T-spin setups (or spliced T-spin setups) are complex methods with two or more T-spins incorporated within. I will illustrate this later.
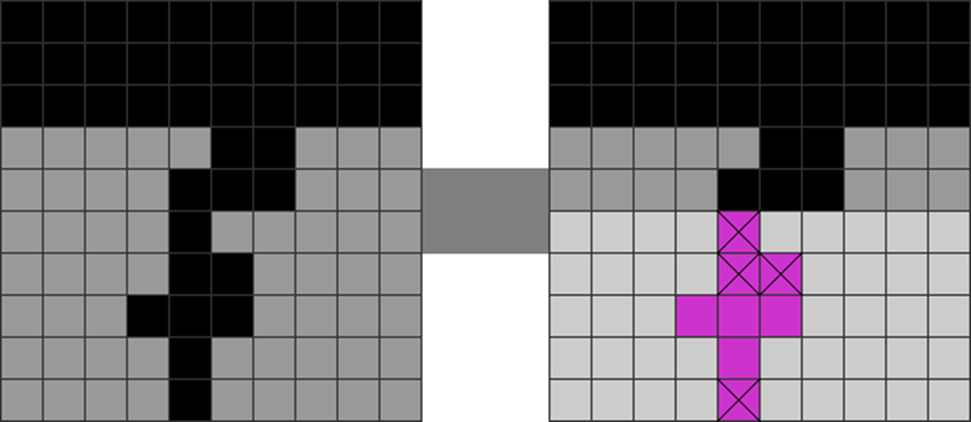
1) Fractal
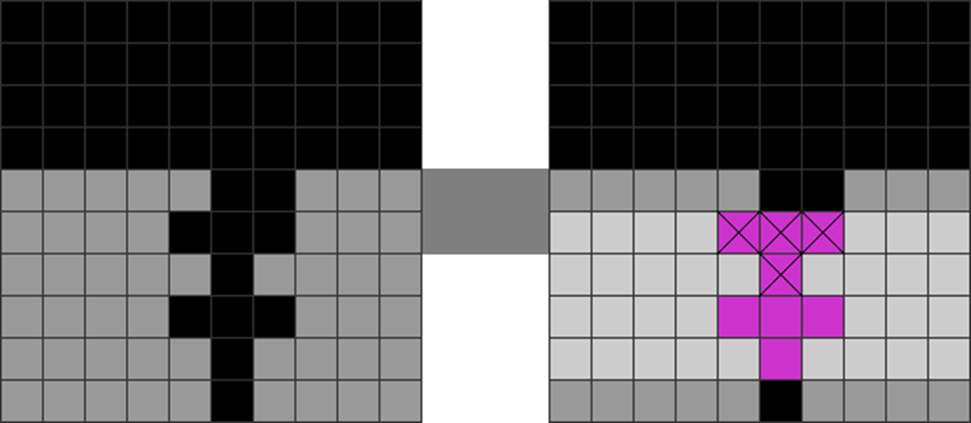
Fractal is a double T-spin double setup. The crossed blocks show the second T-spin.
It is one of the most compact, cleanest, and most efficient T-spin methods to learn. This is because the method does not block off the garbage hole, letting you defend yourself with a Tetris.
Likewise, because of this, one can spike offensively with T-spins, followed by a back-to-back Tetris.
Among all the named T-spin methods, I consider Fractal the most practical. I highly recommend it to be mastered by any serious player.
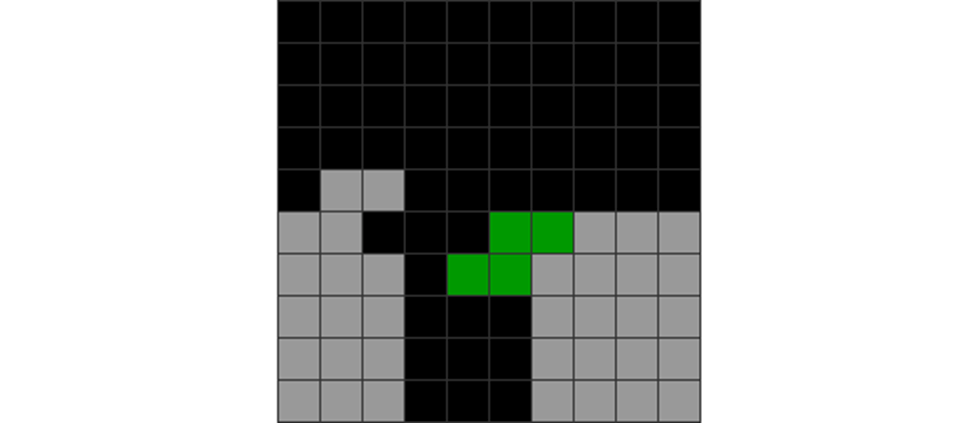
Mid-Game Fractal Situations
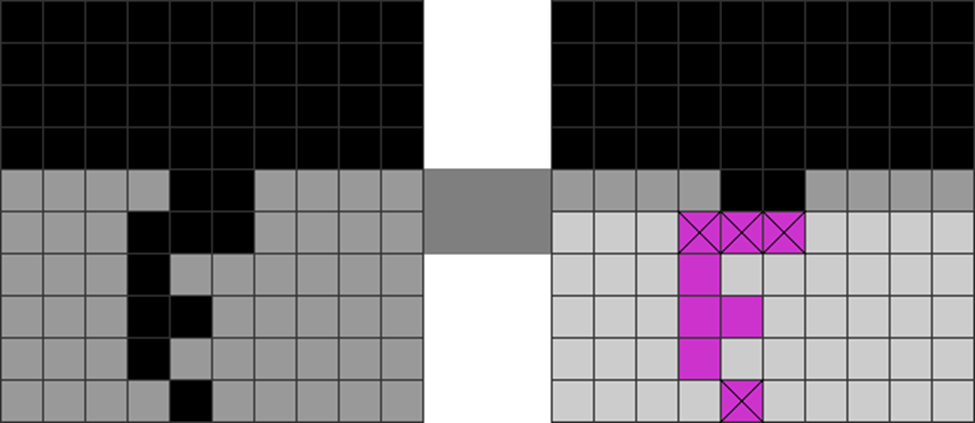
| Diagram Set 12-27 |

| Fractal involves creating the above pattern. Note how some pieces combine well with others to make clean Fractals. |
2) Imperial Cross
Imperial Cross is a double T-spin double method like Fractals. It opens up many opportunities, and I suggest mastering it. Here is the proper finesse to use it:
| Diagram Set 12-28 | |
| 1 | 2 |
| This shows the basic shape of an Imperial Cross. | This involves putting a T into the cavity. However, rotate it vertically, creating a T-spin double line clear. The cleared lines are separate. |
| 3 | 4 |
| This leads to the resultant pattern of a basic T-spin double. | This involves spinning a second T-spin double in to complete the setup. |
Here are the principal methods of constructing the Imperial Cross.
Constructing the ‘short’ side
| Diagram Set 12-29 |


| The above shows ways of creating the ‘short’ side or lower base of the Imperial Cross setup. |
Constructing the ‘tall’ side
| Diagram Set 12-30 |

| The above shows ways of creating the ‘tall’ side or overhang part of the Imperial Cross setup. |
3) Super T-Spin Double (STSD)

The Super T-Spin Double (STSD) method is a double T-spin double setup.
It is one of the easiest methods to create. Its mid-game opportunities are easily recognizable. It is also clean and leaves no residue after completing the two T-spin doubles, like Fractal.
However, it is slightly more dangerous to use than a Fractal. This is because its complete shape blocks the Tetris or garbage hole.
Here are some common mid-game opportunities:
| Diagram Set 12-31 |


| Here are 6 of the most common mid-game opportunities to create STSD, per my experience. |
How do we create STSD? Please observe:
| Diagram Set 12-32 |
| These follow from diagram 12-31’s six mid-game chances, respectively. Please memorize the above patterns to make STSDs. |
They can be partly freestyled – so there’s no need to adhere to rigid patterns staunchly.
4) DT Cannon
DT Cannon, or Double-Triple Cannon, is a T-spin double to T-spin triple method.
It generates the same garbage output as a C-spin (another similar setup to be covered later in this chapter) but is more dangerous and less clean. However, when used wisely, it opens up many mid-game opportunities that significantly boost one’s damage output.
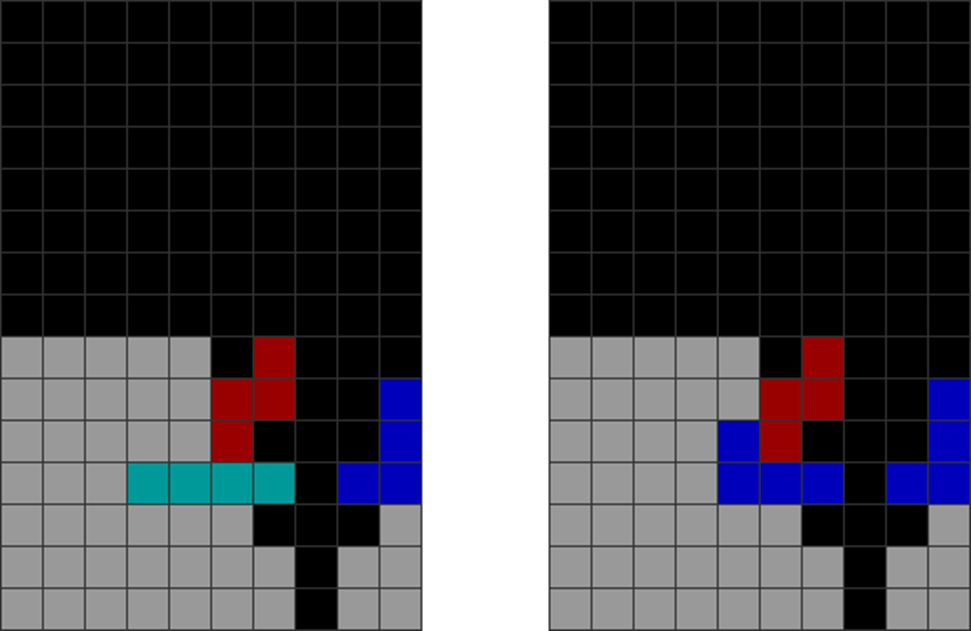
Not all DT Cannons are created evenly. Some are more unclean than others and could be mostly avoided:
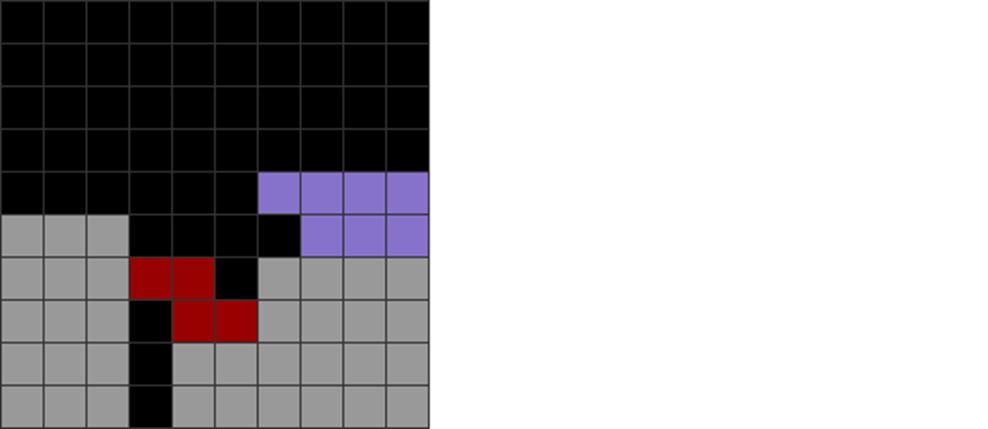
| Diagram Set 12-33 |
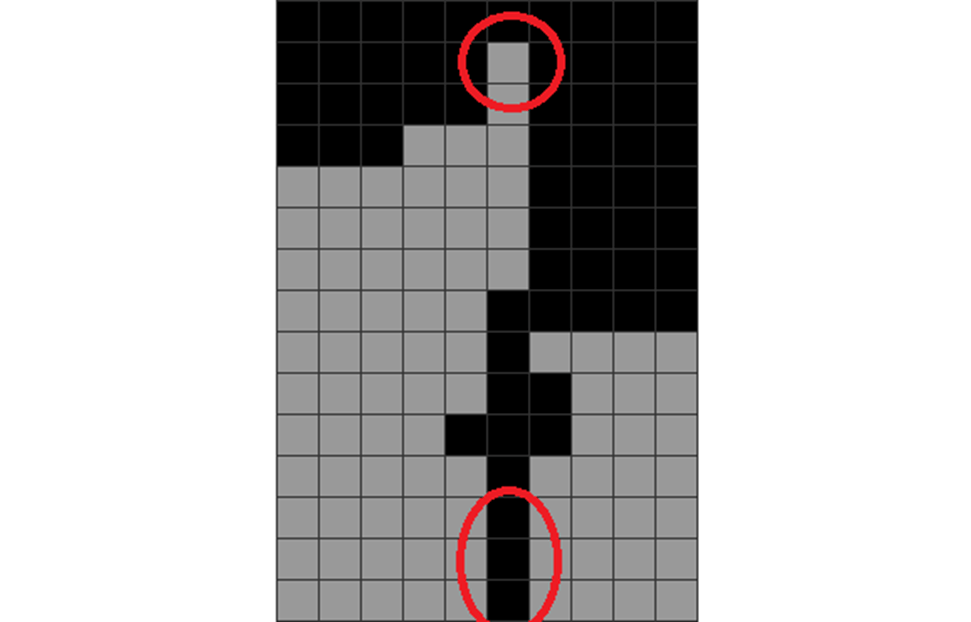
| This example shows an unclean DT Cannon. After both its T-spins conclude, the red-circled overhang will upstack over the red-circled garbage hole below. |
I recommend avoiding such unclean DT Cannons. However, I would sometimes make them as the burst damage is worthwhile.
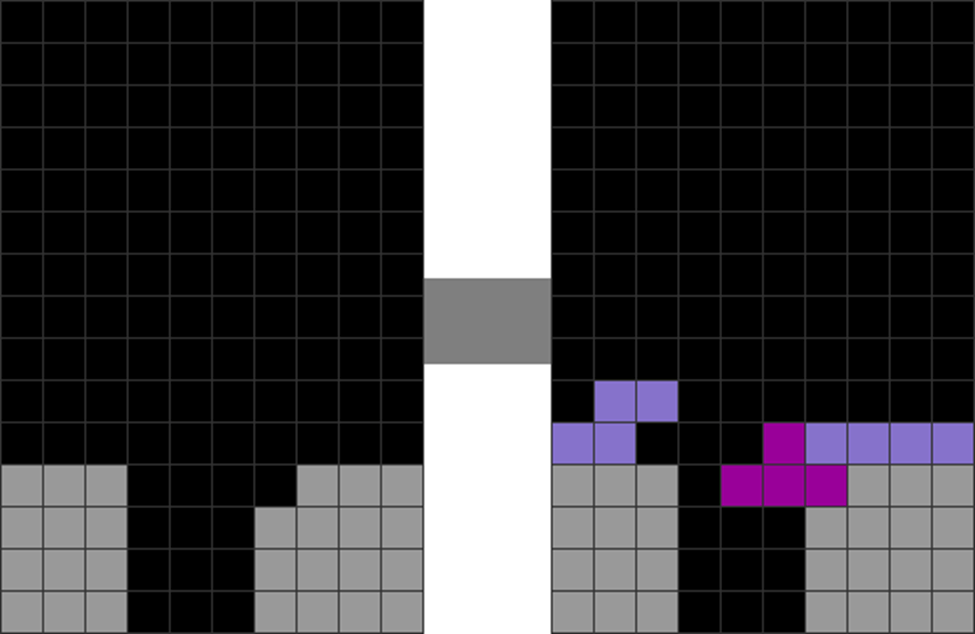
Here’s how to construct it mid-game:
Constructing the “bottom” side:
| Diagram Set 12-34 |


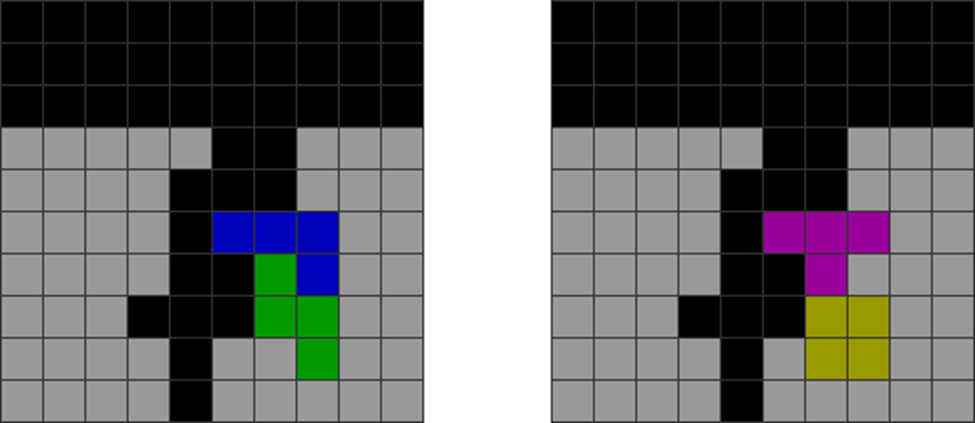
| Here are ways to construct the bottom or base of the DT Cannon. The most common ones involve those with horizontal Z and vertical L placements (S and J if mirrored). |
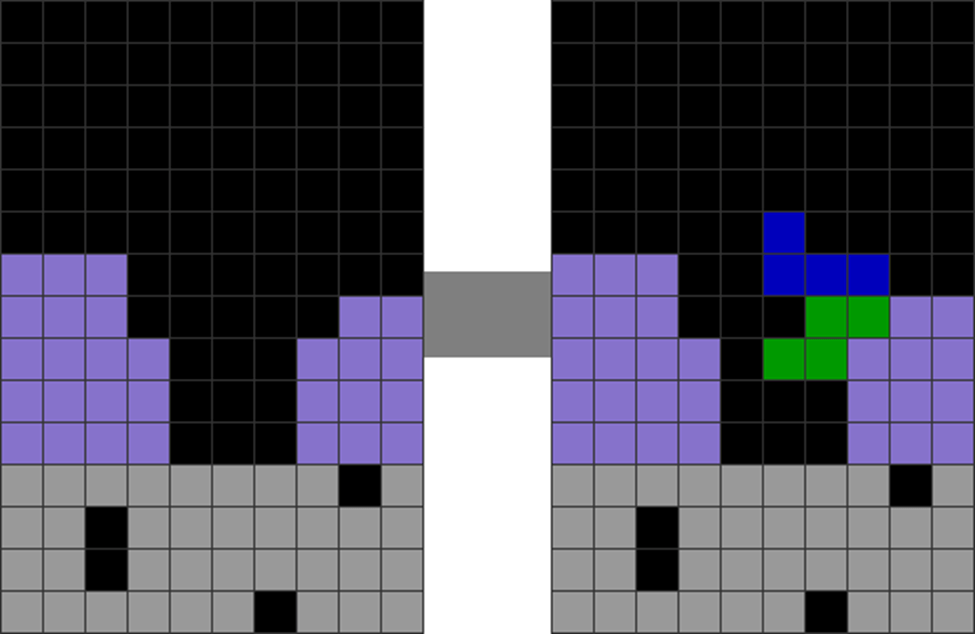
Constructing the “tall” side:
| Diagram Set 12-35 |
| Here are ways to construct the overhangs of the DT Cannon. |
5) C-Spin
C-spin is a splicing method with a T-spin triple followed by a T-spin double.
It differs from DT Cannon because the T-spin double and triple order are reversed. However, it gives the same damage output.
It is the cleanest way to make a T-spin triple. This is because, unlike pure T-spin triples, it leaves no unclean overhangs since the last T-spin is a double. It is also better than DT cannon because the latter leaves an unclean overhang, while C-spins do not.
This method is also helpful because it is one of the cleanest ways to downstack and sustain back-to-backs.
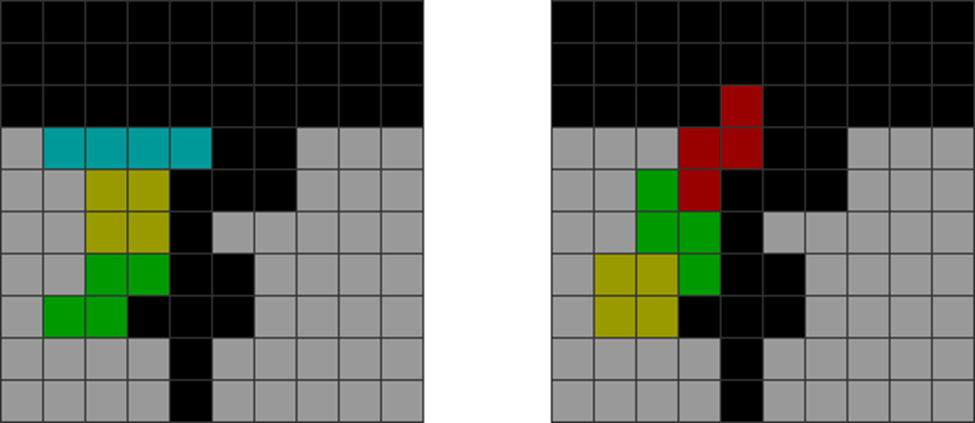
C-Spin Situations
Here are some situations to use C-spin:
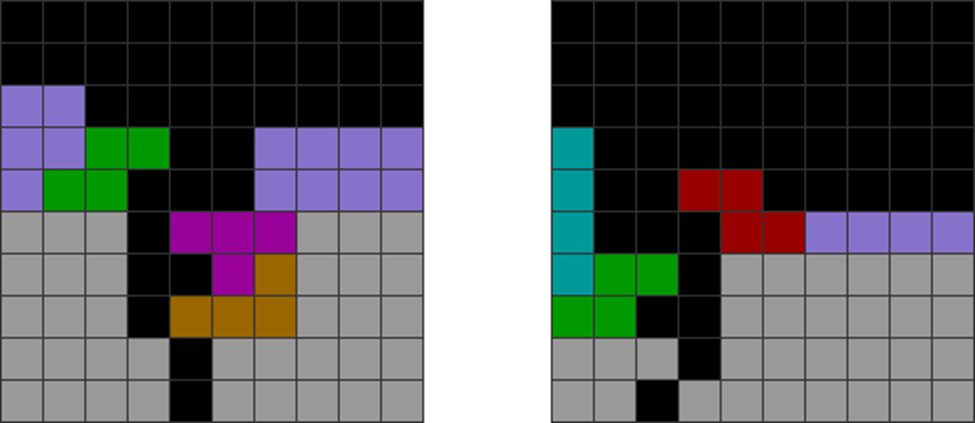
| Diagram Set 12-36 |


| These mid-game situations for C-spin happen most mid-game, per my experience. |
| Diagram Set 12-37 |

| These six follow-ups follow from set 12-36’s six opportunities, respectively. |
6) Cut-Copy Variants
A Cut-copy gives two T-spin doubles.
They are as effective as a Fractal. However, they block the garbage hole, making you vulnerable.
Here’s how to construct it below.
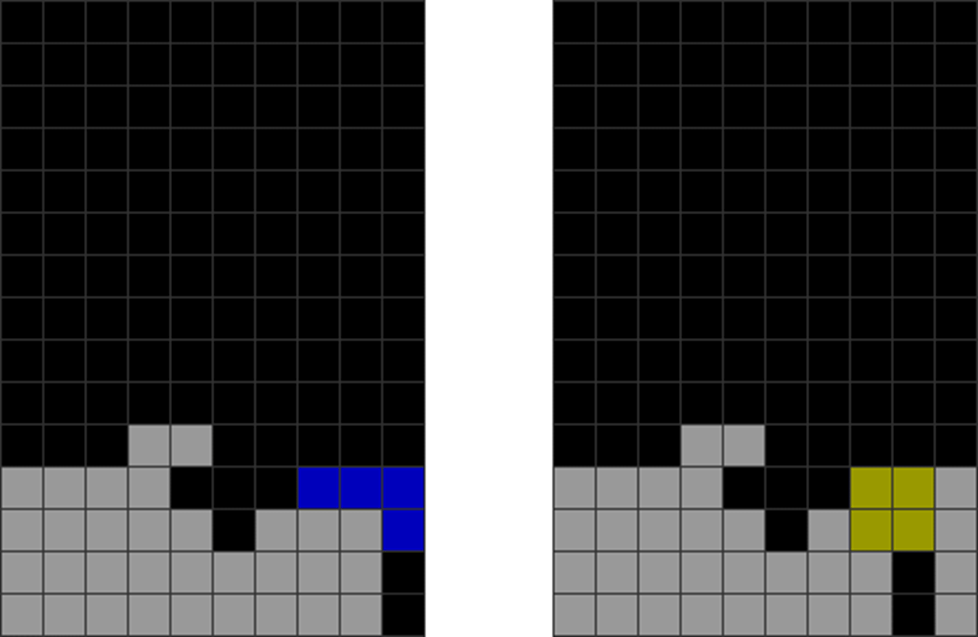
| Diagram Set 12-38 | |
| 1 | 2 |
| The starting field. | It is common to put the S over the cavity like this, then fill the lavender blocks to make a Cut-copy. |
| 3 | 4 |
| The first T-spin double finishes. | This leads to a second T-spin double. |
Summary and Conclusion
This chapter covers mid-game T-spin props and donations, which should quickly make you proficient in Tetris.
The other named T-spin methods are the most common and practical in the canonical corpus of seasoned Tetris experts.
| Summarized Rules-of-Thumb | |
| Flow | Be familiar with all T-spin donations’ and props’ continuations, and use only the best ones. Don’t unthinkingly go for or force a T-spin setup without paying attention to their risks and piece dependencies. |
| Form | T-spin donations and props should be as clean as possible. T-spin donations can be constructed non-linearly (out of order) with spins and soft drops. Memorize all mid-game piece combinations when making basic T-spin props and donations. |
| Balance | Choose safer, simpler T-spin props over complex ones. |
