This chapter covers essential Tetris beginner habits. Most beginner and intermediate Tetris players forget these key practices. Thus, it results in the following:
- Improper, imbalanced, and excessive stacking
- Setup failures from failing to note piece and field dependencies
- Excessive slowdowns and hesitation
Knowing this chapter’s core methods can minimize the above three problems.
1) Vital Mid-game Habits
Every piece should be used as much as possible to achieve the most significant effect. However, none is as crucial as the T and I pieces.
As far as you can, construct your setups by assigning heavy priority to hold T and I. This is so you can use T-spins (to be covered later) or Tetrises for defense or offense as much as possible.
For instance, in this case, here are two choices:
| Diagram Set 2-1 | |
| A | B |
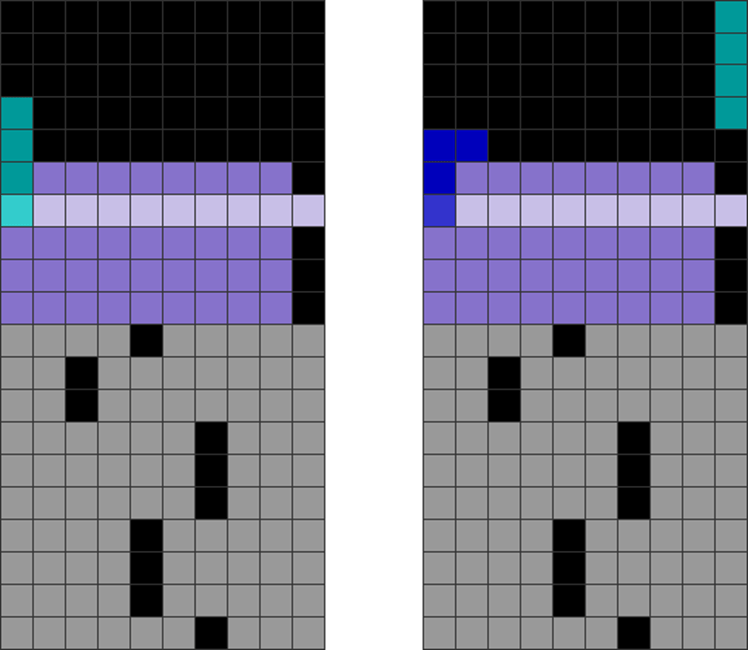
| The player puts an I at the left corner to downstack with a single. | The player skims with a J piece with a single. He then uses a Tetris to do a quad. |
A may prevent you from making the much-needed Tetris for defense since the second I may take 12 pieces to arrive. Thus, a better option, B, is to hold the more strategic I piece, then skim with another piece so you can use the I piece for the Tetris afterward.
Some cases require a perfect piece:
| Diagram Set 2-2 | |
| 1 | 2 |

| The player puts a horizontal L to downstack through the cavity. |
Putting an L to downstack is usually the most optimal way to downstack through step 1’s commonly occurring jagged pattern in columns 3 to 5. You may wish to prioritize holding this L piece to do so.
The same is true for every downstacking decision. Sometimes, you want to avoid unnecessary upstacking over a particular area, so you need a specific piece to downstack through. Prioritise holding it.
2) Minimizing Soft Drops
I recommend avoiding setups that need two or more soft drops. This is because soft drops in guideline Tetris are very slow and incur a significant opportunity cost.
This illustrates such:
| Diagram Set 2-3 | |
| 1 | 2 |
| The player makes cavities that can fit an L and J piece. | The player soft drops both into each respective cavity. This takes up to two soft drops. |
This severe soft drop penalty gives an opponent more time to strike you while you waste time by not building up an attack or defense.
Excellent players only use minimal soft drops when appropriate.
3) Avoid Excessive Skimming and Dirty Downstacking
Many beginner and intermediate Tetris players often skim excessively. Skimming is suitable mainly for misdrop recovery or manipulating a field’s shape to make it easier to downstack or make other vital setups.
Sometimes, you may get situations where you do these:
| Diagram Set 2-4 | |
| 1 | 2 |

| The garbage is scattered and dirty. | The player skims and incurs 2 line clear delays with L and S. |
| 3 | 4 |

| This causes the orange blocks from the L to upstack and block the garbage hole. | The player upstacks a bit more with O and J. |
| 5 | 6 |
| He then excessively and inefficiently skims with J and L pieces. | He finally skims with L, T, and S to clear the colored blocks to get to the garbage hole. |
This skimming spiral is deadly as you have little pressure and incur many line clear delays. It’s essential to avoid this non-stop skim-and-upstack-and-skim cycle.
Instead, they could have used the opportunity cost to upstack to a Tetris or T-spin. This sequence is bad because poorly stationed blocks block the garbage hole. This deals minimal garbage per line clear, culminating in low efficiency.
To avoid it, upstack a bit first before downstacking. For optimal effect, it is better to stack fast. Top players do this by upstacking a bit before downstacking to avoid the deadly spiral.
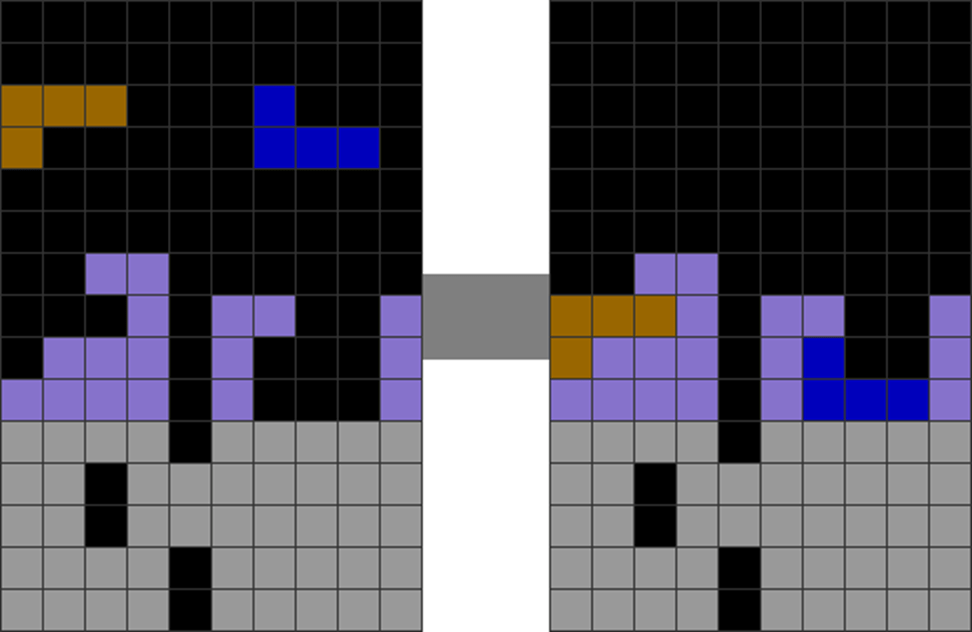
Here’s an illustration:
| Diagram Set 2-5 | |
| 1 | 2 |

| The garbage is scattered and dirty. | The player upstacks the lavender-colored blocks around the cavity. |
| 3 |
| This player starts a downstack combo sequence with T, J, Z, and I pieces, respectively. |
Here, the player upstacks and makes a stack with minimal field divisions in step 2. This leads to smoother downstacking with a lower probability of residue upstacks over the incoming garbage holes. It also has more downstack combos for greater offensive power.
There are situations best learned and recognized while playing.
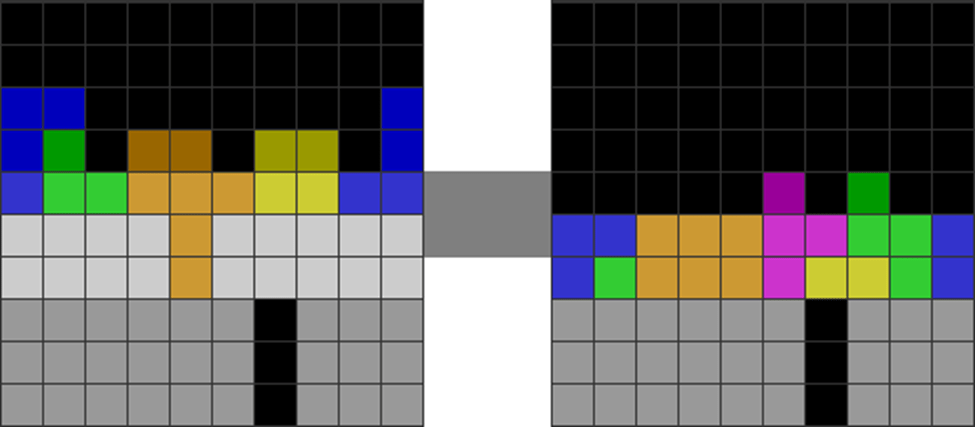
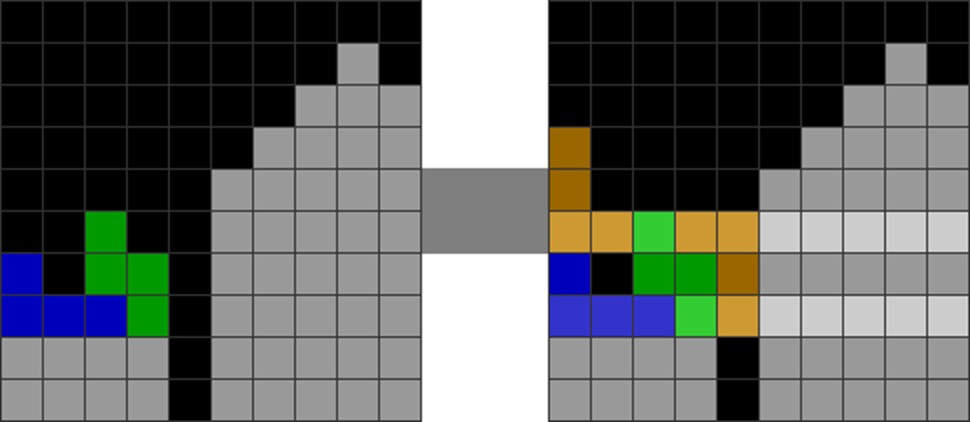
Whenever a player sees that one can only get tiny combos while downstacking, such as below, one could instead upstack to a T-spin or Tetris. Likewise, if one envisages that a downstack would not lead to a clean field, it is better to upstack. Here’s how:
| Diagram Set 2-6 | |
| 1 | 2 |

| The garbage is scattered and dirty. | The player upstacks around the cavity. |
| 3 | 4 |

| The player line clears with a perfectly clean Tetris, exposing the next garbage hole. |
This (i) downstacks to the bottom with fewer required pieces and (ii) maximizes damage.
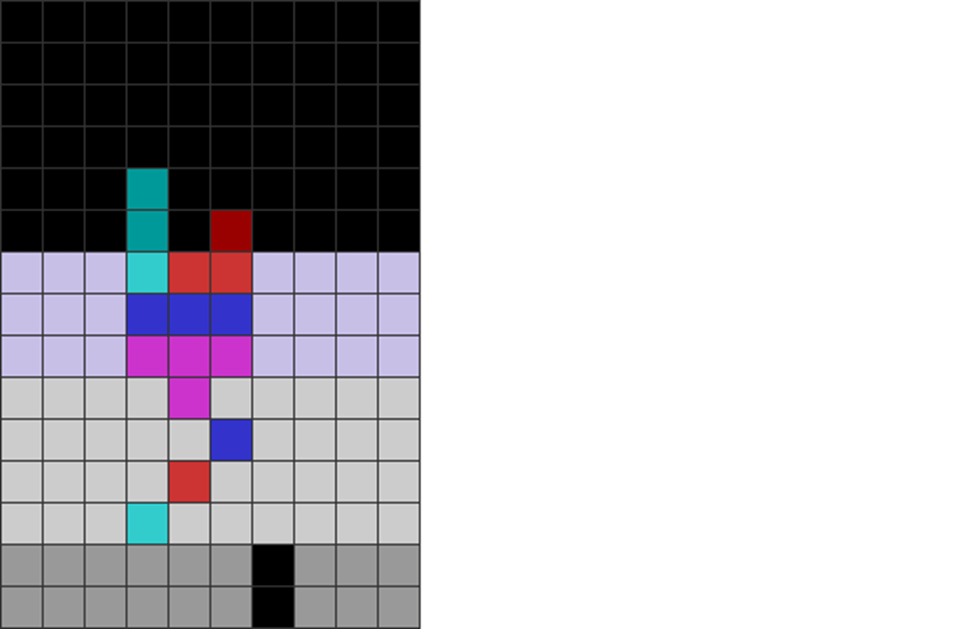
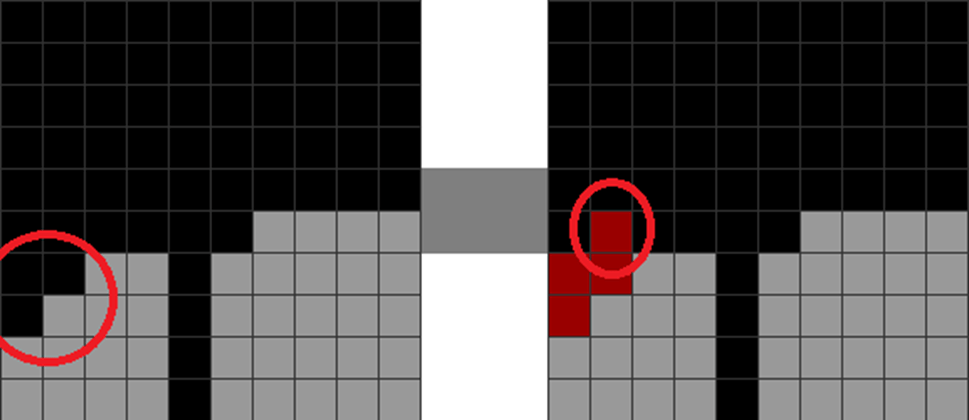
These below are common beginner downstack mistakes. Beginners often make unclean skims or downstacks that leave a residue over future garbage holes.
This is inefficient, as the top residue must be skimmed off before continuing downstacking. These placements should only be used in the most dire situations:
| Diagram Set 2-7 | |
| 1 | 2 |
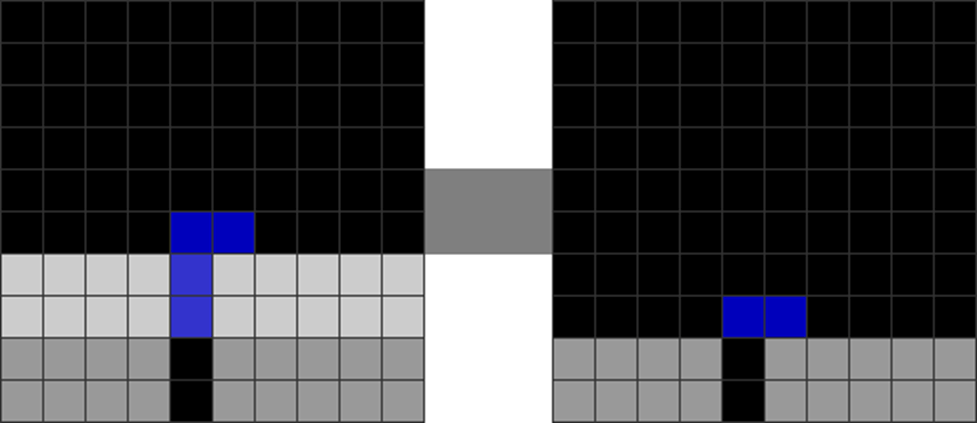
| A J skim leaves two blue blocks blocking the next garbage hole. |
| Diagram Set 2-8 | |
| 1 | 2 |
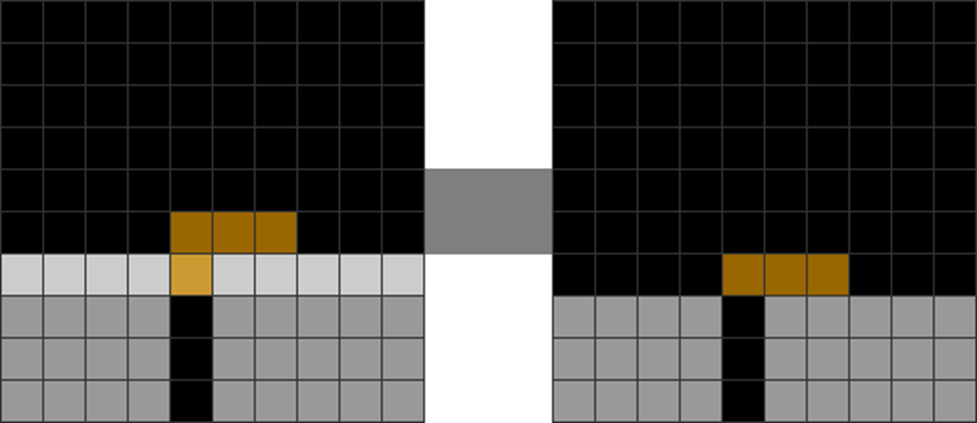
| An L skim leaves orange blocks blocking the next hole. |
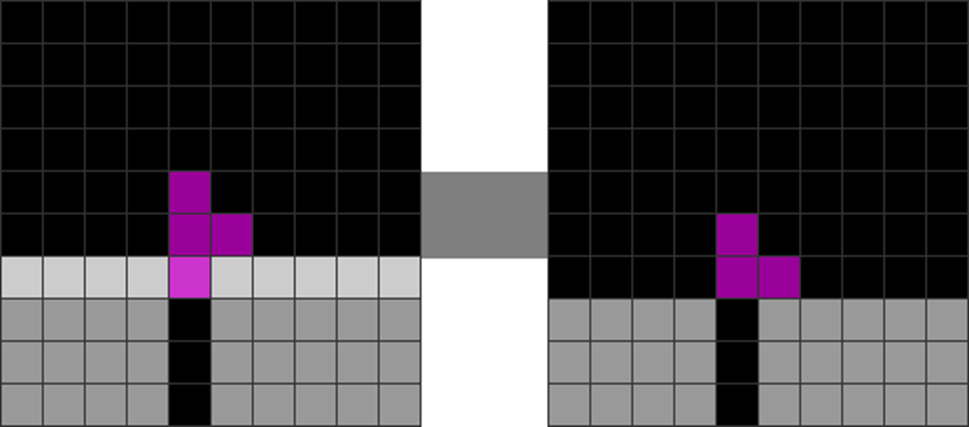
| Diagram Set 2-9 | |
| 1 | 2 |

| An S skim covers the next garbage hole with green blocks. |
| Diagram Set 2-10 | |
| 1 | 2 |
| Same with a T skim. |
The four sequences here are dirty, as after the line clear, they leave a residue that blocks the garbage hole in the fifth column. They are best avoided.
It is advised to use clean skims that expose the garbage hole after the line clear to enable smoother downstacking.
4) Don’t Force Setups
Forcing setups is defined as trying (and failing) to create a setup when the field and incoming preview pieces do not allow for its construction.
Many players force setups and try to do things like maintain non-stop back-to-back bonuses, such as:
| Diagram Set 2-11 | |
| 1 | 2 |
| The player upstacks to make a perfect Tetris in step 2. |
However, the incoming previews may not allow such a luxury. This causes one to waste pieces by placing the incoming pieces in undesired areas while waiting for the right ones. This leads to overstacking in those areas.
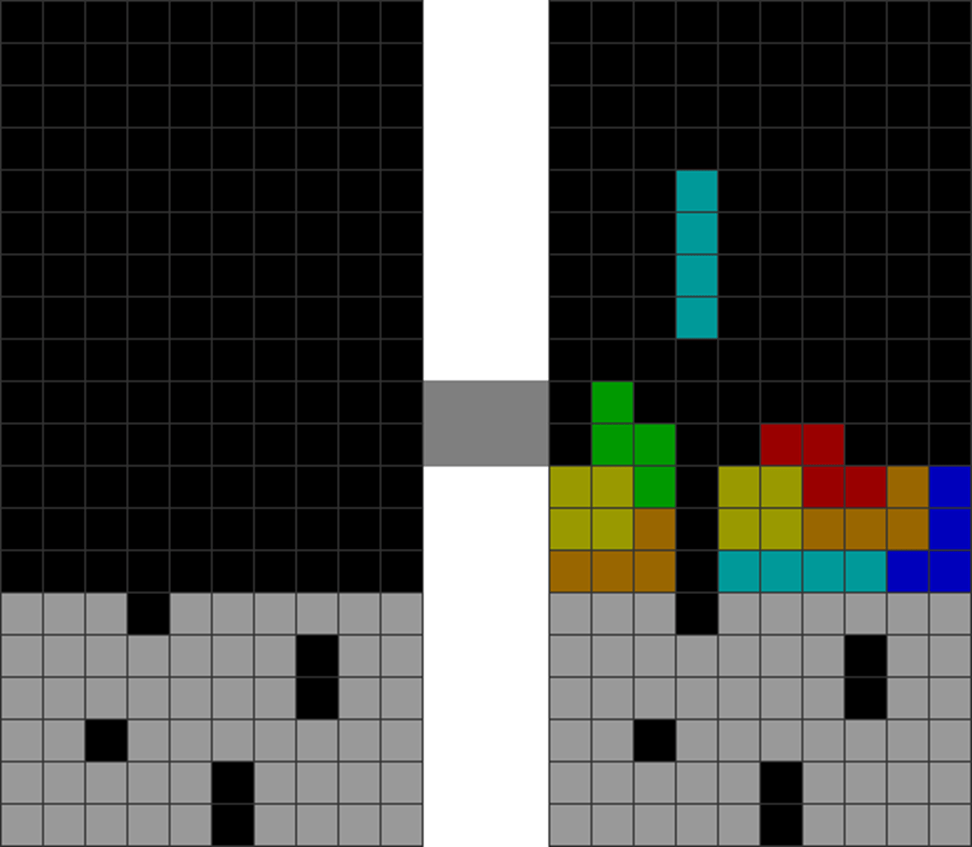
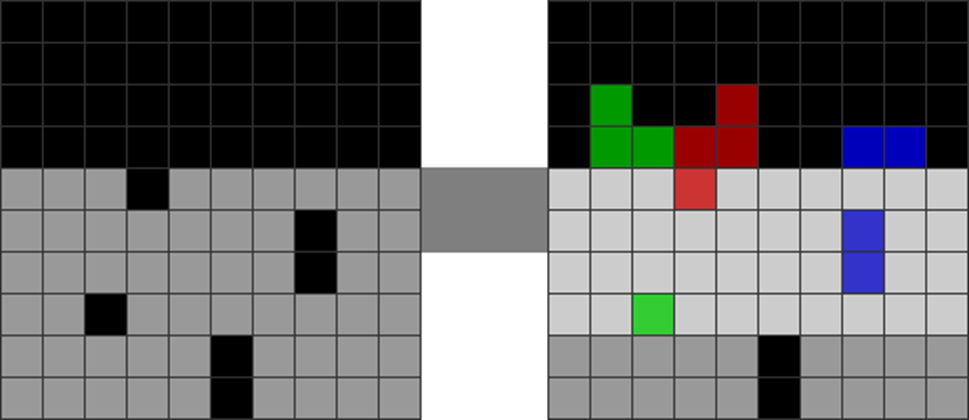
Forcing setups can do this:
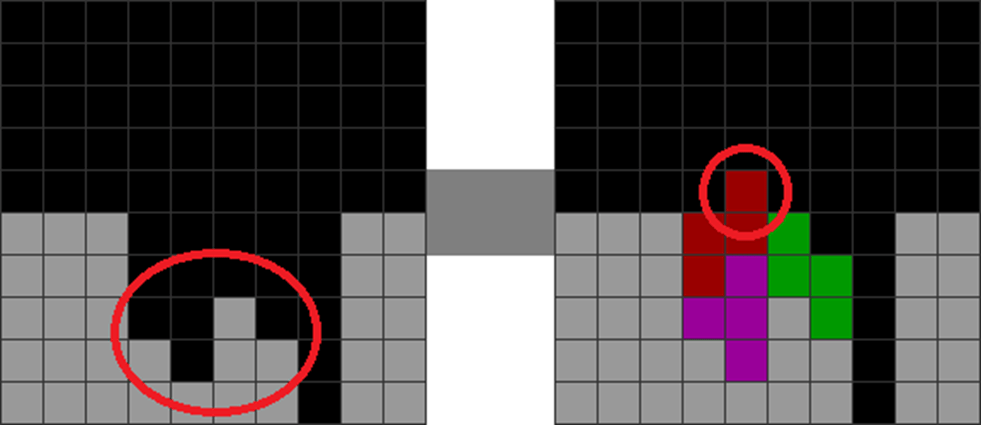
| Diagram Set 2-12 | |
| 1 | 2 |
| A player tries to force a T-spin with J, Z, and O, using Z as an overhang. | The Ts are not in the previews. While waiting for Ts to arrive, he puts all incoming pieces on the left and right sides (red circles). |
T-spins will be covered later. For now, it is a powerful attack that sends as much damage as a Tetris.
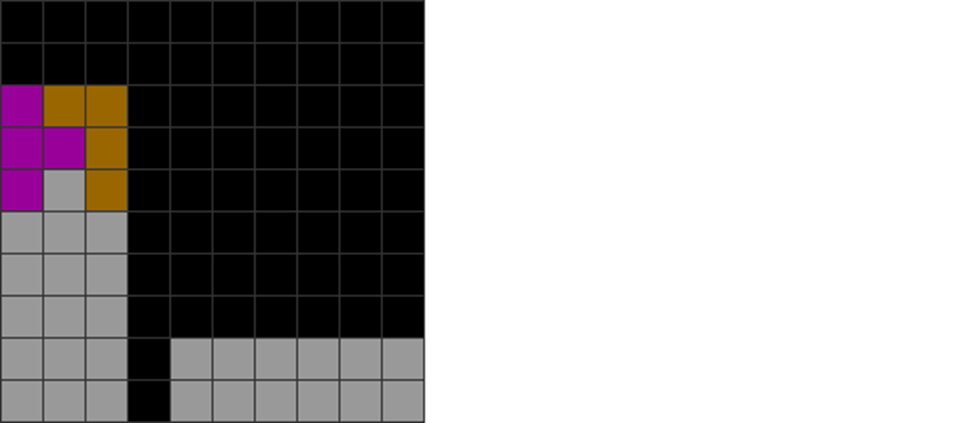
This leads to overstacking. Instead, one can do this below, where sometimes, even the following downstacking options are the most efficient:
| Diagram Set 2-13 | |
| 1 | 2 |
| The player chooses the most immediate pieces available, such as S, Z, and J, to downstack, as there may not be other more efficient setups. |
He may not have the right pieces to make a more robust setup like a Tetris.
Downstacking in diagram 2-13 breaks the back-to-back bonus and may seem inefficient compared to upstacking to a Tetris. Also, the vertical S and Z pieces jut out and uneven the field in step 2. However, sometimes, given the field and preview, it may be the only option.
Therefore, I suggest choosing the most strategic and efficient placements based on the situation and not forcing them.
5) Minimizing Imbalanced Over-stacking
Over-stacking happens when a player places pieces in a way where one area of the field (several columns wide) is far higher than the rest. This is discouraged because of the following reasons:
- The over-stacked part can block future garbage holes, making it hard to downstack.
- It reduces T-spinning opportunities and pressure.
- In terms of time, it wastes opportunity cost to create the following setup for an attack.
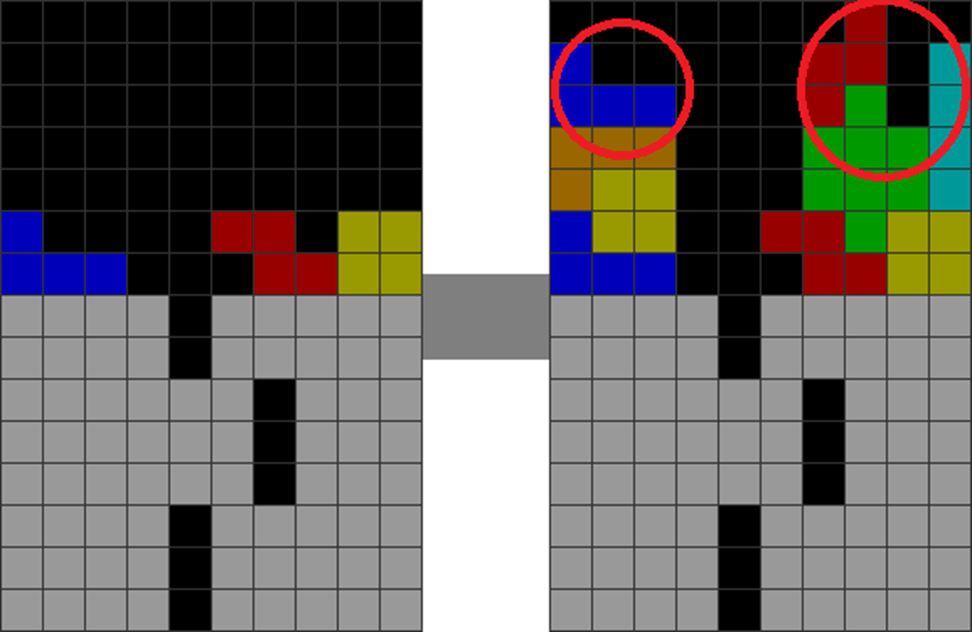
A flatter field is essential as if you stack too tall, you end up with situations like this if you suddenly get hit by garbage:
| Diagram Set 2-14 | |
| 1 | 2 |

| The player overstacks, leading to an overstacked center. | He then receives three lines of garbage. |
Because of the random nature of garbage, it so happens that the three garbage lines (in the bottom red circle) are directly beneath the most overstacked part (the top red circle).
A player thus has difficulty downstacking to the required garbage hole, as every piece of that column must be skimmed off before accessing the garbage hole. If you stack flatter, however, you can open up easier access to garbage holes.
However, one shouldn’t stack way too flatly like this:
| Diagram Set 2-15 | |
| 1 | 2 |

| The player stacks too flatly. | He has no choice but to place S horizontally, leaving a cavity beneath the S piece’s jutting part. |
The player must then use a J soft drop to fill the cavity beneath the S piece, which wastes time and slows one down.
Avoid situations where the stack is over-stacked on one side or creates a well in the middle like this in step 1:
| Diagram Set 2-16 | |
| 1 | 2 |

| This shows an overstacked right side compared to the left. | The player upstacks the left three columns as quickly as possible. To avoid a well in the middle, he adds two vertical I pieces. This leaves a central, one-block column. |
To resolve step 1, upstack the under-stacked side until both sides are more balanced.
For imbalanced situations where one side is overstacked, fill the lower-stacked part as soon as possible.
This makes it easier to make T-spin doubles, which will be covered later.
If you can’t get the right pieces to upstack appropriately, you can do this:
| Diagram Set 2-17 | |
| 1 | 2 |
| This field is extraordinarily jagged and irregular, preventing flat O, L, and J placements. | He skims with two L pieces to flatten the stack. |
If you cannot get the right pieces to stabilize the stack correctly, try to skim off using other pieces as soon as possible.
6) Avoid the Most Common Dead-end Patterns
Avoid dead-end patterns that lead to few or no new T-spins or follow-ups. They often result when some pieces combine to make patterns with poor continuations.
Please remember these three shapes below. They are the three most common dead-end patterns that I have encountered mid-game. Avoiding these can vastly improve your consistency.
| Diagram Set 2-18 | |
| 1 | 2 |
| Avoid this red-circled pattern as far as possible. | Because putting a Z like this still leads to a jagged pattern in this new red circle. |
| Diagram Set 2-19 | |
| 1 | 2 |
| Avoid this red-circled pattern as far as possible. | Because putting a T followed by S and Z like this still leads to a jagged pattern in this new red circle. |
| Diagram Set 2-20 | |
| 1 | 2 |

| Avoid this red-circled pattern as far as possible. | Because putting an S and I like this still leads to a jagged pattern in this new red circle. If you put the S first, you get an I-dependency in column 1. |
Terrible patterns such as these lead to awkward stacking continuations.
One should avoid them at all costs. However, if they cannot be avoided, here are the correct ways to fix them:
| Diagram Set 2-21 | |
| A | B |

| C |
| These three solutions correspond to diagram sets 2-18, 2-19, and 2-20 respectively. See how much smoother and flatter the follow-ups are. |
These patterns are still best avoided because they lead to T and I-dependencies. This means you cannot conserve them for major attacks like Tetrises and T-spins. Avoiding these patterns will save your T and I pieces for such attacks.
Summary and Conclusion
This chapter warrants multiple readings. Many novice players ignore key guidelines in this chapter. They gut themselves and meet dead-ends that end smooth continuations. Revising this chapter reduces such chances.
| Concept | Summarized Rules-of-Thumb |
| Flow | Keep vital pieces on hold. Minimize soft drops. Avoid excessive skimming and dirty downstacking. |
| Form | Avoid the most common dead-end patterns. Manage T pieces well. |
| Balance | Don’t force impossible setups, as they will slow you down. Ts and Is are the most essential pieces to hold. Minimize imbalanced stacking. Minimize overstacking. |
