Note: This is a modified version of book 4’s chapter, which is roughly of the same length.
A Disclaimer: TETR.IO and Educational Use
We are intruding into dangerous territory right now. This and the following chapters will feature all-spin mechanisms and setups, a continuation from Book 3’s All-Spin Guide chapter, which covers only basic all-spins.
This book focuses on official guideline Tetris games. It does not promote, endorse, encourage, or condone the use of any unofficial Tetris variants, including TETR.IO.
For illustration, analysis, and future-proofing of all-spin mechanics, I occasionally reference TETR.IO solely as a tool to demonstrate theoretical setups. All-spin setups in this book are non-official and intended for educational purposes.
Readers should adapt these methods according to the rules of the official Tetris games they play. Some spins that do not work in TETR.IO may work for other variants.
Introduction
In certain Tetris games like TETR.IO, all-spins are granted back-to-back bonus (all-mini+ system), and they help start or sustain it. This adds another way to sustain firepower through back-to-backs.
However, many players overuse all-spins. In many Tetris versions, all-spins are not as powerful as T-spins and do not have the latter’s attack power bonus.
Therefore, one cannot mindlessly spam them. They should, at most, be peripheral to T-spins and Tetrises.
However, some Tetris variants introduce back-to-back chaining or charging, which makes all-spins more powerful and prioritized. In these games, every back-to-back sustained adds to a counter, which is released as extra garbage later (surge). Hence, sustaining back-to-backs to gain this extra attack bonus with all-spins is vital.
This chapter features all-spin methods to sustain back-to-backs, including meta methods that lead to a clean stack with maximal firepower, often incorporating T-spins within.
Methodology
Most traditional official guideline Tetris games do not let all-spins (non-T-spins like L or S-spins) have damage bonuses. Some unofficial Tetris games, like TETR.IO, offer bonuses.
Based on current trends, I strongly predict that future official guideline Tetris games may incorporate bonuses into all-spins. In these games, all-spins may grant back-to-back bonuses or be granted T-spin-like bonuses. However, this is subject to speculation.
I have written the following all-spin chapters to future-proof this book in case such an event occurs. However, many of these all-spin setups are already applicable to the previously mentioned Tetris versions.
In these chapters, I will assume the current all-spin SRS kick mechanisms from official titles like Puyo Puyo Tetris or Tetris 99. I do not consider other rotation systems, such as SRS-X or ARS.
I will also assume that all-spins are granted bonuses (such as back-to-backs) per the all-mini+ system in Tetris variants, such as TETR.IO. I chose this system because it is the purest and cleanest way to determine all-spin bonuses, making it more likely that future, official Tetris games may adopt it.
Methodologically, I used the Four.tris free Tetris software and TETR.IO to determine all-spin calculations. This provides standardization amidst the extreme inconsistency across too many Tetris variants.
All-Mini+ Systems
An all-mini+ system grants back-to-back bonuses to various spins based on the following conditions:
T-spin bonus determination is largely unchanged, using the 3- corner rule, except for the next clause.
Stationary/immobile T-spins are granted back-to-back bonuses.
Here is an example to illustrate clause (2):
Diagram Set 16-1
1
2
Starting field.
This grants back-to-back bonus in all-mini+ systems.
Here, the T piece, upon its final rotation within the cavity in step 2, “locks in” and cannot move up or down (hence the term “stationary”) if gravity reverses (I will explain this soon). It is, therefore, given a back-to-back bonus, similar to those in the following clause, which I will explain further.
3. All-spins (L, J, S, Z, and I-spins) are granted back-to-back bonuses if they fulfill 2 conditions:
Condition 1: The piece that is spun into the cavity results in a line clear.
Condition 2: The piece that is spun-in cannot move up.
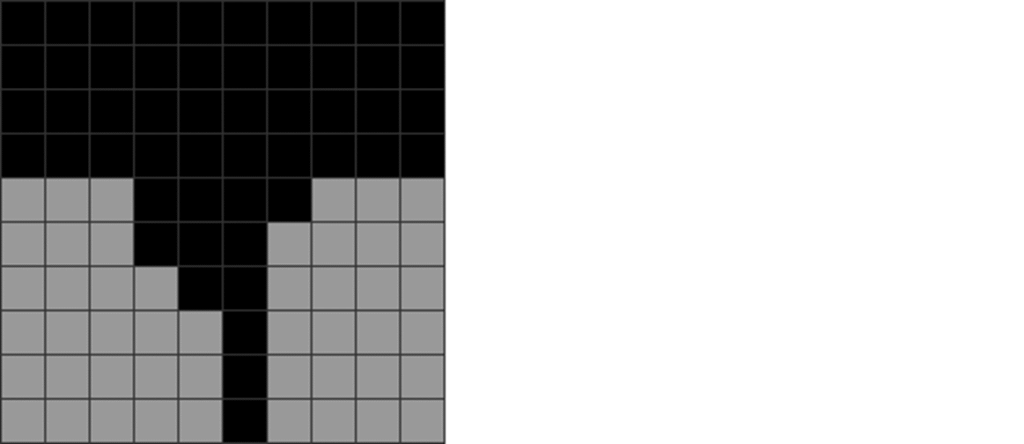
I illustrate condition 2 with the following:
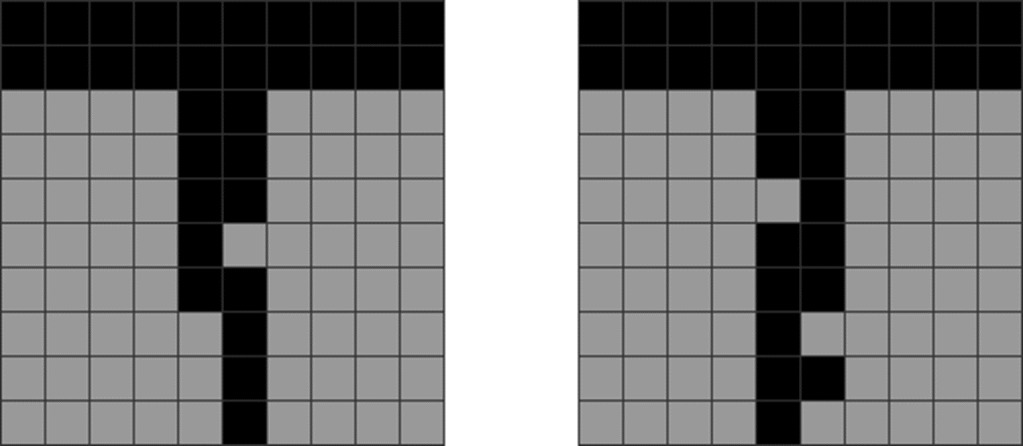
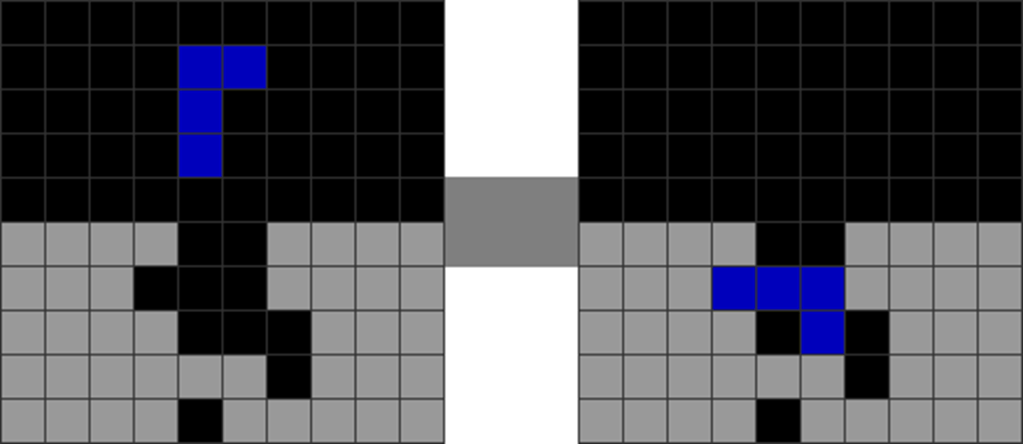
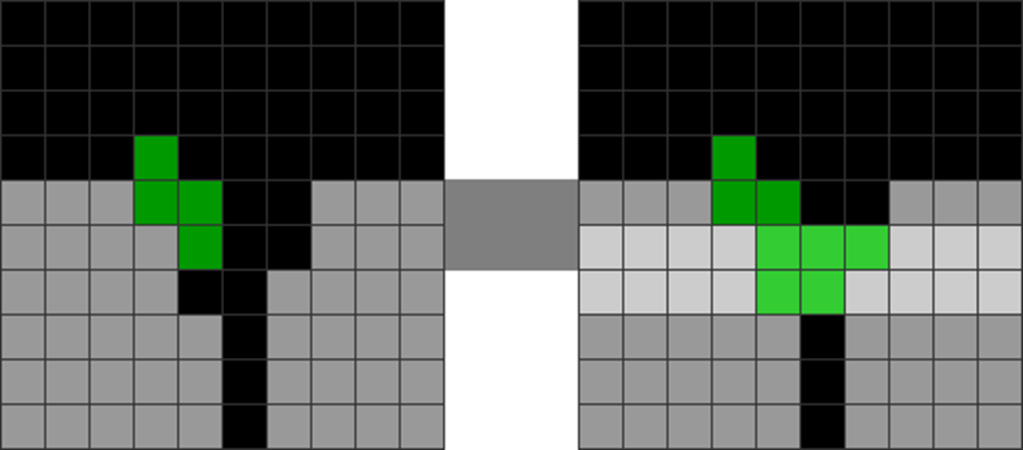
Diagram Set 16-2
1
2
A J-spin setup.
The J-spin single concludes. However, in TETR.IO, this is not given back-to-backs.
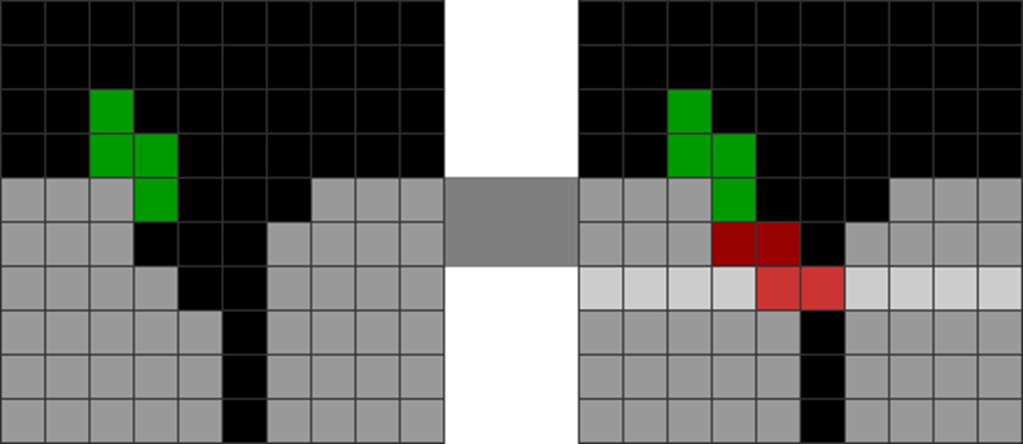
This is why:
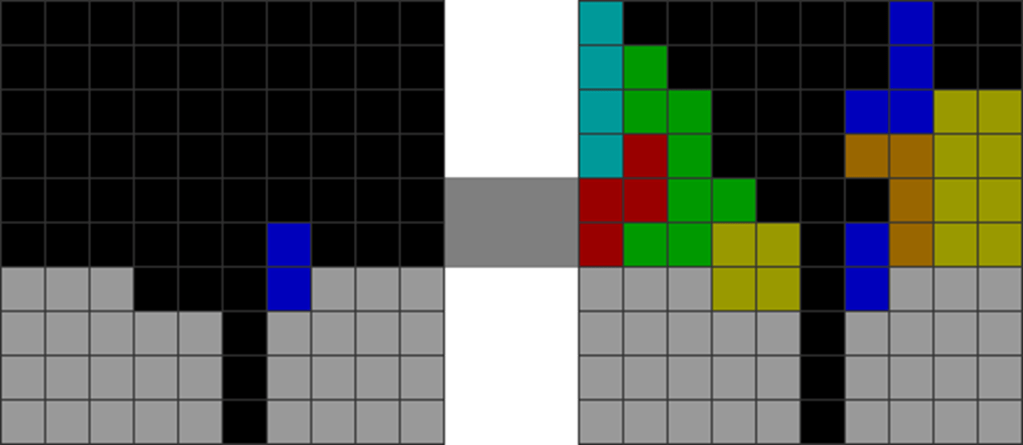
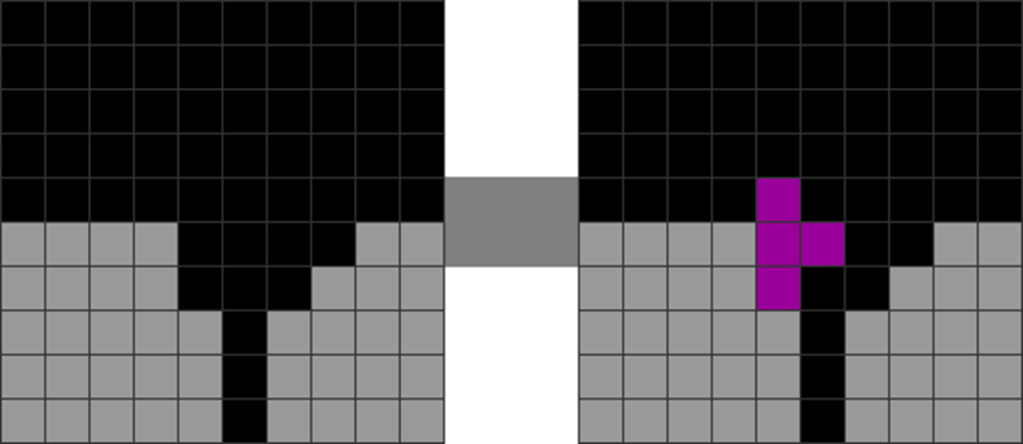
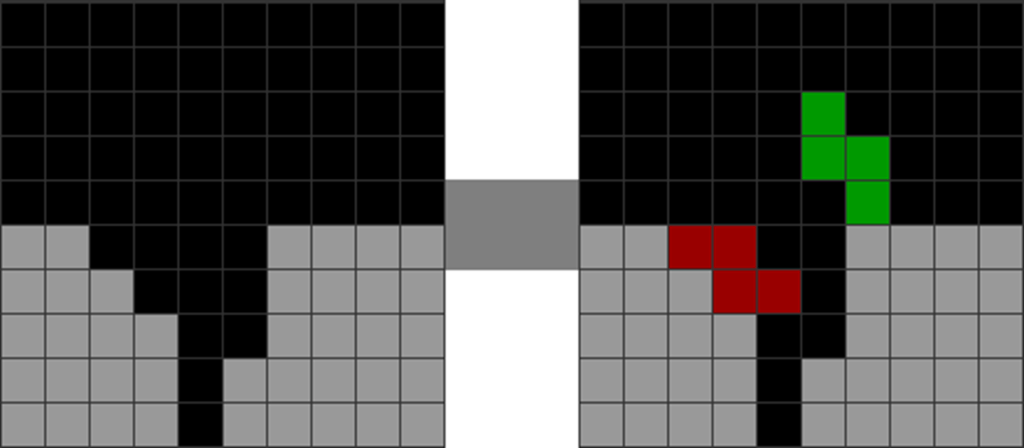
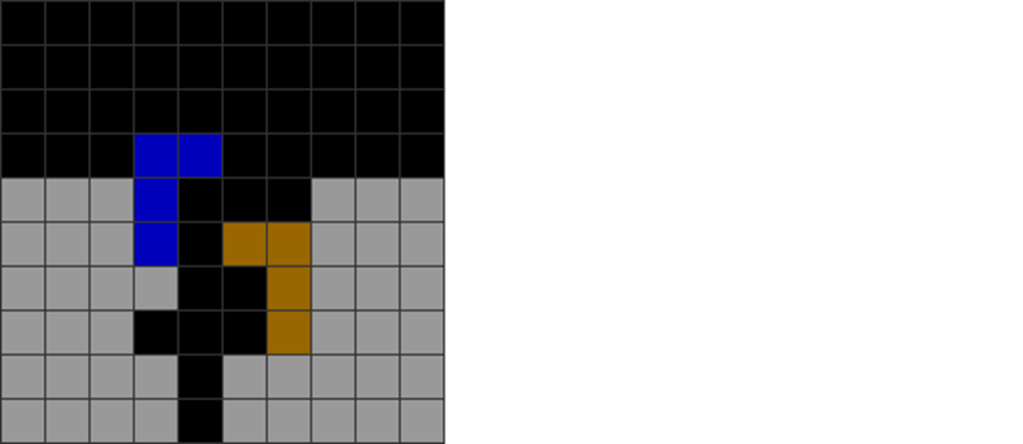
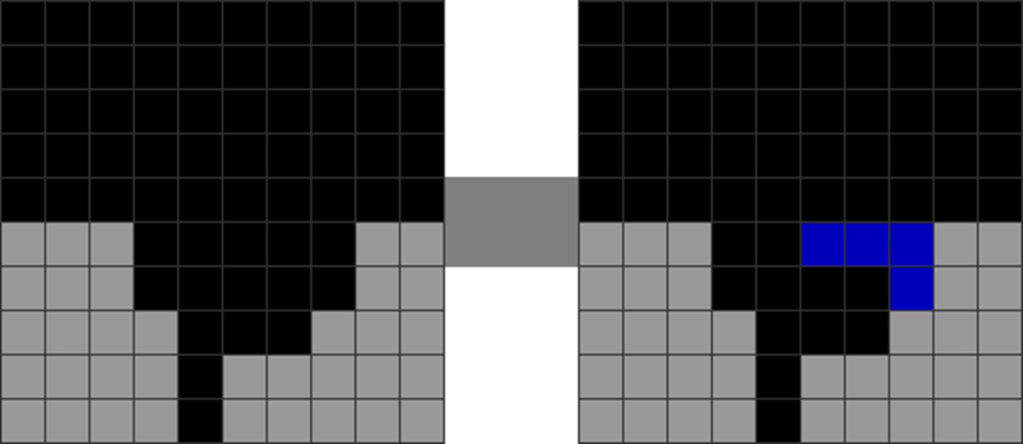
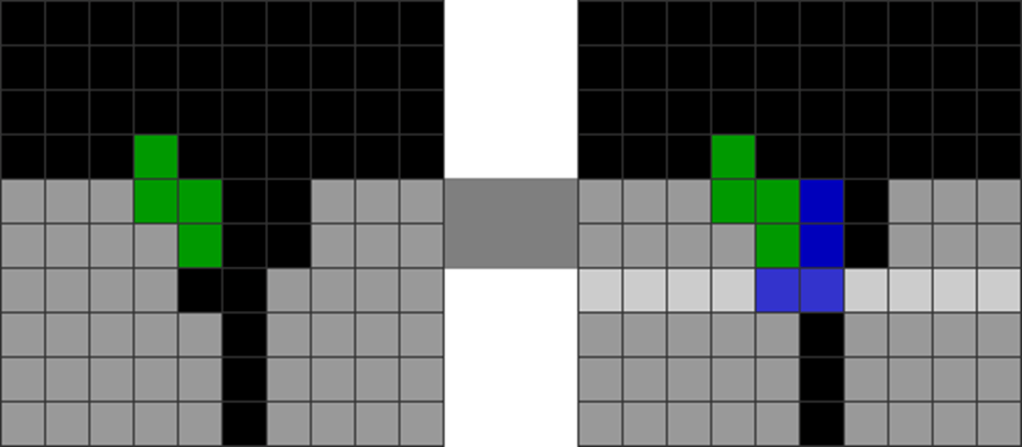
Diagram Set 16-3
1
2
Let us assume that gravity reverses.
Because nothing immediately blocks the J piece, it will move upwards.
The above is not considered an all-spin that is granted back-to-back bonuses in all-mini+ systems. When the piece has been spun into the cavity, and let us assume that gravity suddenly reverses. The spun-in piece can go upwards in step 2, as there are no filled blocks immediately obstructing it. This also explains the same logic as diagram set 16-1 regarding the stationary/immobile T-spin earlier.
For similar methods in this chapter, I will write the following line above them: X – Not in TETRIO / Varies ↓
This means that the most immediate diagrams (typically 2 fields) beneath this line do not have their all-spins be granted back-to-back bonuses in some Tetris variants (like TETR.IO). This may vary in other Tetris versions.
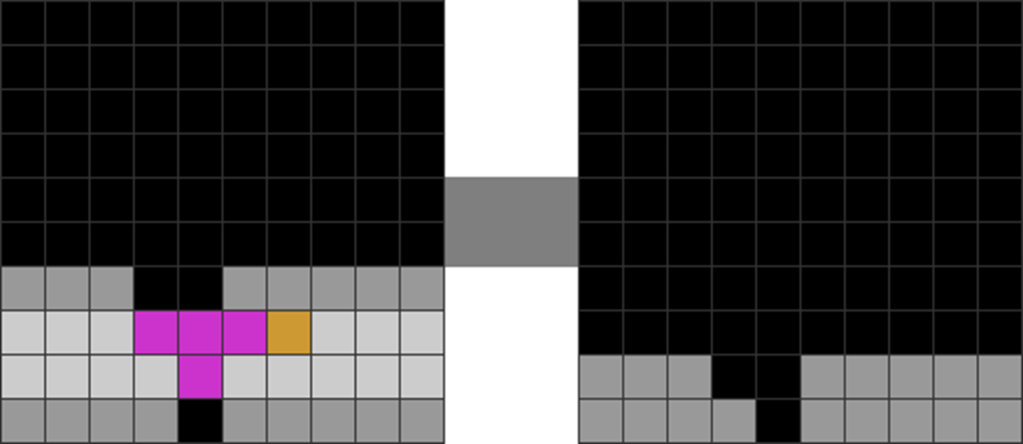
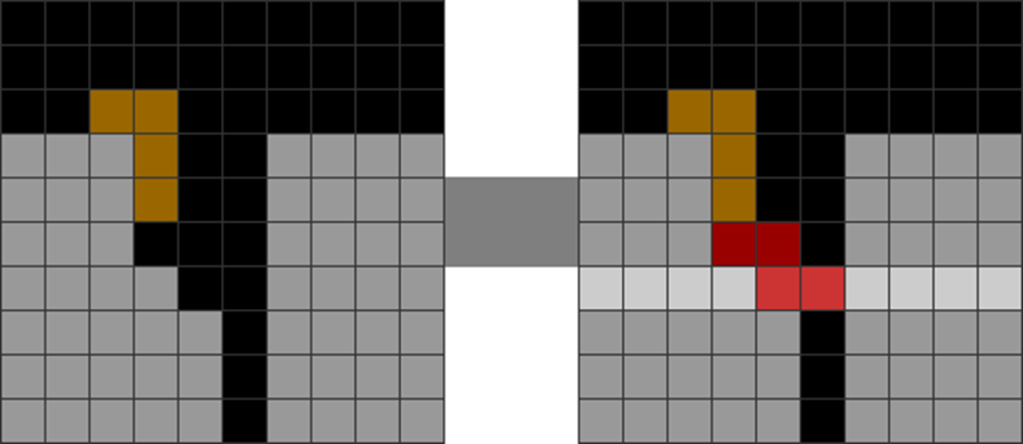
Hence, this is the format and an example:
X – Not in TETRIO / Varies ↓
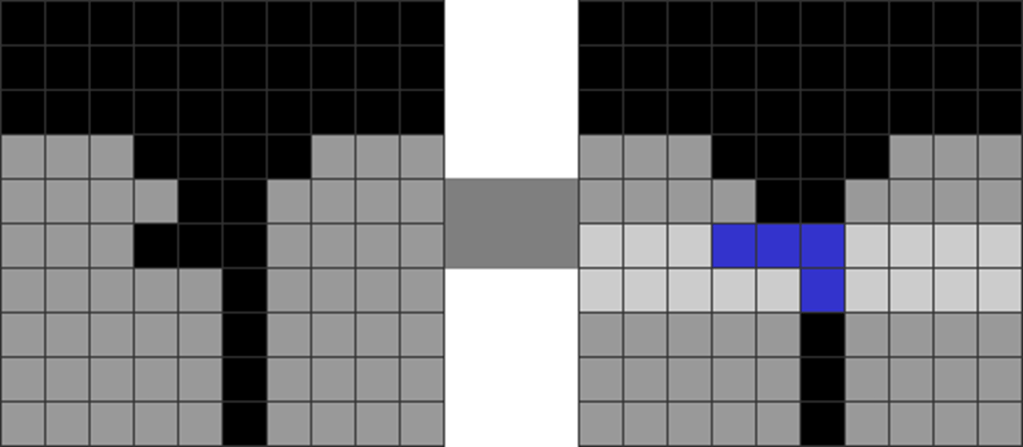
Diagram Set 16-4
1
2
An STSD.
The L piece spins into the cavity, but it can move up. Hence, the L-spin is not given back-to-back bonus in TETR.IO.
However, such methods are still useful skims, as the skims within can shape the field into another T-spin, all-spin, or downstack combo setup.
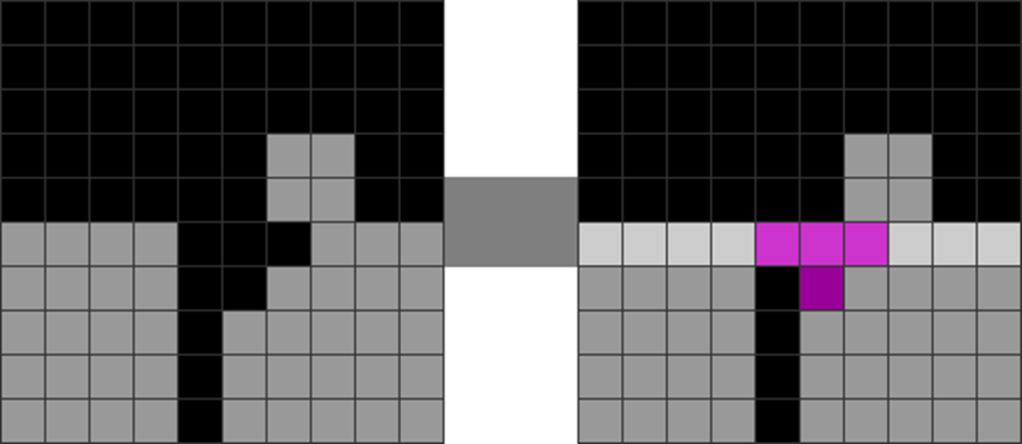
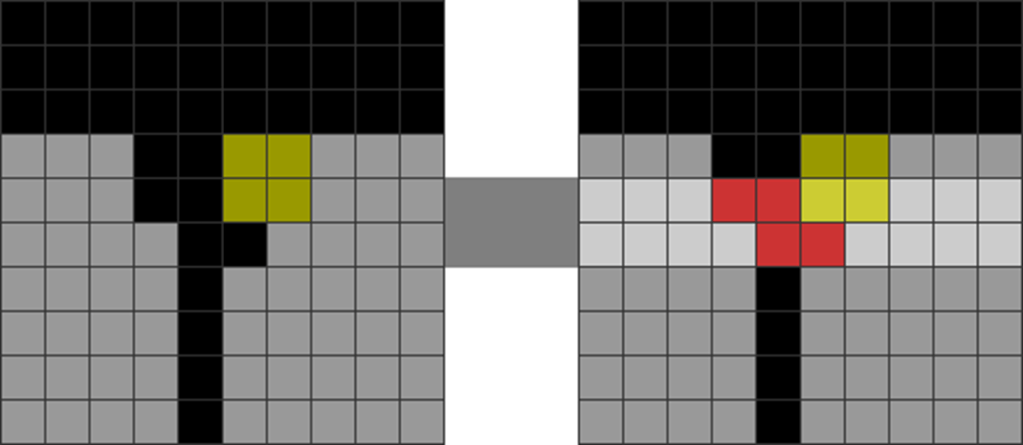
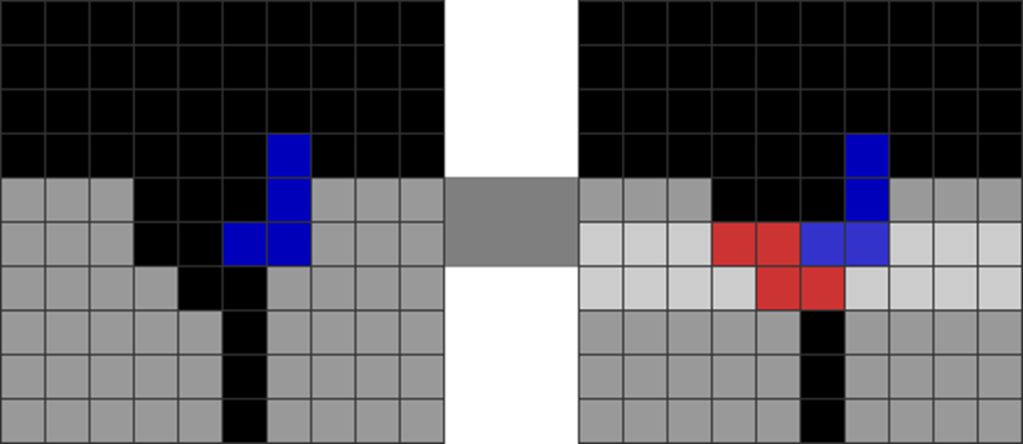
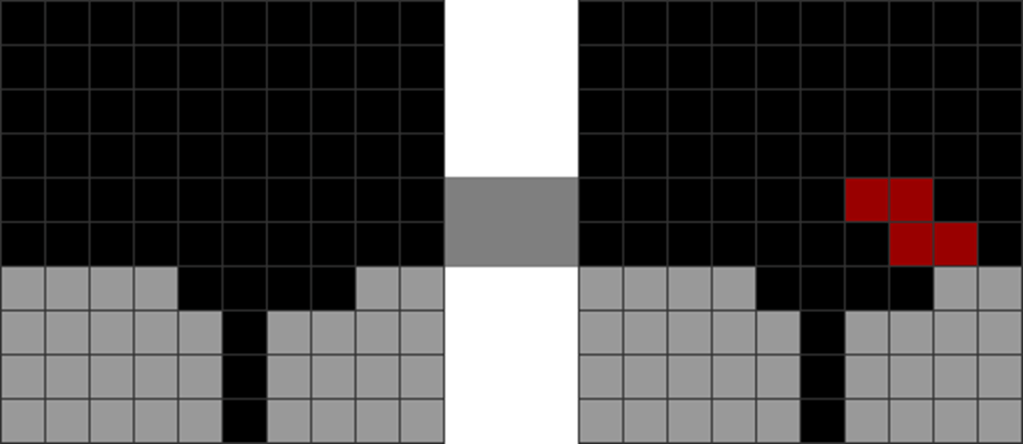
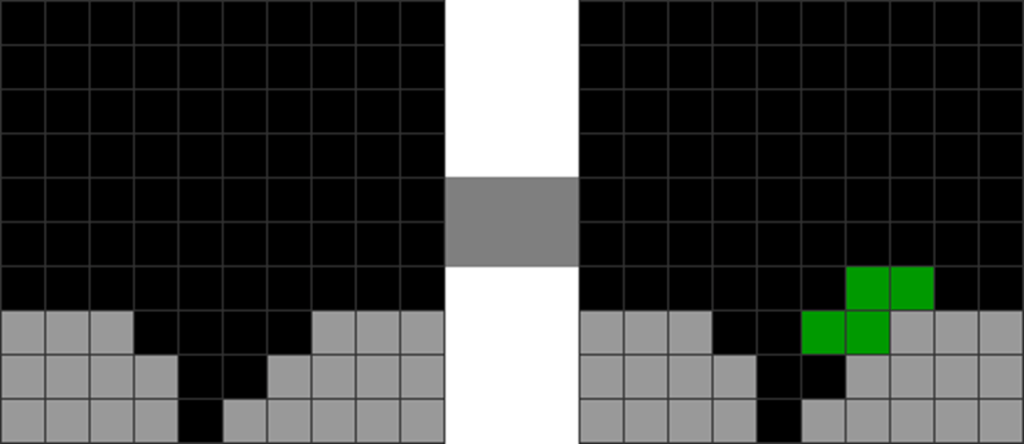
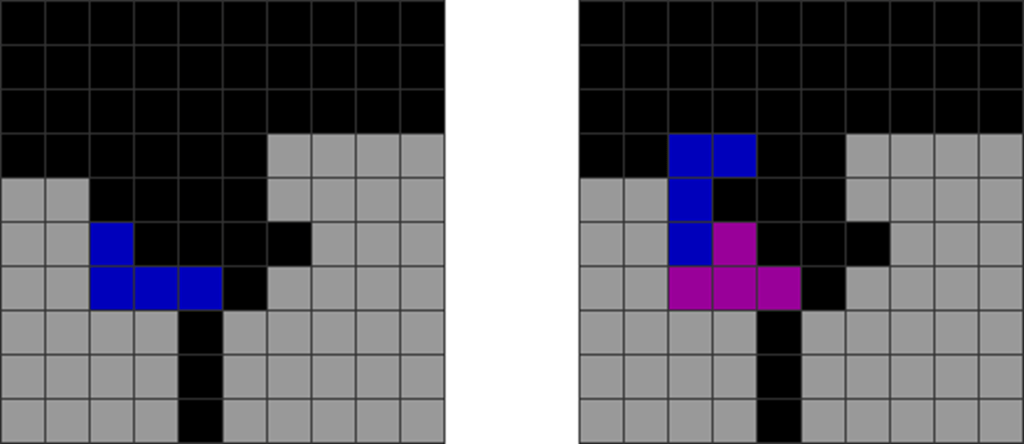
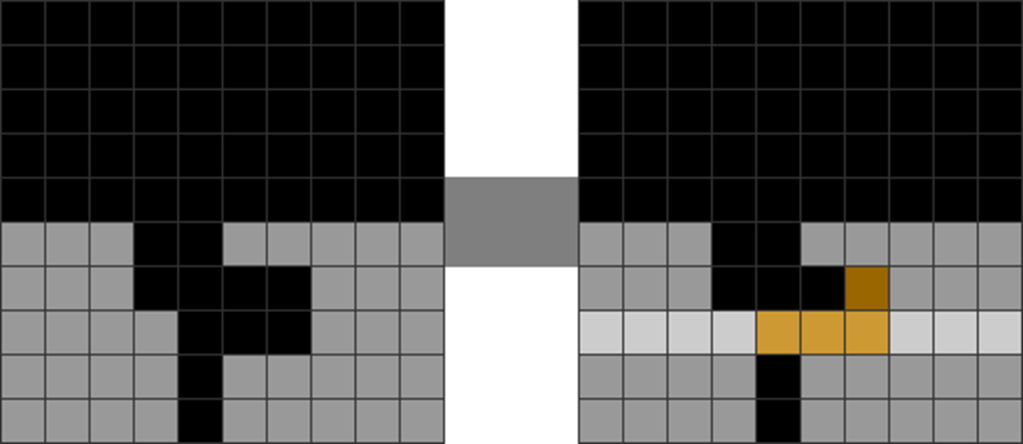
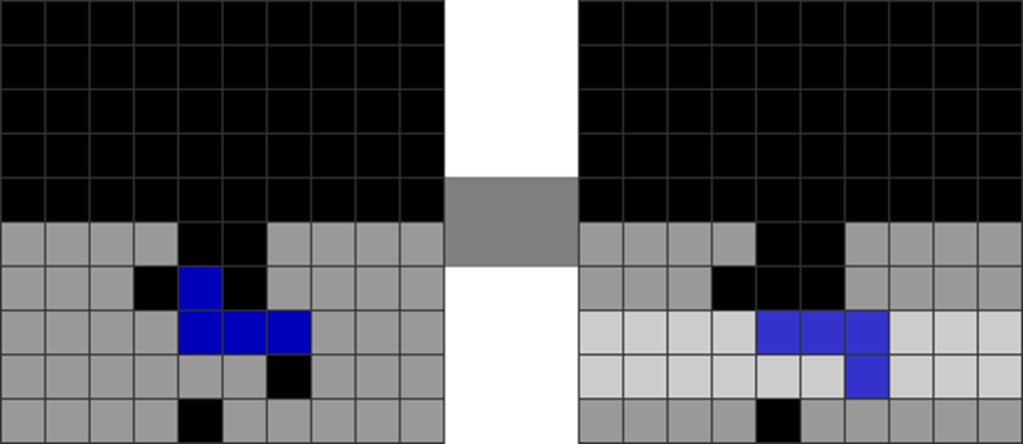
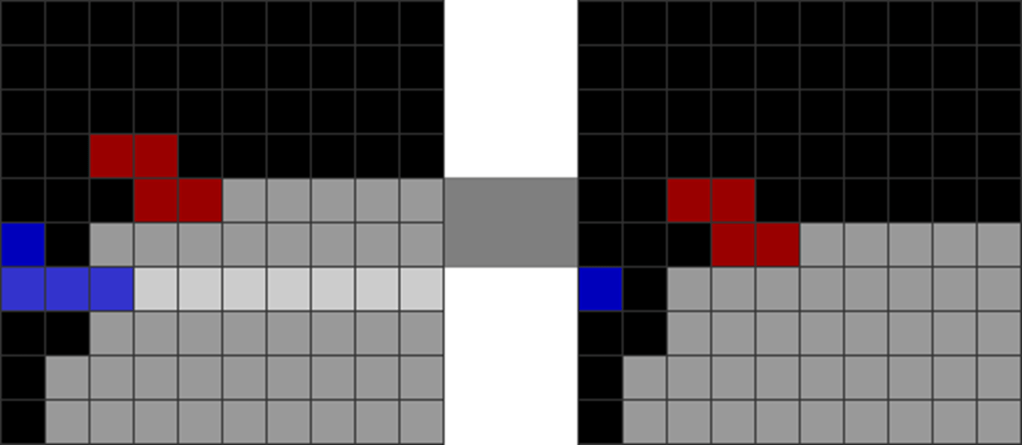
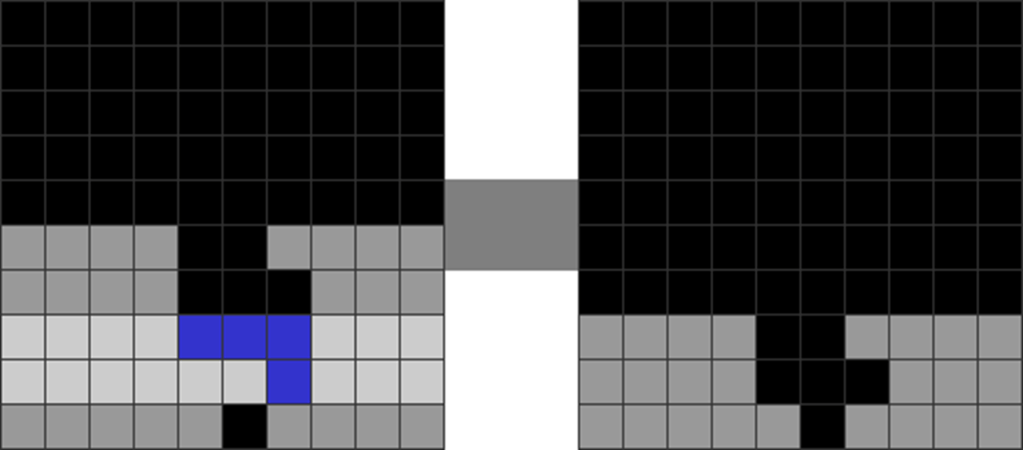
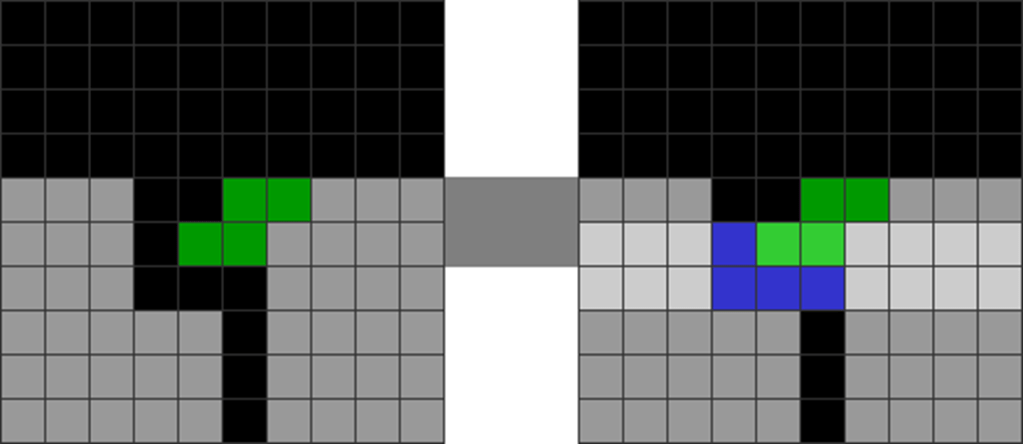
Conversely, the following does the opposite:
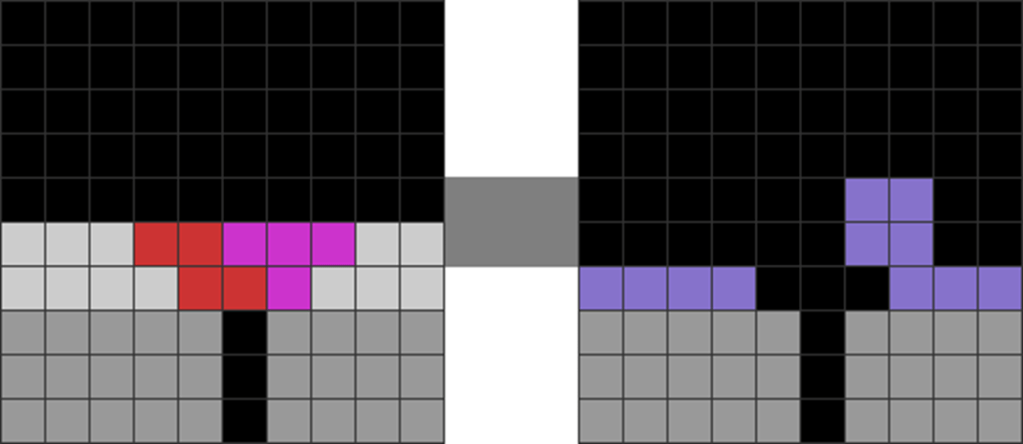
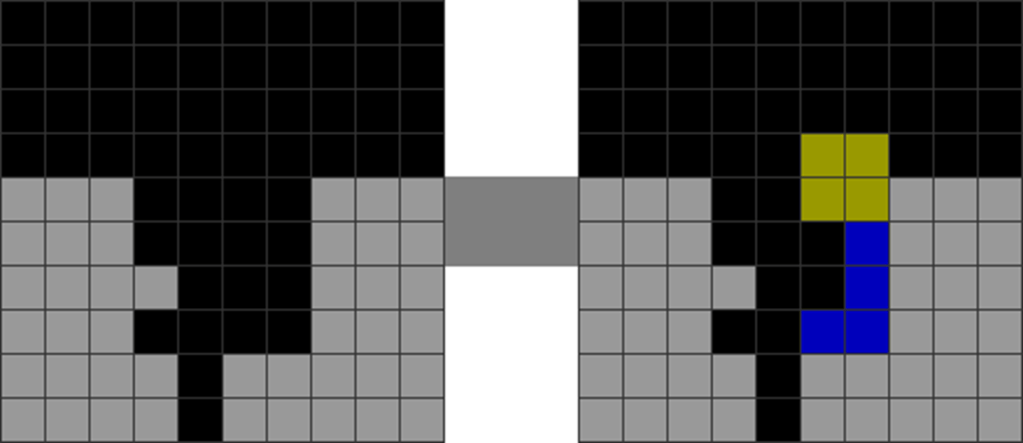
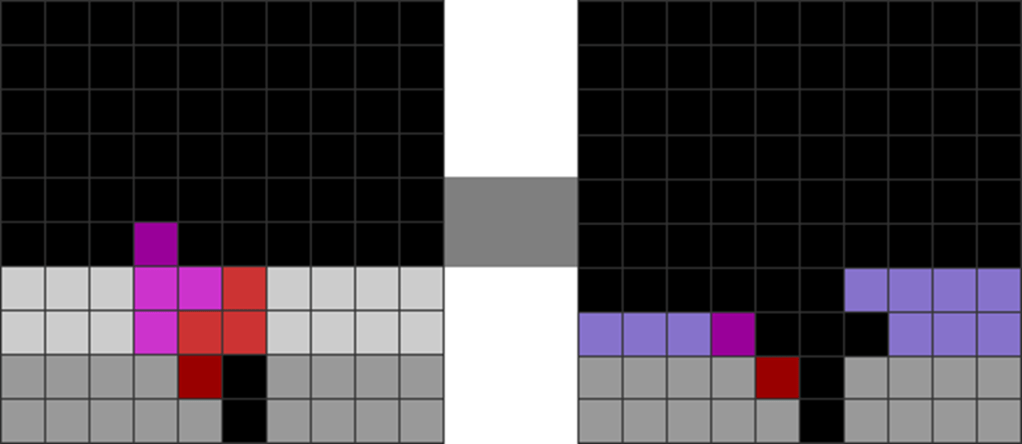
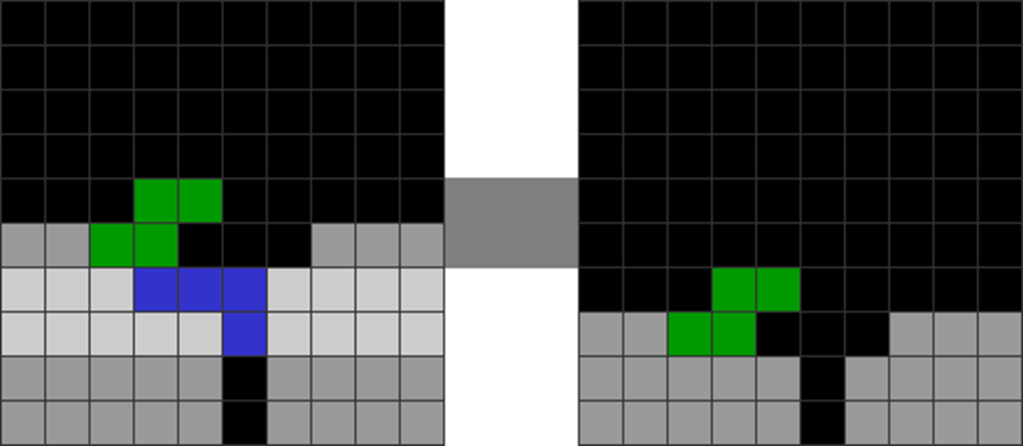
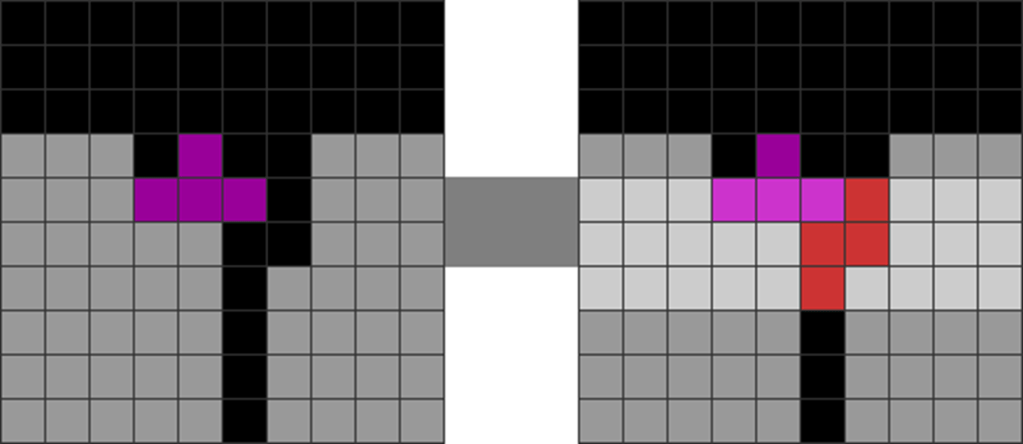
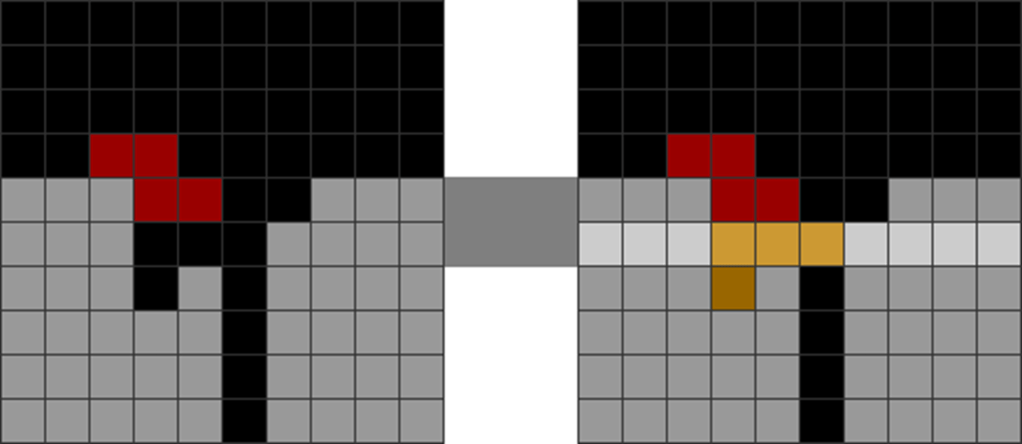
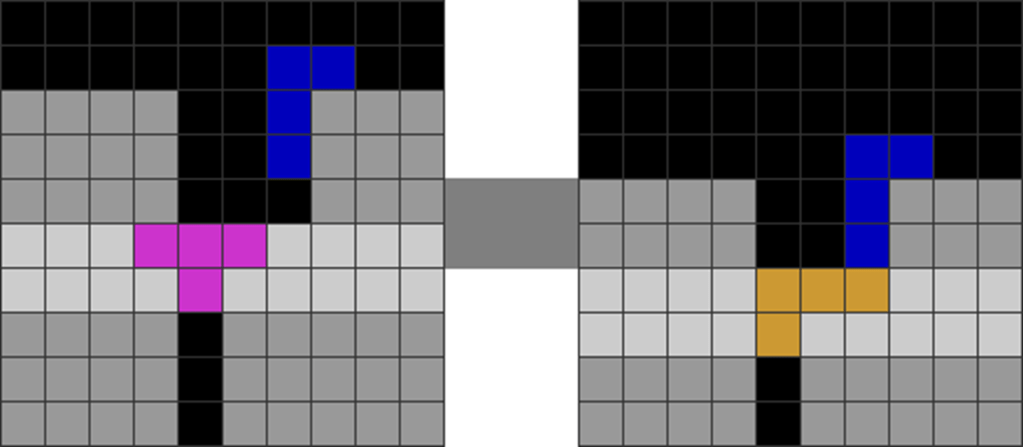
Diagram Set 16-5
1
2
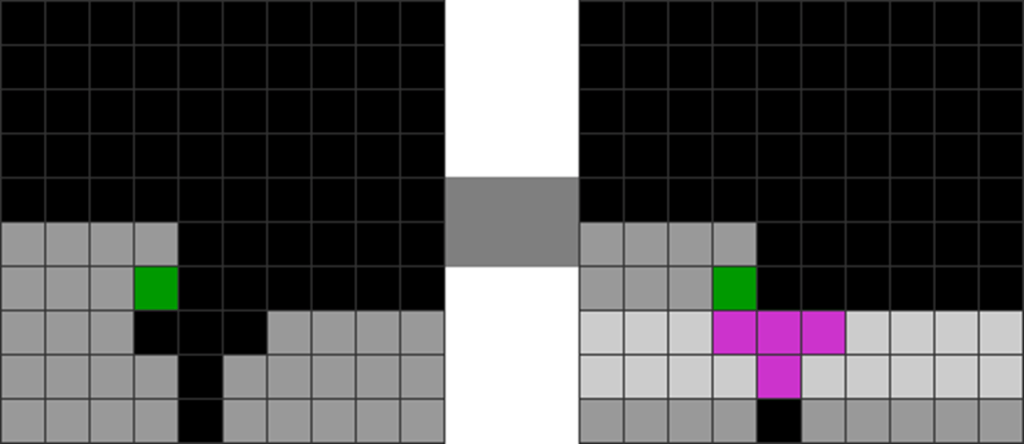
An L-spin setup.
The L piece is spun inside. If gravity reverses, the pink block obstructs the L piece from moving up.
The pink-colored block (red circle) obstructs the spun-in piece. If gravity were to reverse, and the piece tried to move upwards, it would be immediately blocked. Hence, when the lines clear, it is awarded a back-to-back bonus.
This double standard, where T-spins and other all-spins are determined differently, contradicts some other official and unofficial Tetris variants. Some Tetris variants use the corner rule to determine if all-spins are granted bonuses.
However, because of the vast variation in the number of official and unofficial Tetris games that use different calculating methods, I will abide by the all-mini+ system for most of this book. It is simply the cleanest and most non-confusing way to determine all-spins.
A)Core Principles
One should adapt the methods in this chapter based on their relevant Tetris version, whether it is TETR.IO or another game. Players should vary their strategies based on how all-spins are granted bonuses in each specific game.
1)Keep All-Spins as Secondary Fillers
The easiest way to sustain back-to-backs with all-spins is to insert simple all-spins between the T-spins. You do this while stacking normally along a line like this:
Diagram Set 16-6
1
2
Starting field.
A T-spin double concludes.
3
4
The player puts an O overhang for a Z-spin.
A Z-spin double concludes.
5
6
The player makes another Z-spin double.
The Z-spin double concludes. He forecasts a T-spin overhang.
7
8
The Z overhang connects to the garbage hole, creating a T-spin double.
He concludes with a T-spin double.
The entire sequence above sustains back-to-back bonuses in Tetris games where all-spins are granted such. You stack normally with T-spins and Tetrises in between all-spins to sustain back-to-backs.
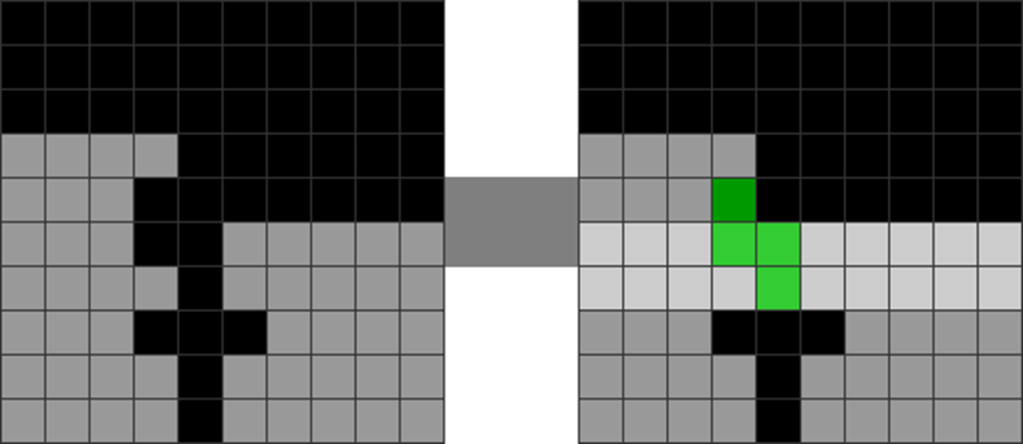
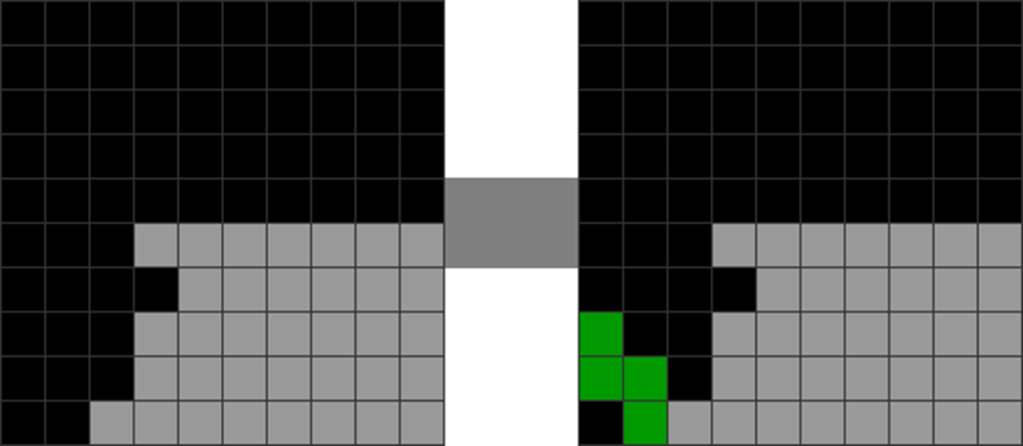
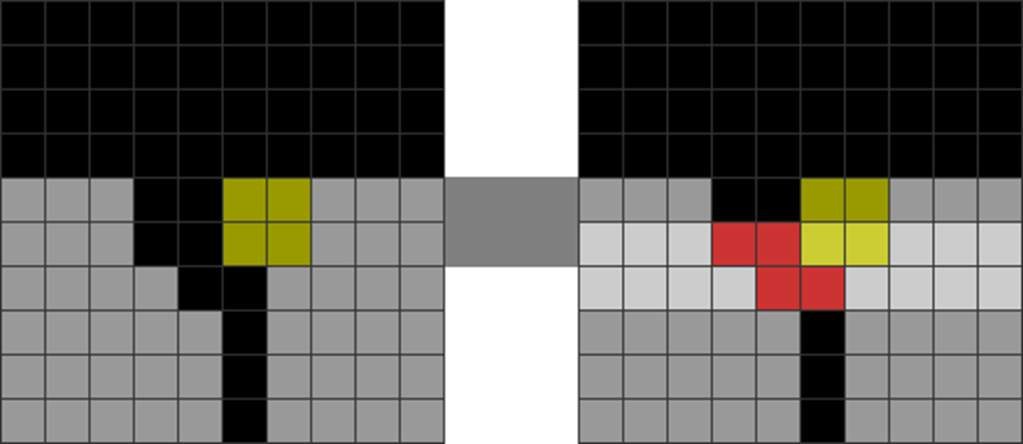
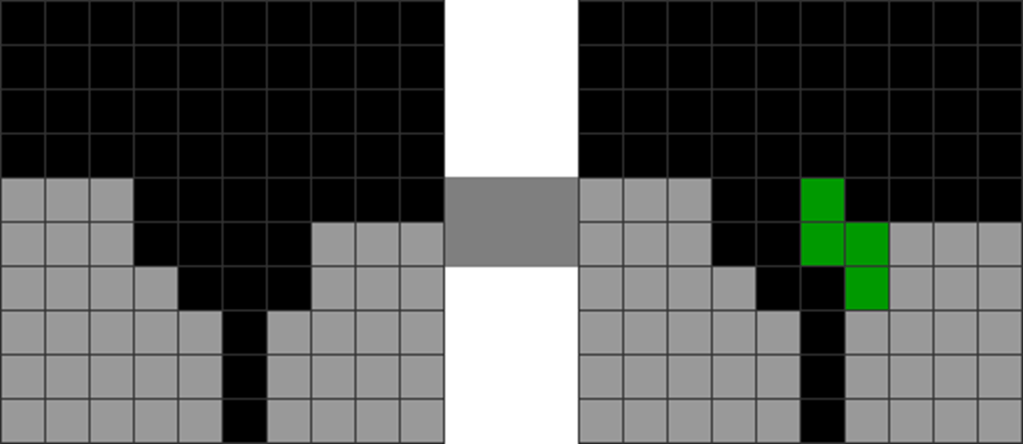
You can also use T-spins (such as T-spin singles or minis) to skim off the unclean residue layers to sustain back-to-backs and get down like this:
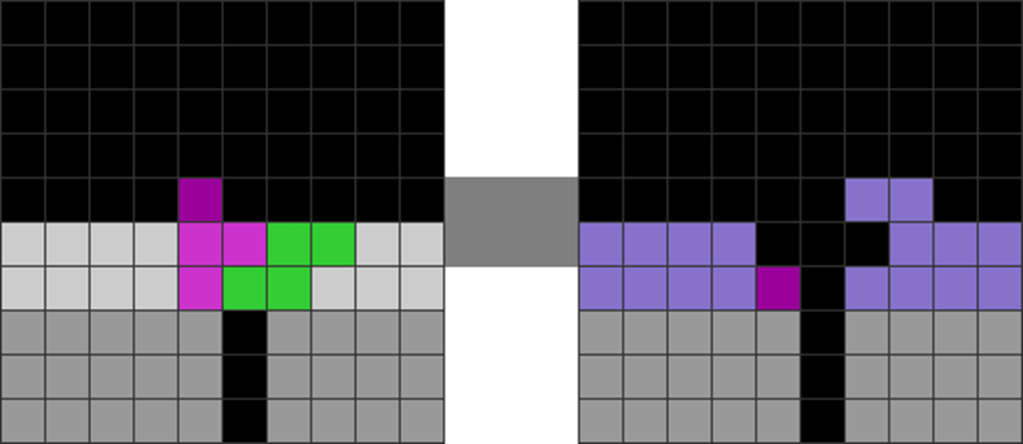
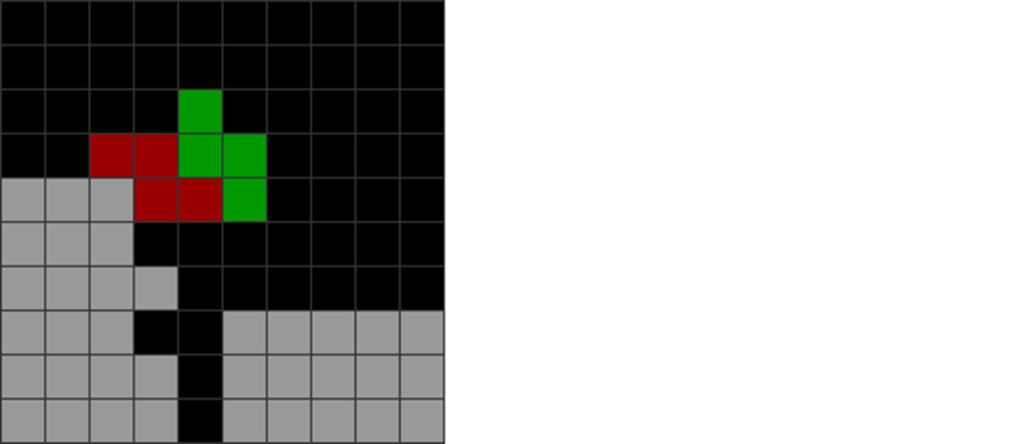
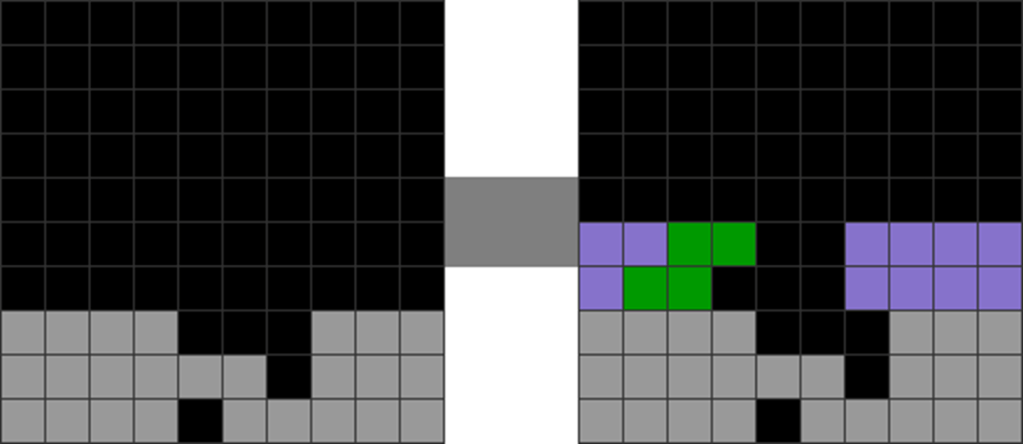
Diagram Set 16-7
1
2
Starting field.
The J-spin double leaves an unclean residue (the green blocks) over the garbage hole.
3
4
The player makes an STSD.
The player sustains back-to-backs by skimming it off with 2 T-spin doubles.
However, if there is no visible T-spin continuation, insert all-spins between the T-spins and Tetrises. This should not be forced, as all-spins are not very efficient, counting only as T-spin minis in some games. They are, however, useful because they contribute to back-to-back charging in some Tetris versions.
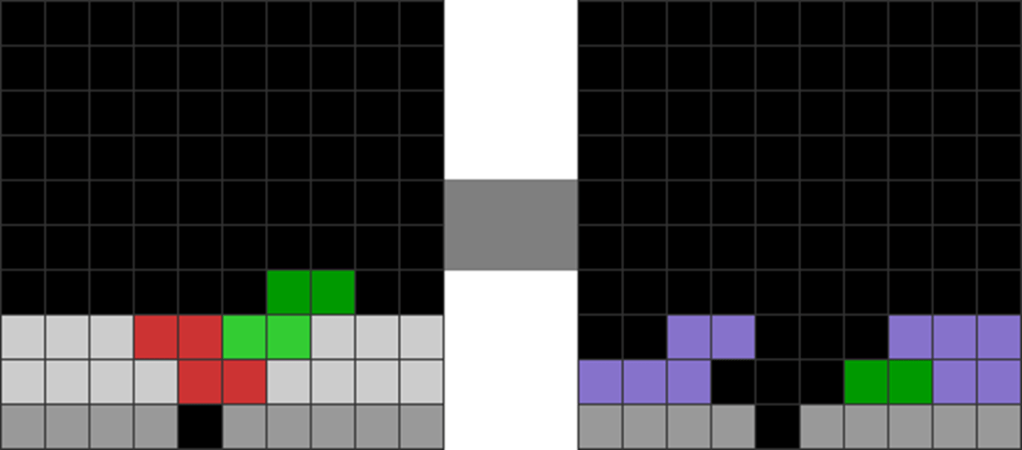
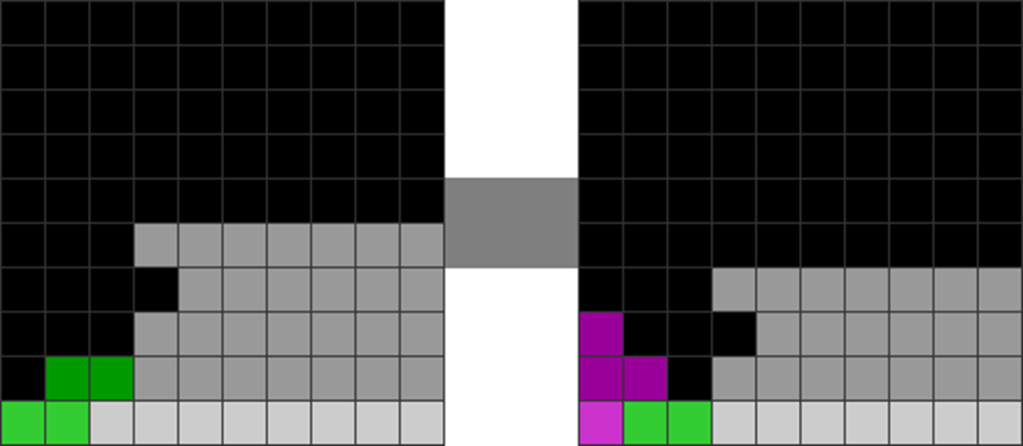
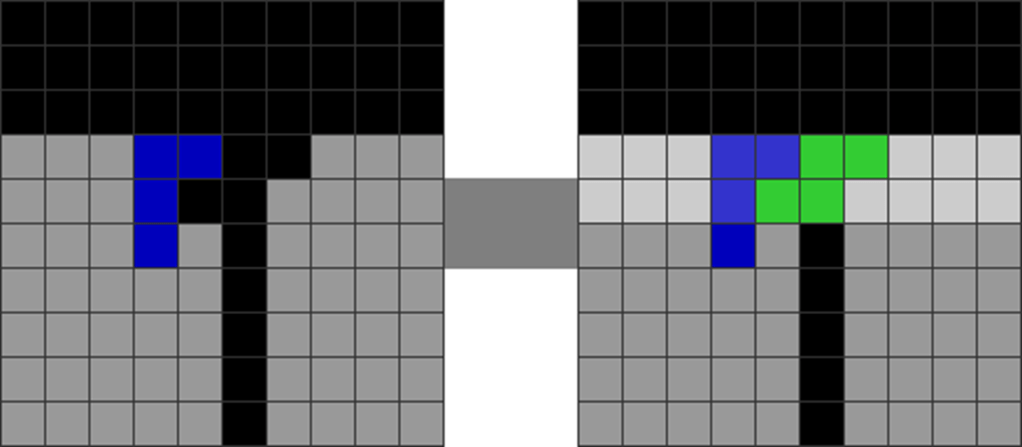
2)Use All-Spins Mainly to Even Stack Imbalance
While stacking along a line, the stack on both sides of a central hole may be inconducively balanced. This makes it challenging to make T-spin doubles. However, one can insert all-spins in between to make line clears, balancing both sides of a stack and creating T-spin continuations:
Diagram Set 16-8
Mid-game chance
This pattern rarely has an easy T-spin double follow-up. Both sides of the stack are imbalanced.
1
2
Put a J this way.
A Z-spin double concludes.
3
4
You get this shape.
With proper stacking, you can chain T-spin doubles and Tetrises quickly.
Here, the player uses a J-spin double and some careful stacking to even both sides of the stack. This allows for easy back-to-back T-spin and Tetris continuations.
In games where all-spins grant back-to-back bonuses, this is acceptable, clean, safe, and efficient.
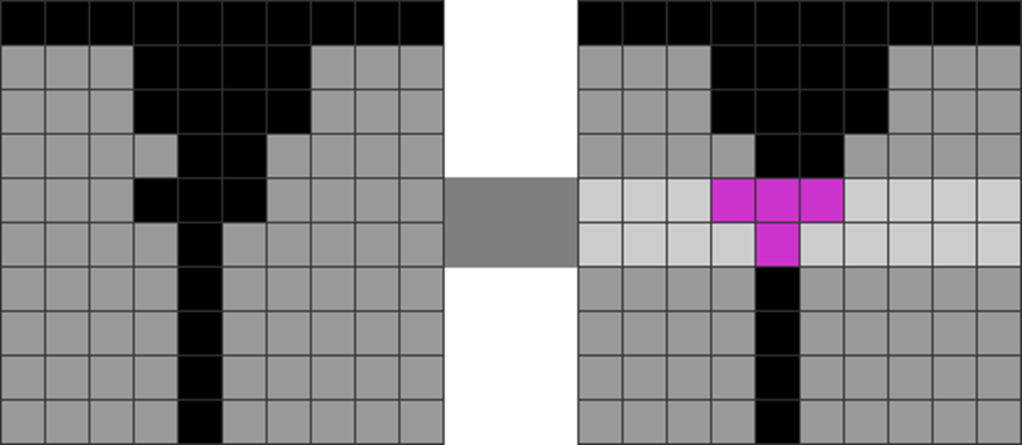
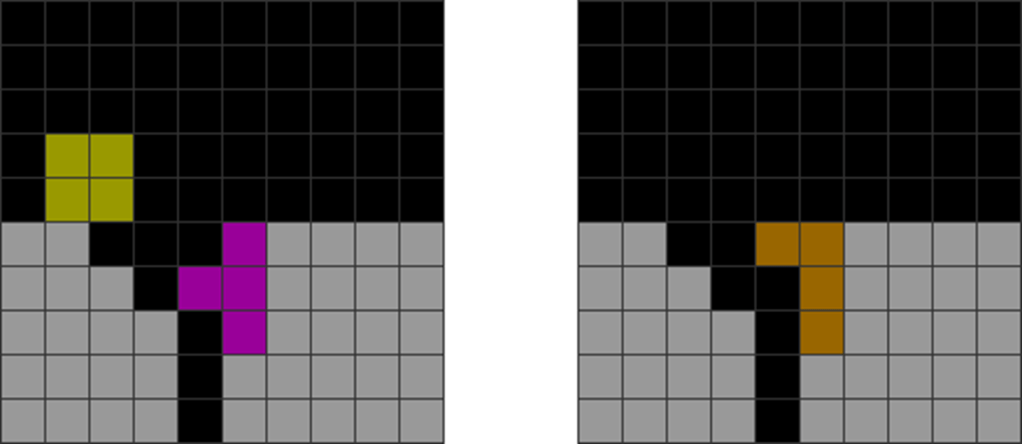
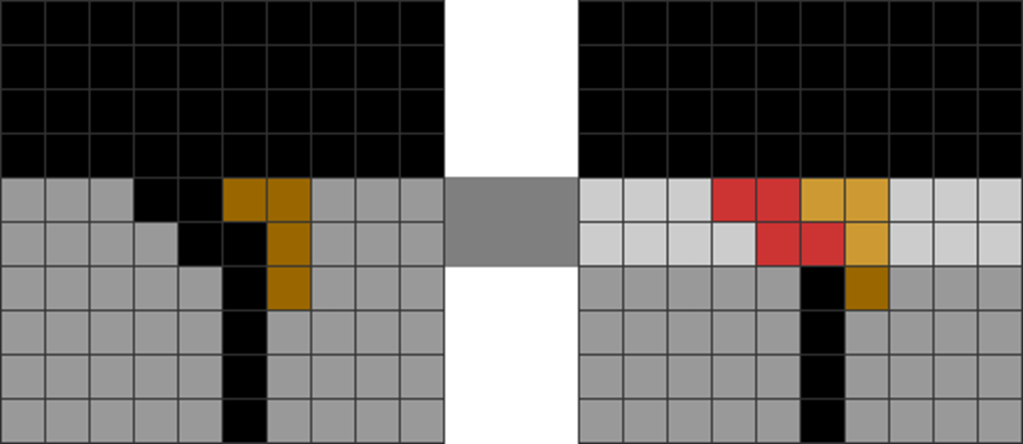
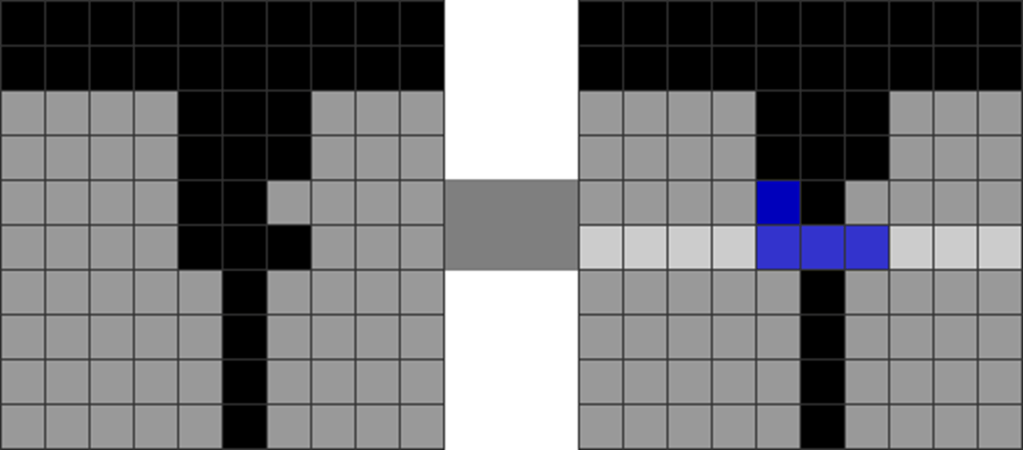
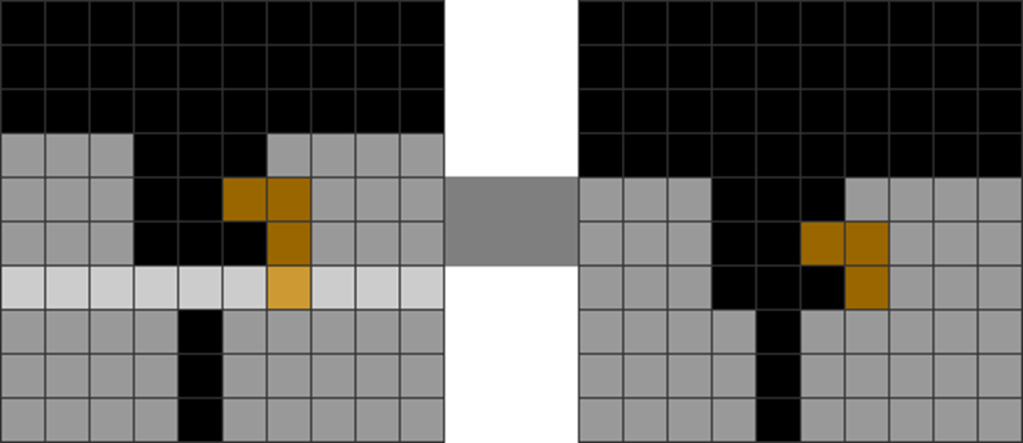
However, one should minimize those that strictly go for all-spins, while leaving a terrible aftermath:
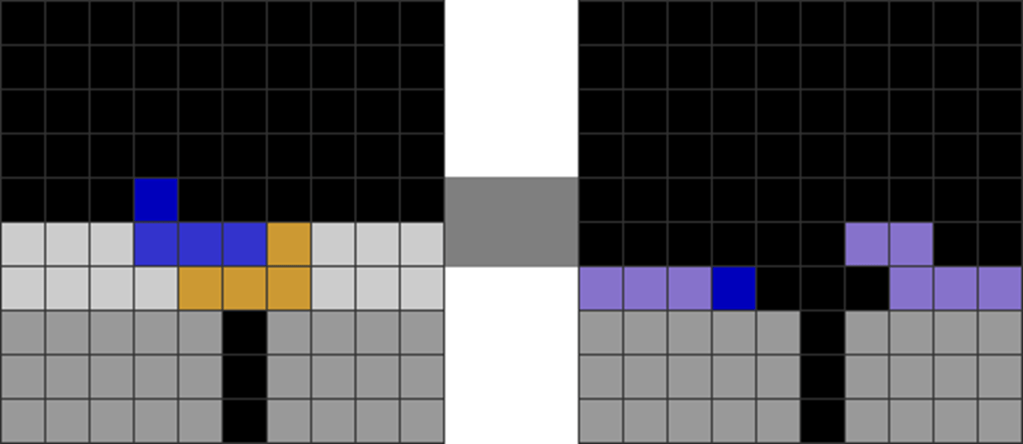
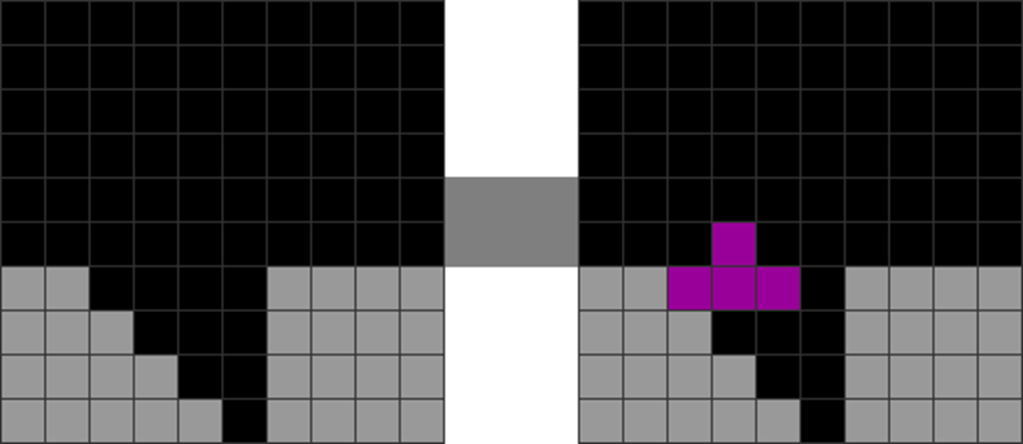
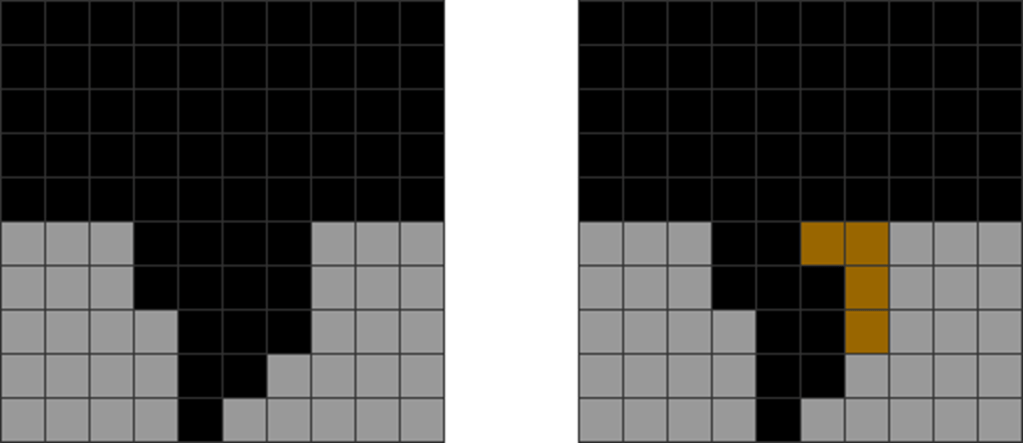
Diagram Set 16-9
1
2
In substitution of the last diagram set’sstep 1, the player places an L in this orientation instead.
He makes a Z-spin double. The resulting orange blocks cover the garbage hole.
Here, the orange blocks from the L will upstack over the garbage hole in column 6, impeding smooth downstacking. It also does not have a smooth T-spin double continuation.
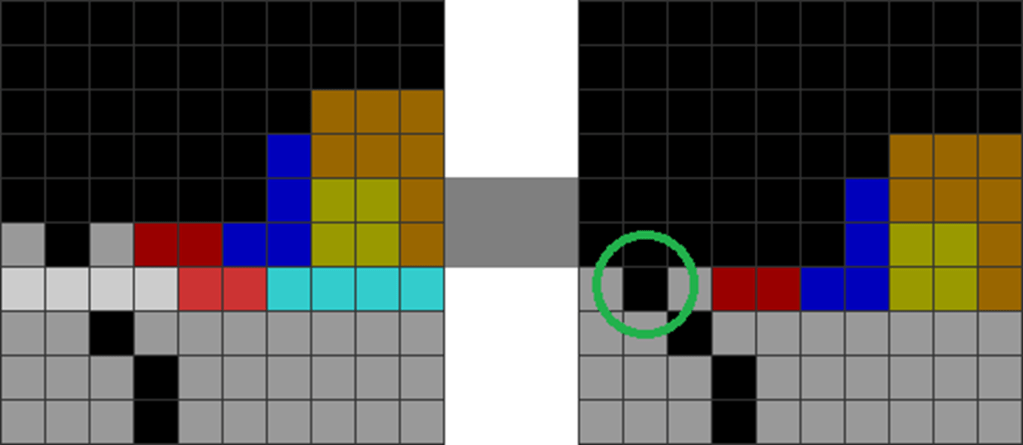
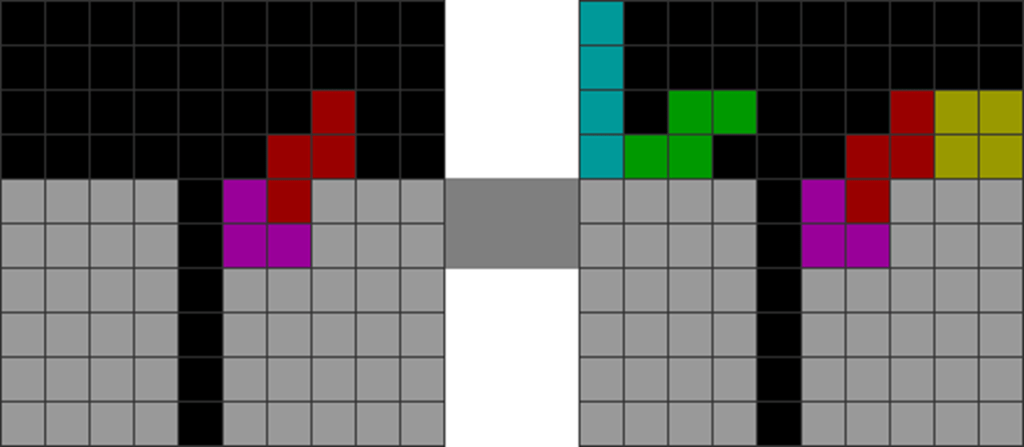
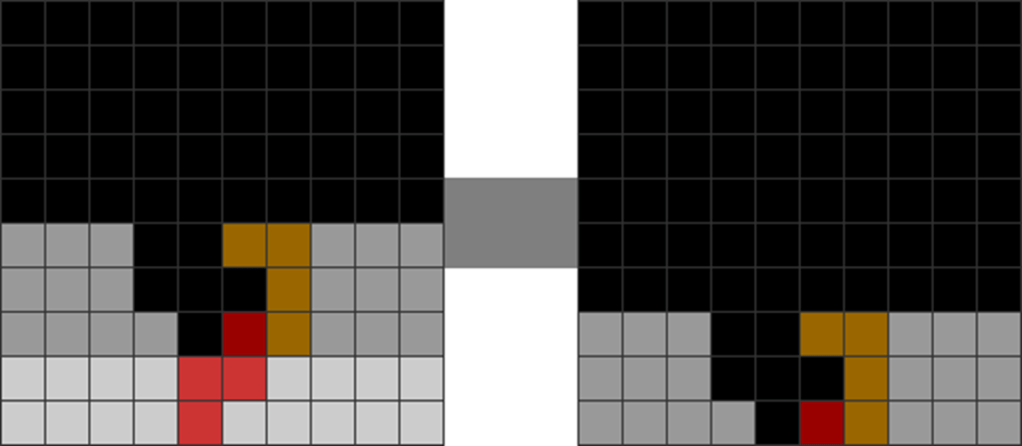
One should also avoid all-spins that lead to these kinds of aftermath patterns:
Diagram Set 16-10
A
B
They typically are difficult for the player to skim through the top layers to sustain back-to-backs and lead to a clean aftermath. Eventually, based on my experience, you will most likely need to skim and break back-to-backs.
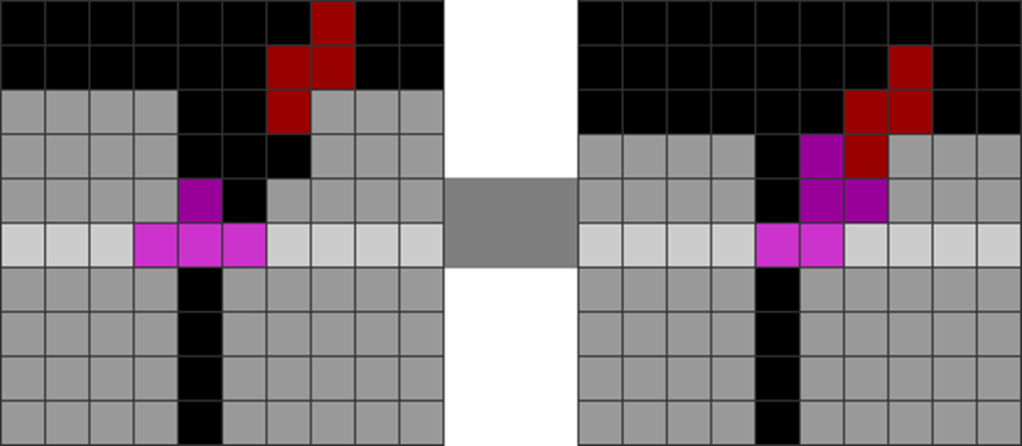
3)Use All-Spins Mainly to Reset Local Parity
In the Parity Management chapter of Book 2, I mentioned that singles, triples, and non-separate line clears typically alter parity (unless a T is placed in it). All-spins with such line clears can upset local parity.
While I said earlier not to spam all-spin methods mindlessly, exceptions exist, such as when one knowingly uses all-spin singles, triples, or separate line clears to rebalance parity.
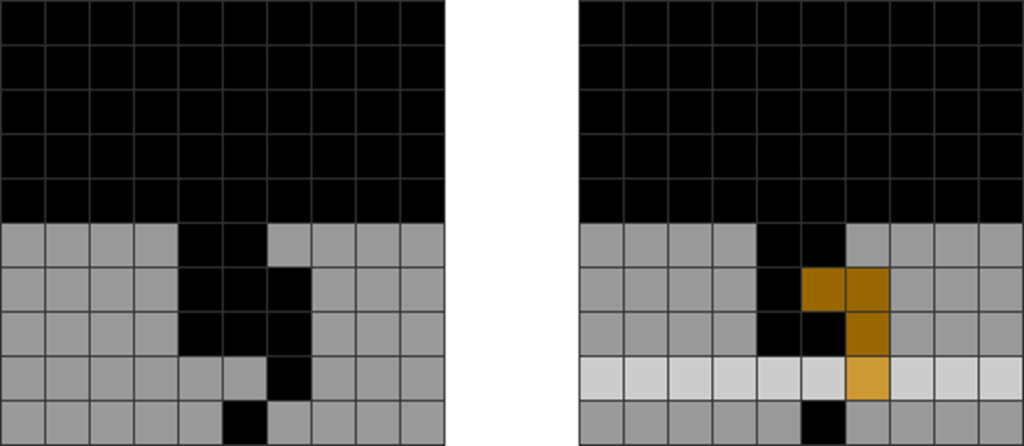
Hence, a player can use an all-spin single to reset a locally parity-imbalanced field to a balanced state, making it easier to stack smoothly afterward:
Diagram Set 16-11
1
2
There are 2 local parity issues in the red circles.
The player upstacks a bit to make a Z-spin single.
3
4
The Z-spin single concludes.
The single eliminates 1 local parity issue, leaving only 1 issue remaining (green circle).
This sustains back-to-backs while also ensuring maximal T-spin chaining and stacking follow-ups.
B) Meta All-Spin Methods to Sustain Back-to-Backs
The following are meta-strategies by many skilled players to sustain back-to-backs while stacking along a line. They are highly effective because, most of the time, they lead to easy T-spin double chaining.
All of them are practical mid-game, and I strongly encourage the reader to memorize them. Most of them are extremely clean with excellent follow-ups and continuations.
I have named them after colors for easier future referencing by Tetris players. Many examples involve holding “soft drop” as you rotate:
Scarlet
Diagram Set 16-12
1
2
3
4
This Z-spin double leads to an even field that can create more T-spins.
The above shares the same mid-game opportunities as the diagram below:
Diagram Set 16-13
A
B
The last diagram set’s method shares the same mid-game chances as simple T-spins with an overhang.
Crimson
This is another common meta method:
Diagram Set 16-14
1
2
3
4
This S-spin double leads to an even field that can create more T-spins.
Vermilion
This L-spin is also common:
Diagram Set 16-15
1
2
3
4
This L-spin double leads to an even field that can create more T-spins.
The last 2 diagram sets share the same mid-game opportunities as the diagram below:
Diagram Set 16-16
A
B
The last 2 diagram sets’ methods share the same mid-game opportunity as a Parapet.
Tangerine
This is tricky, but helpful:
Diagram Set 16-17
1
2
3
4
This I-spin single (using the Pierce method) leads to an even field that can create more T-spins.
The above shares the same mid-game opportunities as the diagram below:
Diagram Set 16-18
A
The last diagram set’s method shares the same mid-game opportunity as a horizontal Parapet.
Coral
The following is considered a gem by many players:
Diagram Set 16-19
1
2
3
4
This S-spin single leads to an even field that can create more T-spins.
Firebrick
This is also decent:
Diagram Set 16-20
1
2
3
4
This Z-spin double leads to an even field that can create more T-spins.
Rust
This is tricky, but highly regarded and used:
Diagram Set 16-21
1
2
3
4
Putting the J this way in step 2 lets you get an S-spin single that leads to easy T-spin chaining in step 4.
The above shares the same mid-game opportunities as the diagram below:
Diagram Set 16-22
A
B
The last diagram set’s method shares the same mid-game chances as the above.
Maroon
This is also wonderful:
Diagram Set 16-23
1
2
3
4
This trickly J-spin double leads to an even field that can create more T-spins.
Here are its shared mid-game chances:
Diagram Set 16-24
A
B
The last diagram set shares the same mid-game situations as the above methods. B shows a Z-spin double chance.
Copper
This is another method:
Diagram Set 16-25
1
2
3
4
This S-spin double leads to an even field that can create more T-spins.
This is its main shared mid-game pattern:
Diagram Set 16-26
A
A mid-game DT Cannon.
This is excellent, being another similar sub-variant:
Diagram Set 16-27
1
2
This S-spin double leads to an even field that can create more T-spins. It is the same as the Copper method.
It partly resembles the shape of the mid-game opportunity of the following Polymer T-spin:
Diagram Set 16-28
A
The last diagram set shares almost the same mid-game situations as the above Iso T-spin double.
Cobalt
The following is tricky, but useful when mastered:
Diagram Set 16-29
1
2
3
4
This subtle Z-spin single leads to an even field that can create more T-spins.
Cerulean
The method below is tricky, but it happens mid-game frequently:
Diagram Set 16-30
1
2
Starting field.
An L-spin single finishes.
3
4
A T-spin double finishes.
You get this.
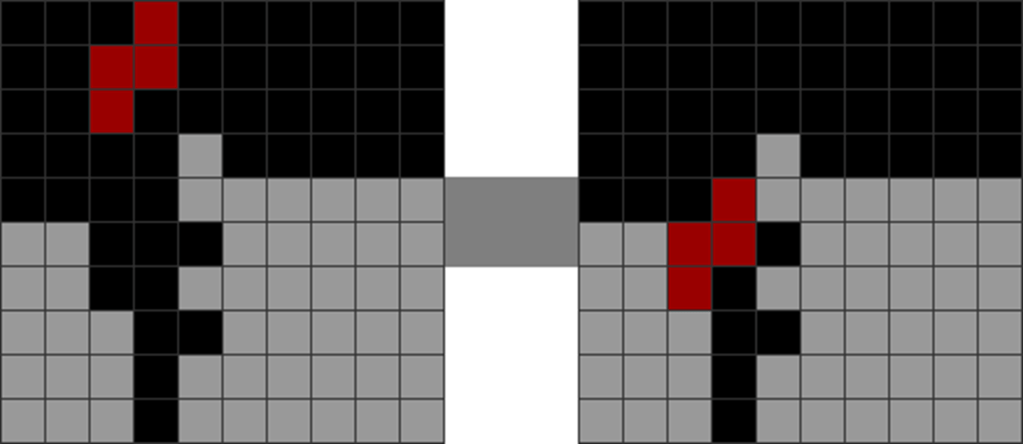
Here is its most common mid-game chance:
Diagram Set 16-31
1
2
Mid-game chance.
Put a J like this.
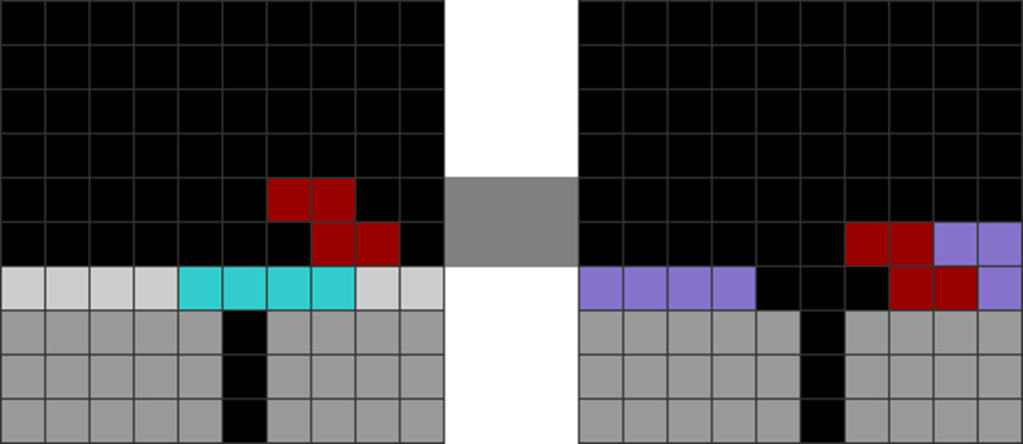
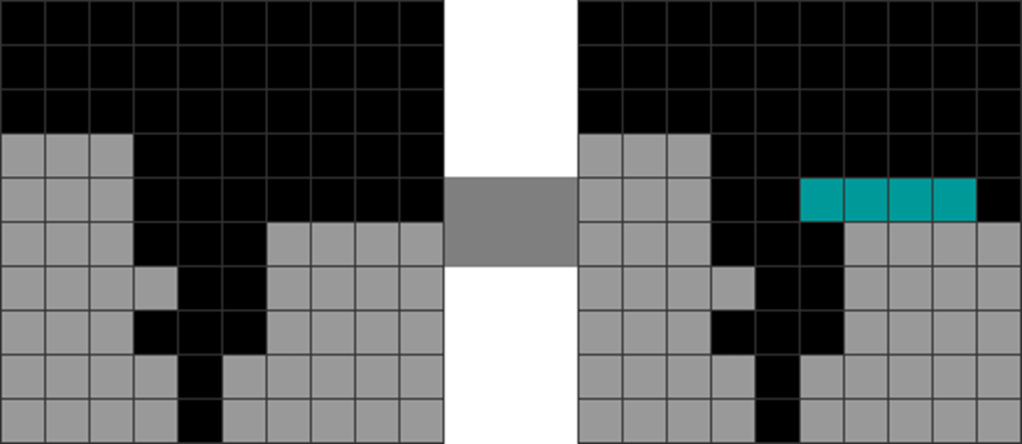
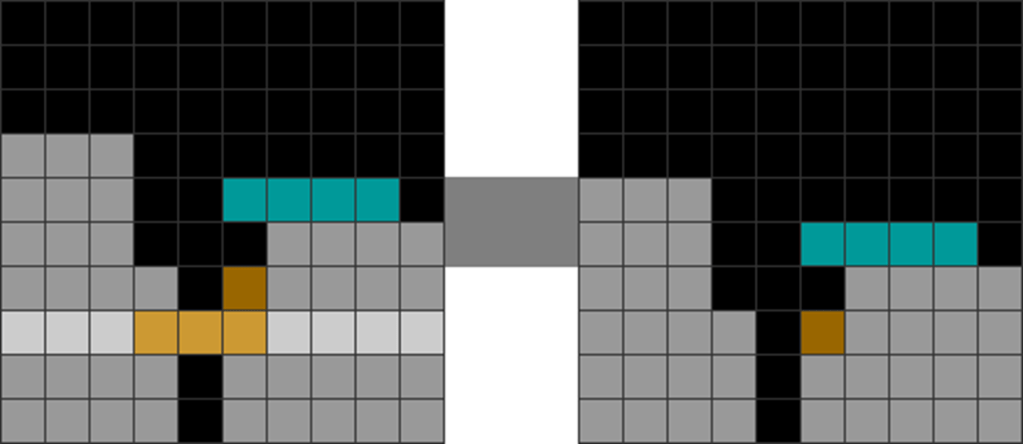
Turquoise
This is useful in repairing failed Imperial Crosses from misdrops:
Diagram Set 16-32
1
2
Starting field.
An S-spin double finishes.
3
4
You get this.
A T-spin double finishes.
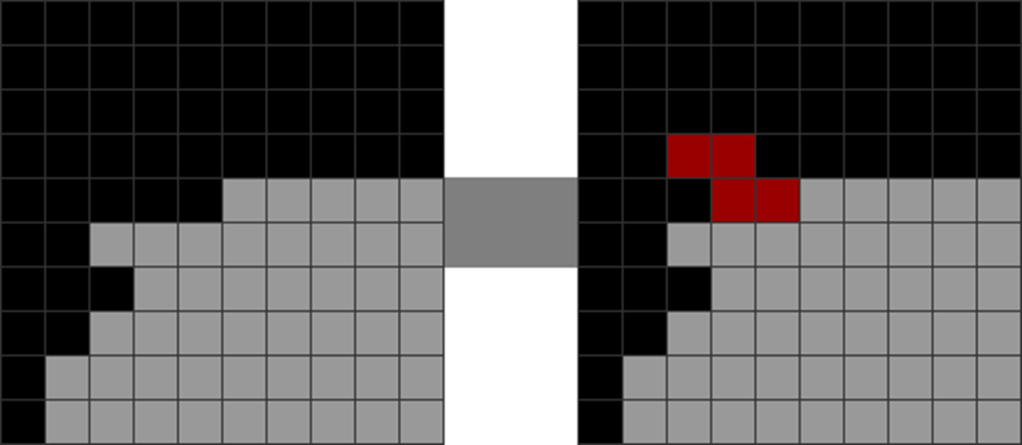
Or it can be easily upgraded from a standard T-spin double setup:
Diagram Set 16-33
1
2
Mid-game T-spin double chance.
Top an O and J to make the setup.
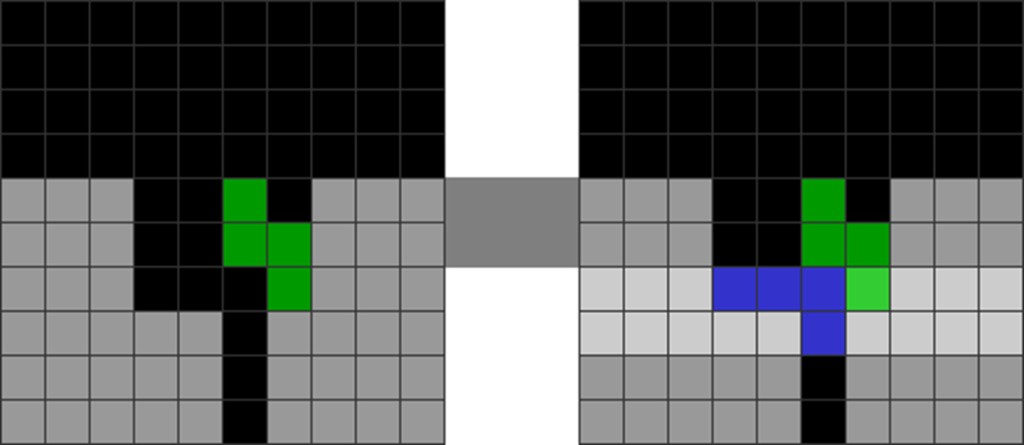
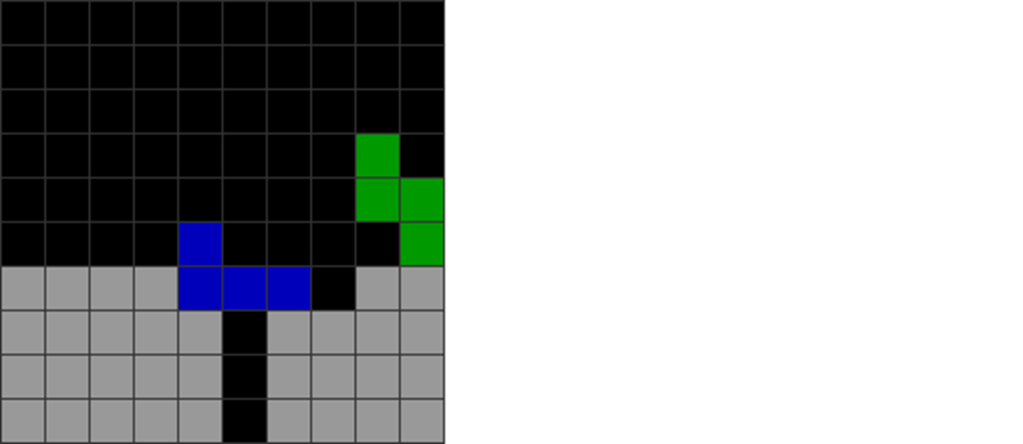
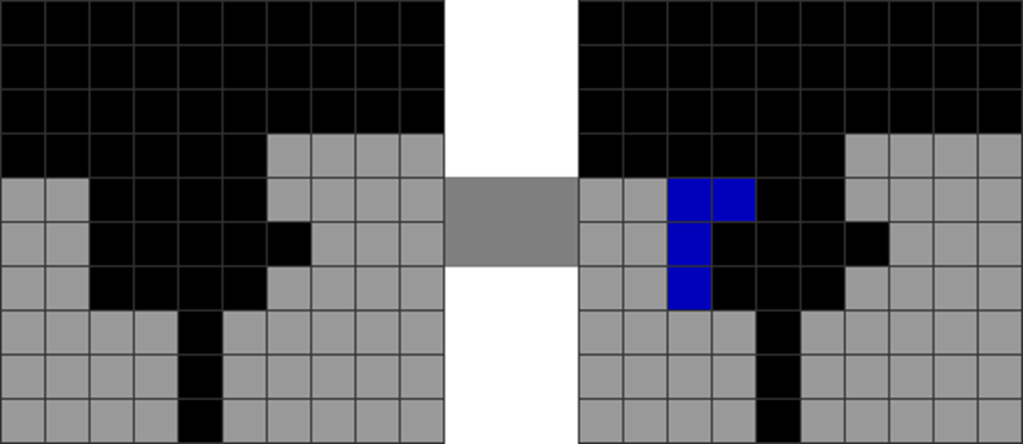
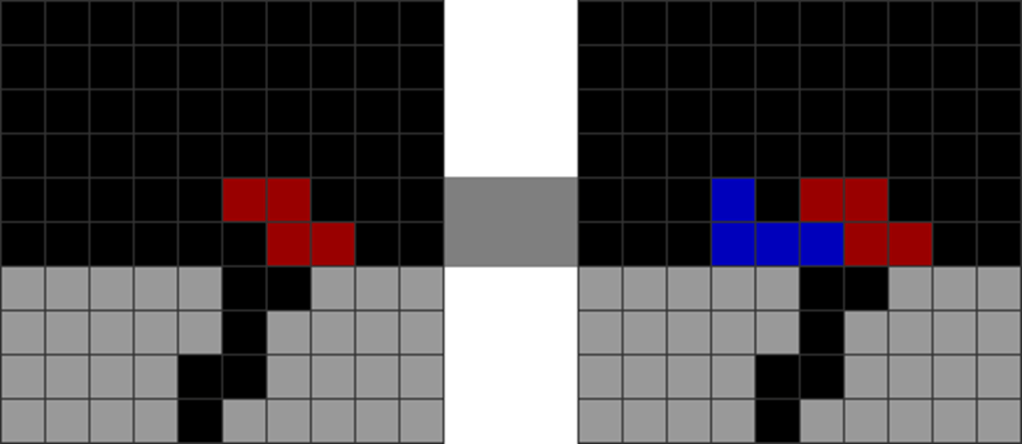
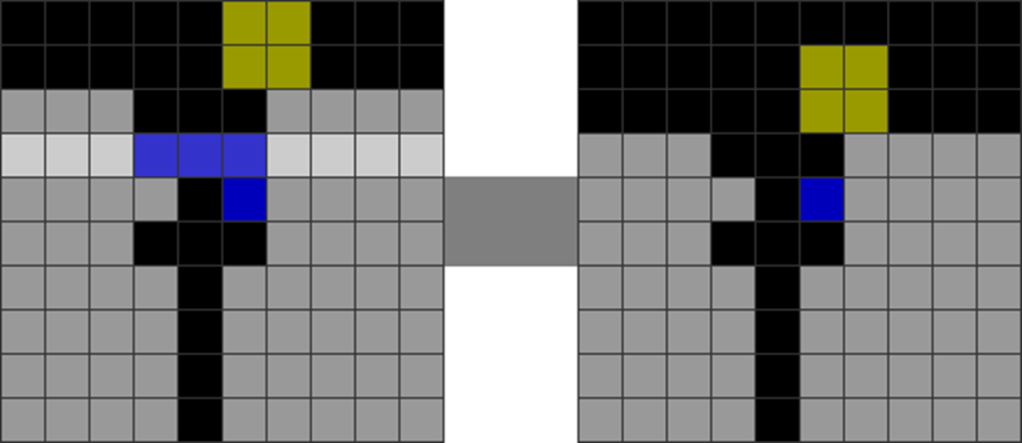
Indigo
The following is tricky, but useful:
Diagram Set 16-34
1
2
Starting field.
Insert a Z piece vertically into the cavity.
3
4
Rotate to perform the Z-spin double.
You get this.
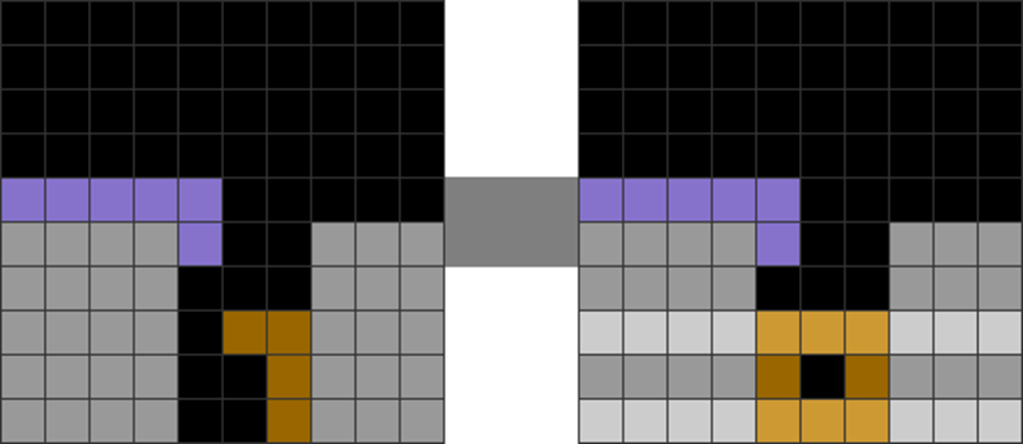
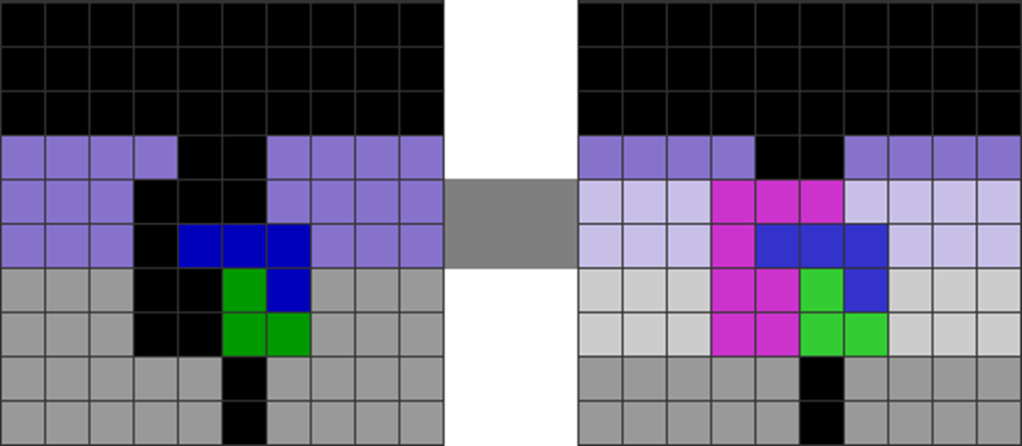
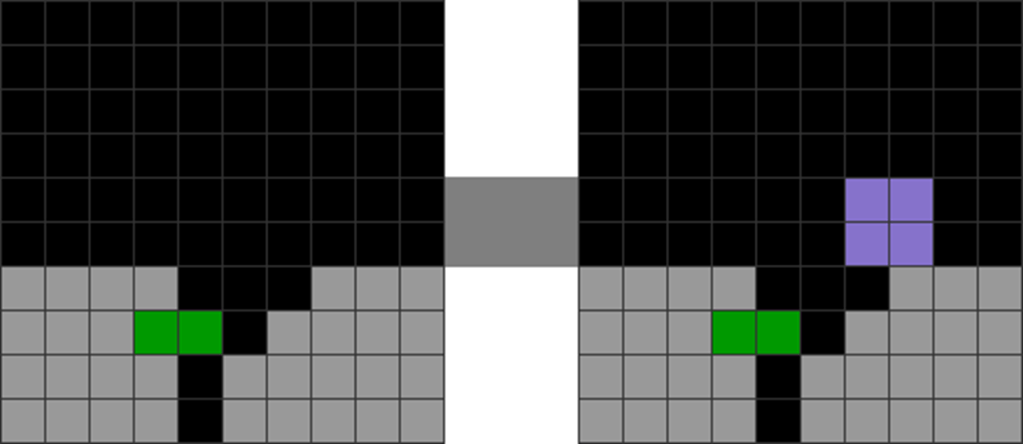
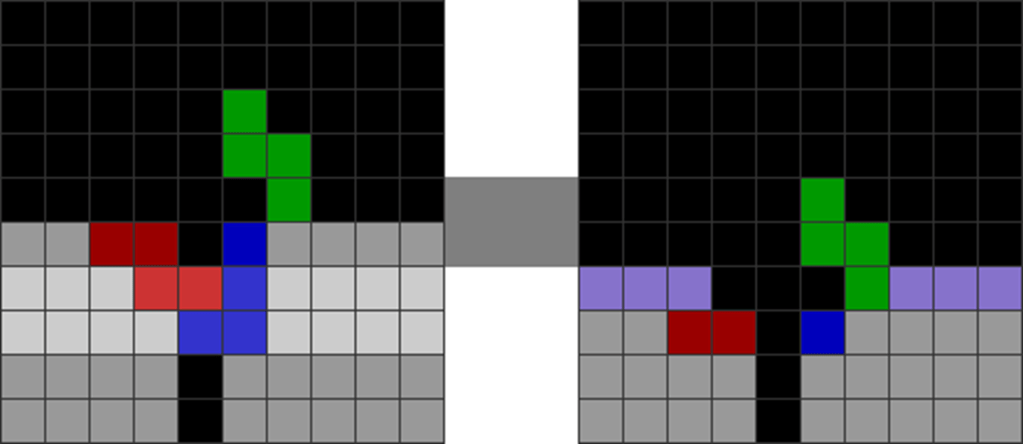
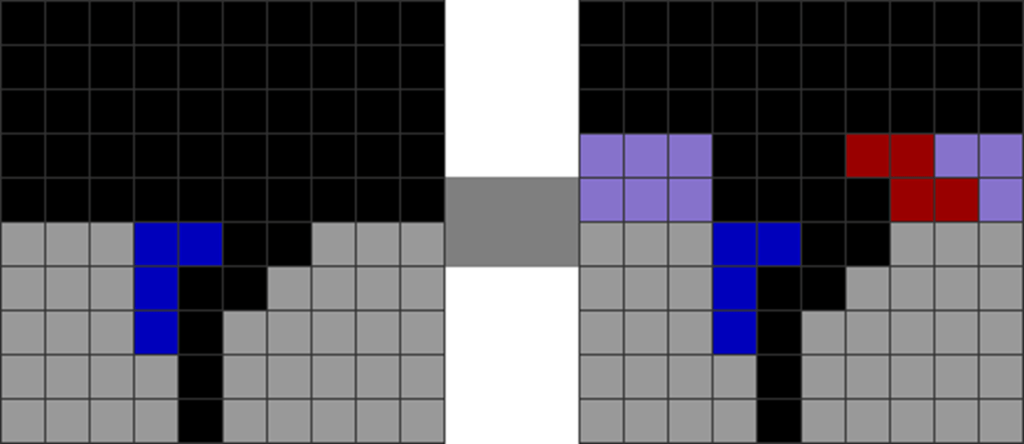
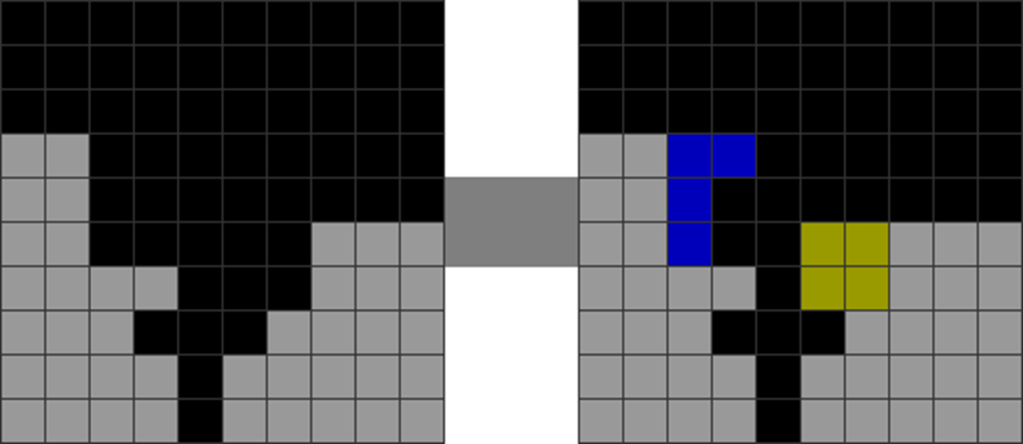
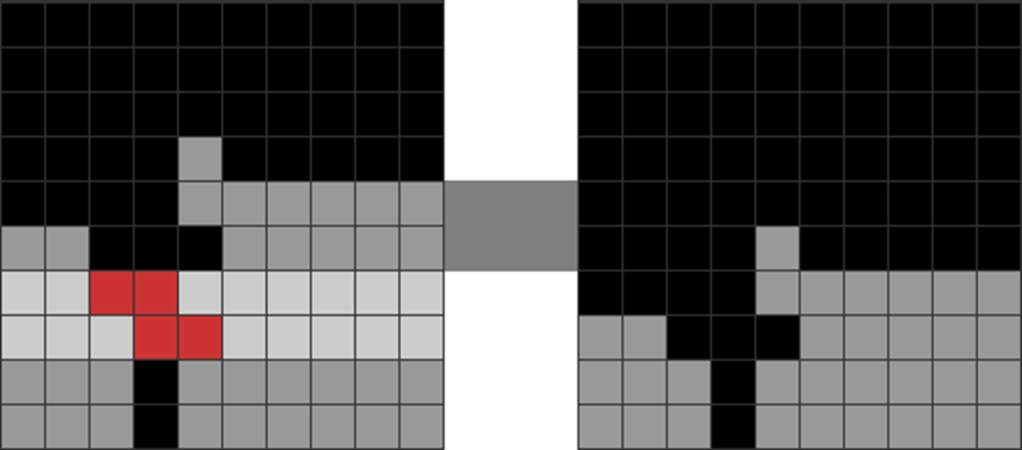
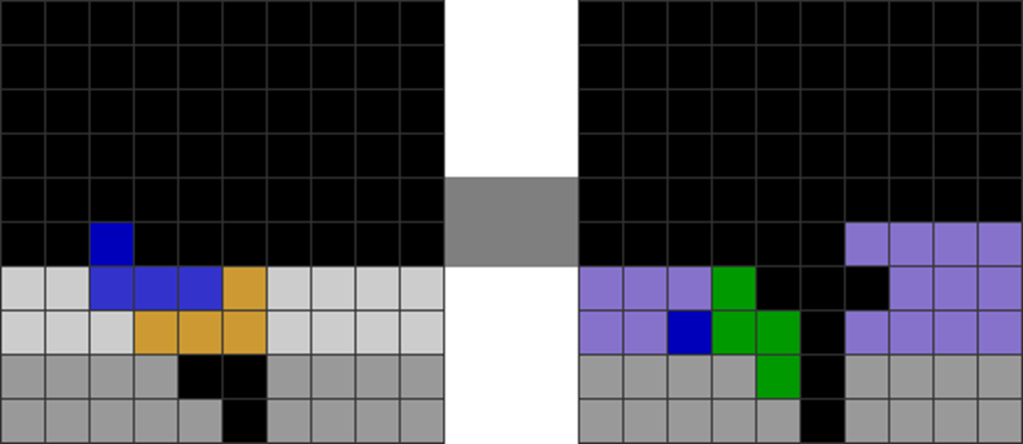
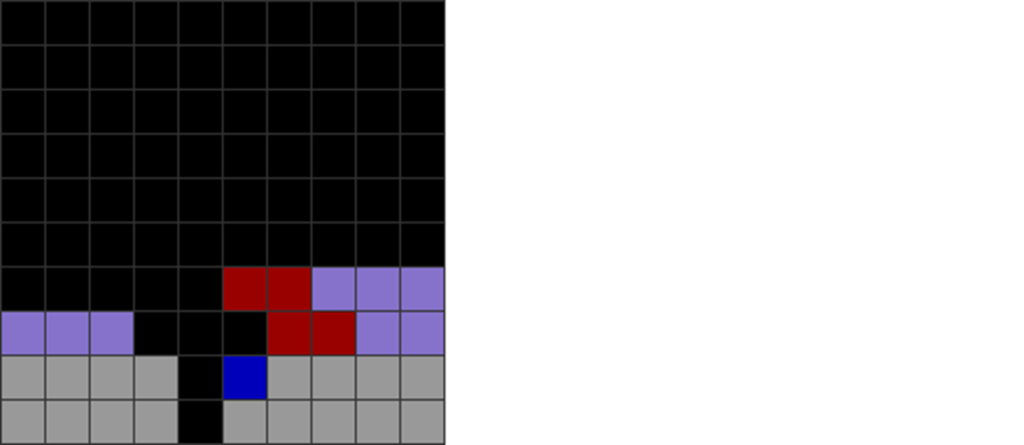
This is its mid-game opportunity:
Diagram Set 16-35
1
2
Recognize this Z-spin double mid-game chance.
Put an overhang over it and build the lavender parts.
Navy
The following involves many 180-degree rotations, but it works:
Diagram Set 16-36
1
2
Insert the J piece vertically into the cavity.
Rotate it right.
3
4
Rotate 180 degrees.
Rotate 180 degrees again to get the J-spin double.
You can easily create it mid-game if you recognize the following garbage pattern:
Diagram Set 16-37
1
2
Recognize this J-shaped garbage pattern mid-game.
Put an S overhang and build the lavender parts.
Sage
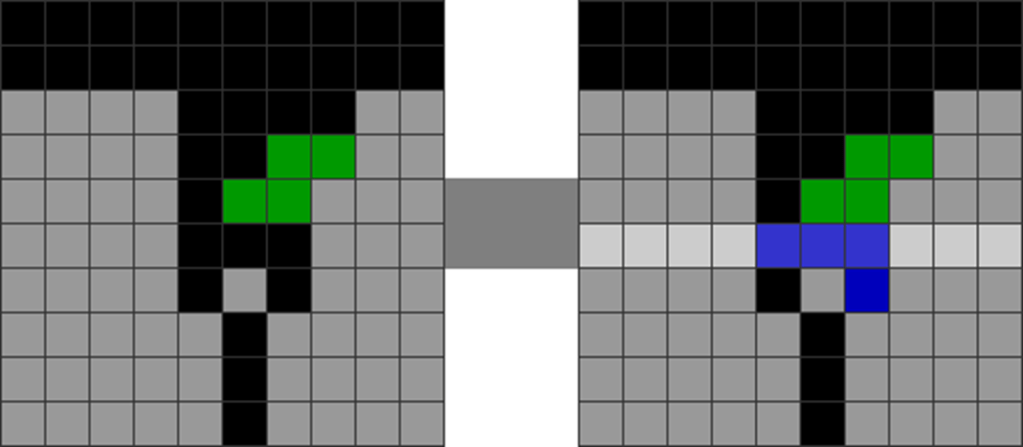
These Z-spins (S if mirrored) are also highly useful mid-game. The Z piece can be inserted in like magic:
Diagram Set 16-38
1
2
3
4
This Z-spin single leads to an even field that can create more T-spins. It shares the same mid-game opportunity as a Kaidan.
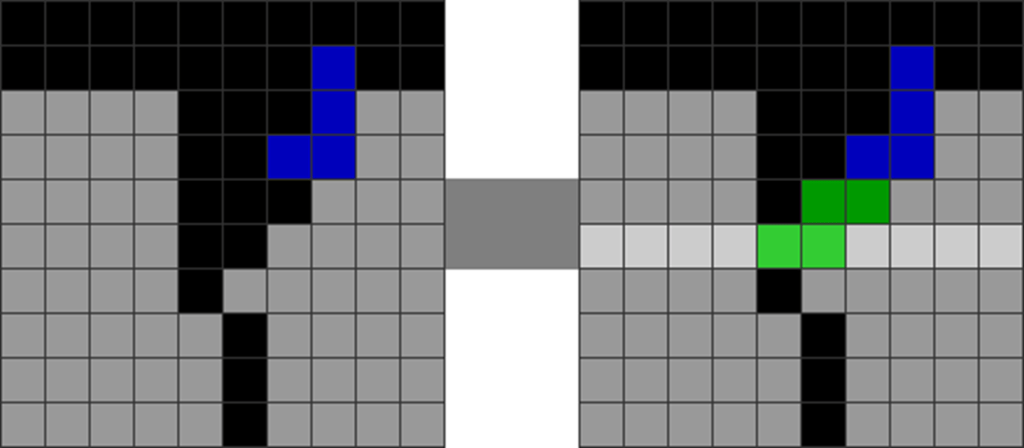
Mint
Diagram Set 16-39
1
2
3
4
This Z-spin double leads to an even field that can create more T-spins.
Olive
Diagram Set 16-40
1
2
3
4
This Z-spin double leads to an even field that can create more T-spins.
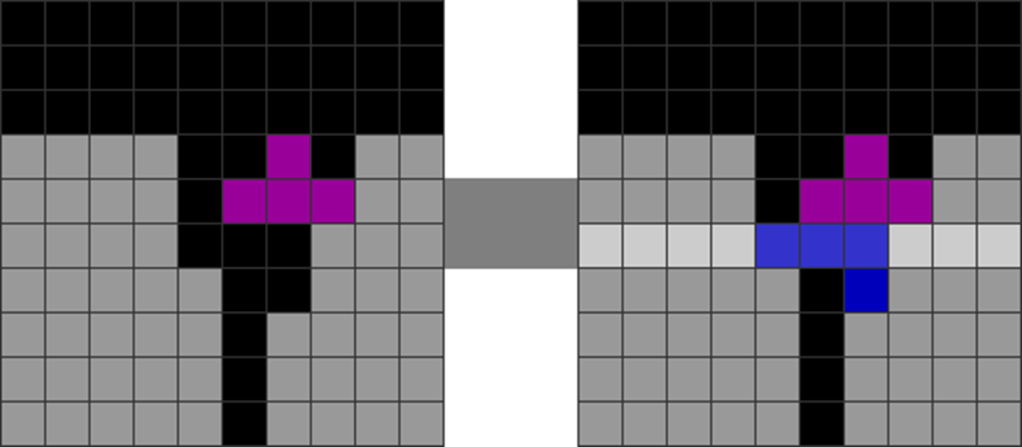
Lavender
The following are like the above Z-spins, but involve L and J-spins:
Diagram Set 16-41
1
2
3
4
This L-spin double leads to an even field that can create more T-spins. It shares the same mid-game chances as a Kaidan T-spin double.
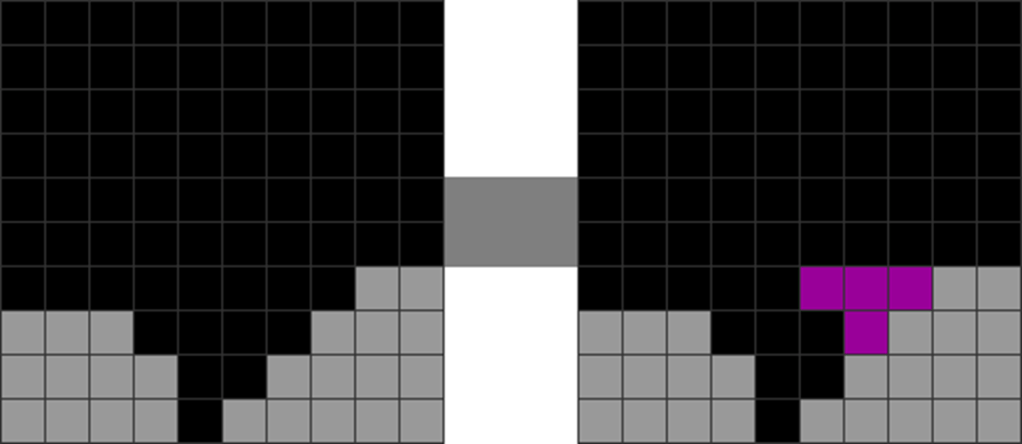
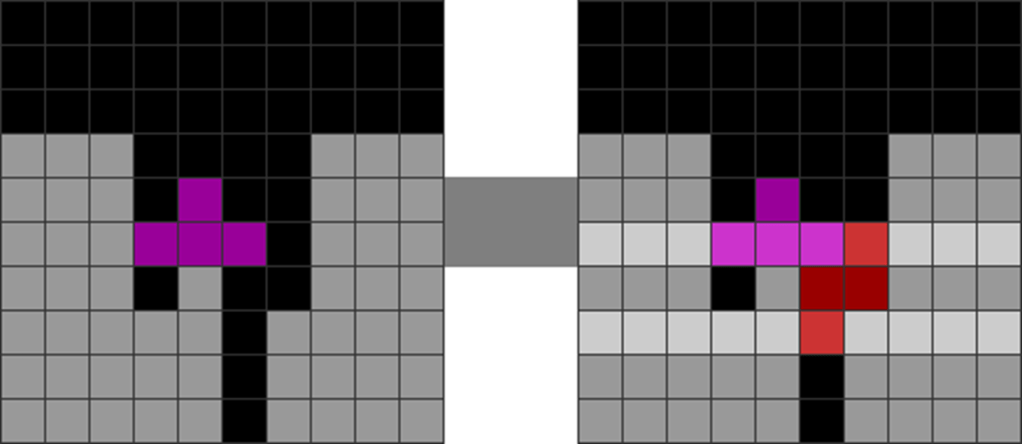
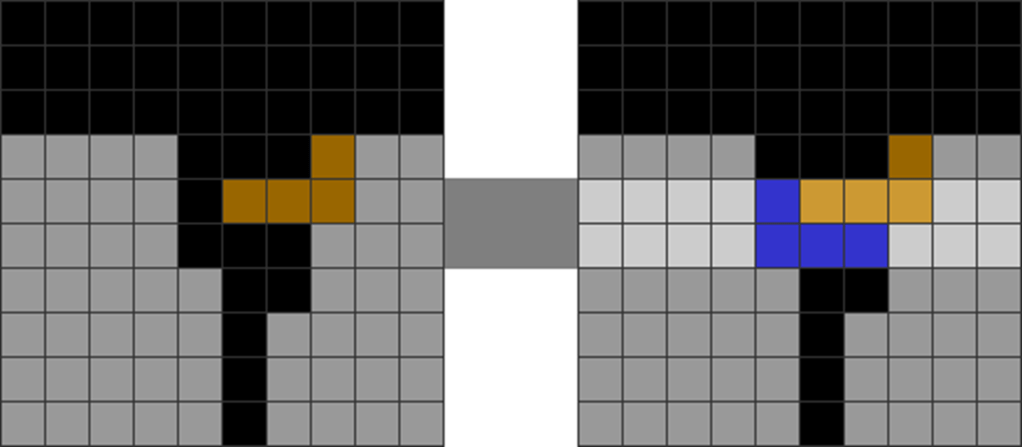
Orchid
This L-spin single also leads to easy T-spin doubles:
Diagram Set 16-42
1
2
3
4
This L-spin single leads to an even field that can create more T-spins.
Lilac
This 180-degree J-spin can sustain back-to-back T-spins easily:
Diagram Set 16-43
1
2
3
4
5
This J-spin double’s finesse is tricky, involving multiple rotations to create an easy T-spin chaining opportunity.
Mauve
During 9-0 stacking, you can use these to create T-spin double chaining chances:
Diagram Set 16-44
1
2
3
4
This J-spin single leads to a T-spin double.
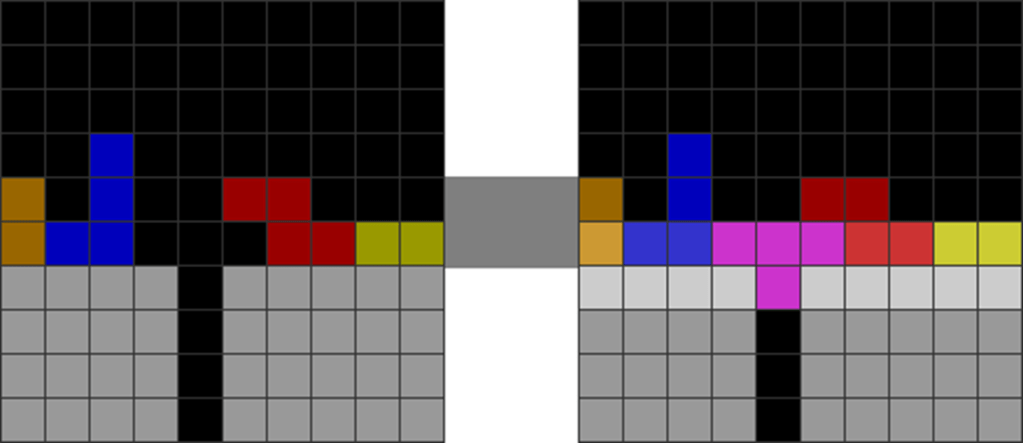
Magenta (Koshihiro)
The following method is called Koshihiro.
X – Not in TETR.IO / Varies ↓
Diagram Set 16-45
1
2
3
4
This S-spin mini leads to a Yoshihiro T-spin. Step 4 creates an even field that can be easily T-spin-chained.
Marigold
The following is the best meta method in this section:
Diagram Set 16-46
Mid-game chance
1
2
3
4
This Z-spin double leads to easy T-spin double chaining.
Flax
This is also highly clean, leading to a field with balanced stacks for quick T-spin double follow-ups:
Diagram Set 16-47
Mid-game chance
1
2
This Z-spin double leads to a balanced stack.
Dandelion (Cremate Meta Version)
The following Cremate method leads to a T-spin double. It is one of the best meta methods:
X – Not in TETR.IO / Varies ↓
Diagram Set 16-48
1
2
This J-spin single uses the Cremate method to create a prophecy T-spin double.
Charcoal
The following shares the same mid-game situation as a dirty T-spin triple. However, its S-spin double is cleaner, leading to both sides of the stack being even:
Diagram Set 16-49
Mid-game chance
1
2
This S-spin double leads to a balanced stack.
Ash
The following is another vital meta method because of its cleanliness, efficiency, and the creation of T-spin double continuations:
Diagram Set 16-50
1
2
This J-spin single leads to a quick T-spin double opportunity. You only need to add an overhang.
Pewter
Next, you have this bonus technique:
Diagram Set 16-51
Mid-game chance
1
2
3
4
This T-spin mini leads to a balanced stack.
Technically, this is not an all-spin method. Still, it is wise to categorize it here as it is thematically similar enough to incorporate.
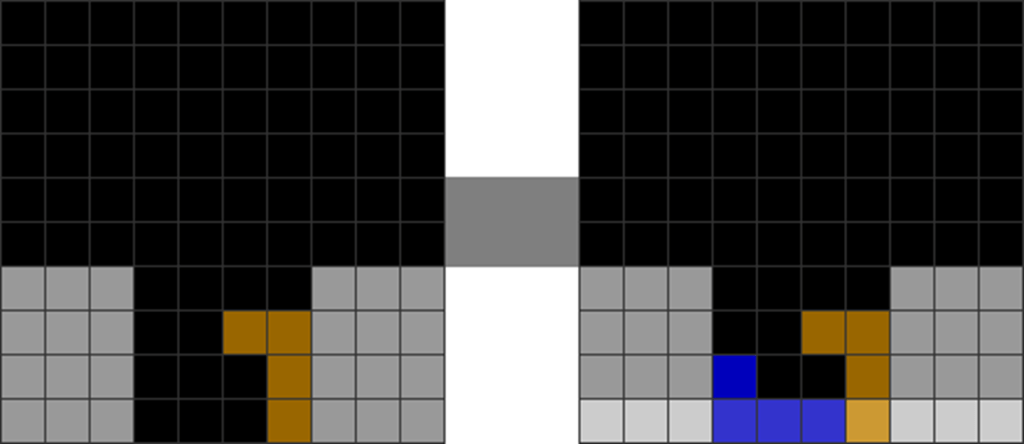
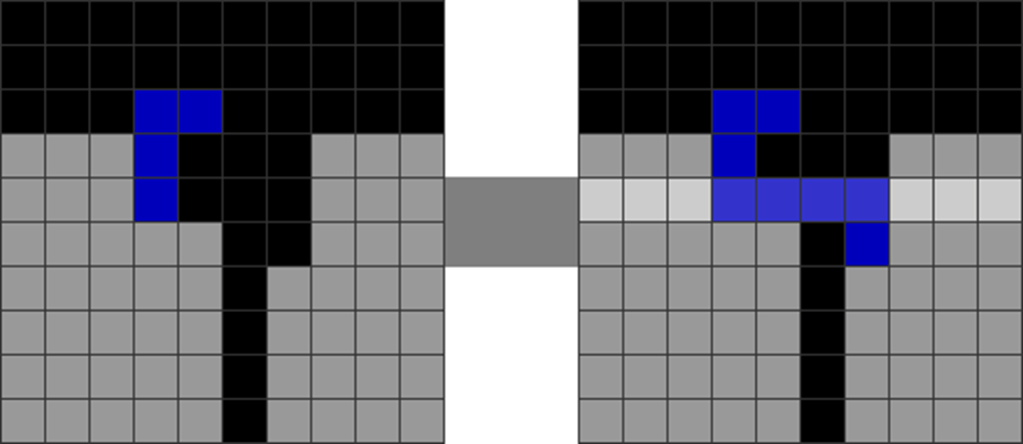
Bluetiful
Diagram Set 16-52
Mid-game chance
1
2
3
Tricky, but it is considered a meta strategy in games with all-spin bonuses.
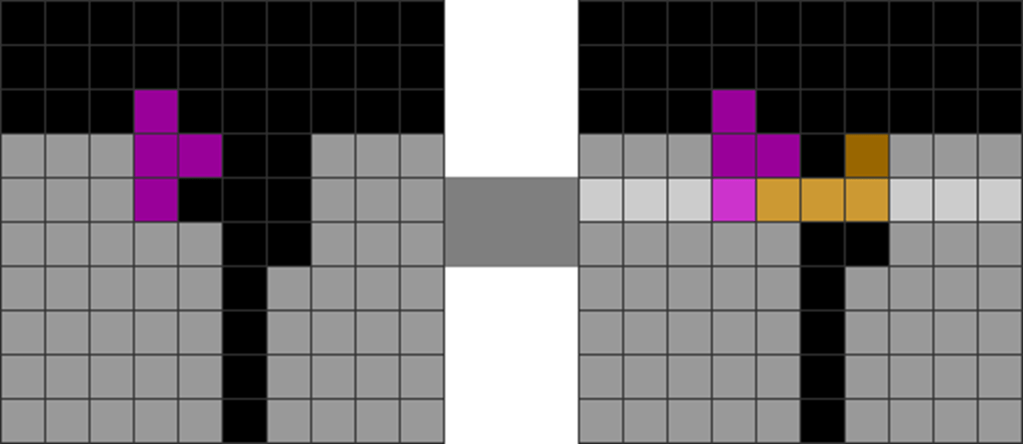
Byzantium
Next, you have this:
Diagram Set 16-53
Mid-game chance
1
2
3
A variant of Rat Intuition.
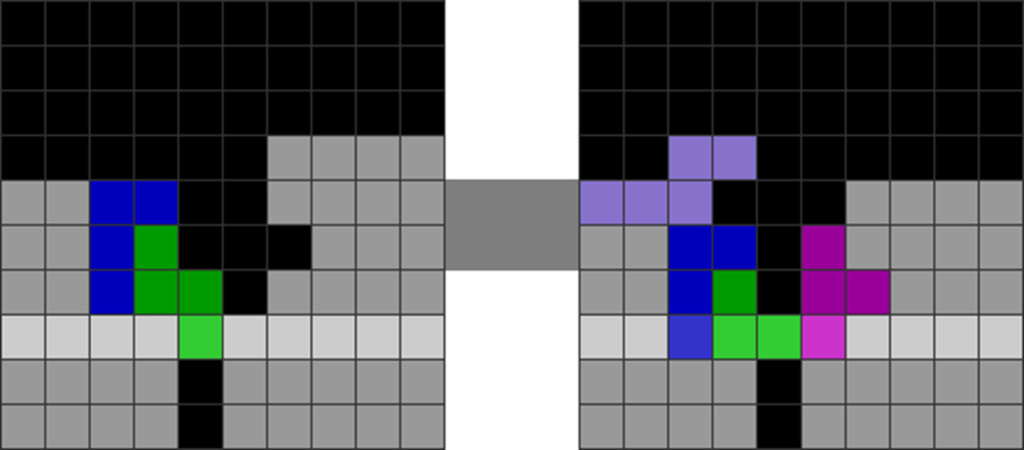
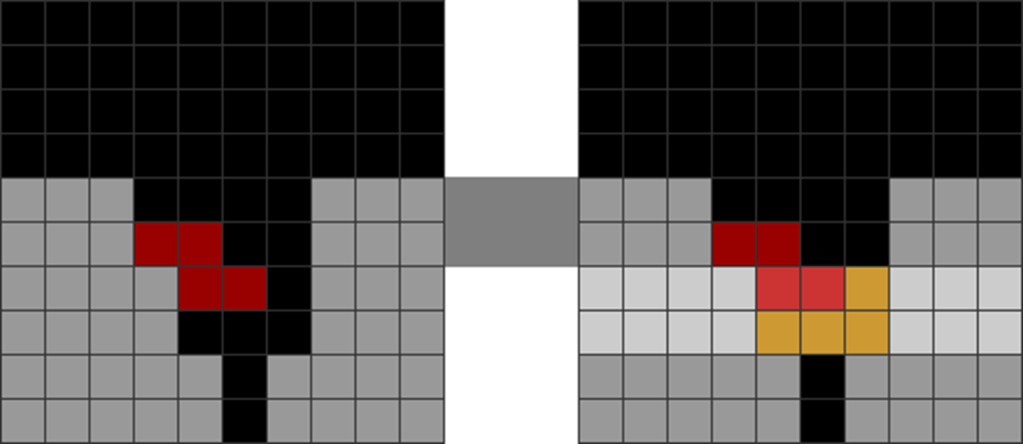
Amaranth
This version is splendid mid-game, even if it does not contain any T-spins:
Diagram Set 16-54
Mid-game chance
1
2
3
An L-spin to S-spin triple.
This is very easy to remember, as it shares the same common mid-game situation as this highly prevalent method:
X – Not in TETR.IO / Varies ↓
Diagram Set 16-55
1
2
A J-spin to T-spin double. This may not be given back-to-backs in some games.
Aureolin
Finally, this is an L-spin to T-spin double:
Diagram Set 16-56
Mid-game chance
1
2
An L-spin to T-spin double.
C)Non-Meta All-Spin Methods to Sustain Back-to-Backs
Here is a list of many other all-spin methods to insert between setups while stacking along a line to sustain back-to-back bonuses. They are not as practical as the meta methods in the last sub-section, but many can be highly useful.
Many are far less clean or upset continuations.
These are common patterns you get while stacking along a line. They are not exhaustive.
I also rated them (5 stars is the best) and added commentaries for each type.
Method 1
Diagram Set 16-57
Mid-game chance
A1
A2
B1
B2
The Above’s Rating: ★ ★ ★ ☆ ☆
Comments: Dirty.
Method 2
Note that this is mostly dirty:
Diagram Set 16-58
1
2
3
4
This S-spin double is helpful. However, it leaves an unclean residue in step 4.
The Above’s Rating: ★ ★ ☆ ☆ ☆
Comments: Very dirty and disrupts T-spin continuations.
Method 3
Diagram Set 16-59
Mid-game chance
A1
A2
The Above’s Rating: ★ ★ ★ ☆ ☆
Comments: Clean and efficient. But it may disrupt T-spin continuations. Wastes a T in the stack.
Method 4
This continues from the last diagram set’s mid-game chance.
X – Not in TETR.IO / Varies ↓
Diagram Set 16-60
B1
B2
Highly Practical and Recommended!
The Above’s Rating: ★ ★ ★ ★ ★
Comments: Clean and efficient. Creates excellent T-spin continuations. This is not considered a meta method because of the higher field and piece dependencies.
Method 5
This continues from the last diagram set’s mid-game chance.
Diagram Set 16-61
C1
C2
The Above’s Rating: ★ ★ ★ ★ ☆
Comments: Clean and efficient. Creates excellent T-spin continuations. But adds an extra cavity under the L.
Method 6
Diagram Set 16-62
Mid-game chance
A1
A2
The Above’s Rating: ★ ★ ★ ★ ☆
Comments: Clean and efficient. Can follow up with an STSD sometimes.
Method 7
This method is highly similar to method 5. Still, it differs because the resultant field is level, making it easy to build an overhang for the T-spin.
Diagram Set 16-63
Mid-game chance
A1
A2
Highly Practical and Recommended!
The Above’s Rating: ★ ★ ★ ★ ★
Comments: Clean and efficient. Creates excellent T-spin continuations. This is not considered a meta method because of the higher field and piece dependencies.
Method 8
Diagram Set 16-64
Mid-game chance
A1
A2
The Above’s Rating: ★ ★ ☆ ☆ ☆
Comments: Dirty. Disrupts most simple T-spin continuations. However, A2 can sometimes be followed up with an STSD.
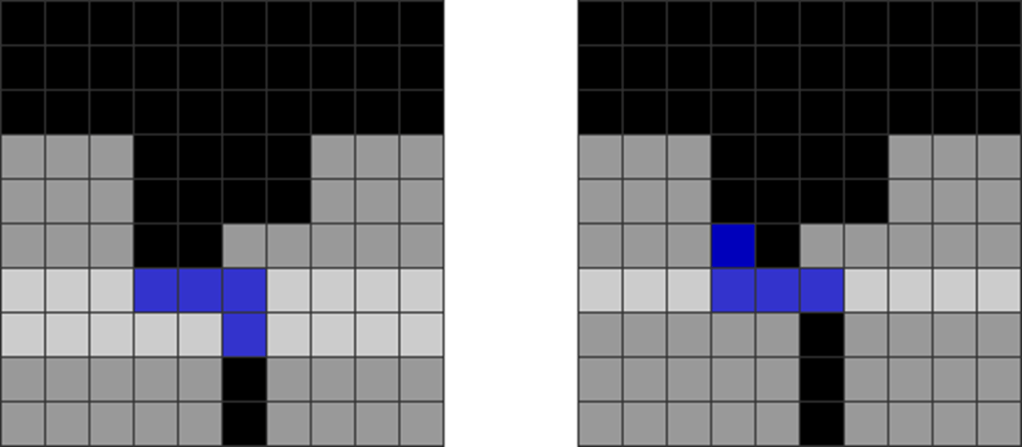
Method 9
This continues from the last diagram set’s mid-game chance.
Diagram Set 16-65
B1
B2
The Above’s Rating: ★ ★ ☆ ☆ ☆
Comments: There is almost no reason to do an I-spin single over a T-spin!
Method 10
This continues from the last diagram set’s mid-game chance.
Diagram Set 16-66
C1
C2
The Above’s Rating: ★ ★ ★ ☆ ☆
Comments: Clean and efficient. Creates excellent T-spin continuations. However, it needs 2 J dependencies.
Method 11
Diagram Set 16-67
Mid-game chance
A1
A2
The Above’s Rating: ★ ★ ★ ☆ ☆
Comments: Unclean and disrupts simple T-spin continuations. However, as a clean double, it does not alter parity.
Method 12
Diagram Set 16-68
Mid-game chance
A1
A2
The Above’s Rating: ★ ★ ★ ★ ☆
Comments: Clean and efficient. Creates excellent T-spin continuations by sometimes evening both stacks around a hole.
Method 13
Diagram Set 16-69
Mid-game chance
A1
A2
The Above’s Rating: ★ ★ ★ ☆ ☆
Comments: Decent. Strange aftermath pattern.
Method 14
Diagram Set 16-70
Mid-game chance
A1
A2
Highly Practical and Recommended!
The Above’s Rating: ★ ★ ★ ★ ★
Comments: Clean and efficient. Creates excellent T-spin continuations. But wastes a T in the stack. This could be a meta-method. However, height variations on both sides of the stack can potentially affect T-spin continuations.
Method 15
Diagram Set 16-71
Mid-game chance
A1
A2
The Above’s Rating: ★ ★ ☆ ☆ ☆
Comments: Rare to use. Disrupts simple T-spin continuations.
Method 16
Diagram Set 16-72
Mid-game chance
A1
A2
The Above’s Rating: ★ ★ ★ ★ ☆
Comments: No Ts are wasted (they are used for T-spin line clears). However, T-spin minis are weak.
The above is technically not an all-spin method, but I have categorized it here because of thematic similarity.
Method 17
X – Not in TETR.IO / Varies ↓
Diagram Set 16-73
Mid-game chance
A1
A2
Highly Practical and Recommended!
The Above’s Rating: ★ ★ ★ ★ ★
Comments: Clean and efficient. Creates excellent T-spin continuations. This is not considered a meta method because of the higher field and piece dependencies versus a typical Cremate technique.
Method 18
Diagram Set 16-74
Mid-game chance
A1
A2
The Above’s Rating: ★ ★ ☆ ☆ ☆
Comments: Awkward and hard to use despite being somewhat clean.
Method 19
This continues from the last diagram set’s mid-game chance. It is very similar to methods 5 and 7, but differs in the starting situation:
Diagram Set 16-75
B1
B2
The Above’s Rating: ★ ★ ★ ☆ ☆
Comments: Awkward to use, but leads to some T-spins.
Method 20
Diagram Set 16-76
Mid-game chance
A1
A2
The Above’s Rating: ★ ★ ★ ★ ☆
Comments: Clean and efficient. However, it may not cause good T-spin continuations.
Method 21
Diagram Set 16-77
Mid-game chance
Alt. A
Alt. B
The Above’s Rating: ★ ★ ★ ☆ ☆
Comments: Dirty. May mess up T-spin chaining.
Method 22
Diagram Set 16-78
Mid-game chance
A1
A2
The Above’s Rating: ★ ★ ★ ★ ☆
Comments: Clean and efficient. But it may disrupt T-spin continuations.
Method 23
This continues from the last diagram set’s mid-game chance:
Diagram Set 16-79
B1
B2
Be careful: perform the 180-degree J-spin before gravity pulls the J piece down into the hole in column 6.
The Above’s Rating: ★ ★ ☆ ☆ ☆
Comments: Dirty. Disrupts excellent T-spin continuations. Needs a 180-degree rotation.
Method 24
Diagram Set 16-80
Mid-game chance
A1
A2
The Above’s Rating: ★ ★ ★ ☆ ☆
Comments: Unclean. Disrupts T-spin continuations.
Method 25
Diagram Set 16-81
Mid-game chance
A1
A2
The Above’s Rating: ★ ★ ★ ☆ ☆
Comments: Clean and efficient. But disrupts T-spin continuations.
Method 26
Diagram Set 16-82
1
2
The Above’s Rating: ★ ★ ★ ☆ ☆
Comments: Clean and efficient. But disrupts T-spin continuations.
Method 27
Diagram Set 16-83
Mid-game chance
A1
A2
The Above’s Rating: ★ ★ ★ ☆ ☆
Comments: Clean and efficient. Disrupts T-spin continuations.
Comments: Clean and efficient. May disrupt T-spin continuations.
I regard some of these methods as “clean” because, with a bit of upstack, the aftermath can be easily upgraded to a Tetris follow-up.
Method 30
Diagram Set 16-86
Mid-game chance
A1
A2
The Above’s Rating: ★ ★ ★ ☆ ☆
Comments: Clean and efficient. Awkward. May disrupt T-spin continuations.
Method 31
Diagram Set 16-87
Mid-game chance
A1
A2
The Above’s Rating: ★ ★ ☆ ☆ ☆
Comments: Dirty and awkward. Disrupts T-spin continuations.
Method 32
The following continues from the last diagram set’s mid-game chances:
Diagram Set 16-88
B1
B2
The Above’s Rating: ★ ★ ★ ☆ ☆
Comments: Clean and efficient. May not create T-spin continuations.
Summary and Conclusion
By memorizing these all-spin methods to insert between T-spins, you can easily increase your chances of sustaining back-to-backs in certain Tetris games.
The reader should experiment with these further and note that all-spin setups are continuously being developed and optimized by the player base. I will update my HowtoTetris and Galactoid Tetris WordPress websites with new findings in the future if there are vital discoveries.
Concept
Summarized Rules-of-Thumb
Flow
Suppose you had to learn one set of techniques. In that case, the meta all-spin methods to sustain back-to-backs while stacking along a line should be mastered until you are devastatingly fast.
Form
Memorize this chapter’s methods not by merely recognizing their form, but by their shared, common mid-game chances with other well-known situations or setups. Be cautious with the non-meta methods in this chapter, as they are not as safe, clean, or efficient.
Balance
All-spins should primarily be used as fillers between larger attacks, such as T-spins and Tetrises, to sustain back-to-backs. Use the meta all-spin methods here to even both sides of the stack to create even more T-spin continuations.