Questions related to defenses and survivability. Downstacking, skimming, and combos are related to lowering your stack’s height to survive better.
Questions
Why should one not cover holes while downstacking too often?
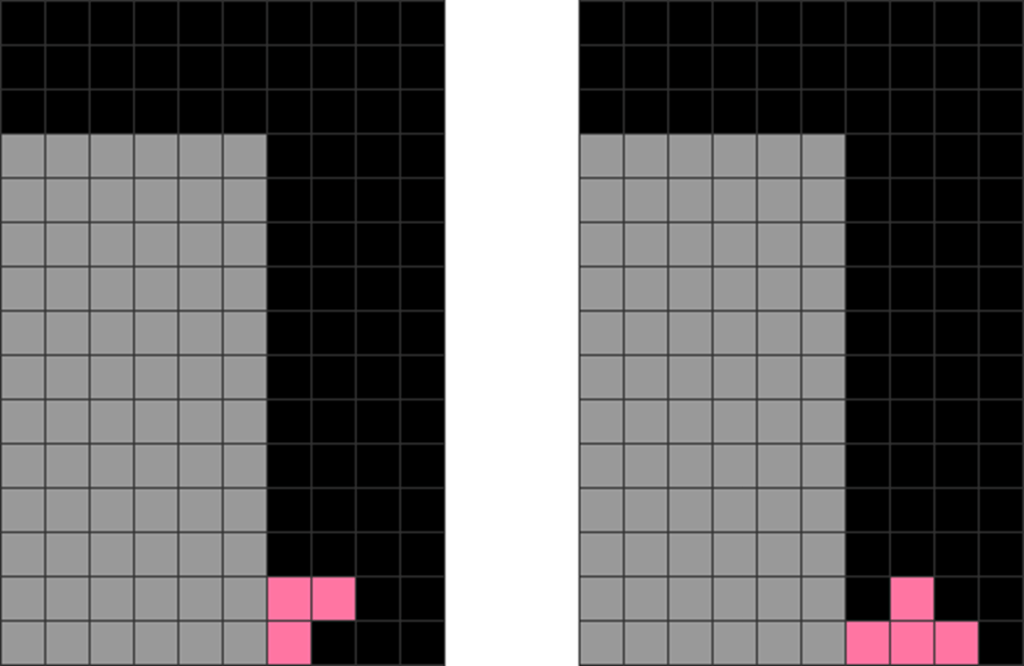
Many beginner players cover holes excessively with certain specific placements during downstacking, like this:
Diagram Set 5-1
1
2
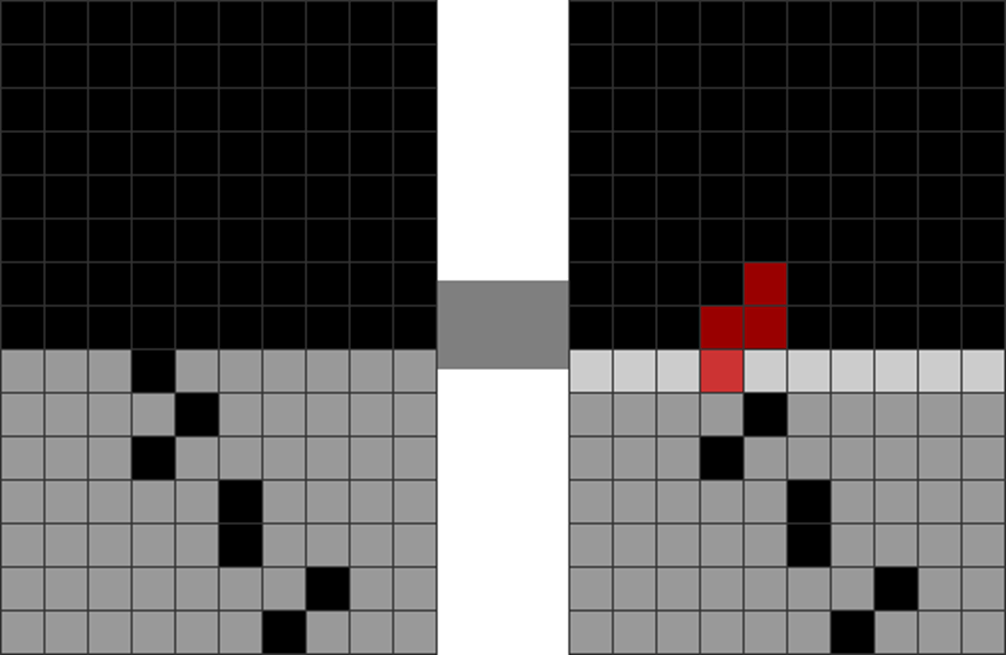
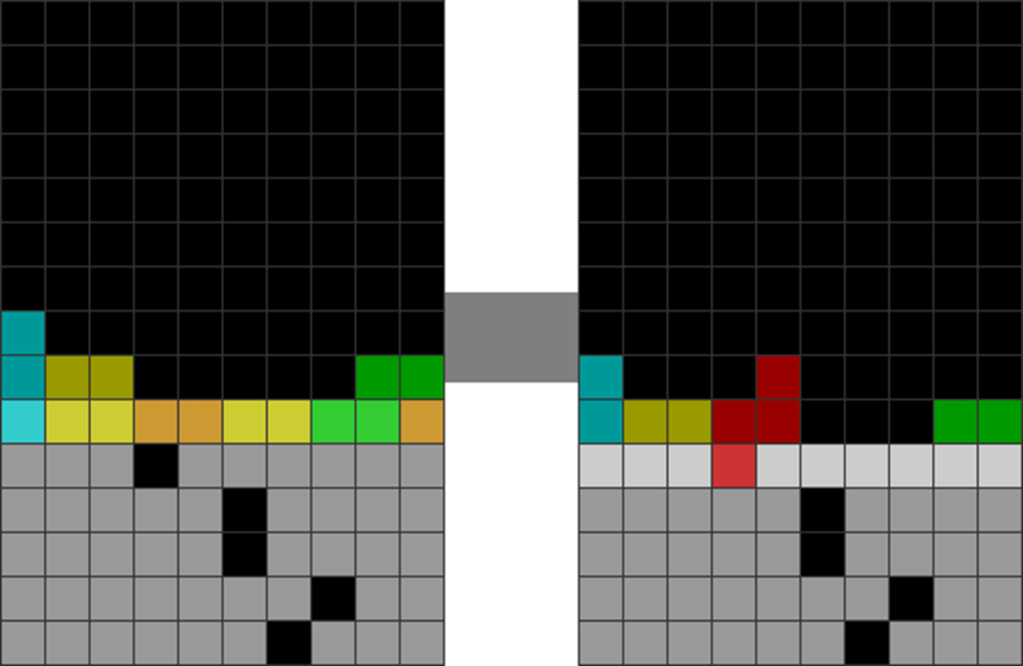
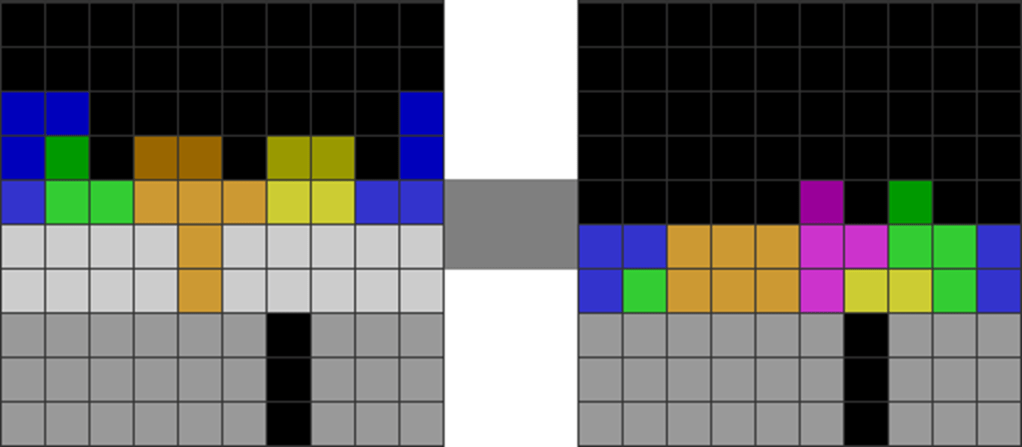
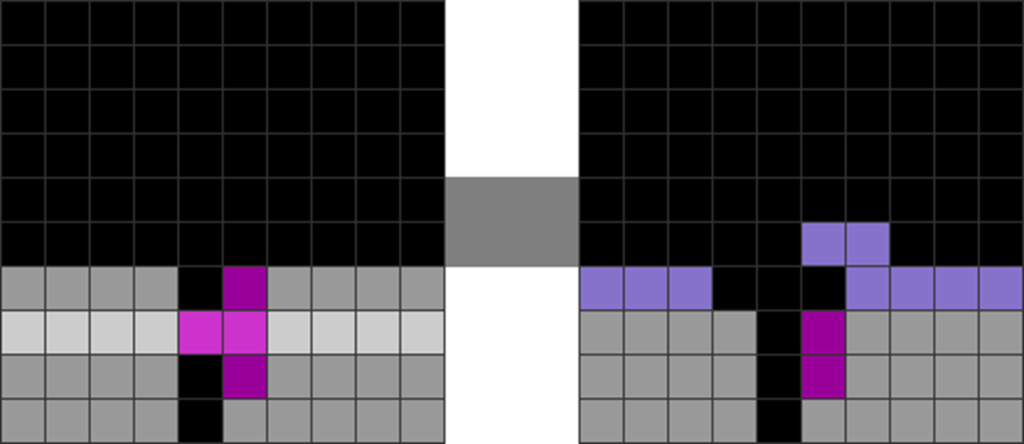
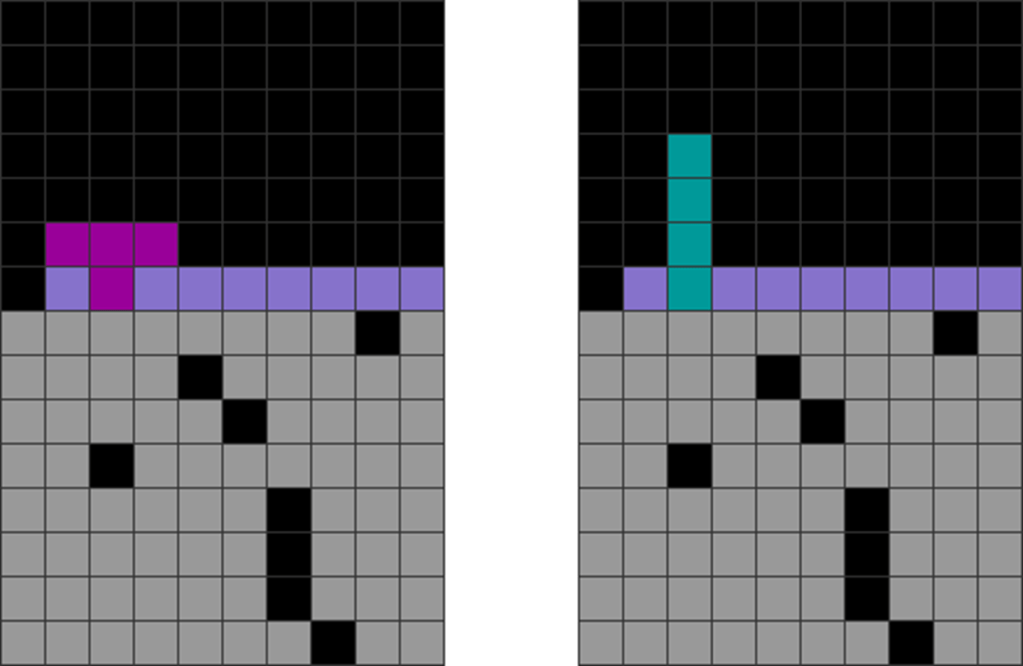
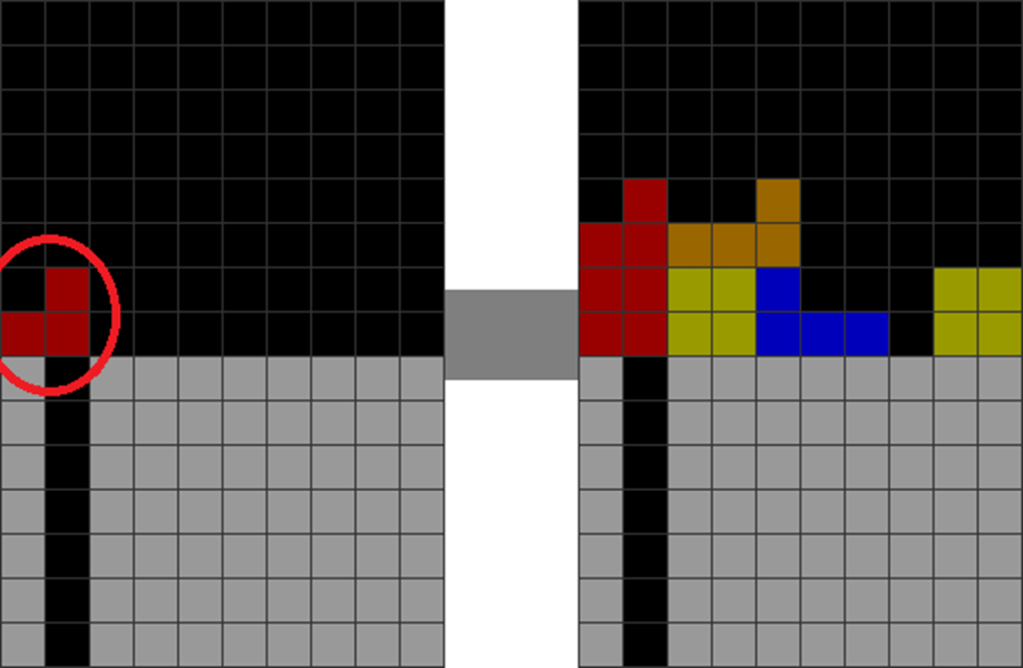
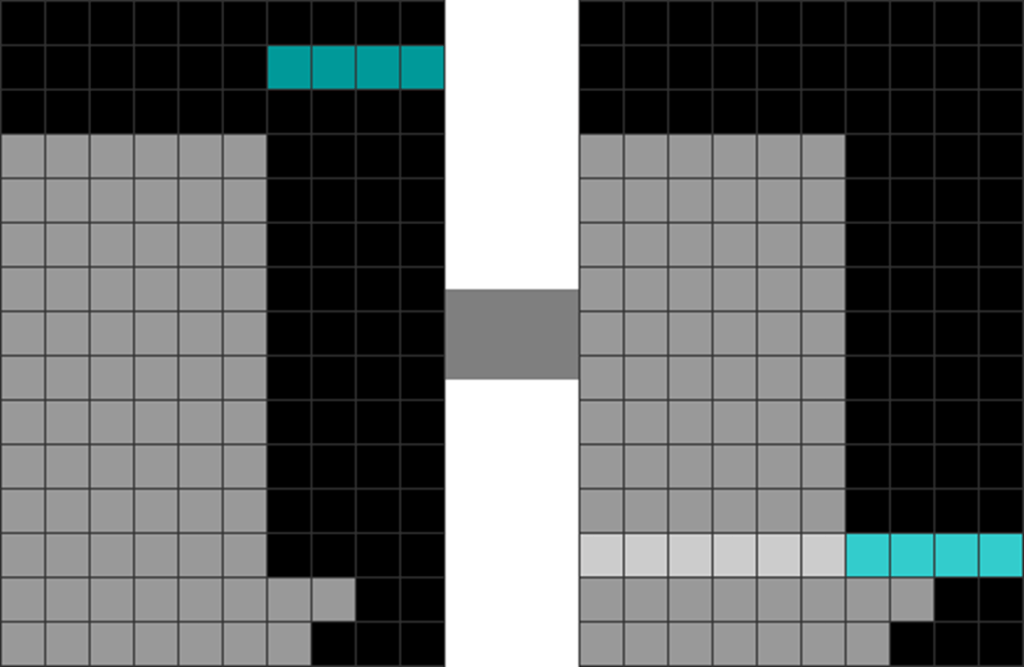
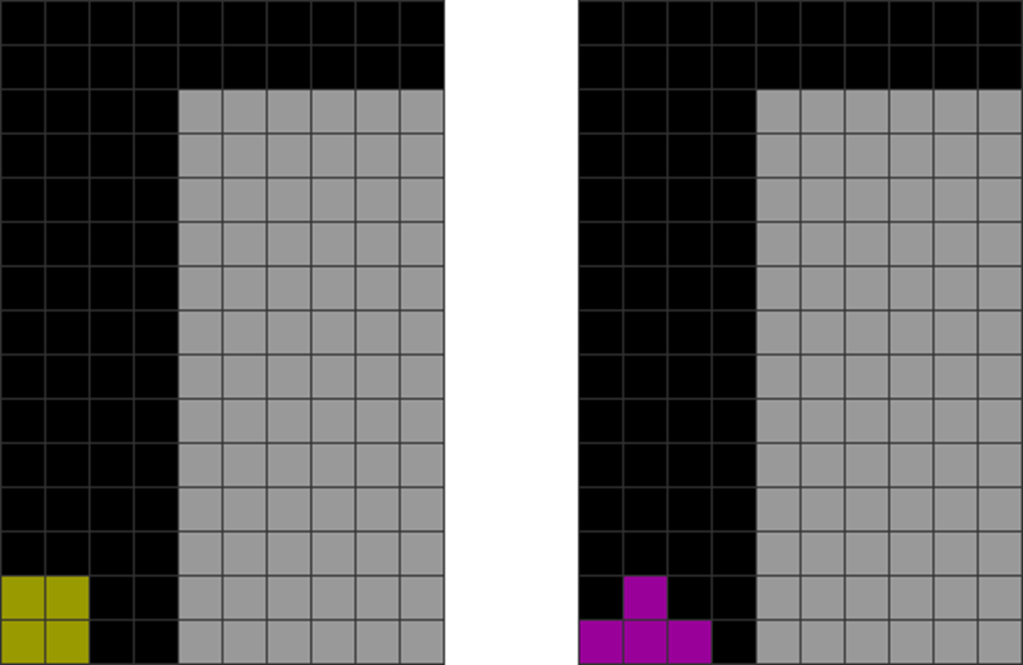
This is the starting field, with semi-dirty garbage.
The player uses a vertical Z piece to downstack the first garbage hole.
3
4
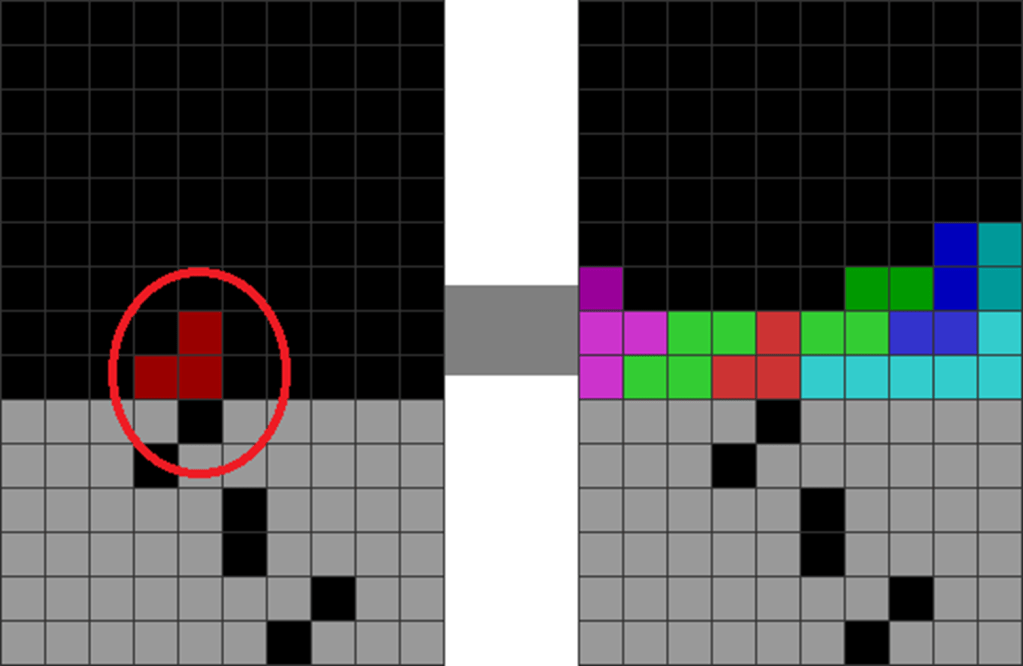
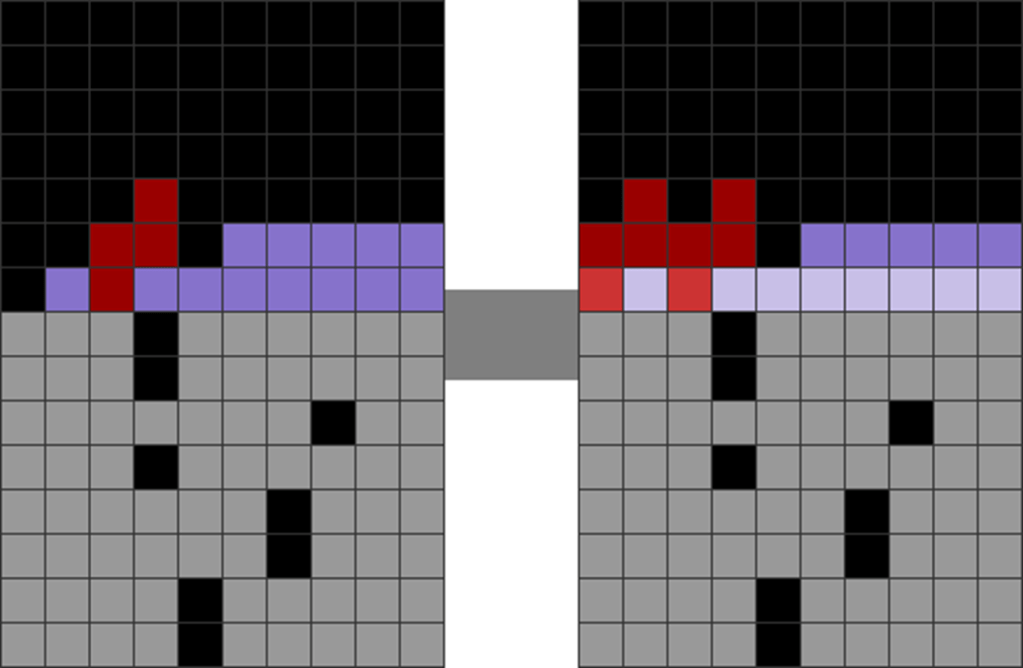
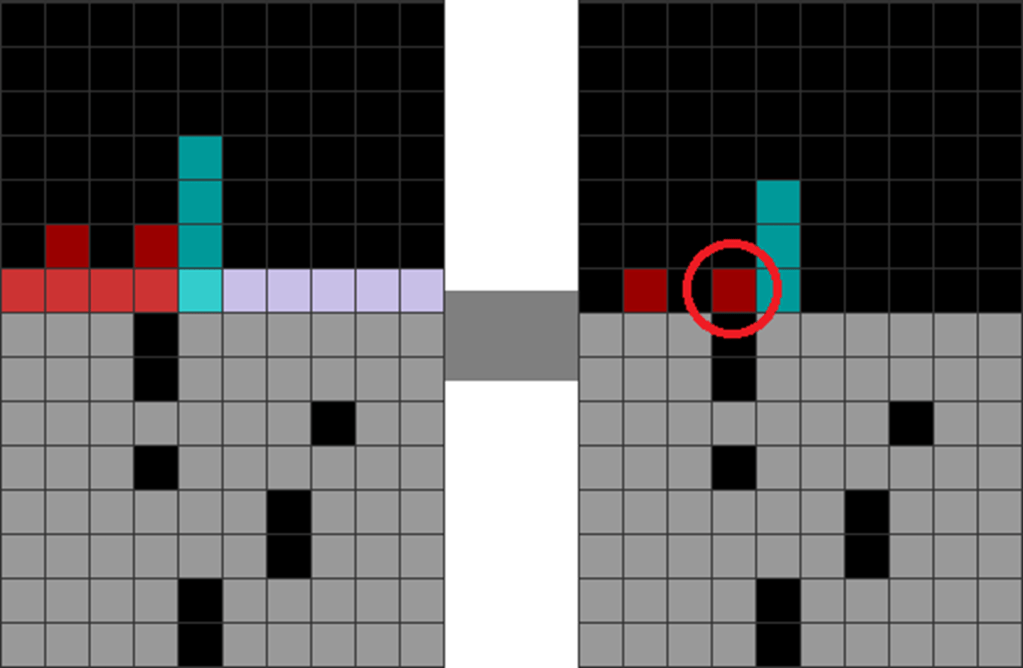
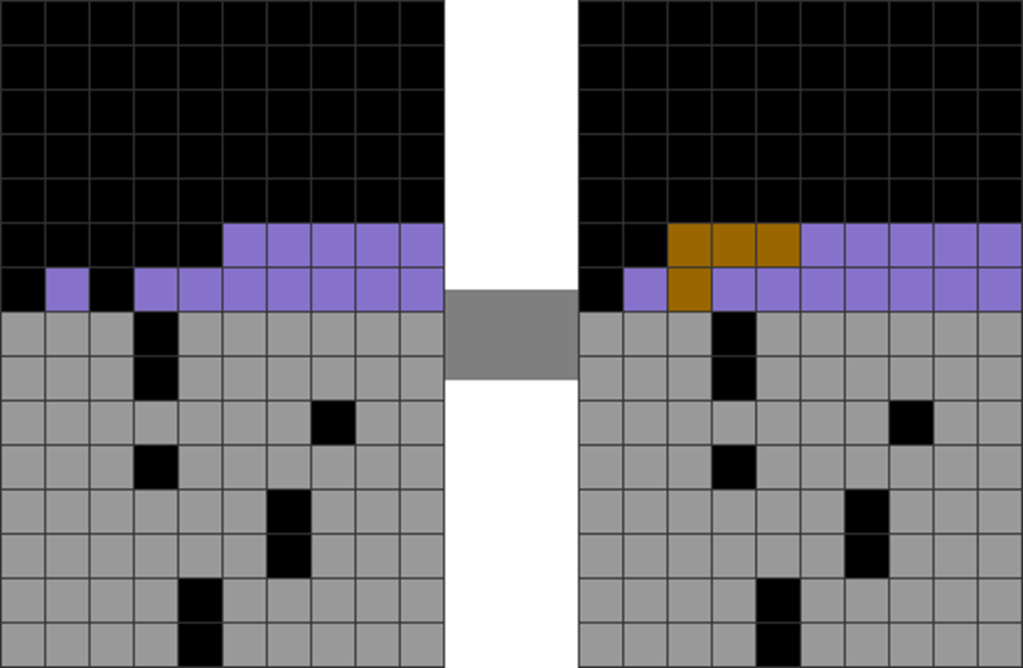
This leaves a red-circled area where the 2 red-colored blocks are upstacked over the next garbage hole.
A player must build up 2 layers to skim through them to expose the next garbage hole.
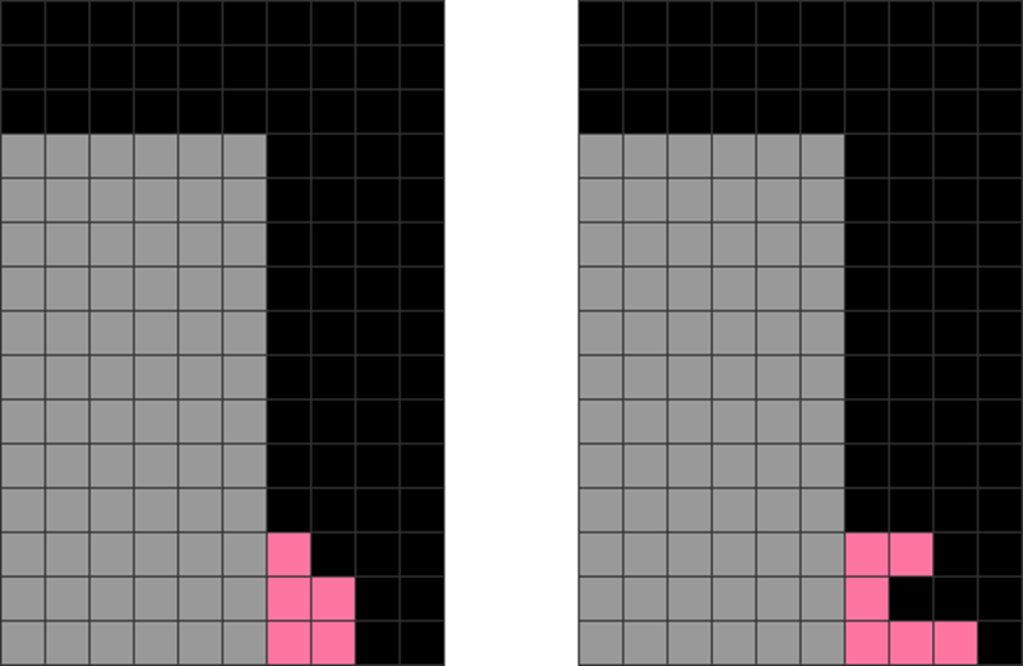
Here, the vertical Z piece will stack 2 blocks over the next garbage hole after the initial line clear.
These 2 blocks must then be skimmed off before one can access the next garbage hole.
Instead, a player should find other placements, such as this:
Diagram Set 5-2
1
2
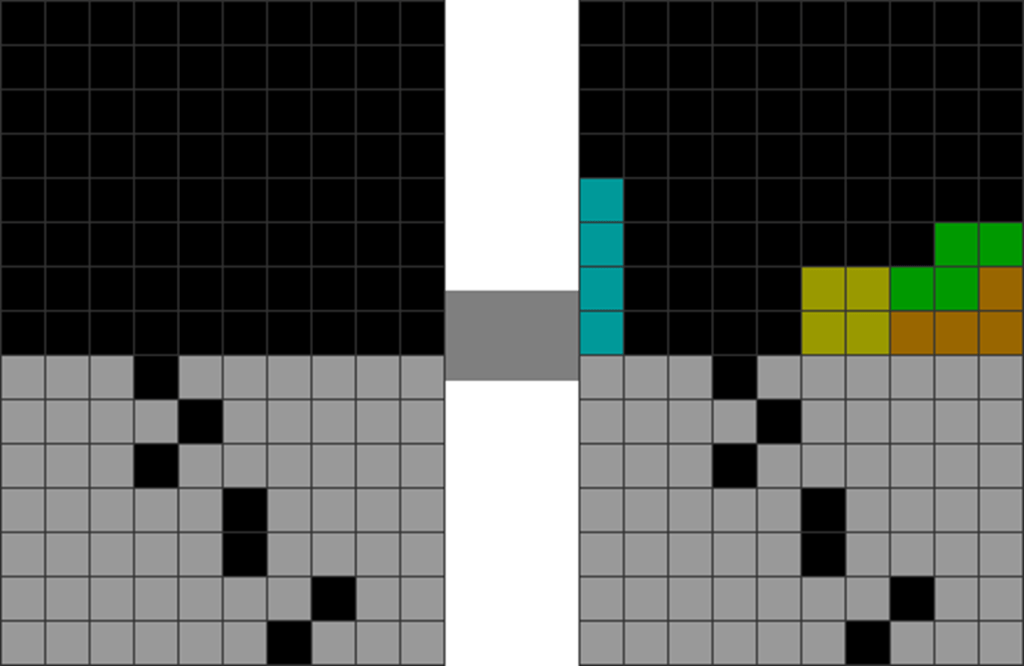
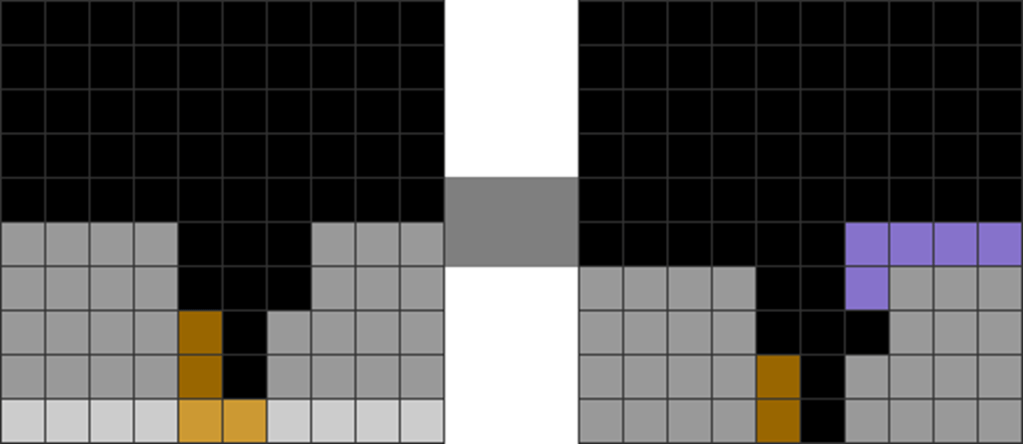
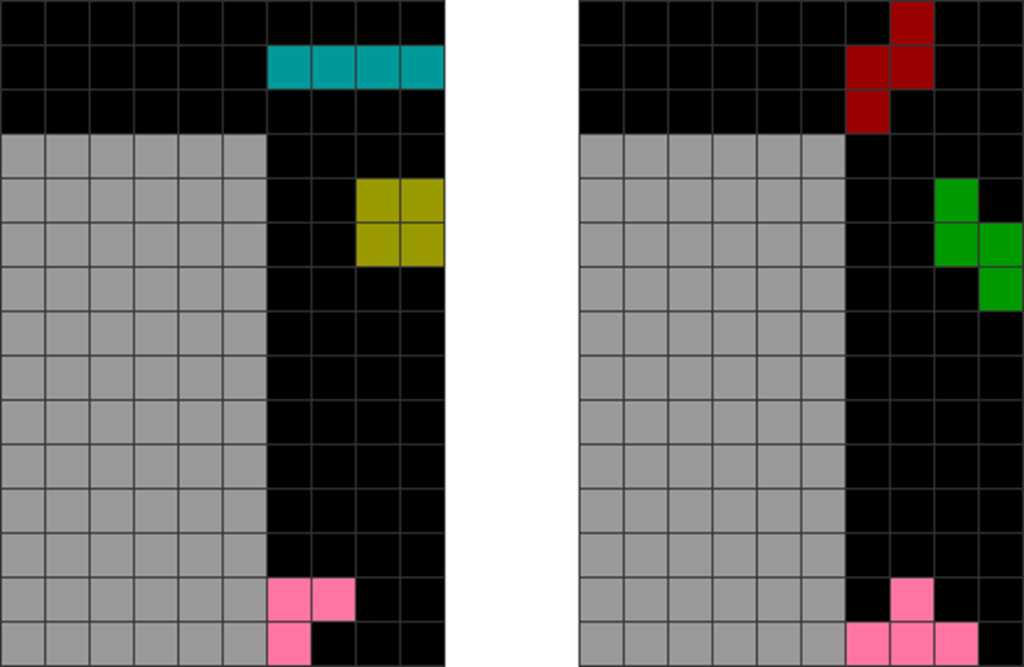
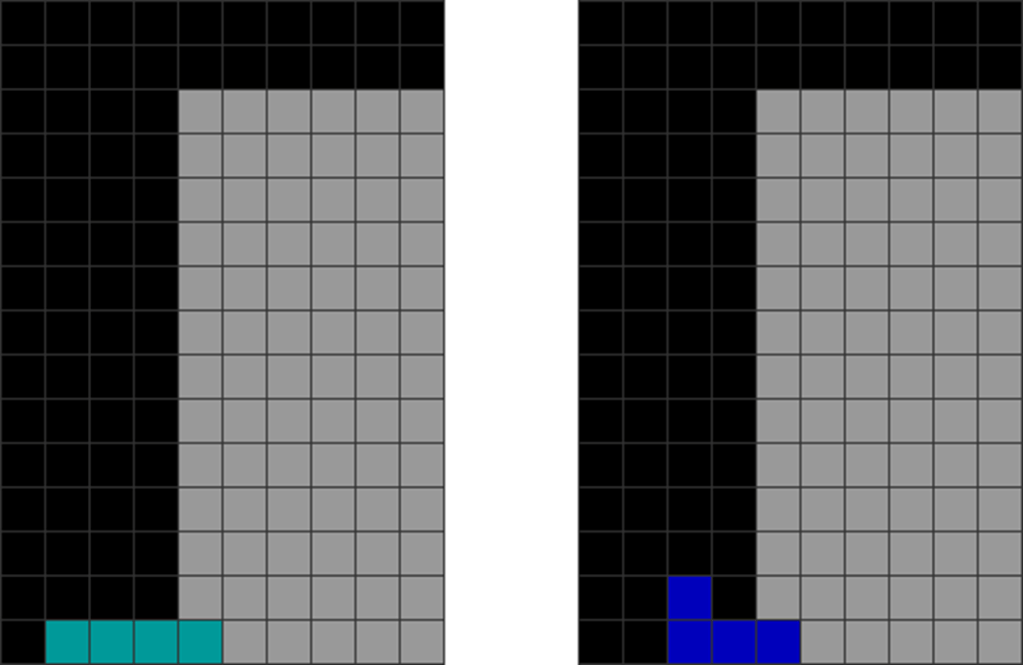
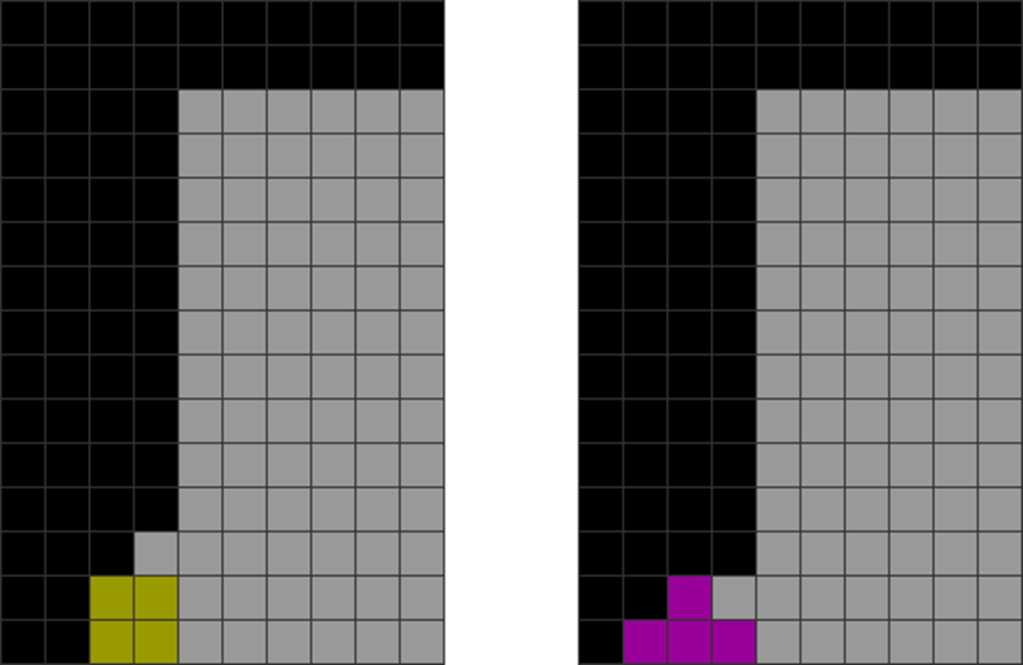
This is the same starting field as the last diagram set.
The player upstacks a bit.
3
4
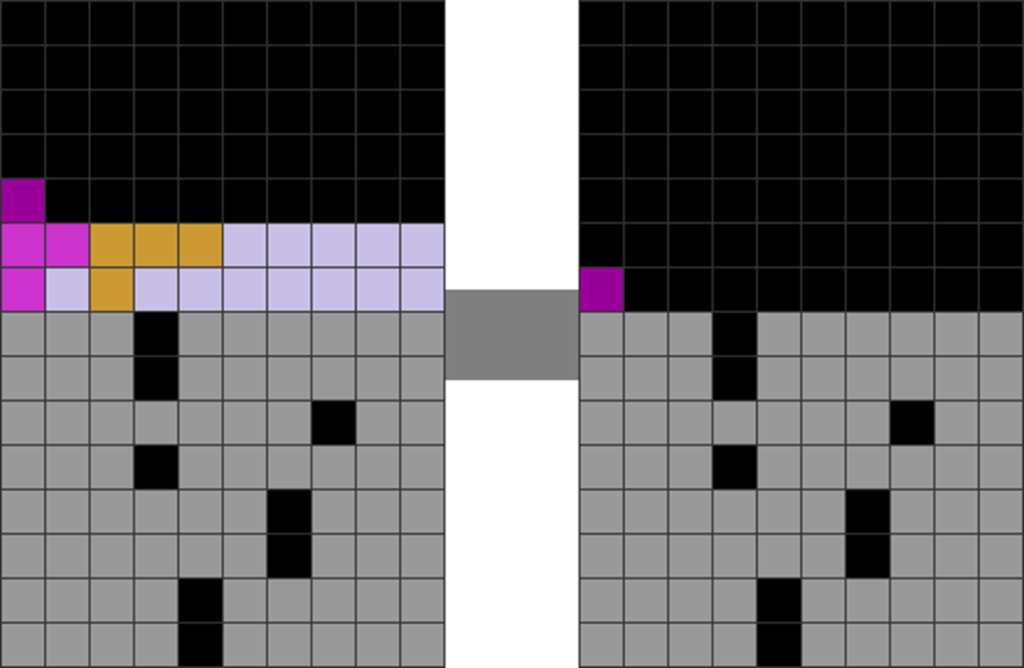
He uses a J to skim and downstack, opening up the second garbage hole.
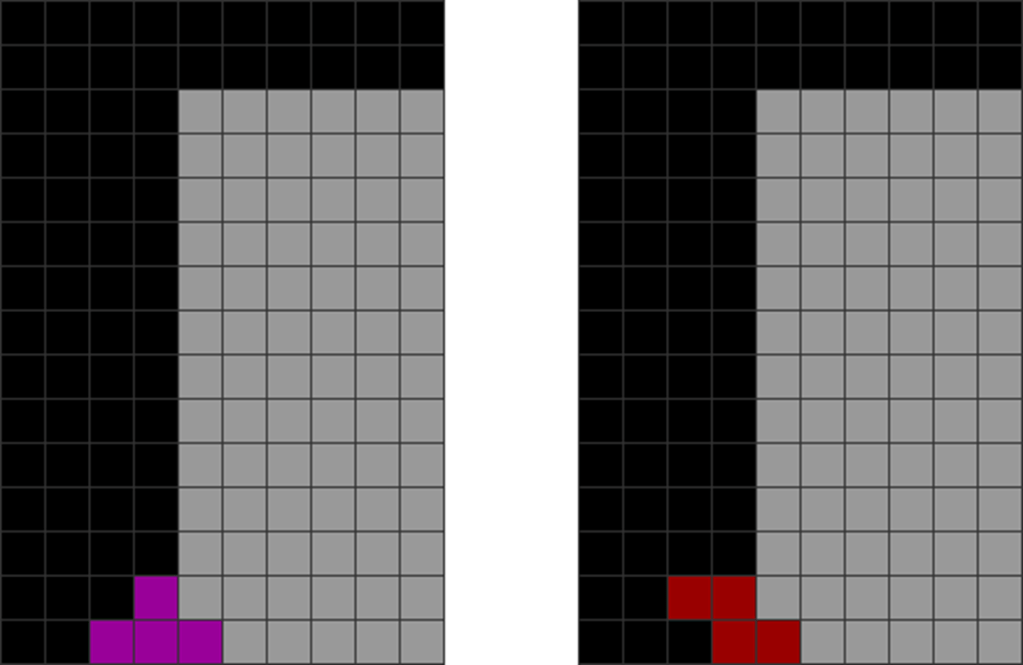
The next garbage hole is downstacked with an L.
5
6
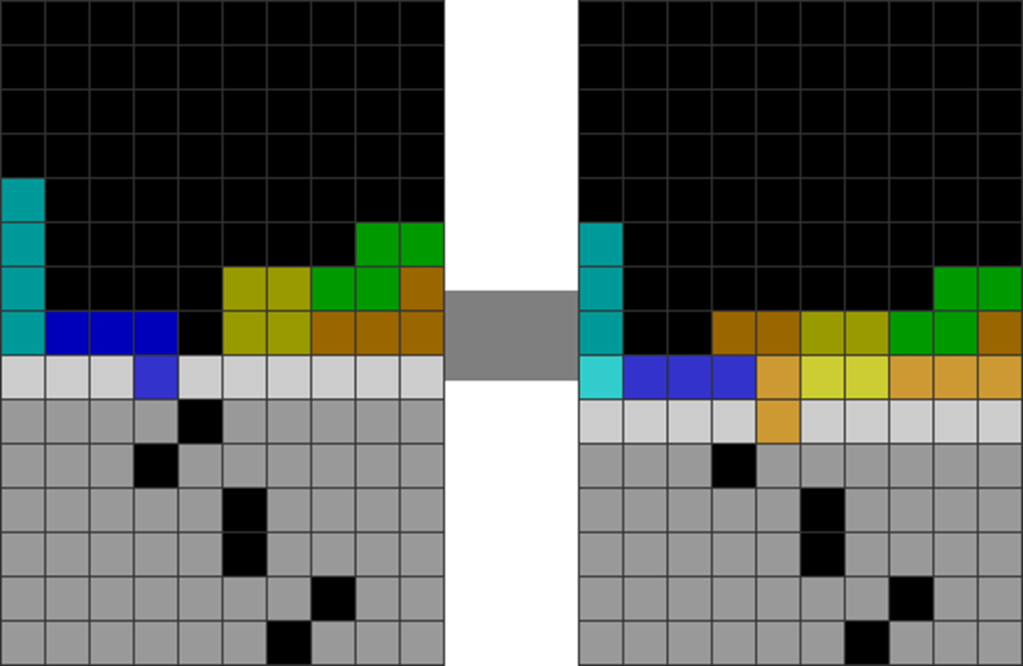
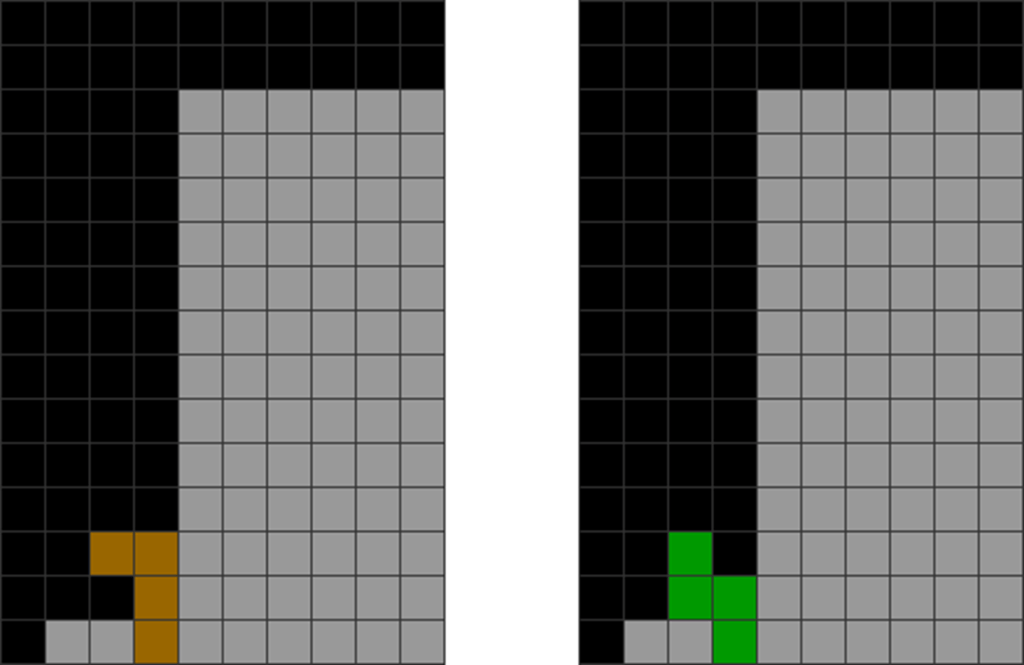
Then, an O.
Finally, a Z-skim opens the garbage hole in column 6.
Here, the garbage hole is exposed with fewer upstacked lines, making it easier for one to survive.
Some players are also not mindful of their stacking while making T-spins while downstacking:
Diagram Set 5-3
1
2
The player makes a T-spin double.
The first T-spin double line clear concludes.
3
4
He then skims and breaks back-to-back bonus with a J piece.
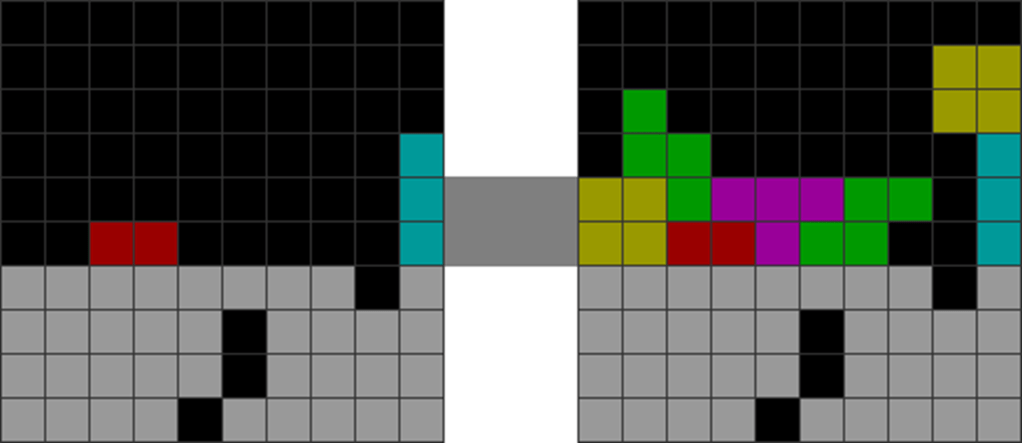
He constructs a second T-spin double with a Z overhang.
5
6
The second T-spin double line clear concludes.
He skims and downstacks with an I and J, but the red block from the second T-spin double’s overhang still blocks the next garbage hole.
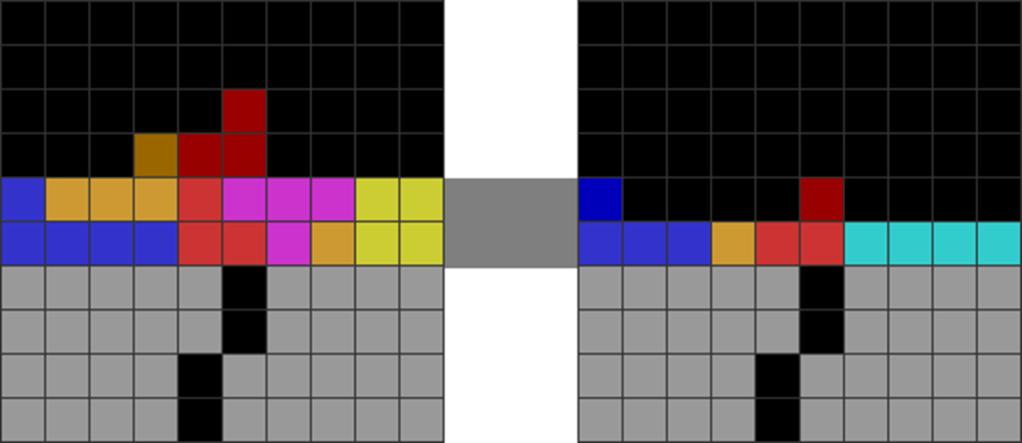
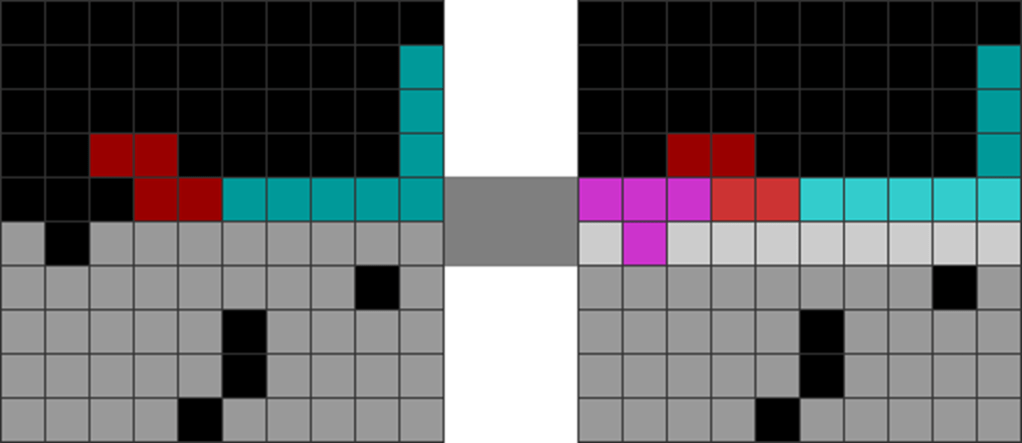
Here, after the T-spin downstack, there are residue blocks that cover the next garbage hole. This leads to excessive skimming.
Instead, a more adept player should do this (unless there is no other choice):
Diagram Set 5-4
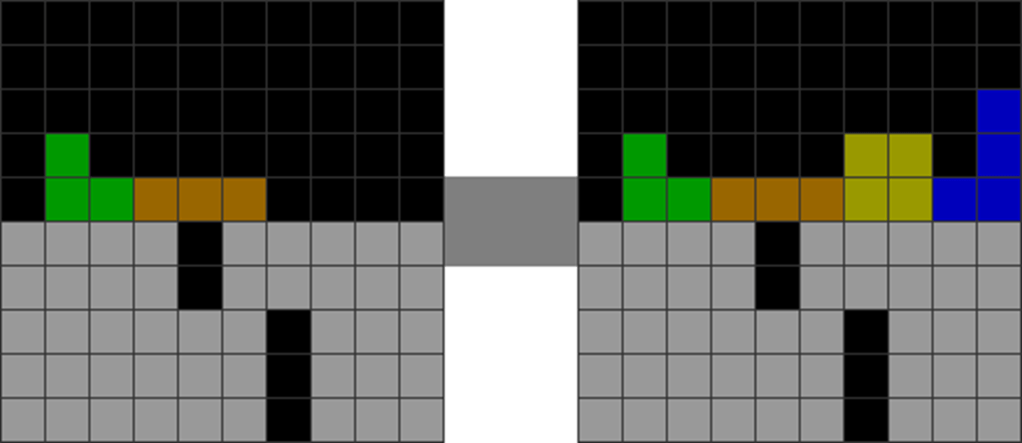
1
2
Starting field.
A T-spin line clear occurs.
3
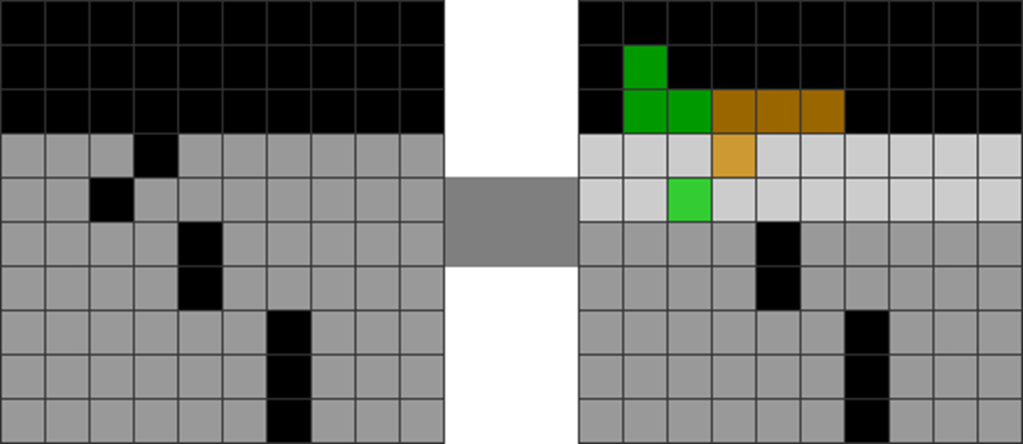
4
The next garbage hole is exposed cleanly.
The player can continue making a T-spin triple without extra line clears.
After the T-spin downstack with the T piece, the player exposes the garbage hole, maintaining pressure without falling into an endless skimming cycle that causes long line clear delays.
Why should one not over-skim?
Many beginner players make the following tragic mistake:
Diagram Set 5-5
1
2
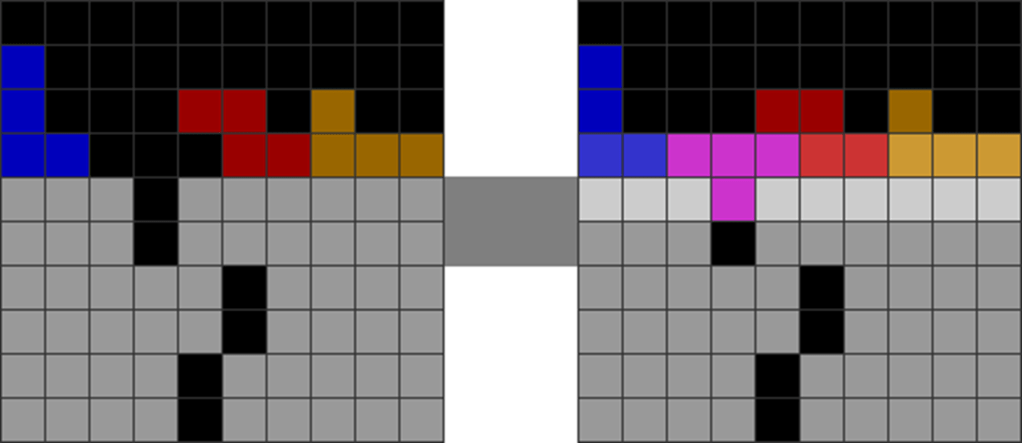
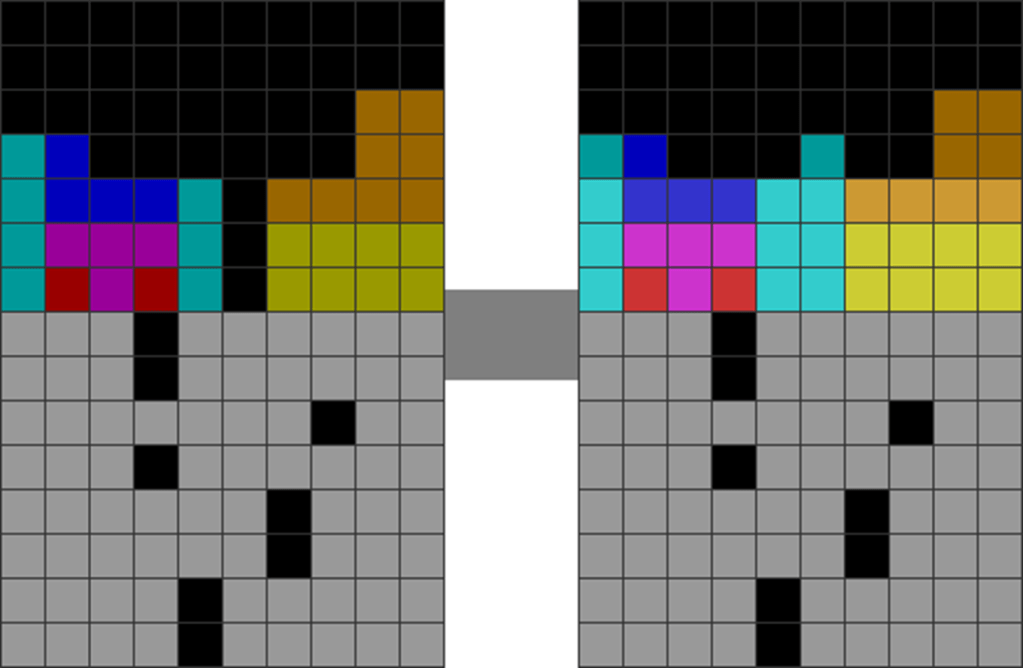
The garbage is scattered and dirty.
The player skims and incurs 2 line clear delays with L and S.
3
4
This causes the orange blocks from the L piece to upstack and block the garbage hole.
The player upstacks a bit more with O and J.
5
6
He then skims with J and L pieces excessively and inefficiently.
He finally skims with L, T, and S to clear the colored blocks and reach the garbage hole.
Here, they would upstack a bit, skim, and repeat. The process generates minimal garbage output (due to too many single line clears and few combos) and maximal line-clear delay penalties.
Instead, a player should do this:
Diagram Set 5-6
1
2
The same starting field as the last diagram set.
The player makes a T-spin instead.
Here, a player upstacks quickly to a T-spin setup to generate some garbage. If a player cannot do it, they can at least make a double or triple before getting down.
By minimizing line clear delays, you minimize opportunity cost.
The logic is simple: imagine driving from your home to a mall. You drive forward a mile, then suddenly reverse half a mile. This repeats until you reach the mall.
Everyone should realize that this is incredibly inefficient. The same logic applies to this upstack-and-skim-and-repeat cycle: it wastes time and upstacked pieces.
By minimizing it, one can go at full thrust and ensure that they maximize garbage output per unit of time and per piece placed.
Why should one not hesitate to skim when needed?
I have observed that even high-level players often upstack too aggressively when they should sometimes skim.
There are several reasons one should skim generously:
Diagram Set 5-7
1
2
This sequenceinvolves using an O to skim. The Z overhang is placed first, so when the O double completes, it leads to a forecasted T-spin double.
3
Alt. A
The T-spin double is ready.
Here, the player tries to instead upstack to make a T-spin without skimming. He may get topped out because of over-stacking.
One reason is that some skims only require a single piece (or a few) to reach a safer, cleaner garbage line. Conversely, compare the main sequence to the above’s Alt. A.
Here, if a player wants to upstack to sustain back-to-backs instead of skimming, they would need many more pieces placed before they can get the next T-spin or Tetris setup. Therefore, a quicker way to get an offensive attack is to skim.
Another reason is that some skims create T-spin or cleaner Tetris opportunities, such as:
Diagram Set 5-8
1
2
The player uses a T skim to create a single. This balances both sides of the stack, allowing a T-spin double follow-up.
Diagram Set 5-9
1
2
Same, with an L skim leading to an easy T-spin double.
Here, some skims even out both sides of the field to make a quick T-spin. Some may even shape the field into another T-spin setup. Others make a perfect 4-block-high rectangle to make a clean Tetris.
Hence, while skimming breaks back-to-back bonuses, they can sometimes offer quicker and safer ways to make offensive setups. It also boosts survival.
Why does stacking flatter contribute to more efficient downstacking?
Stacking flatter contributes to more efficient downstacking, which requires fewer pieces to get down.
The reason for this arises from a very scientific and mathematical reasoning:
Diagram Set 5-10
1
2
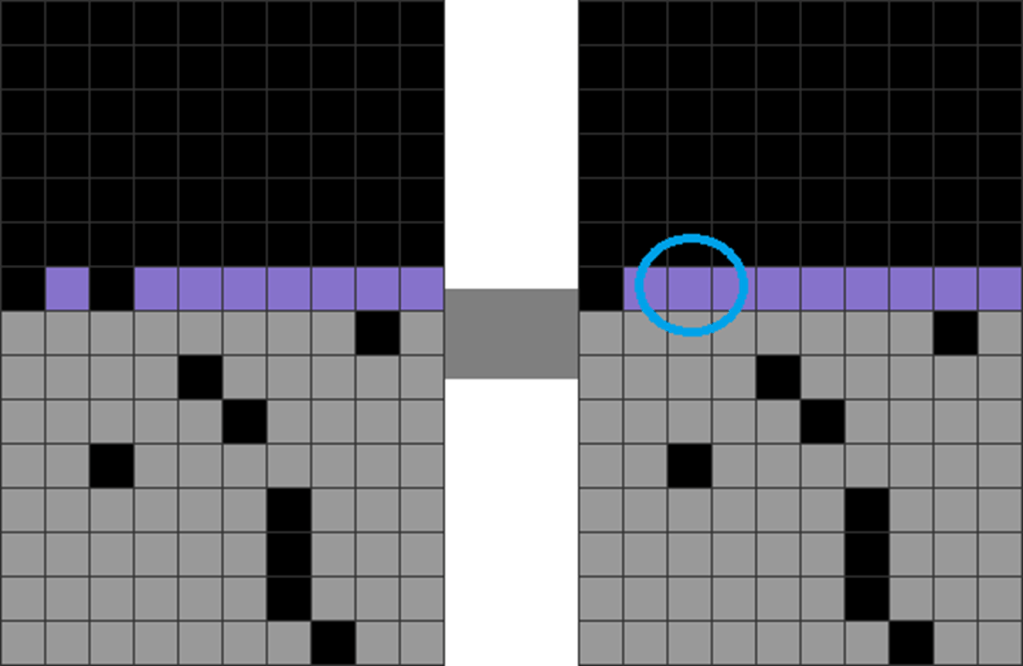
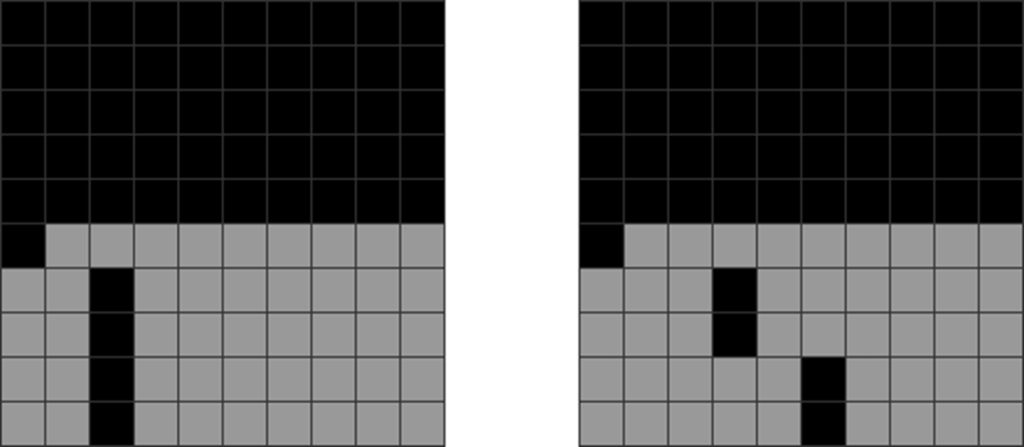
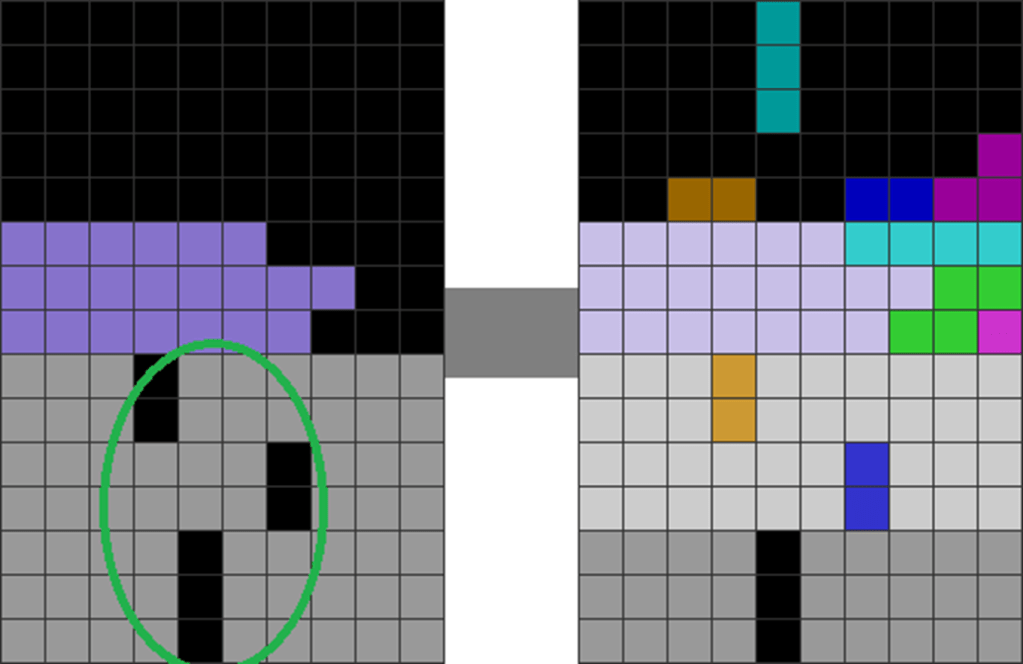
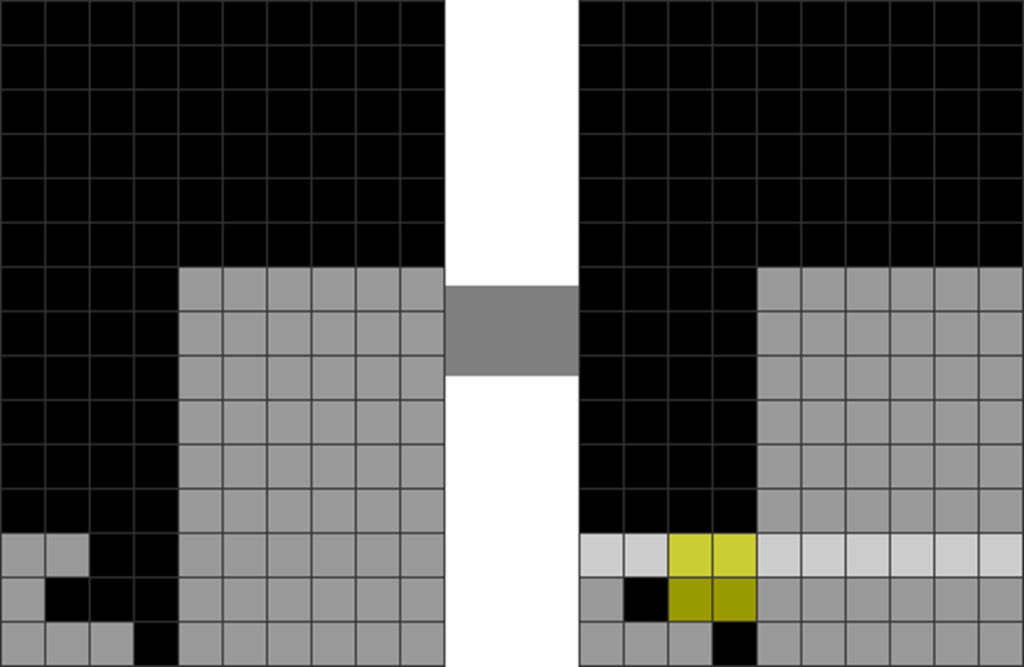
There is a hole splitting a field (third column).
Ideally, to downstack or skim it with no additional upstack, you need a 1-block piece to fill it (the blue-circled block) in step 2.
However, 1-block pieces do not exist! All 7 pieces have 4 blocks each, and their orientations are fixed.
Diagram Set 5-11
Starting Field
How do we downstack this pattern?
Diagram Set 5-12
A
B
C
D
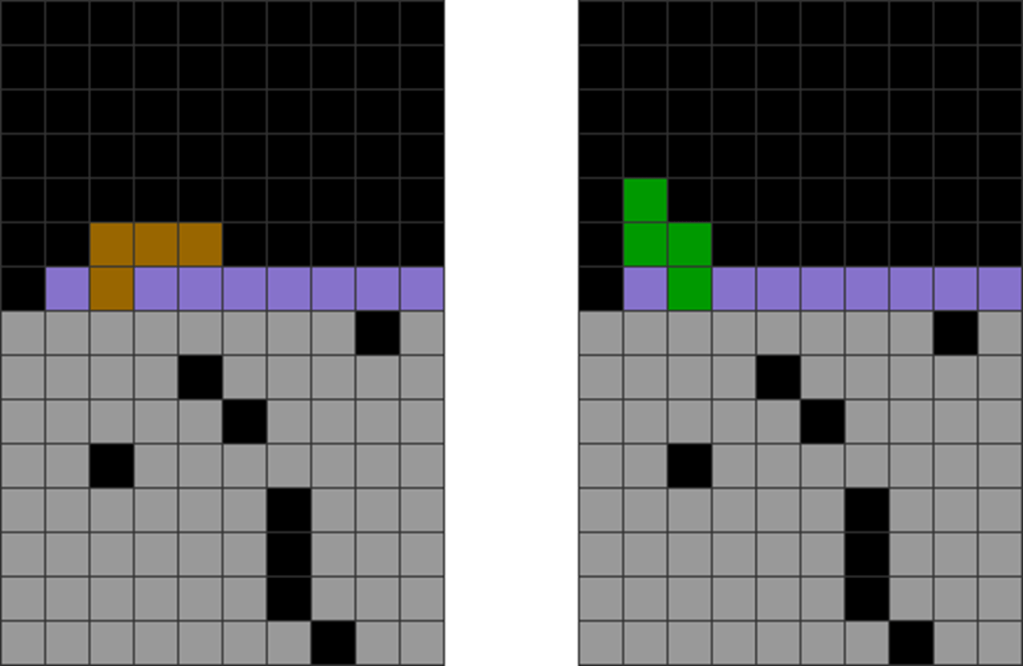
In all 4 examples, you fill the first cavity with a cost — an added 1 line of upstack over it, thus decreasing downstacking efficiency. All L, S, T, and I configurations will leave at least 2 vertical blocks of upstack.
Here, a player stacks unevenly. To fill the cavities, nearly every permutation with the 7 minoes will cause at least 2 extra lines of upstack over the cavity.
This increased colored upstack to garbage line ratio leads to the following:
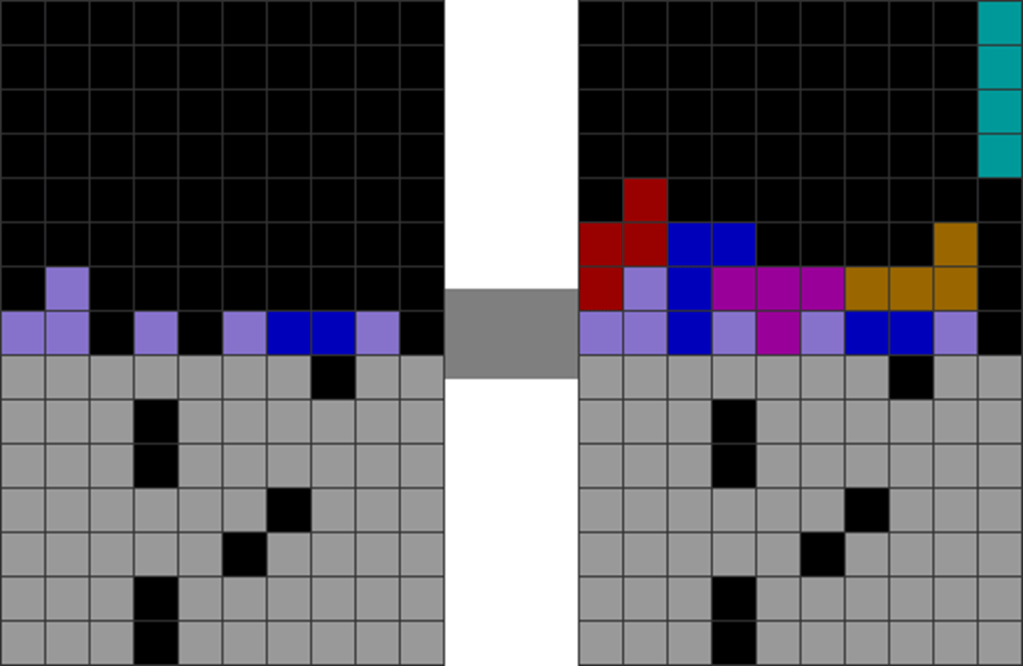
Diagram Set 5-13
1
2
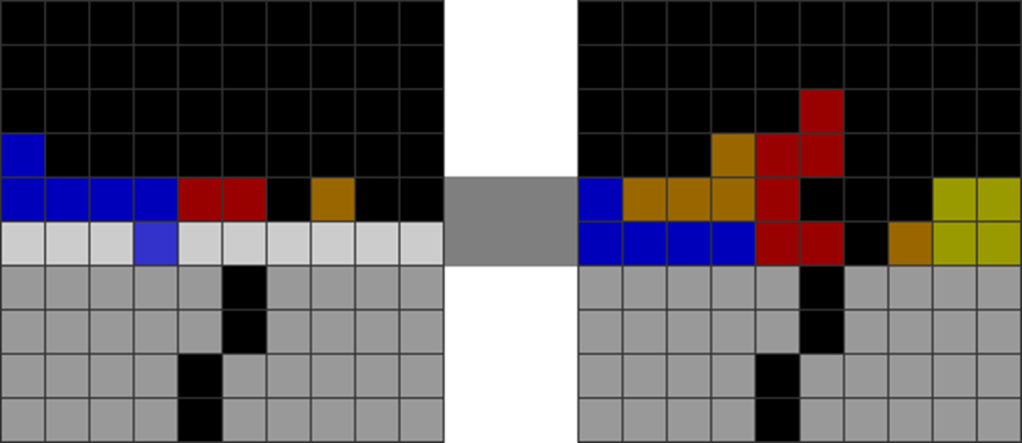
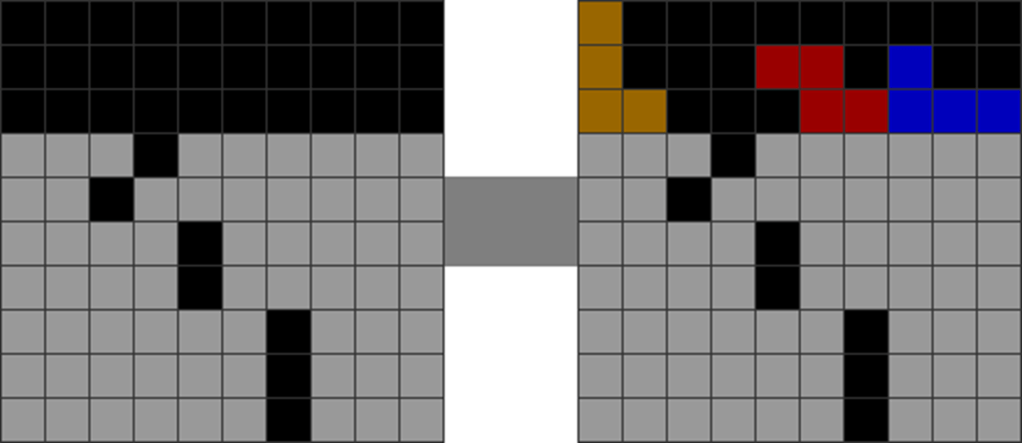
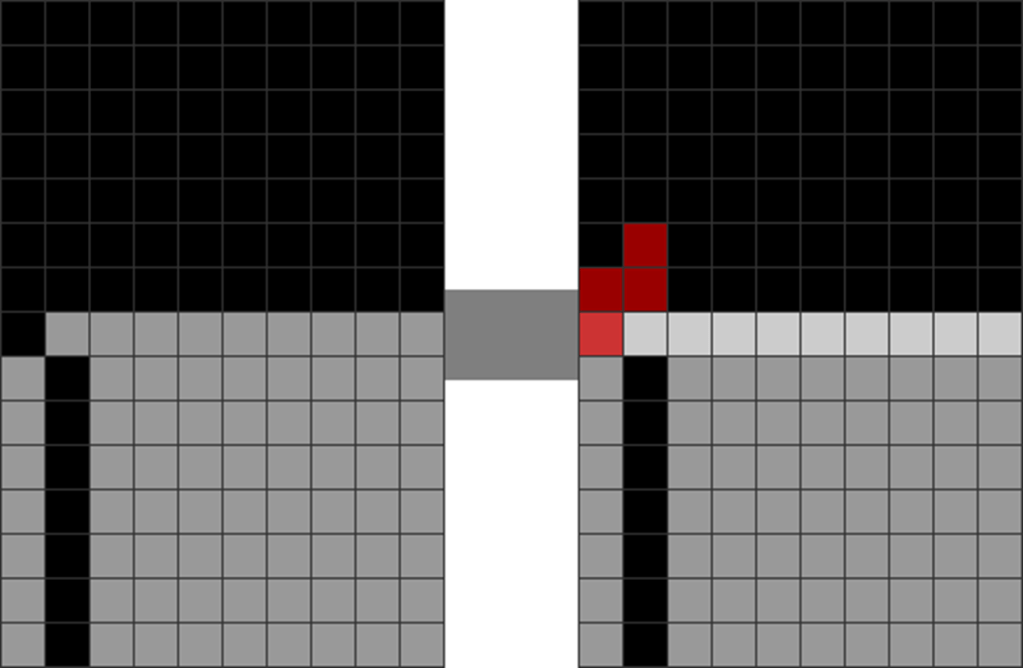
Starting field.
The player skims with a Z piece.
3
4
Then, with an I piece.
But the remaining red block (the red circle) obstructs the next garbage hole beneath.
5
6
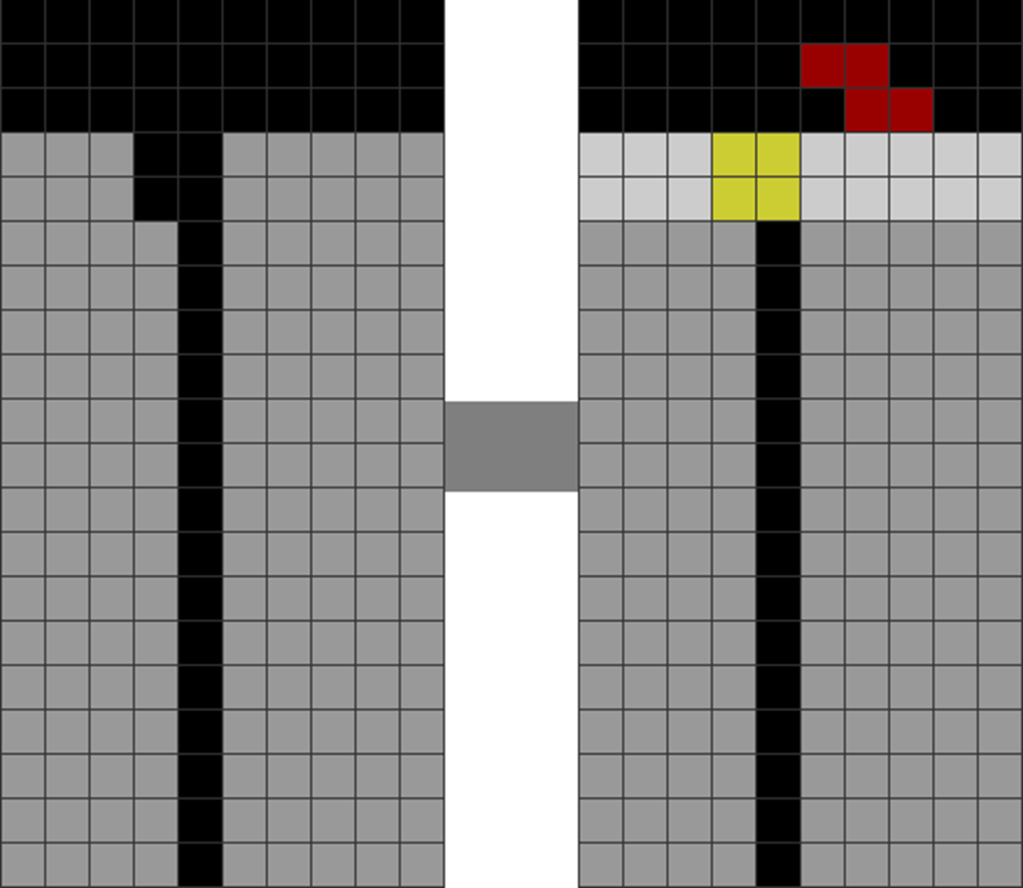
The player must then upstack a lot more.
He finally skims with an I piece, exposing the garbage hole in column 4.
The player needs more time to skim off the top colored layers to get down. This means more pieces are needed to finally dig one’s way down.
Conversely, if one stacks flat, this happens:
Diagram Set 5-14
1
2
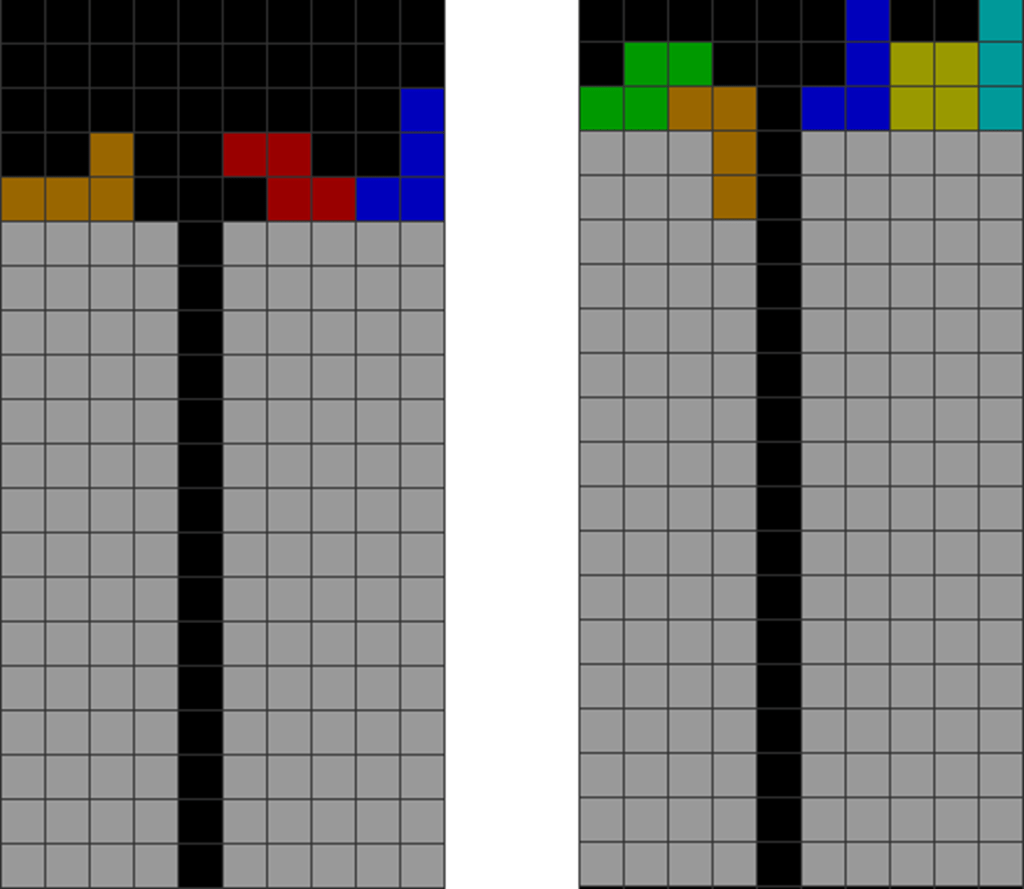
Starting field.
The player puts an L piece flatly.
3
4
He skims with a T piece.
The next garbage hole is immediately and quickly exposed!
With careful stacking that has minimal cavities, one does not need to fill cavities as described in diagram set 5-13.
The lines can be skimmed off with minimal pieces to reach the next garbage hole.
This reduces the colored-to-garbage line ratio, hence increasing your downstacking efficiency.
Hence, by stacking flatter, your downstacking prowess can improve sizably.
Why fill corner cavities flatly to increase downstacking smoothness?
While playing, one can often encounter the following situations:
Diagram Set 5-15
A
B
The cavities are in column 1, at the corner, in both examples.
Here, the less optimal way to manage these corner cavities is to stack like this:
Diagram Set 5-16
1
2
Starting field.
The player skims with a Z piece.
3
4
This leaves the red-colored blocks (in the red circle), which obstruct the next garbage hole.
The player spends too much time trying to get down, but fails.
Here, the stacking leads to a jagged field, which, as explained in my last question, can cause mino configurations that upstack 1 or 2 extra lines above future garbage holes.
This increases your colored-upstacked row-to-gray garbage row ratio, decreasing your efficiency.
Instead, do this:
Diagram Set 5-17
1
2
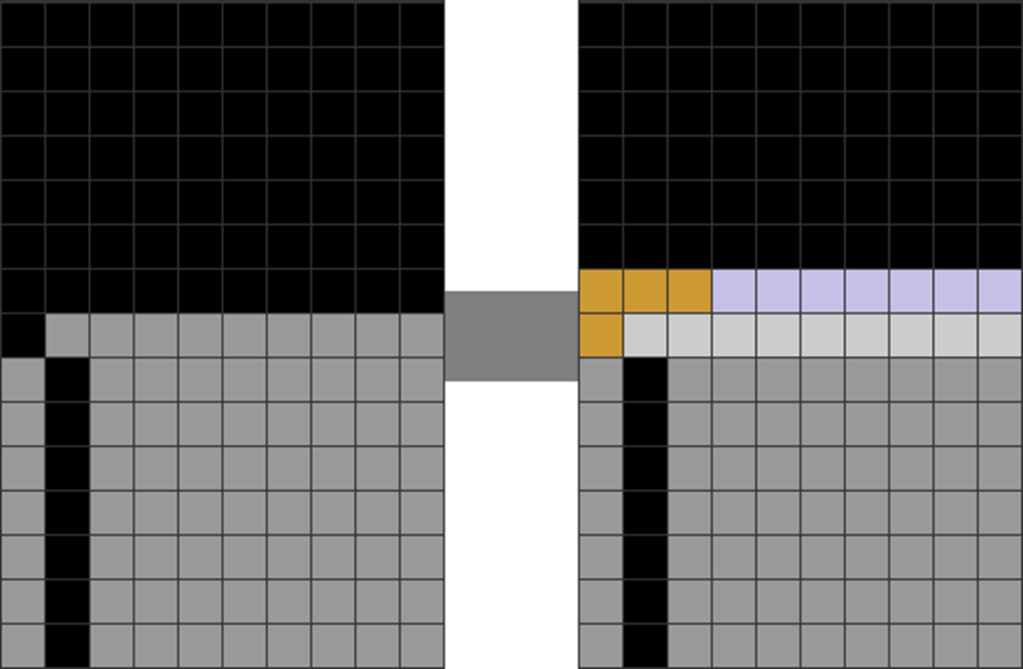
Starting field.
The player upstacks a bit with the lavender blocks, then skims with an L piece.
Here, the player uses a horizontal L piece to fill the cavity.
From my experience, this configuration reduces the chance of an extra row upstack over them, which reduces your colored upstack row-to-garbage row ratio, increasing your efficiency.
Also, by keeping cavities filled flatly, you avoid jagged surfaces that end downstack combo continuations. Please see the next question for this explanation.
Why does a less jagged field lead to smoother downstacks and more combos?
A more jagged stack often arises from parity imbalances (see chapter 4).
When a field is parity imbalanced, there are often many cavities at the top layers of a field:
Diagram Set 5-18
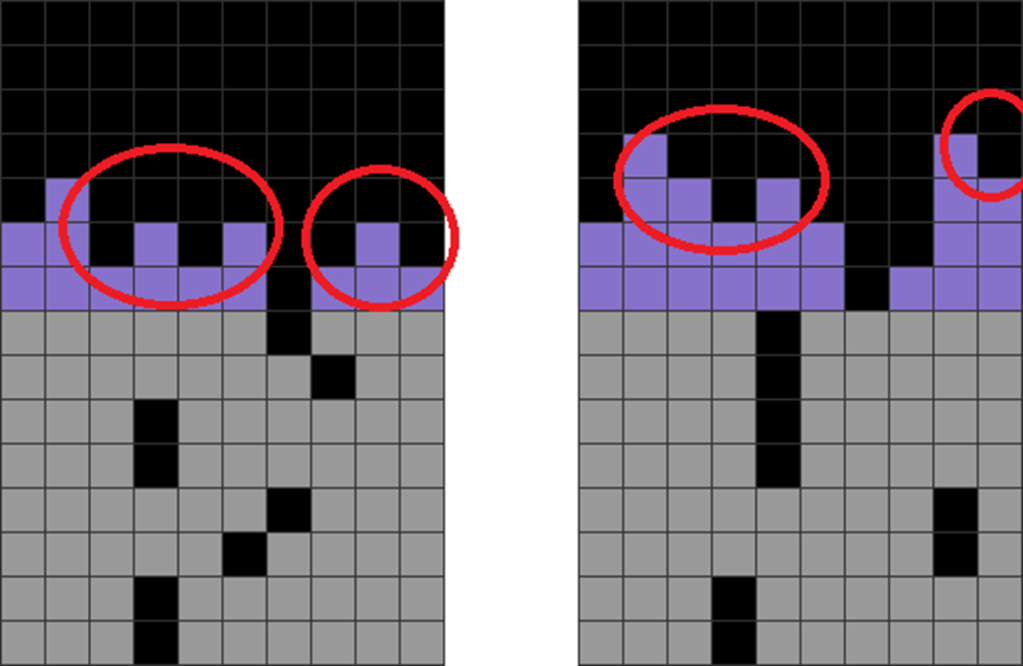
A
B
Both examples have many field divisions and jagged areas in the red circles.
Let us observe what happens when a field is potted with many field divisions (holes/cavities):
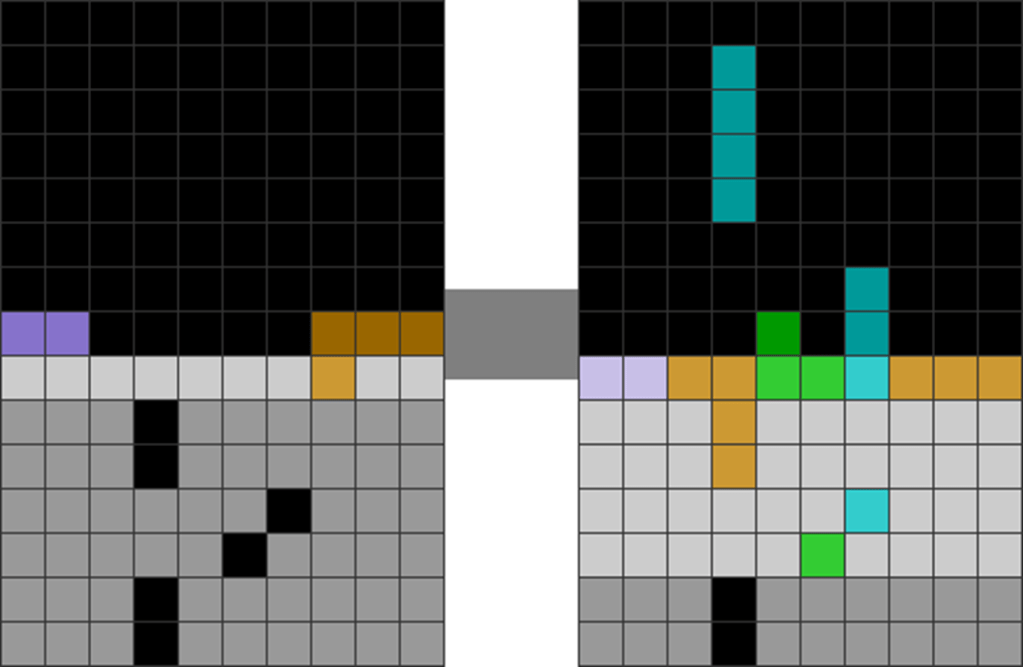
Diagram Set 5-19
1
2
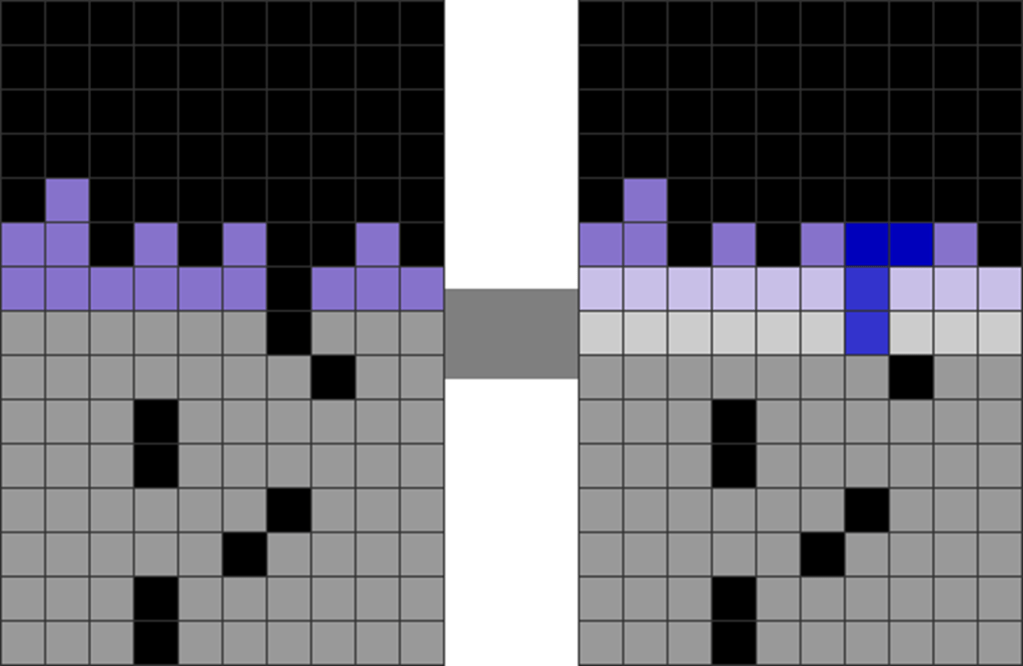
Starting field with many jagged areas (parity imbalances).
The player is forced to skim with a J piece, as there is nowhere to place it cleanly.
3
4
You get this jagged aftermath. This stops the combo sequence.
To get down, you must upstack a bit to skim the colored blocks and reach the next garbage hole.
Here, when a player tries to downstack, they must fill the cavities before continuing. This is because an entire row must be filled before one can skim off a row.
Hence, when a player stops just to fill the cavities caused by a local parity imbalance, they halt combos, reducing their offensive garbage output while downstacking. Conversely, let us consider parity-balanced fields with few field divisions:
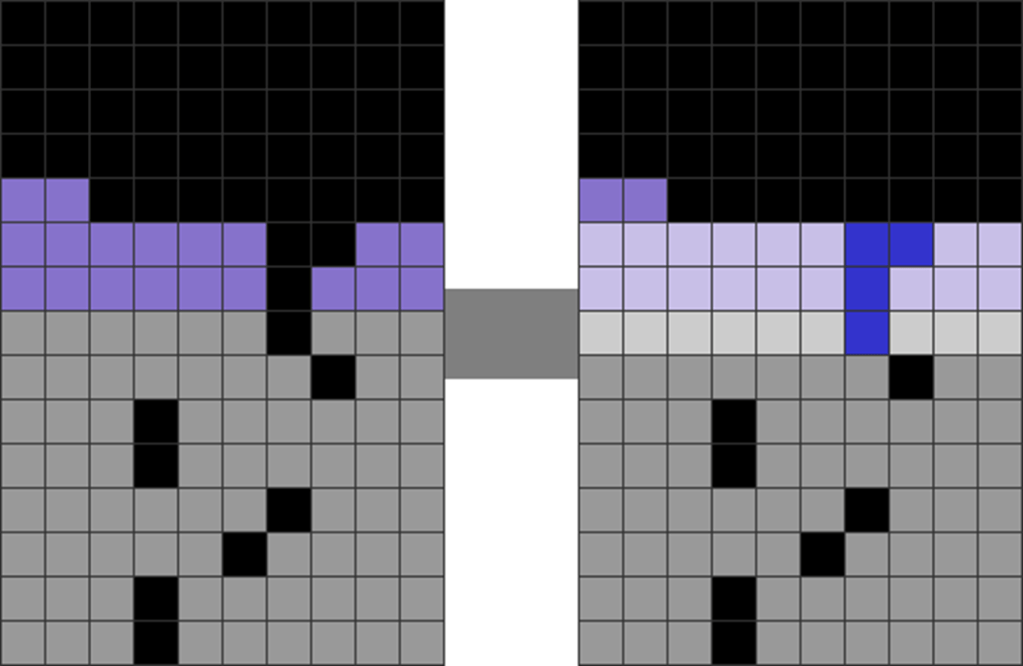
Diagram Set 5-20
1
2
Starting field with a parity-balanced (flat) top layer.
This makes it easier to skim off the top, colored layers with a single, clean skim.
3
4
You continue the combo.
You get a massive downstack combo without stopping.
Here, when a player downstacks, it is far easier to get downstack combos because there are no cavities to break combos (since they must be filled first).
This explains why a flatter field arising from even parity (with fewer jagged cavities) leads to far smoother downstacking and maximal combos.
Hence, before initiating a downstack, fill the parity-imbalanced areas with Ts first, like this:
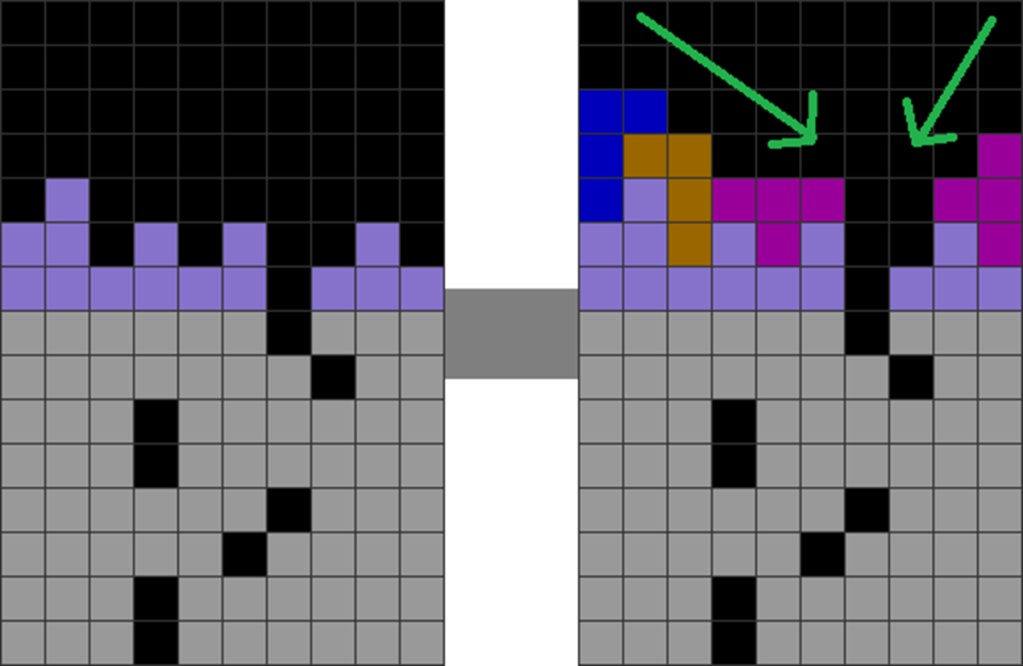
Diagram Set 5-21
1
2
A severely parity-imbalanced field.
Use Ts to flatten the jagged areas and create a taper (in the directions of the green arrows) towards a well.
Having a well-like shape that tapers into a well improves downstacking efficiency and combo chances.
Why does holding on to the I, L, J, or T pieces increase the chances of a successful 4-wide combo sequence?
Holding Is helps continue a 4-wide combo sequence, as all horizontal placements of Is will always continue the combo:
Diagram Set 5-22
1
2
A side 4-wide is ready.
A horizontal I piece will always continue combos, since its flat orientation fits into a 4-wide well.
As for L, J, or T pieces, this is mathematically less obvious. It is, however, from empirical and experiential grounds that I can confirm this to be the case.
If you want a mathematical reason, simply look at the 4-wide solution chart, such as this:
Diagram Set 5-23
The 3-residue 4-wide solutions.
If you count the number of continuations L, J, or T placements lead to, they are considerably higher than S, Z, or O placements.
Mathematically, it is likely that L, J, and T have many rotational orientations. This boosts the number of solutions that can continue a combo sequence.
Conversely, O pieces only have 1 orientation: they are the same no matter how you rotate them, hence restricting combo sequence chances.
Why do players stall during center 4-wides or side 4-wides?
When one attends Tetris tournaments, it is common to see high-level players go head-to-head with 4-wide methods.
This is sometimes the meta in games like Puyo Puyo Tetris.
Here is what I mean:
Diagram Set 5-24
You
Opponent
Both players stall using 4-wide as far as possible.
Here, 2 players begin the match with side 4-wide. However, they let the pieces fall slowly, dragged by gravity without soft dropping or hard dropping. They wait as long as possible, even wiggling pieces, to postpone the line clearing that continues the 4-wide combo sequence.
Why?
This is because doing so increases their chances of receiving extra garbage lines below the 4-wide setups:
Diagram Set 5-25
1
2
After the 4-wide sequence nearly finishes, the player receives extra garbage lines (green circle) if they are not countered.
The player can then continue the 4-wide combo into the garbage holes below. This may stretch a combo sequence into the 15th or more combo levels.
These extra lines can then be accessed after clearing the top, colored 4-wide setup. As long as you consecutively line clear to sustain the combos, these extra lines help provide more garbage to finish off an opponent.
Why are some 4-wide residues better than others?
4-wide often has many residue forms:
Diagram Set 5-26
A
B
3-residue 4-wide.
4-residue 4-wide.
C
D
5-residue 4-wide.
6-residue 4-wide.
The residue number refers to the number of residue blocks in the 4-wide “well” of the 4-wide setup.
Most typical Tetris players are familiar with the standard 3-residue 4-wide method:
Diagram Set 5-27
A
B
C
D
3-residue 4-wide has 3 blocks in the 4-wide activation area (columns 1 to 4) on the left side for the above 4 examples.
However, more types of residue systems exist, such as 4-residue, 5-residue, 6-residue, or higher forms of 4-wide:
Diagram Set 5-28
A
B
4-residue 4-wide uses 4 blocks in the 4-wide activation area on the left side (columns 1 to 4) for all the above 2 examples.
Diagram Set 5-29
A
B
5-residue 4-wide uses 5 blocks in the 4-wide activation area on the left side for all the above 2 examples.
Diagram Set 5-30
A
B
6-residue 4-wide uses 6 blocks in the 4-wide activation area on the left side for all the above 2 examples.
3- and 6-residue 4-wide sequences have the highest chances of a 4-wide continuation. This is followed by 4-residue 4-wide and 5-residue 4-wide.
Why is it so?
It is simply because 3- and 6-residue 4-wides solutions are (i) many and (ii) many sub-solutions lead to further continuations, compared to the other 4-wide forms.
The mathematical reasoning is too extensive to explore in this book.
Hence, a general application is to use skims to shape 4- and 5-residue 4-wide patterns into 3- and 6-residue ones to create more combo opportunities.
Here is an example of how a player uses skims to transform a 6-residue 4-wide pattern into a 3-residue 4-wide one:
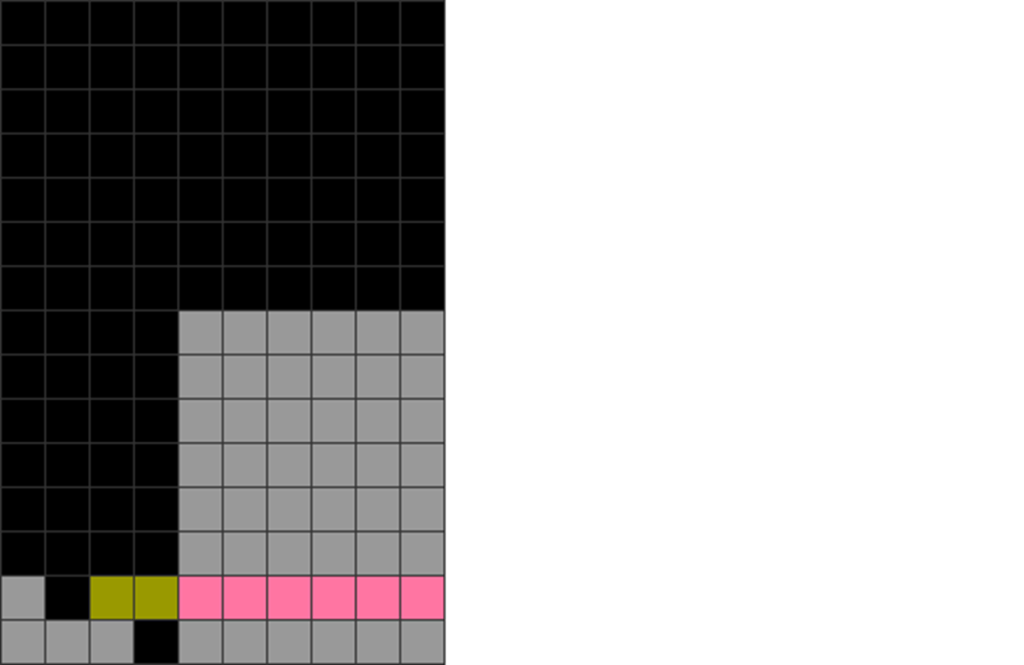
Diagram Set 5-31
1
2
The player starts with a 4-wide with 6 residues.
An O skim transforms the 6-residue 4-wide.
3
The field changes to a 3-residue 4-wide pattern (pink layer) stacked above row 1.
This skimming method can be generalized to converting a 4- or 5-residue 4-wide pattern into a 3-residue form.