Questions about properly placing your pieces within parts of a Tetris field. Stacking is the most vital sub-skill of Tetris.
Questions
Why stack flatter?
Many players often disregard the old platitude that one should “stack flatter.”
They believe this is trivial and that high-level gameplay involves other stunts, such as crazy T-spins or 10 back-to-back perfect clears.
In all my years of writing 7 Tetris guidebooks, I have repeatedly emphasized to my students that they must never neglect flat stacking.
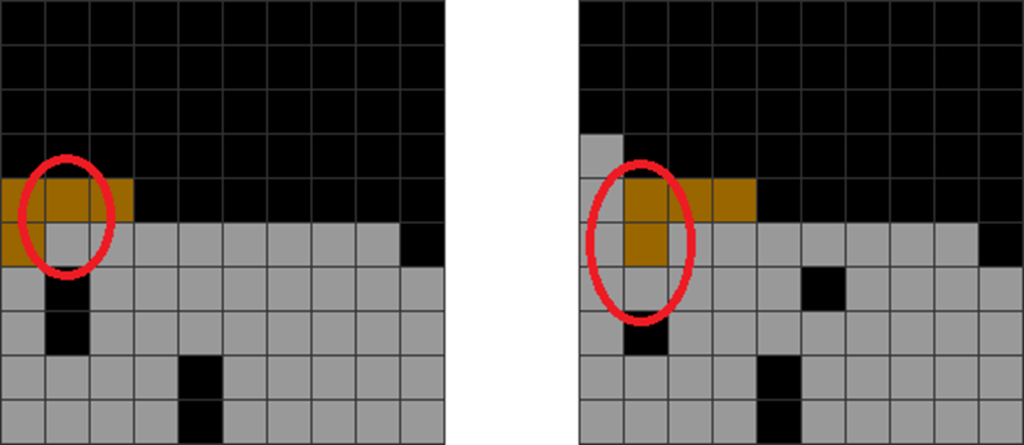
Flat stacking entails keeping a balanced stack where not one part of the stack is overstacked:
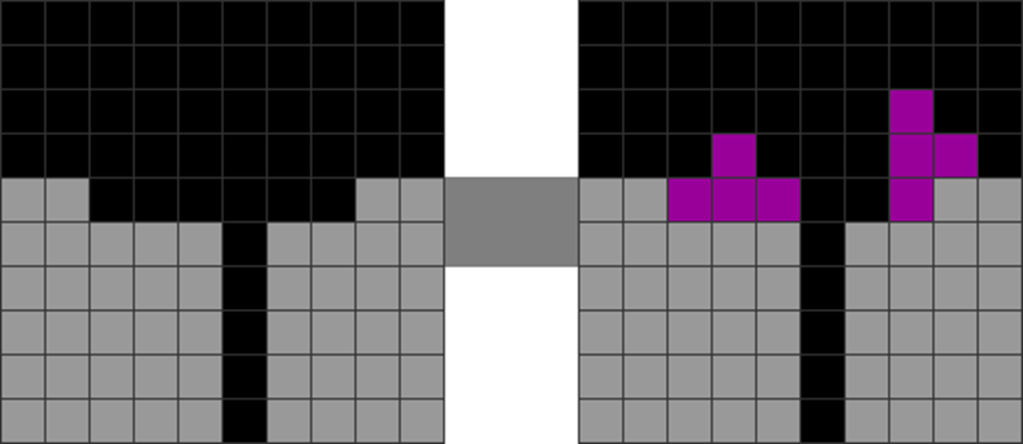
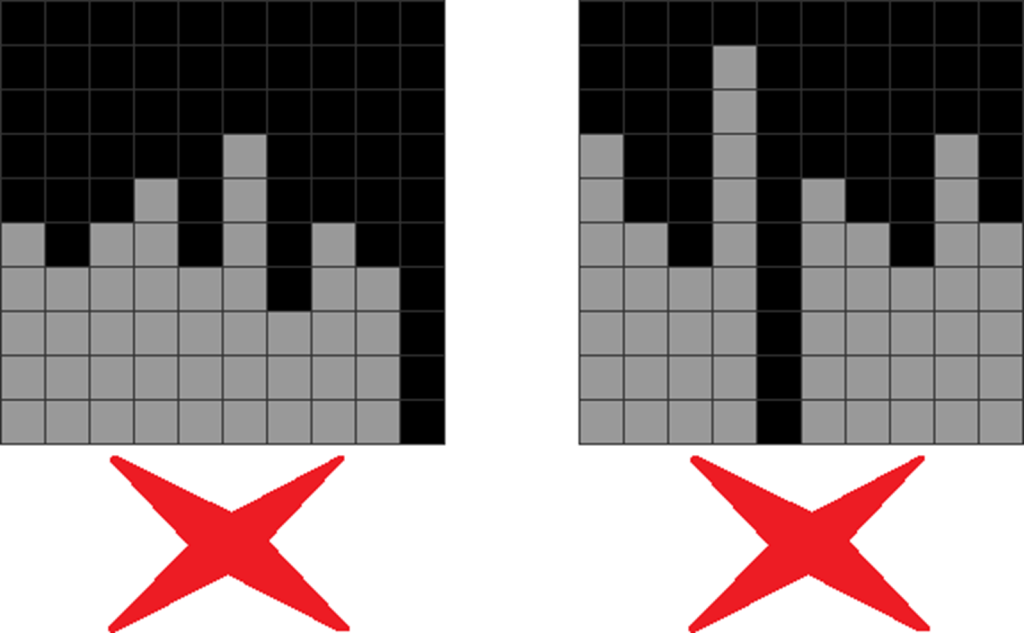
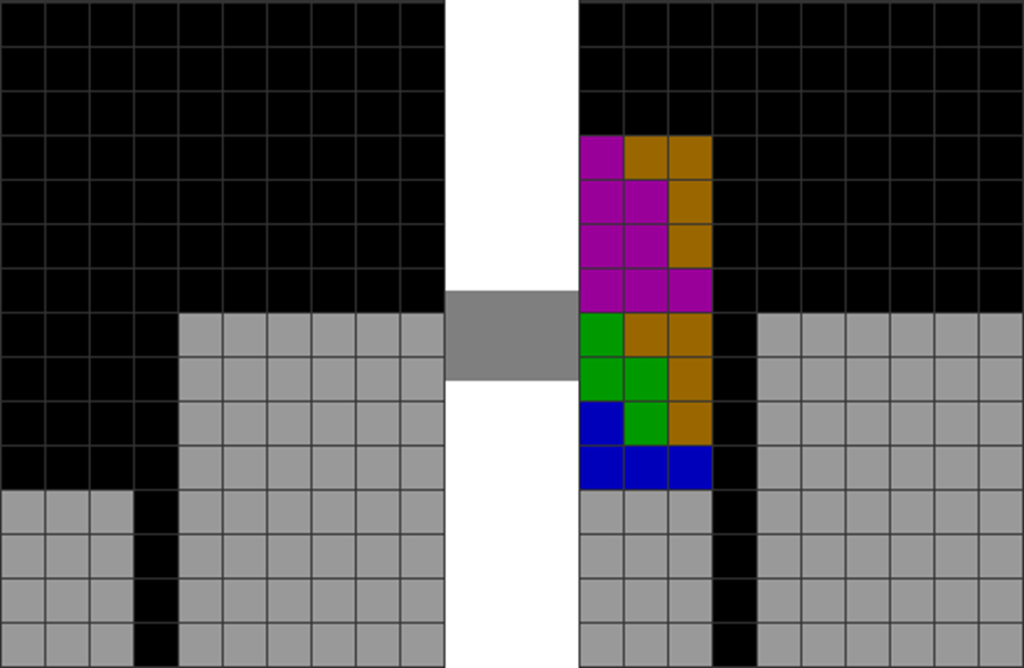
| Diagram Set 4-1 | |
| A | B |
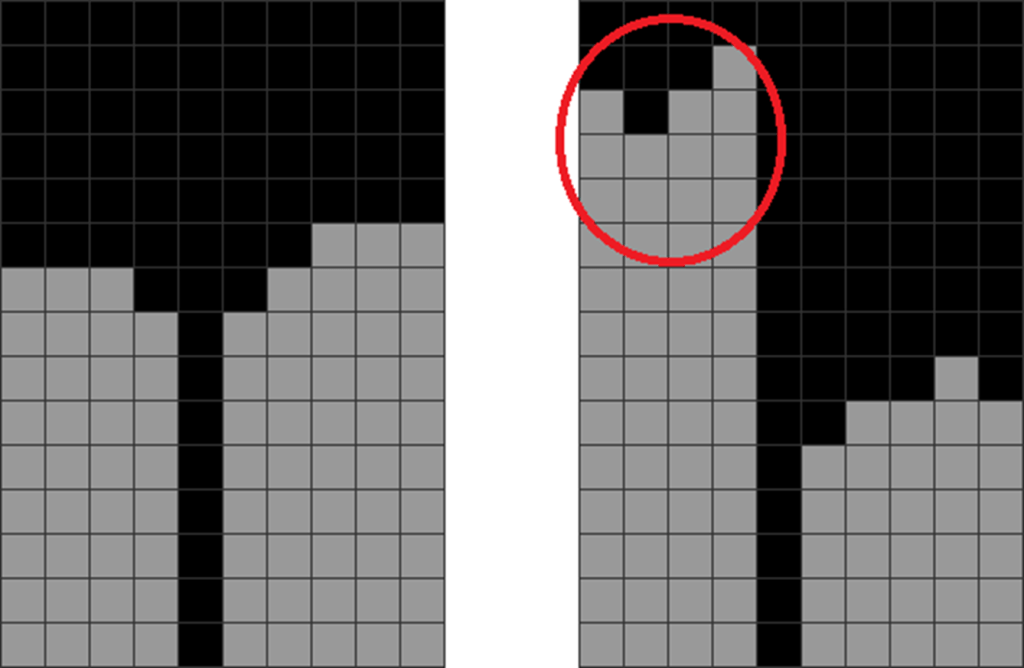
| A balanced stack. No part of the stack is overstacked. | The red-circled part is taller than the rest of the stack. It is overstacked. |
And here is a subtle discernment: one should “stack flatter” but not “stack flat” entirely. Here is why:
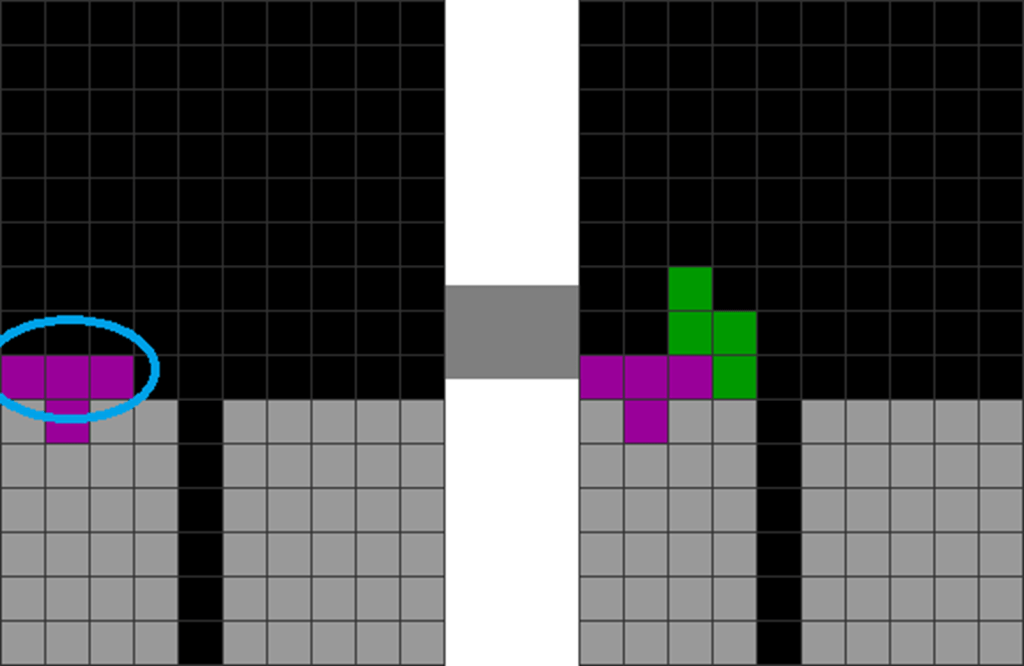
| Diagram Set 4-2 | |
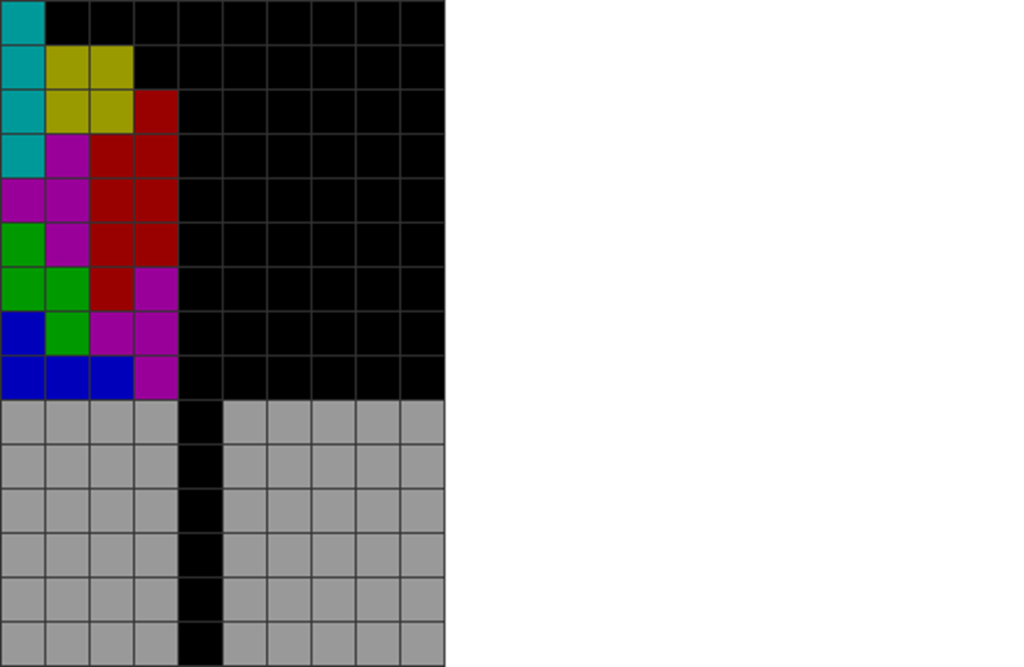
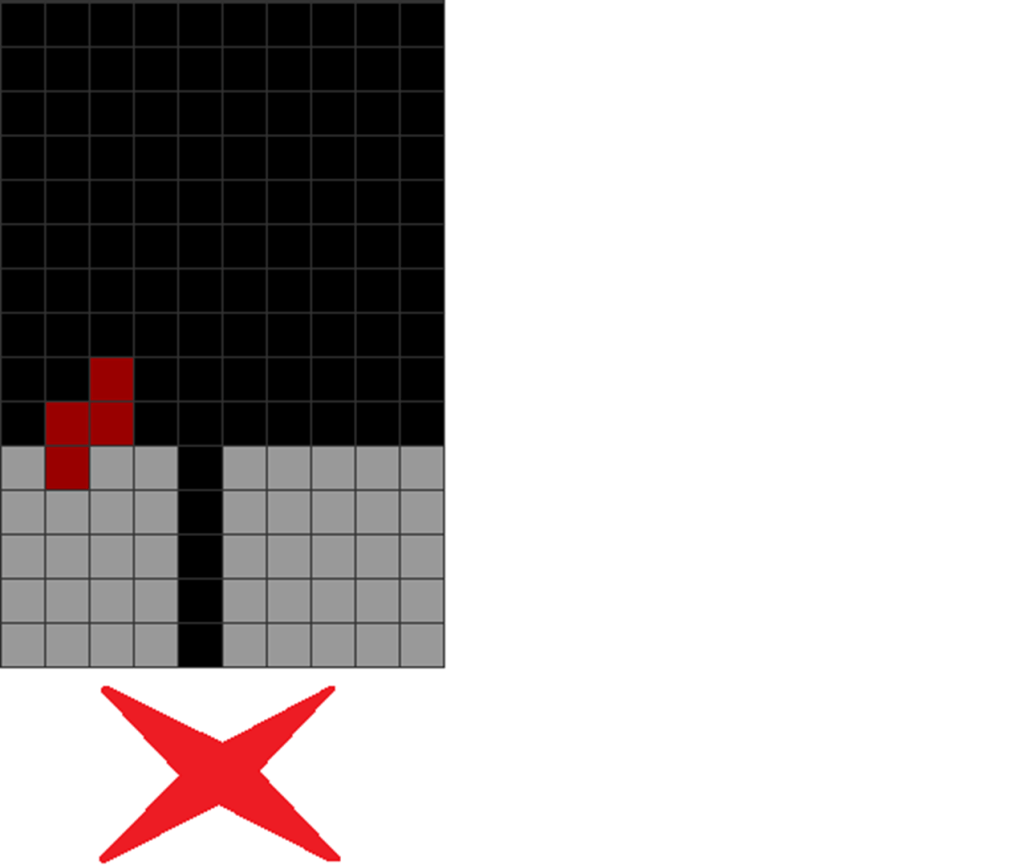
| 1 | 2 |
| The player stacks too flatly. | He has no choice but to place S horizontally, leaving a cavity beneath the S piece’s jutting part. |
Stacking too flat can require you to activate soft drops to fill the cavities left by S and Z pieces, which incurs a hefty soft drop time delay. Step 2 does this with the J piece.
Here is the scientific reason one should stack flat: to minimize the ratio of colored, upstacked lines to garbage lines.
Efficiency is defined as:
True Efficiency = [(Garbage lines sent) + (lines downstacked)] / (Total pieces used to downstack)
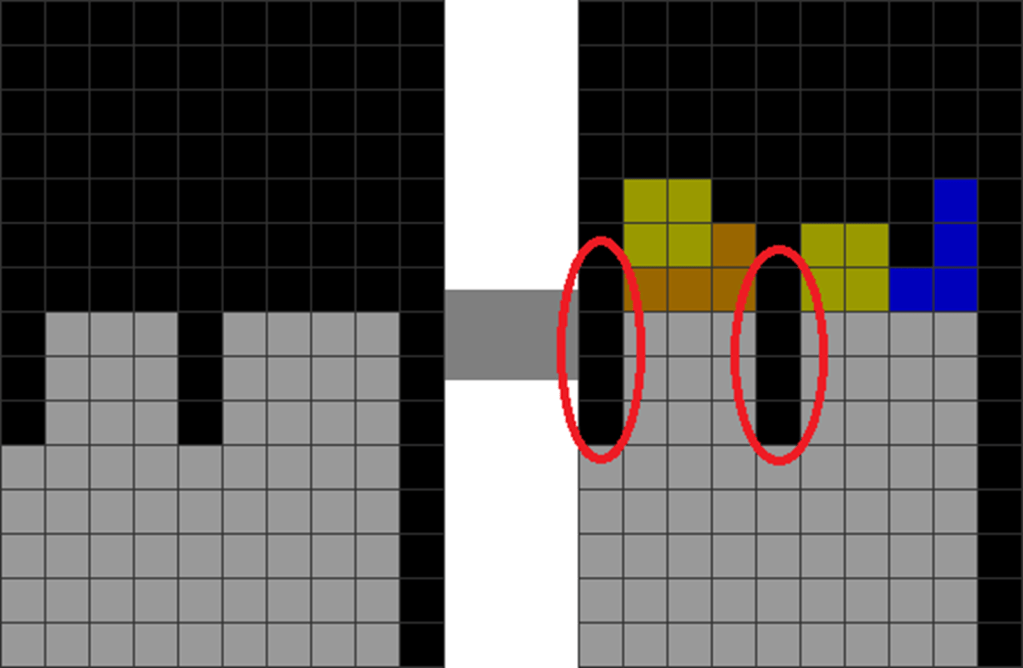
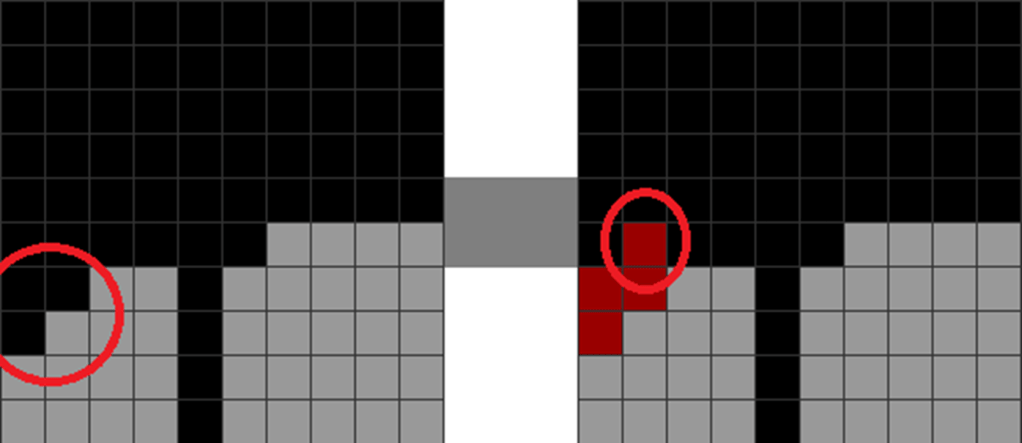
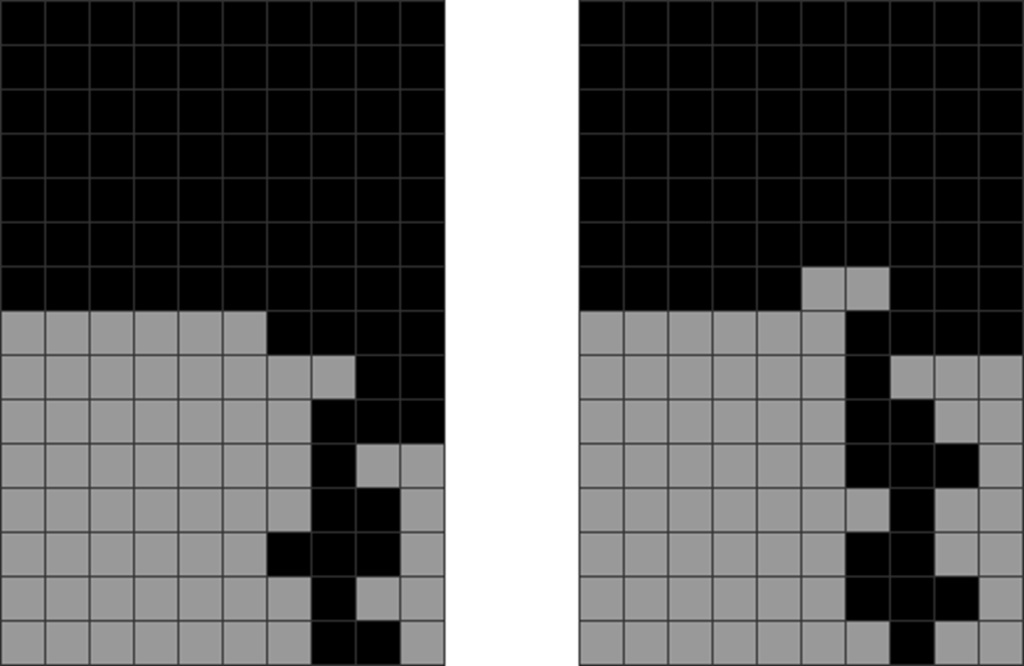
Here is an illustration below. In this example, the player stacks hazardously. To fill up the cavities, many mino placements will cause at least 2 extra lines of upstack over them:
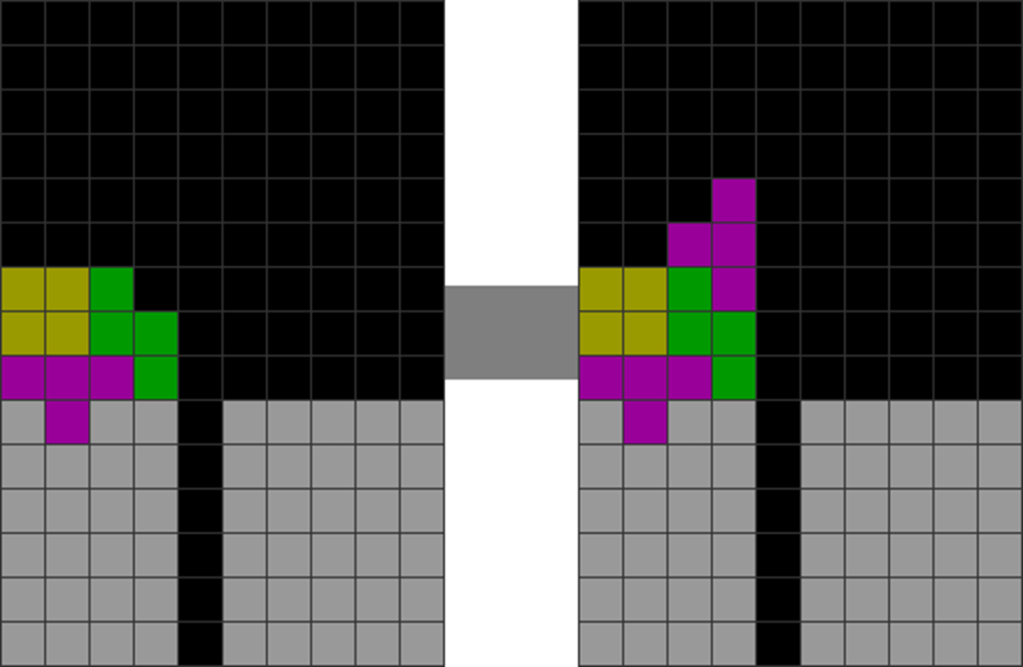
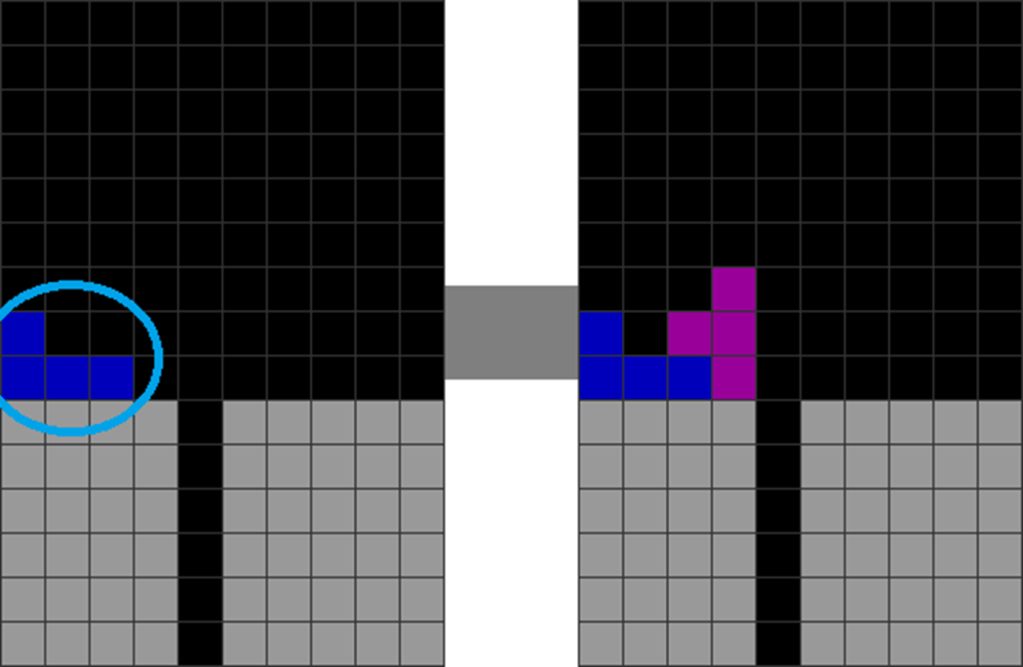
| Diagram Set 4-3 | |
| A | B |
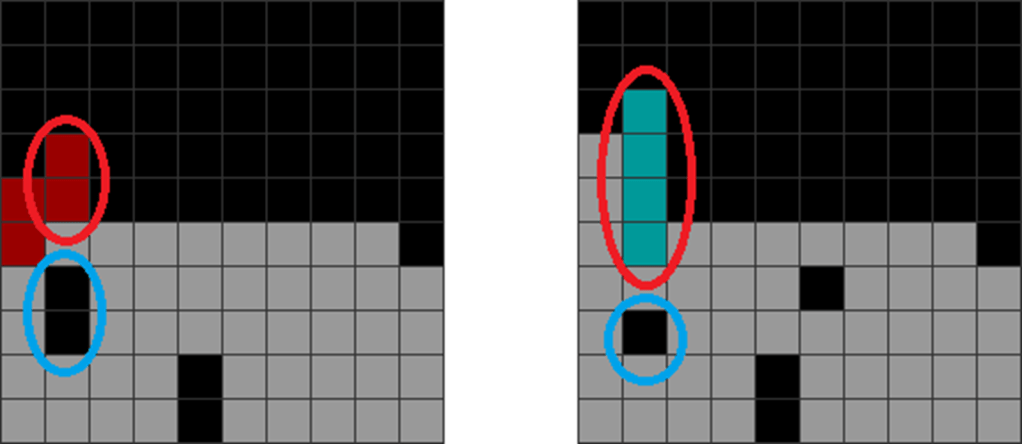
| The Z placement will have 2 extra upstacked blocks (red circles) blocking the blue-circled garbage hole. | The I placement will have 4 extra upstacked blocks (red circles) blocking the blue-circled garbage hole. |
Skimming the top layers off requires more total pieces to downstack:
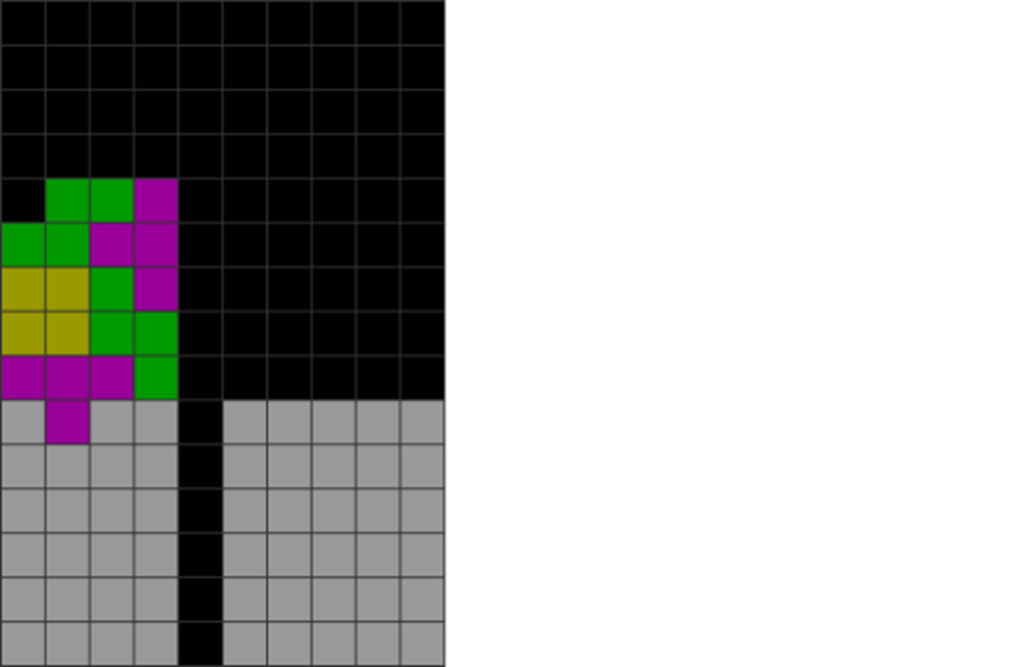
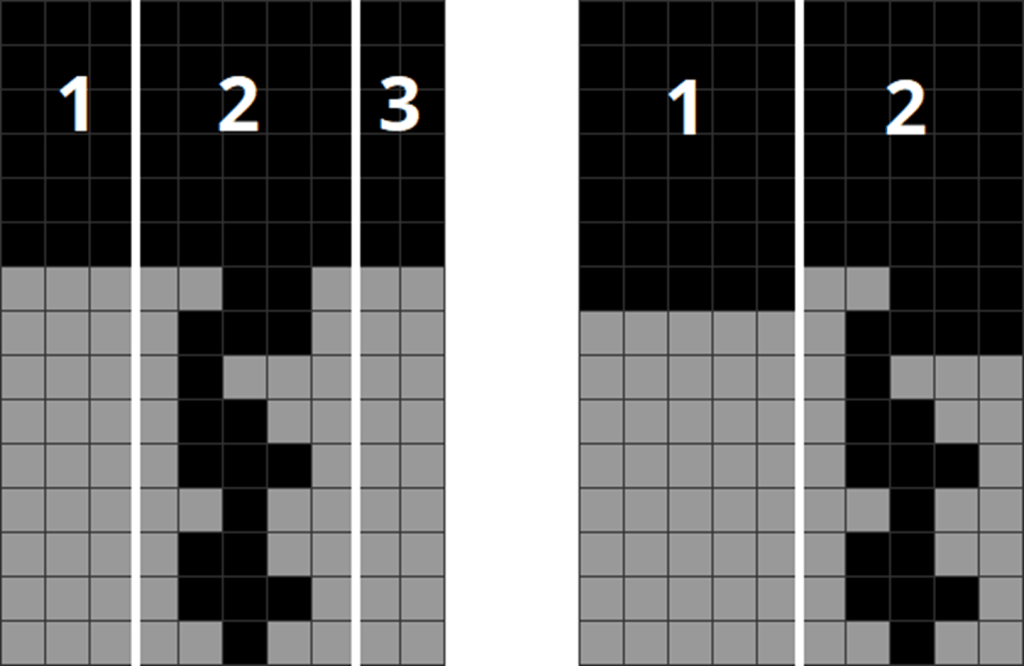
| Diagram Set 4-4 | |
| 1 | 2 |
| Starting field. | To skim off the red blocks, you must upstack a lot before skimming them off with a Tetris. |
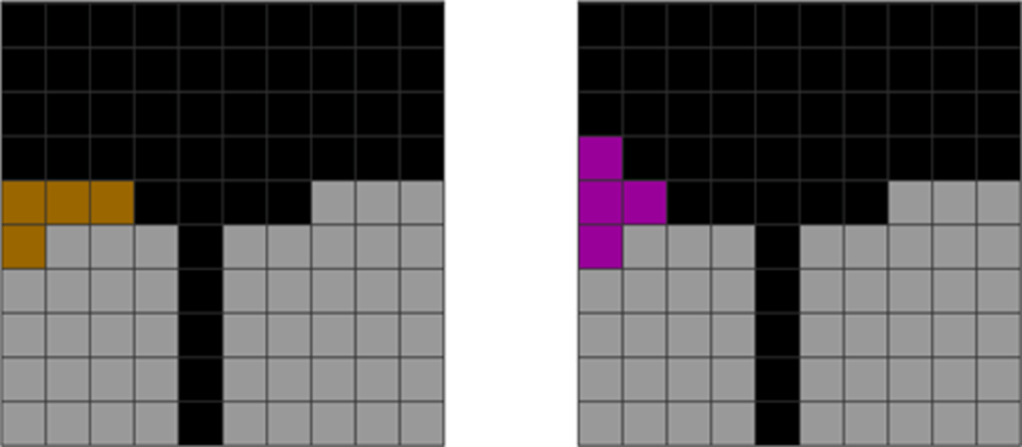
However, if you stack flatter, you minimize the total pieces needed to downstack:
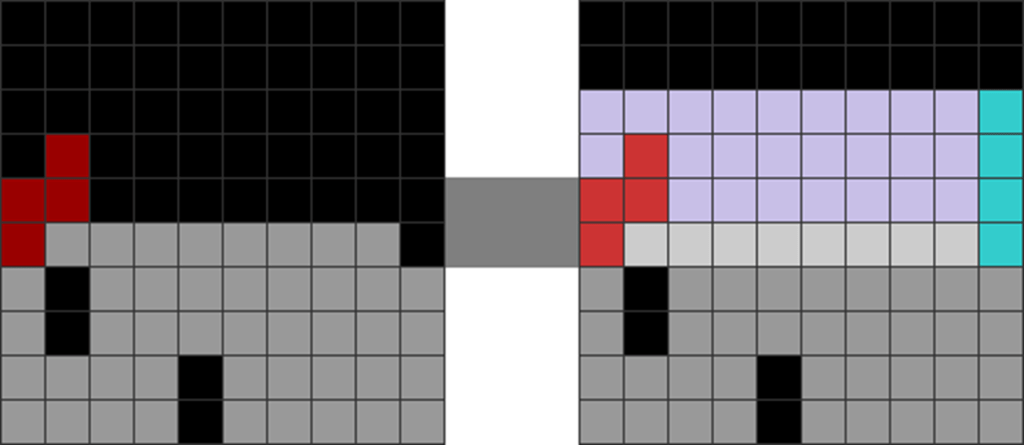
| Diagram Set 4-5 | |
| A | B |
| The flatter L placement only covers the next garbage hole with 1 extra orange block (red circle). | This placement also minimizes upstacked blocks. |
This lets you skim off the top layers and reach garbage lines more easily with fewer pieces. This boosts your efficiency:
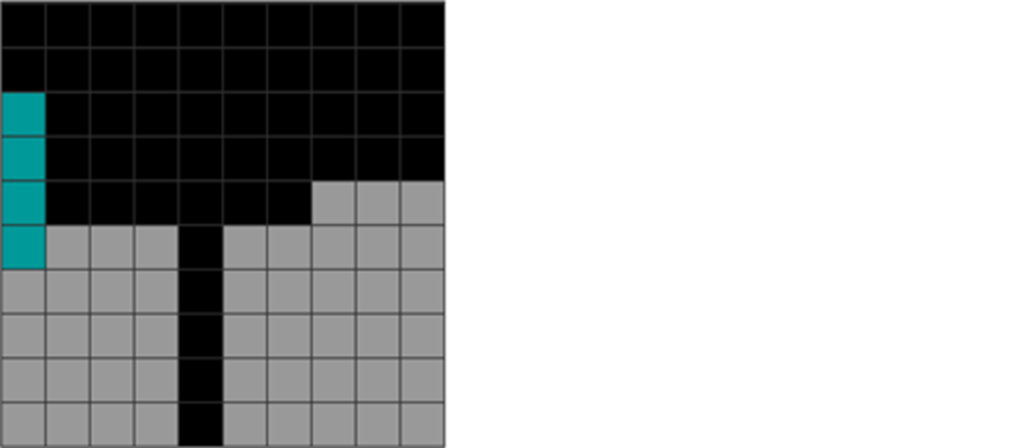
| Diagram Set 4-6 | |
| 1 | 2 |
| Starting field. | To skim off the orange blocks, you need fewer upstacked rows. |
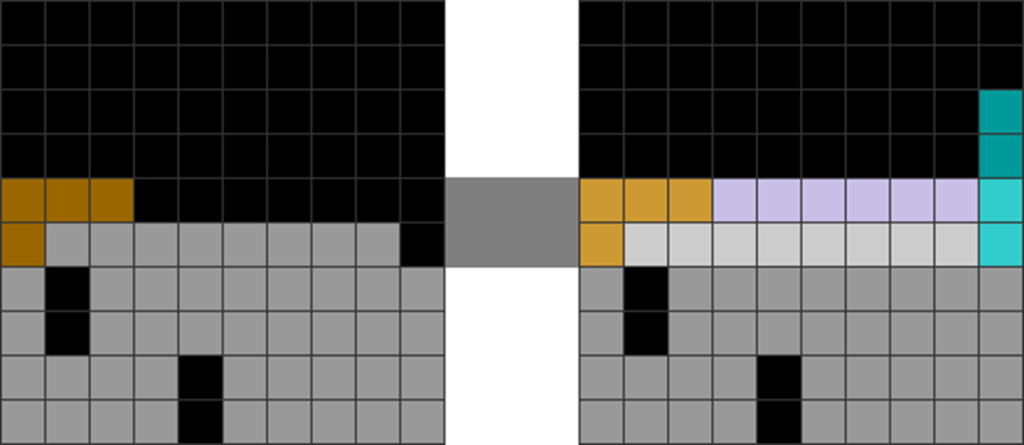
Here is also what happens when you have higher lines of upstack:
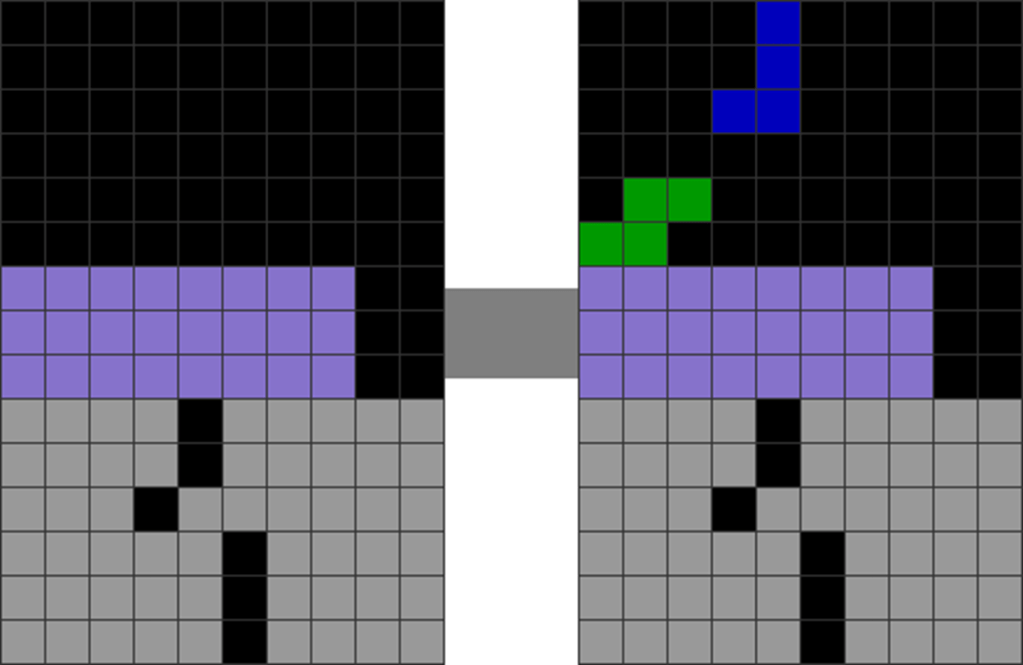
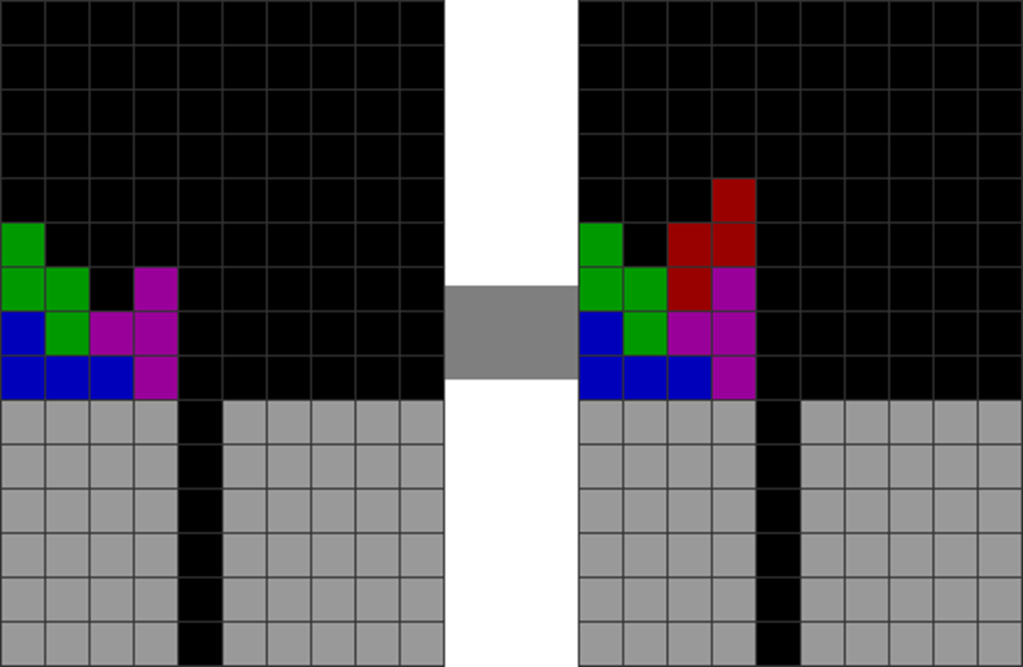
| Diagram Set 4-7 | |
| A | B |
| The player overstacks. The ratio of upstacked lavender to gray garbage blocks is too high. |
Hence, you must skim off more colored, lavender layers before reaching the garbage lines, reducing your survivability as well.
Finally, setups that are partly made of garbage are more efficient. You get more of these opportunities if you stack flatter.
| Diagram Set 4-8 | |
| 1 | 2 |

| Starting field with 3 lines of clean garbage at the top 3 rows. | Upgrade it with 1 line of upstack (lavender blocks) for a clean Tetris. |
The above setup starts off with 3 lines of free garbage. You only need to upstack 1 more row to complete the Tetris, saving you plenty of time.
By stacking flatter, you minimize inefficiencies caused by having too large a portion of your stack being composed of manually upstacked blocks and boost your survivability.
Why is proper stacking vital to all other kinds of skills?
Stacking properly indirectly improves your downstacking and T-spinning capacity. It also boosts your survivability and many other sub-domains. Without proper stacking, almost all other setups will fail.
While there is too much information to explain in this sub-section, I will illustrate using just T-spins:
| Diagram Set 4-9 | |
| 1 | 2 |
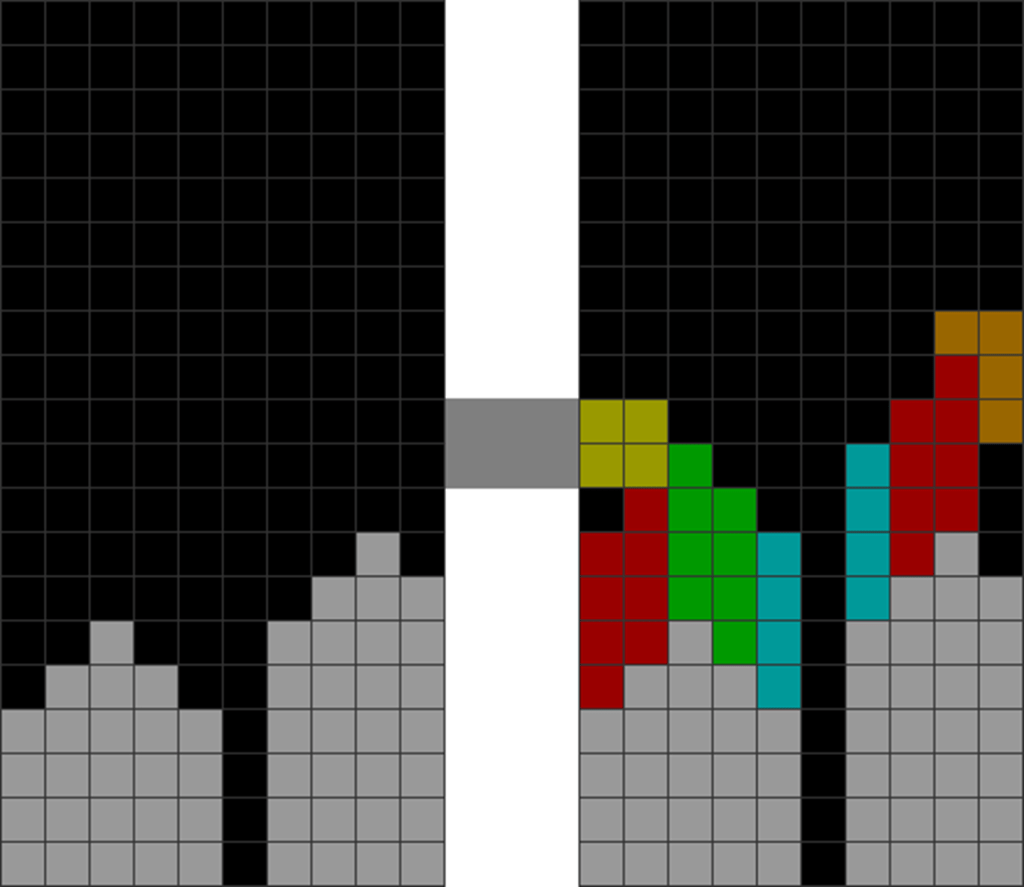
| The player tries to set up an insanely complex T-spin (which grants 4 T-spin doubles). | However, he stacks the left side wrongly and dirtily. |
Here, an intermediate player tries to create a super-fancy, complex T-spin setup. However, his stacking on the left “stacking side” is jumbled. He fails to properly manage parity (handling jagged areas).
Hence, he is forced to stack over holes, ruining his setup in step 2.
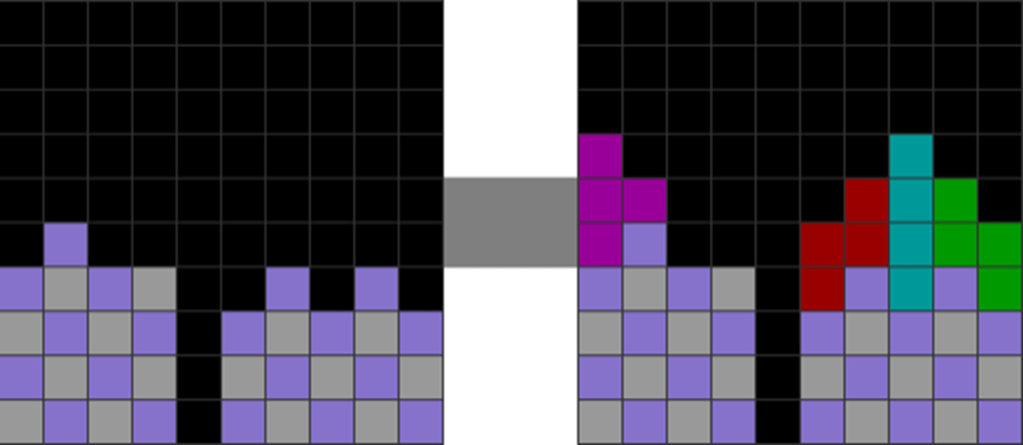
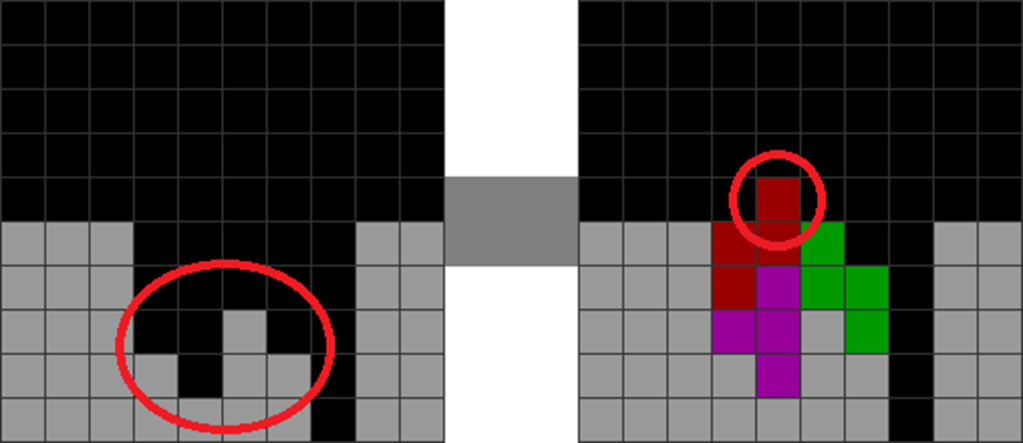
| Diagram Set 4-10 | |
| 1 | 2 |
| A field with several I-dependencies. | It leads to further overstacking, worsening the I-dependencies of the red-circled parts. |
Here, a player fails to observe piece dependencies. He creates many I dependencies in many areas of the field. Since the I pieces do not arrive, he is forced to overstack by placing incoming pieces around the long columns caused by the I dependencies (in the red circles).
This ruins his stacking, overstacks many parts, and makes him susceptible to being spiked. Conversely, good stacking does this:
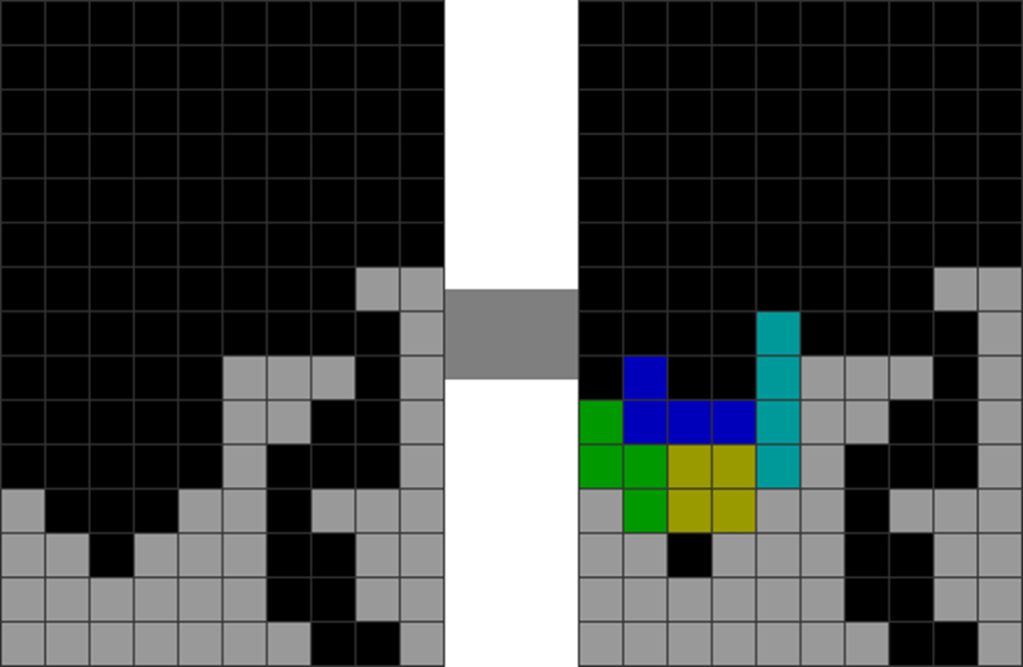
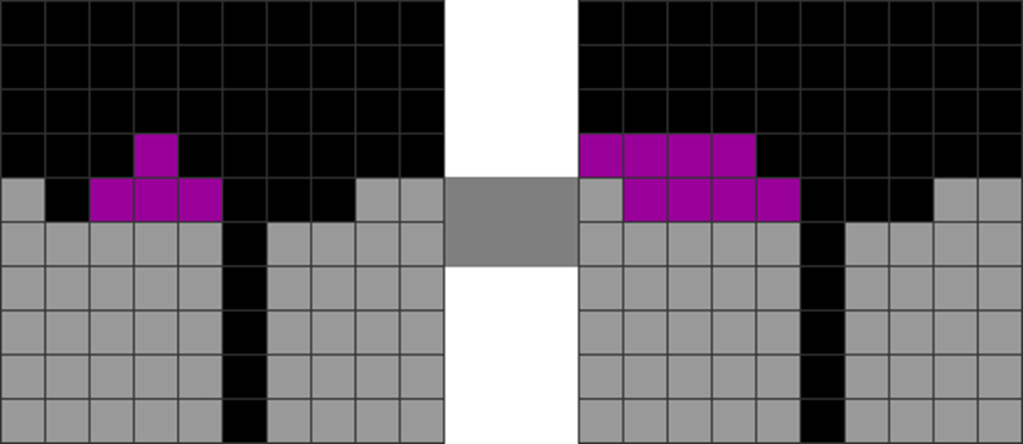
| Diagram Set 4-11 | |
| 1 | 2 |
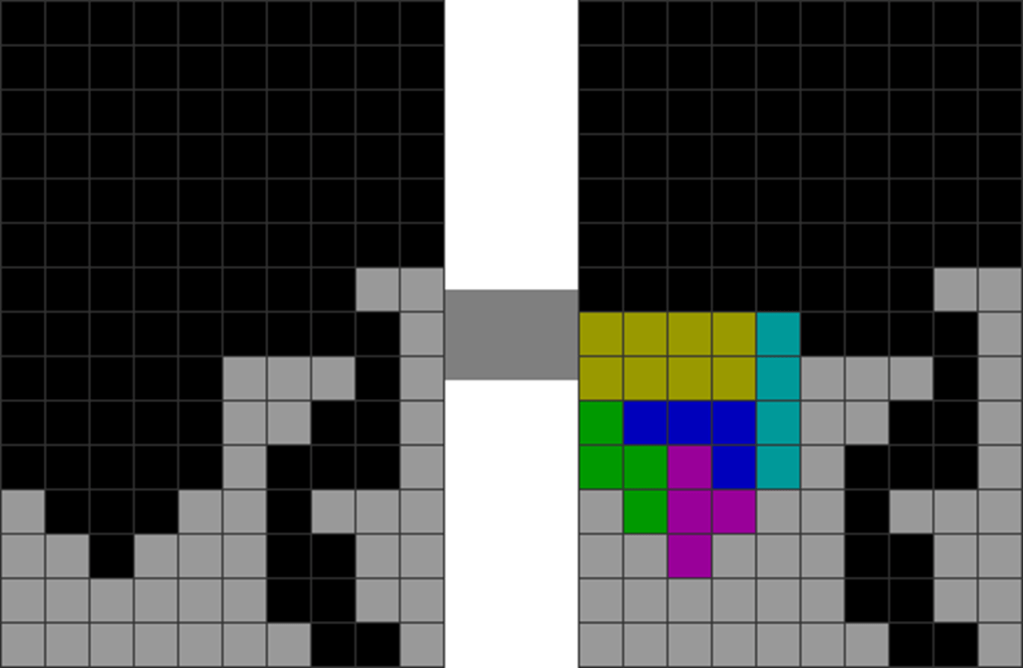
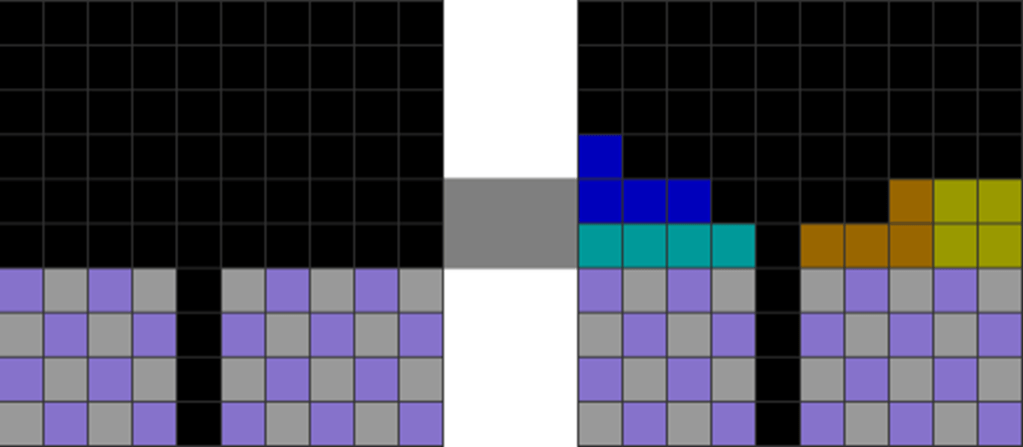
| Starting field with a local parity imbalance on the left side (jaggedness). | He fixes the jagged area correctly and stacks flatly. The setup is ready for use. |
However, here, a player stacks properly, enabling the complex T-spin setup. He observes proper parity management by placing Ts together in the stack, thereby flattening many areas. This ensures maximal stacking follow-ups without getting into dead ends.
Hence, his setup success rate is boosted significantly.
This applies to every setup: Tetrises, downstacking, skimming, combos, and so forth.
By stacking properly, you avoid getting stuck in dead ends and dirty stacking, which can ruin setups.
Hence, to improve in Tetris, my suggestion to most players is to simply improve their stacking consistency: stack flatter and more cleanly.
Why put pairs of Ts together in the stack?
This question is a bit too general. However, I will answer this part first before reframing.
Please observe:
| Diagram Set 4-12 | |
| 1 | 2 |
| Ts are often placed next to each other to immediately resolve the parity imbalance caused by the first T placement. |
Here, the player places an initial T piece on an already flat part of the stack. This makes the field jagged (parity-imbalanced).
Ideally, a player should put another touching T piece next to it to even out parity, flattening the stack. Why do this?
Parity is the imbalance between odd and even filled blocks in a stack. Below in B, gray-filled blocks are even, and lavender-filled blocks are odd. This is arbitrary, and the designation can be reversed, with gray and lavender blocks representing the opposite.
| Diagram Set 4-13 | |
| A | B |
| A’s parity can be analyzed by highlighting its alternate blocks as lavender and gray in B. |
When parity is imbalanced, it is difficult to place horizontal L, J, I, or O pieces:
| Diagram Set 4-14 | |
| 1 | 2 |
| Intuitively, you can tell this field is parity-imbalanced simply from the stack’s surface’s jagged patterns on both sides. | This causes only vertical S, Z, and I pieces to be placed. Flatter placed O and L pieces will cover holes. |
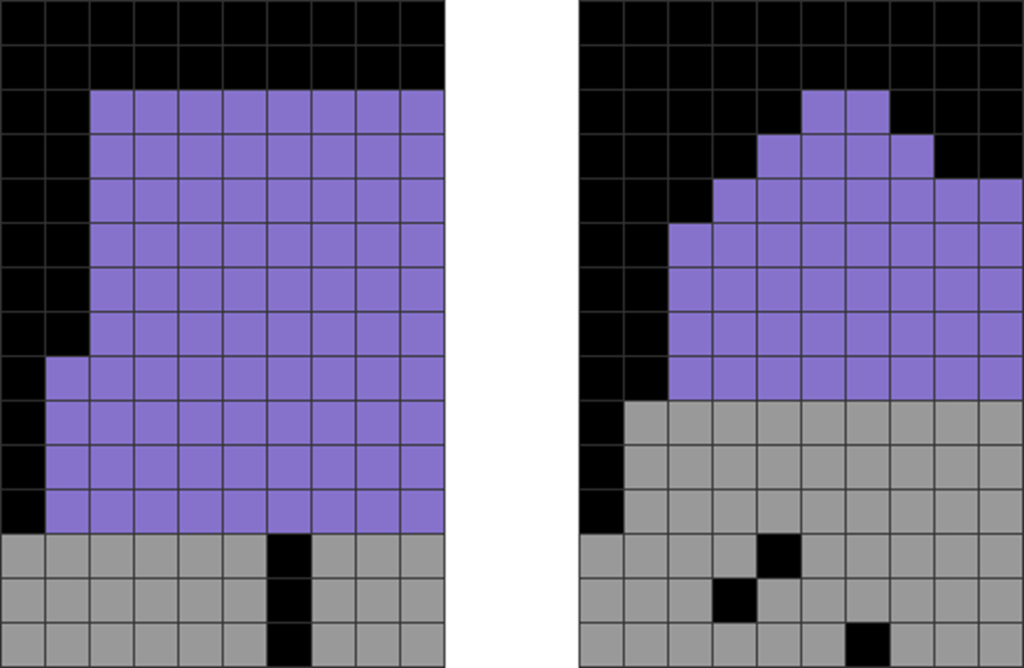
When parity is balanced, it is easy to stack because it reduces the chances of dangerous overstacking or stacking over holes:
| Diagram Set 4-15 | |
| 1 | 2 |
| Step 1 is parity-balanced, enabling placing flat pieces like L, J, O, and Is horizontally in step 2. This further keeps the stacks level, preventing unclean stacking over holes. |
By combining Ts, you flatten a field. More generally, one should put Ts into areas where parity is imbalanced, such as:
| Diagram Set 4-16 | |
| 1 | 2 |
| The difference between lavender and gray blocks is 2. | Putting Ts in the stack next to each other resets the number of lavender and gray blocks to the same. |
Generally, players intuitively resolve parity by placing Ts in jagged areas.
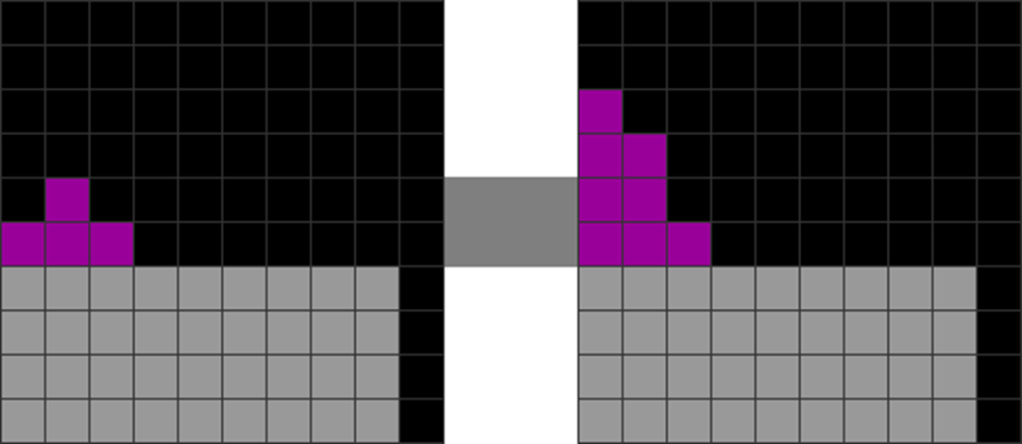
The mistake many people make is placing 2 Ts far apart, like this below, even though the original field is already flat (parity-balanced).
| Diagram Set 4-17 | |
| 1 | 2 |

| Placing the second T elsewhere creates another parity imbalance. | The player must then put 2 extra T pieces to balance them. |
Doing this creates 2 parity imbalances, which require 2 more Ts to fix!
Now, I can reframe this question more generally. It is not necessary for the 2 Ts to touch.
A parity-imbalanced field does not necessarily have to arise from having placed an initial T. They can arise from many other factors. However, generally, players intuitively resolve parity by placing Ts in jagged areas.
The key is to spot parity-imbalanced areas and place a T to fix them as soon as possible:
| Diagram Set 4-18 | |
| 1 | 2 |
| The field is originally parity-imbalanced on both sides. The gray blocks are not formed from Ts. | Putting 2 Ts makes it less jagged, making stacking easier! |
Why should one minimize T placements in the stack?
By this, I specifically refer to T placements in the stack that do not lead to a T-spin line clear:
| Diagram Set 4-19 | |
| 1 | 2 |
| Starting field. Both sides of the stack are flat (parity-balanced). | He places 2 Ts in the stack, making each side jagged. The Ts are wasted. |
Placing Ts in the stack is absolutely necessary at times, such as:
| Diagram Set 4-20 | |
| 1 | 2 |

| Starting field with a local parity imbalance on the left side (jagged). | He places a T on the left side to flatten it and re-balance parity. |
Often, when the field is parity-imbalanced (jagged or stair-like), one must typically place a T in the stack to flatten it. This is to ensure maximal stacking follow-ups, since if you do not, the jagged field can only accommodate vertical S, Z, T, or I pieces, leading to overstacking.
However, what is wasteful are situations like these:
| Diagram Set 4-21 | |
| 1 | 2 |
| Starting field with a local parity imbalance on the left side (jagged), created by placing the T piece. | He fixes the jagged area correctly by adding a touching T to balance parity, making it flat. |
Here, the field is already parity-balanced (flat). In step 1, the player places a T to make the area jagged. Because of this, a second T needs to be placed in step 2, touching the original T to flatten it.
This is a wasteful use of T pieces, because every T placed in the stack could have been used for T-spinning.
The field will rise faster, leading to a higher Tetris-to-T-spin ratio when one line clears.
Since Tetrises are far less efficient than T-spins, your overall attack per line (APL) will decrease, resulting in lower efficiency and firepower in the long run.
Therefore, minimizing T wastage in the stack is vital to playing efficiently.
Why should one fill corner cavities as soon as possible?
Corner cavities refer to these:
| Diagram Set 4-22 | |
| A | |
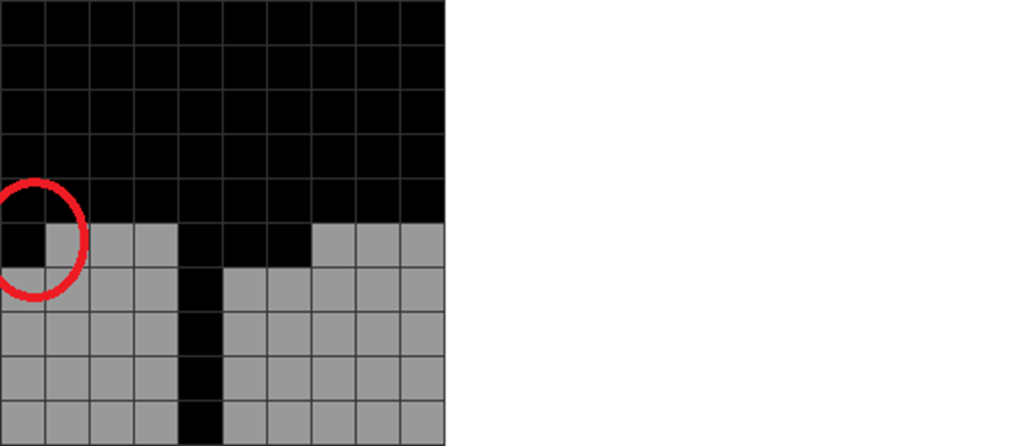
| While stacking, one often encounters corner cavities like these (in the red circle). |
If you do not fill them up quickly, it could lead to severe I-dependencies like this:
| Diagram Set 4-23 | |
| 1 | 2 |
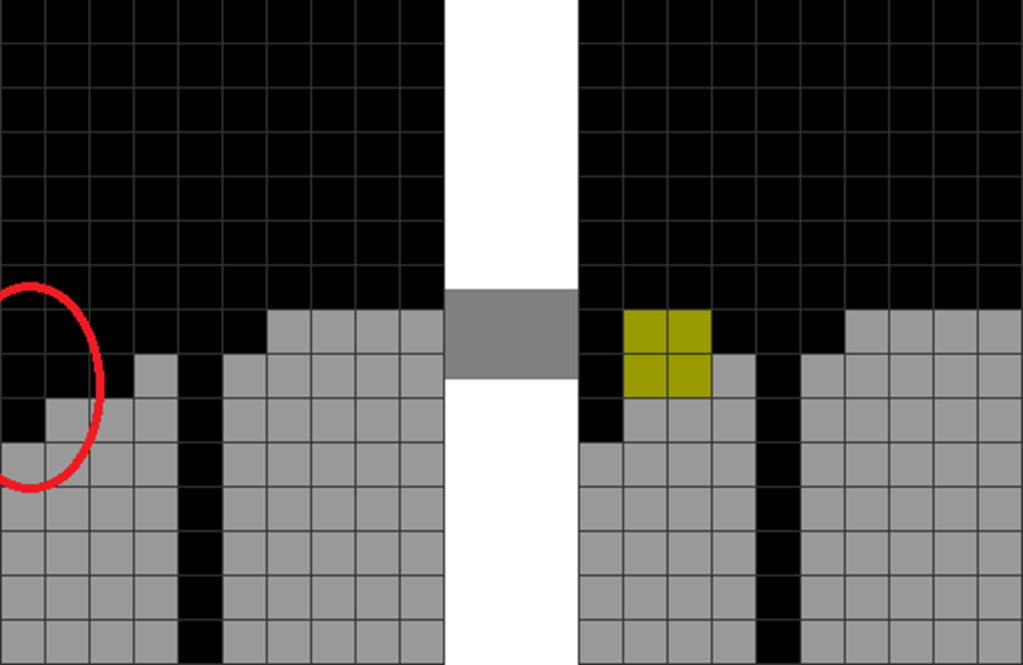
| The player fails to fill the cavity in the red circle. Instead, he puts an O piece, resulting in an I dependency in column 1. |
The safest ways to fill them are to use horizontal L and J pieces, or place Ts in a way that leads to a taper:
| Diagram Set 4-24 | |
| A | B |
| C |
| The original pattern can be filled in 3 stable ways. The most stable ones create a U-shape taper into the middle. These use the L, T, and I pieces, respectively. C’s I placement is alright, but it can overstack. |
From my experience, doing this leads to far more consistent stacking follow-ups, minimizing dead-ends and overstacking.
I cannot prove this mathematically, but can only state authoritatively that it is empirically true, based on my 3000+ hours of Tetris experience.
Why do some top Tetris players stack so well and avoid stacking dirtily?
They do this by managing 2 things: (i) proper parity management and (ii) proper field harmony.
Parity management is the handling of the field’s jaggedness, in layperson’s terms.
Although this has been partly covered in an earlier question, I am repeating it briefly for those who skipped some answers.
More technically, parity management is about handling the ratio of the even to odd filled blocks, as shown here:
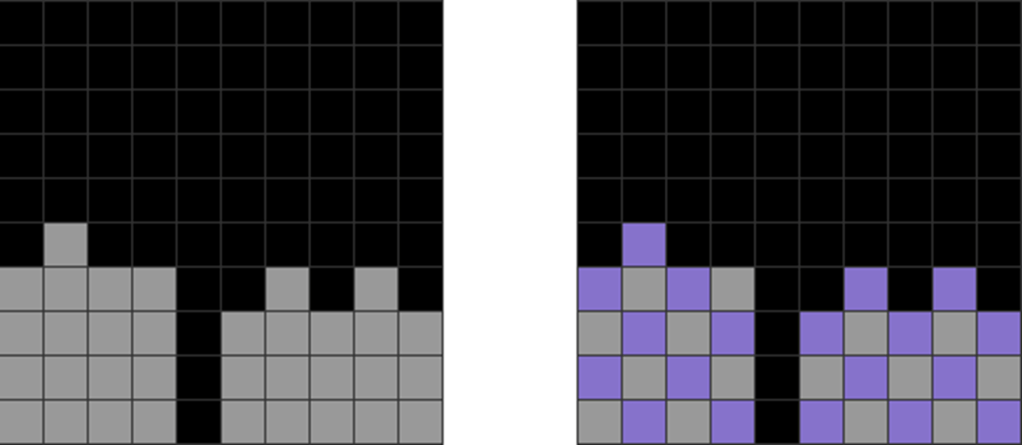
| Diagram Set 4-25 |
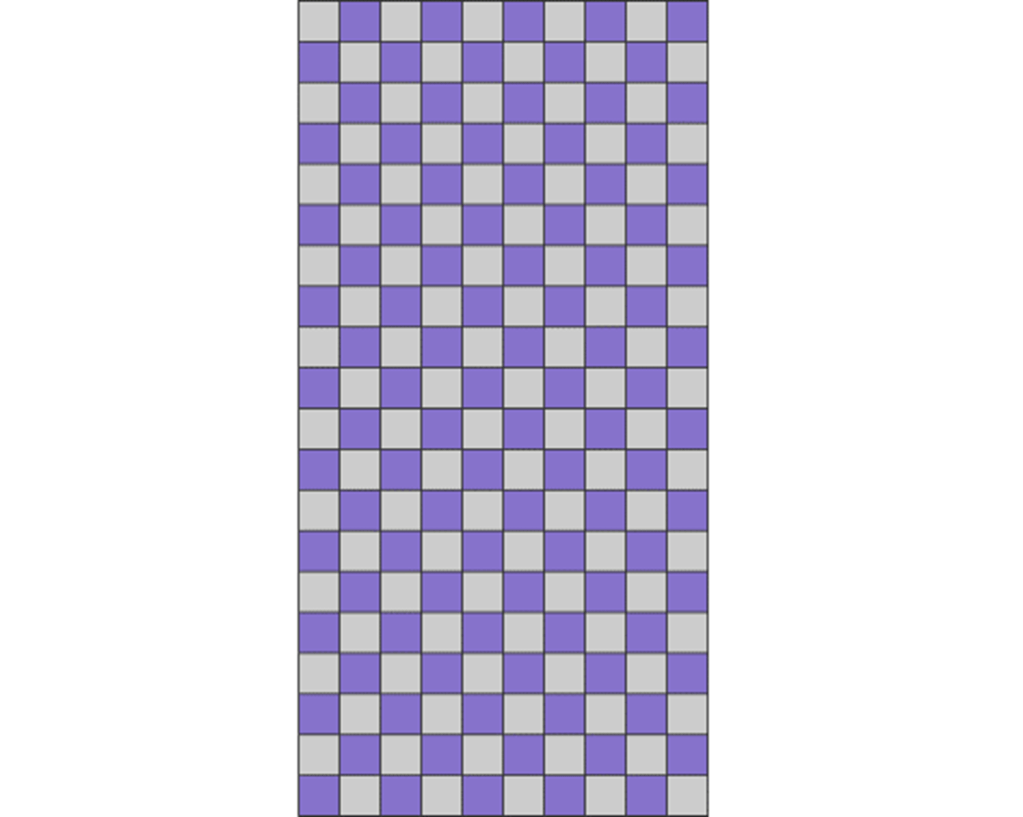
| The Tetris play area is a tall rectangle 20 blocks high and 10 blocks wide. The lavender and gray blocks represent the alternation of even and odd blocks. |
Although not shown in the game, we use this checkerboard pattern to visualize the stack’s contours in some diagrams.
A parity-imbalanced field has an unequal number of odd to even blocks, resulting in the difficulty of placing horizontal pieces (like L, J, and O pieces) flatly:
| Diagram Set 4-26 | |
| 1 | 2 |
| Only the S, Z, T, and I minos can be placed vertically and cleanly on the above parity-imbalanced stack. |
Only vertical S, Z, I, and T pieces can be accommodated, causing you to overstack. Sometimes you are forced to put L, J, and O over holes dirtily.
Conversely, a parity-balanced field has an equal number of odd and even blocks, resulting in it being easier to accommodate horizontal L, J, and O placements:
| Diagram Set 4-27 | |
| 1 | 2 |

| Step 1 is parity-balanced, enabling placing flat pieces like L, J, O, and Is horizontally in step 2. This further keeps the stacks level, preventing unclean stacking over holes. |
A skilled player manages parity properly, mainly by placing touching T pieces in parity-imbalanced or jagged areas, like in the earlier diagram set 4-18.
This flattens the field and makes it easier to accommodate the flatter orientations of pieces. Doing this minimizes overstacking or stacking over holes, making top players very consistent.
Outstanding players also manage field harmony, defined as stacking in a way that maximizes follow-up stacking without dead-ends.
Summarily, it involves minimizing certain dead-end field shapes that can lead to terrible stacking follow-ups, like these:
Dead-end pattern 1:
| Diagram Set 4-28 | |
| 1 | 2 |
| Minimize this red-circled pattern as far as possible. | Because putting a Z like this still results in a jagged pattern in the new red circle. |
Dead-end pattern 2:
| Diagram Set 4-29 | |
| 1 | 2 |
| Minimize this red-circled pattern as far as possible. | Because putting a T followed by S and Z like this still leads to a jagged pattern in this new red circle. |
Dead-end pattern 3:
| Diagram Set 4-30 | |
| 1 | 2 |
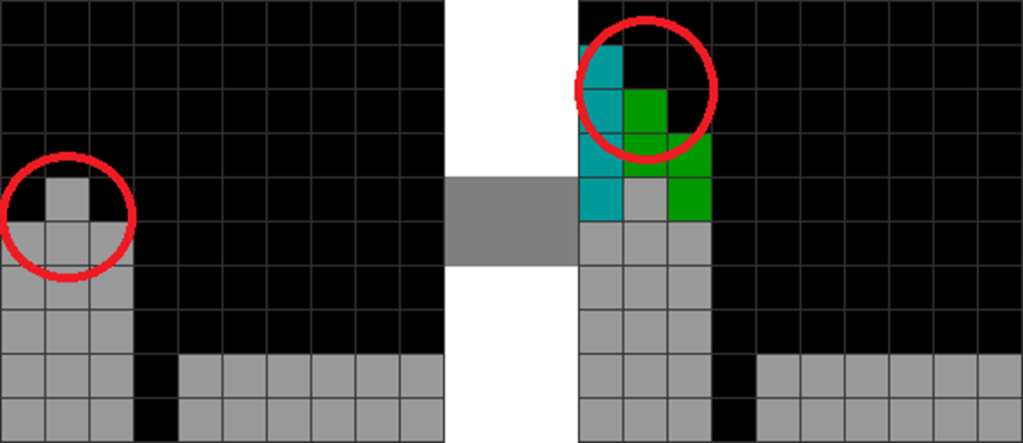
| Minimize this red-circled pattern as far as possible. | Because putting an S and I like this still leads to a jagged pattern in this new red circle. If you put the S first, you get an I-dependency in column 1. |
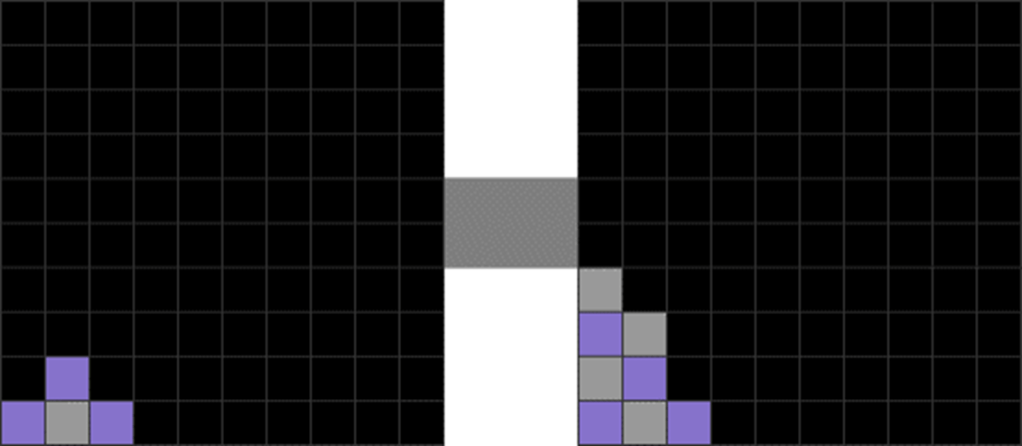
It also means stacking in the following ways in A and B to maximize stacking follow-ups:
| Diagram Set 4-31 | |
| A | B |
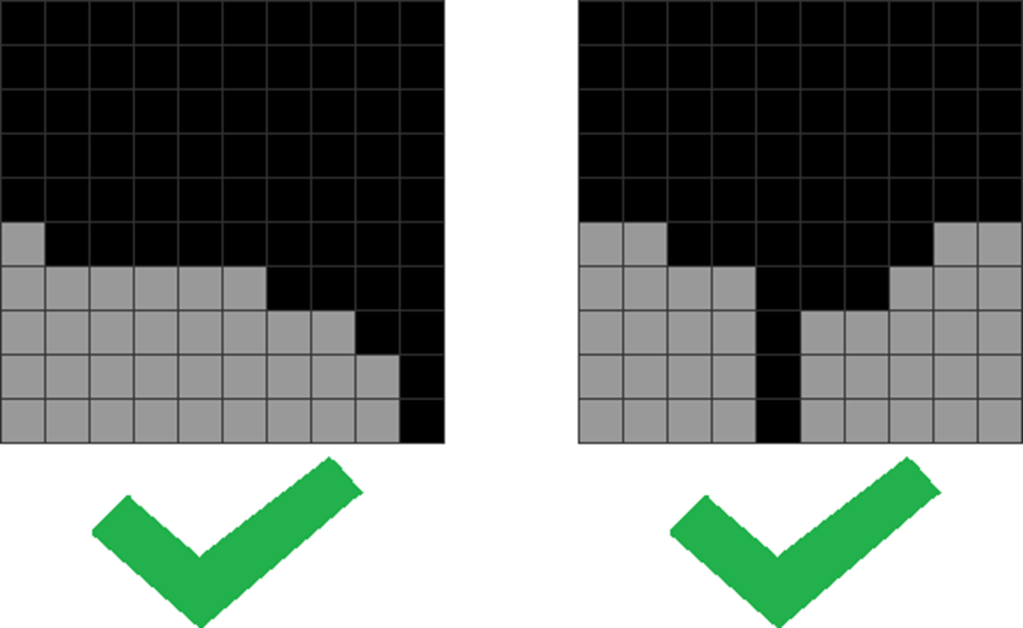
| These 2 fields are relatively flat and open, making it easy to stack properly afterwards. |
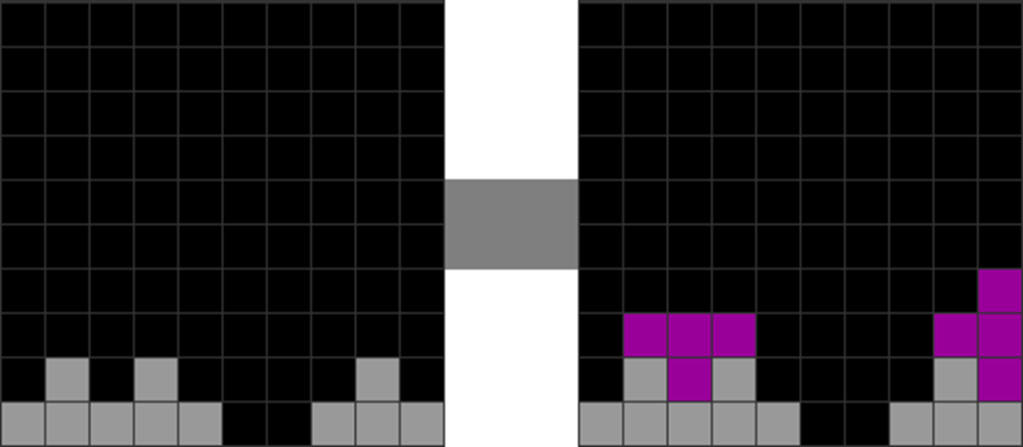
| C | D |
| These 2 fields are terrible. They have severe piece dependencies and field divisions, making stacking follow-ups difficult. |
There are more advanced aspects, such as using 4-wide solution patterns to stack certain 4-blocks-wide patterns like these to ensure that one minimizes dead-ends:
| Diagram Set 4-32 | |
| 1 | 2 |
| Columns 1 to 4’s surface (blue circle) resembles a 3-residue 4-wide pattern. I put a T, resembling one of the 4-wide pattern’s solutions. | Stack with S. This emulates another solution to step 1’s 3-residue 4-wide pattern. |
| 3 | 4 |
| Continue with O. | Continue with T. |
| 5 |
| Continue with the S piece. |
Using 4-wide patterns to stack 4-blocks-wide patterns has been covered deeply in my Book 4’s field harmony chapter, partly free on my howtotetris.com website.
By managing parity and field harmony, many top players can stack endlessly almost without ever getting into dead-ends (stacking over holes dirtily).
How do some experts stack so well as to get their T-spin setups to work nearly 100% of the time?
Some experts are adept at these kinds of complex T-spin setups:
| Diagram Set 4-33 | |
| A | B |
| A DT-STSD. This gives 3 T-spin doubles. | An Eta Carinae. This gives 4 T-spin doubles. |
Experts like Yakine can stack the “stacking part” of the stack (columns 1 to 5 in A and B) so well that they rarely get into dead ends despite the complexity of their setups.
As a T-spin expert myself, here is how I do it:
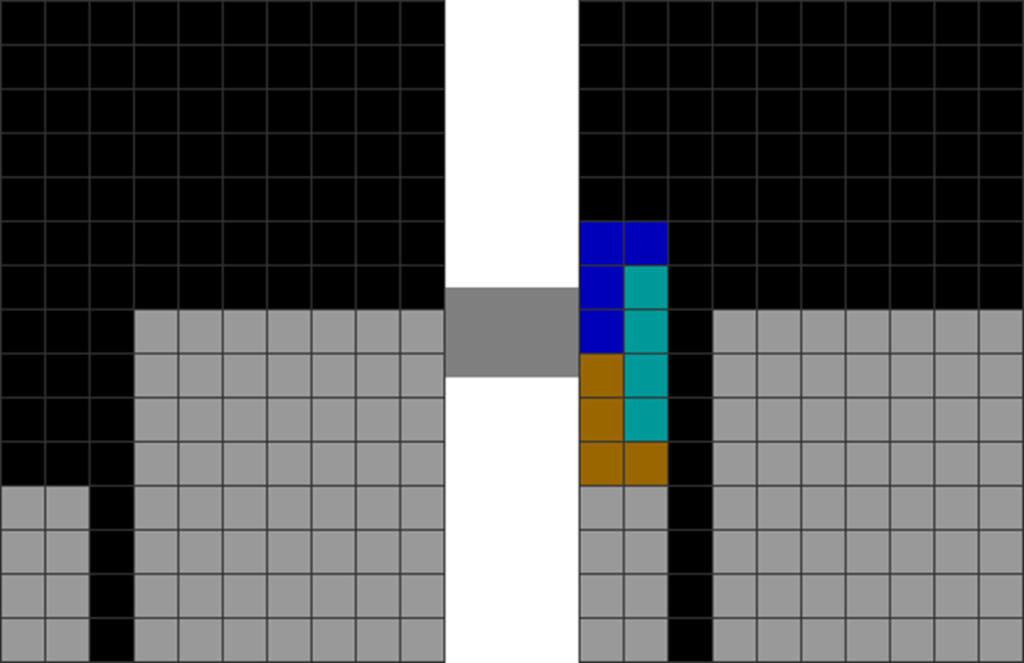
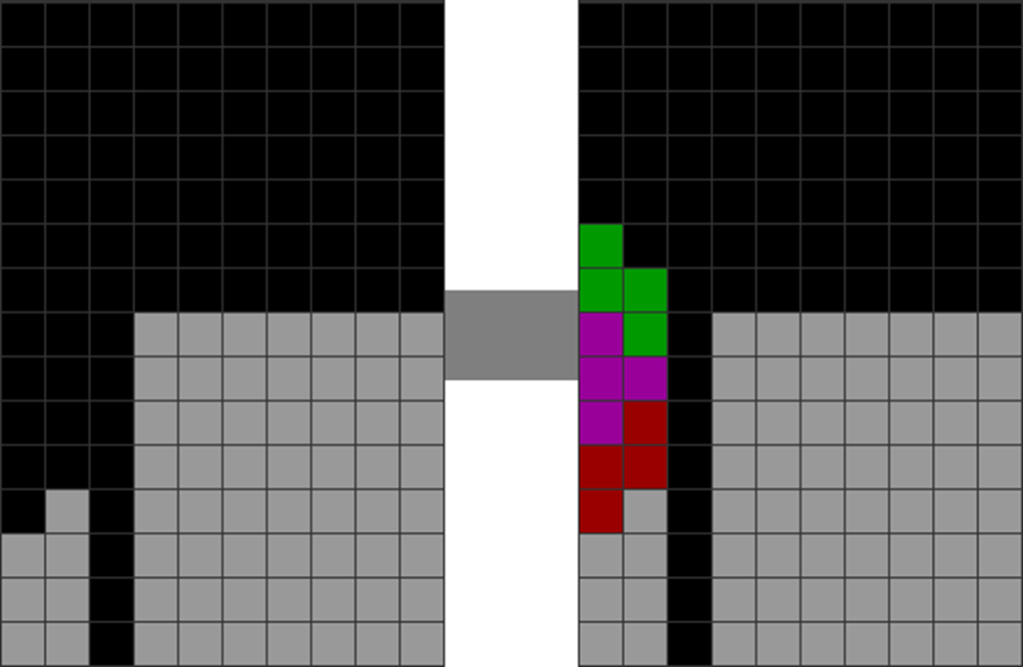
| Diagram Set 4-34 | |
| A | B |
| You can divide this setup into 3 parts. | If the T-spin setup is pushed to the right, it simplifies matters by reducing the number of parts to manage to 2. |
Note that the field in A can be divided into 3 parts: (i) the left stack, (ii) the central T-spin setup area, and (iii) the right stack.
This is easier and has only 2 areas if your T-spin setup is on the right or left side of the field, like in B.
The key is to stack parts 1 and 3 well for image A.
These areas are often 2, 3, or 4-block thick, with fixed, memorizable patterns you can use to optimize stacking follow-ups that rarely get stuck in dead ends.
To stack 2-block-wide areas (like diagram set 4-34’s A’s area 3), do this:
| Diagram Set 4-35 | |
| 1 | 2 |
| Starting field. The left stack is 2-block-wide. | One way of filling columns 1 and 2 is to stack L, I, and J into rectangles. |
Here are other methods:
| Diagram Set 4-36 | |
| 1 | 2 |
| Another starting field. The left stack is 2-block-wide. | Stacking alternating S, T, and Z over columns 1 and 2 works. |
There are only a limited number of ways to stack 2-block-wide towers and minimize dead ends.
For 3-block-wide areas (like diagram set 4-34’s A’s area 1), use the 6-3 stacking patterns:
| Diagram Set 4-37 | |
| 1 | 2 |
| Starting field. The left stack is 3-block-wide. | You stack 3×4 rectangles like this in columns 1, 2, and 3 (LSJ and TTL here). |
Finally, for 4-block-wide areas, use the 4-wide patterns.
Here is a truncated version of the 4-residue 4-wide pattern from Book 2:
| Diagram Set 4-38 |
| A fraction of the 4-residue 4-wide solution set. |
You use it to stack 4-block-wide areas:
| Diagram Set 4-39 | |
| 1 | 2 |
| Starting field. The left stack is 4-block-wide. The blue-circled part resembles a 4-residue 4-wide pattern. | Putting T this way resembles one of the solution sets of 4-residue 4-wide. |
| 3 | 4 |
| Putting the S piece does the same, continuing the sequence. | The player continues. |
| 5 |
| Note that the player never gets stuck in any dead-ends. |
Notice how some 4-block-wide areas resemble the 4-block-wide well of a 4-wide setup?
This has been covered in my Book 2’s combo chapter. The above example uses 4-residue 4-wide solutions. However, you can also use other residues, such as the standard 3-residue 4-wide solution set.
It is not always the case, but if a 4-block-wide stacking area forms the 3- or 4-residue 4-block patterns, you can easily use the 4-wide pattern solutions to stack continuously and minimize dead-ends.
You should also avoid placements that discontinue stacking continuations like these:
| Diagram Set 4-40 | |
| A | |
| This breaks 4-wide continuations by dividing the field. There are no visible 4-wide pattern “solutions” to continue it. |
Hence, by stacking various parts of a field well and properly observing field harmony and parity management, you can minimize dead ends and significantly increase setup consistency.
