Questions related to T-spins and all-spins. The mighty T-spin is one of the most efficient attacks in the game. All-spins further boost the game’s complexity by adding new setups.
Questions
Are T-spins twice as efficient as Tetrises?
Many people believe that T-spins are twice as efficient as Tetrises, because they send 2 times as many lines of garbage per row cleared:
Diagram Set 7-1
A
B
A T-spin double sends 4 garbage lines after clearing 2 rows.
A Tetris sends 4 garbage lines after clearing 4 rows.
However, this is not entirely true because of the following reasons:
Many official guideline Tetris games have a sizable soft drop time. When you make a T-spin, you must incur a hefty soft drop time to lower the T piece into the T-spin setup’s cavity. This reduces its efficiency.
Many official guideline Tetris games vary in a Tetris’ or T-spin’s line clear delay. In Puyo Puyo Tetris, a Tetris line clear delay is longer than a T-spin, making Tetrises less efficient. However, in Tetris Effect: Connected, a Tetris’ line clear delay is only half of that of the former game, making it more efficient.
Many T-spin triple setups require another soft drop after the initial T-spin triple to fix the overhang:
Diagram Set 7-2
1
A T-spin triple aftermath.
Alt. A
Alt. B
You can follow up step 1 with a T single line clear.
You can follow up with an S single line clear.
Given these variations, T-spins are not necessarily twice as efficient as Tetrises. Perhaps a rough estimate would be around 1.6 times as efficient for official guideline Tetris games.
They approach the 2x efficiency level in non-official Tetris games with no line clear delays and soft drops set to near-instant.
Why should one stay closer to the garbage line when making some T-spins?
To illustrate what I mean, please observe:
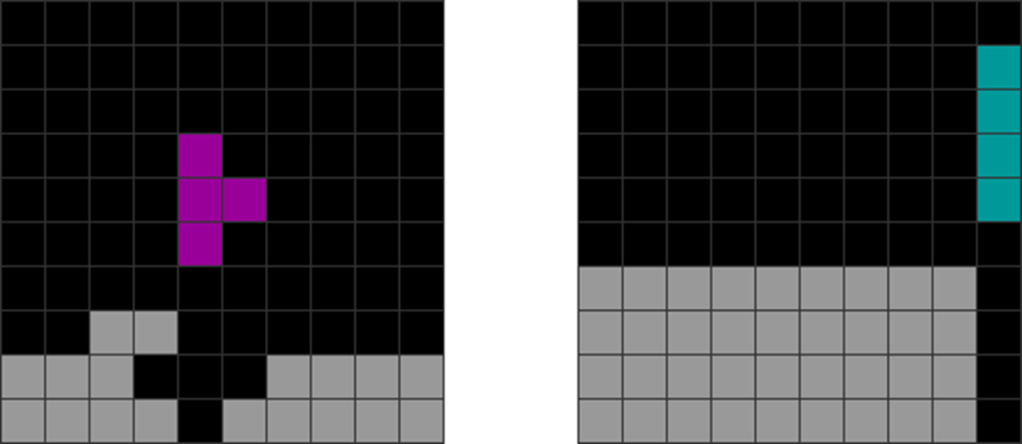
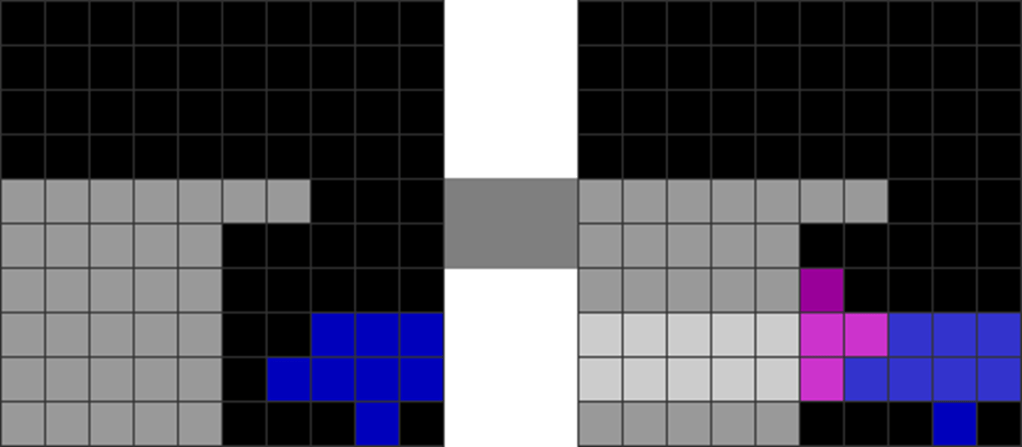
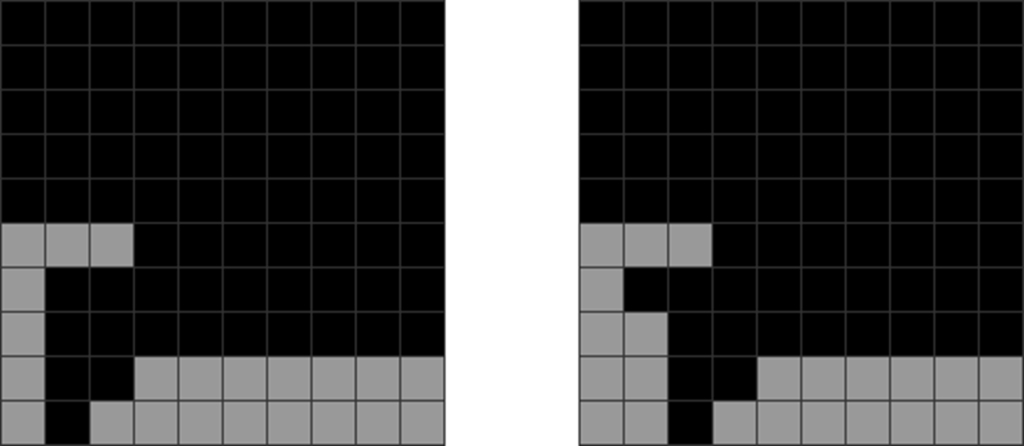
Diagram Set 7-3
1
2
2 lines of free garbage.
The player creates a DT Cannon. 5 lines are upstacked instead of the usual 7, making it more efficient.
Now, compare to a manually and fully stacked DT Cannon:
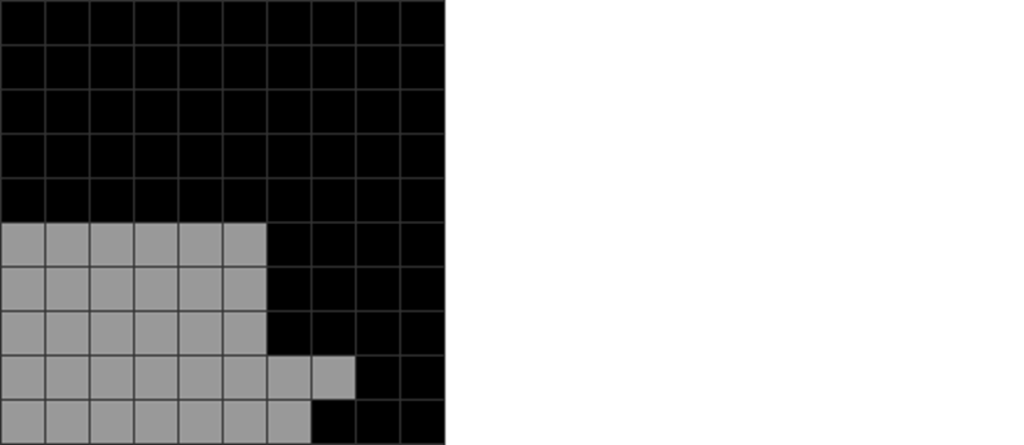
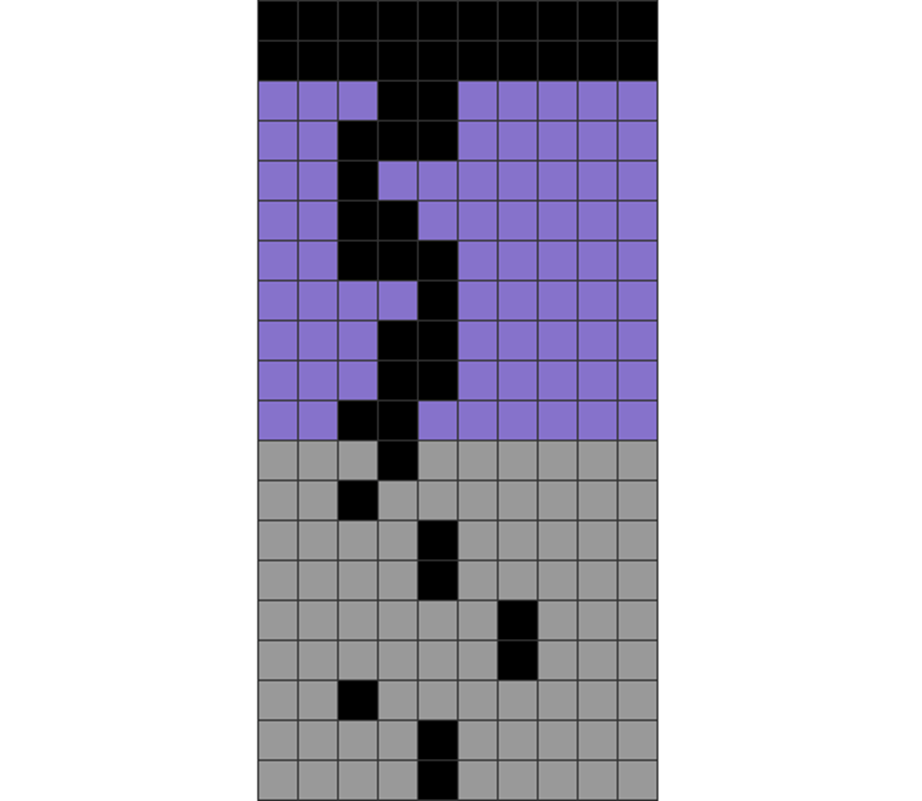
Diagram Set 7-4
A
All 7 lines are manually upstacked, which is less efficient.
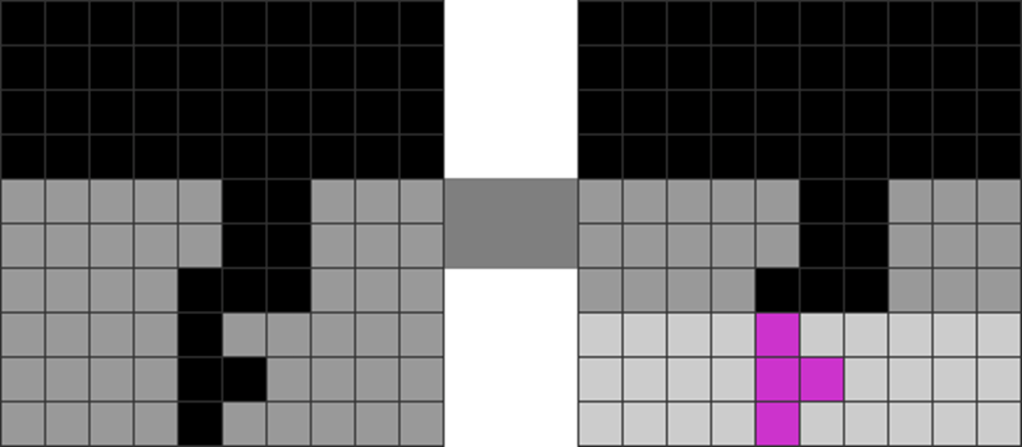
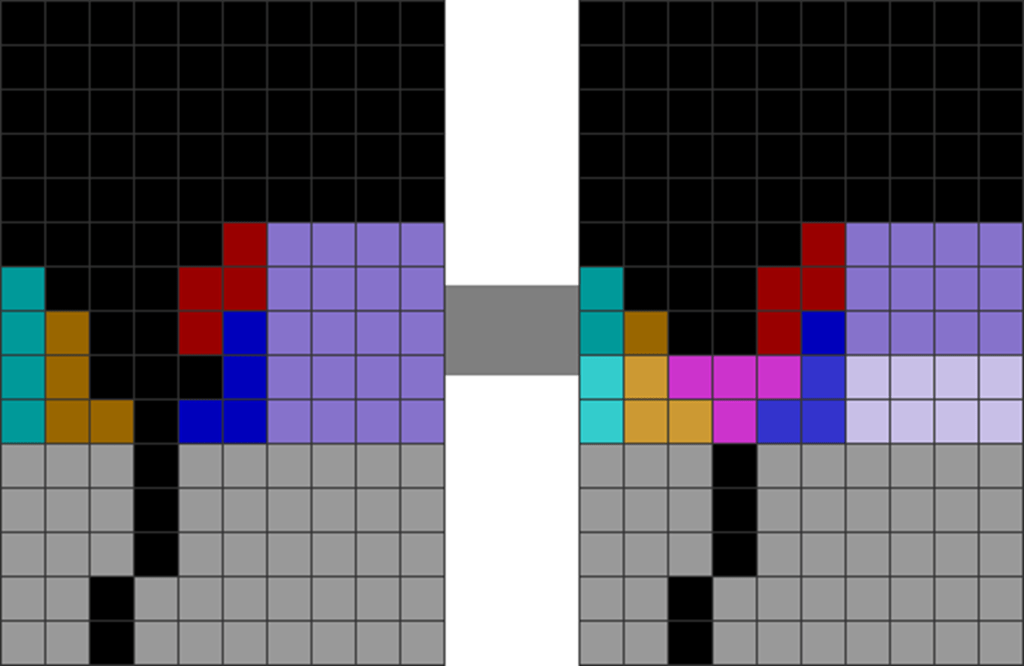
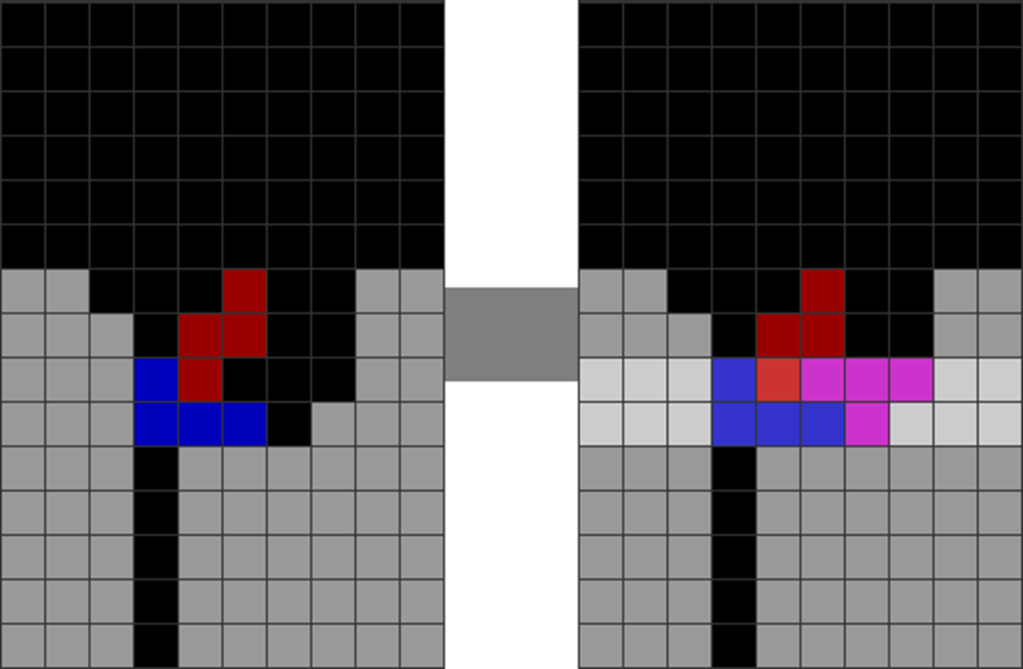
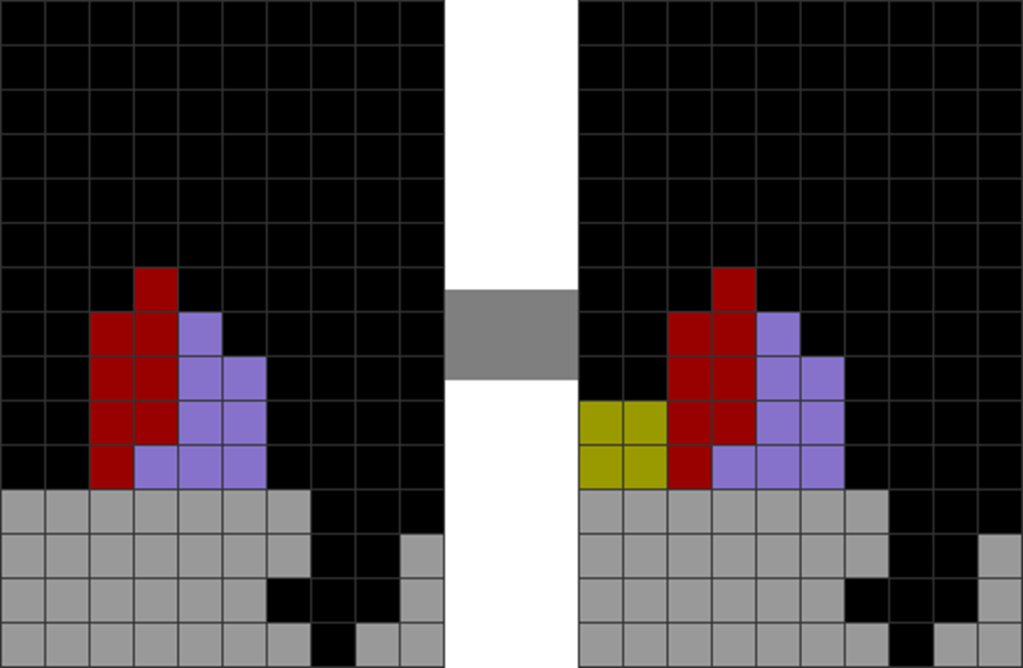
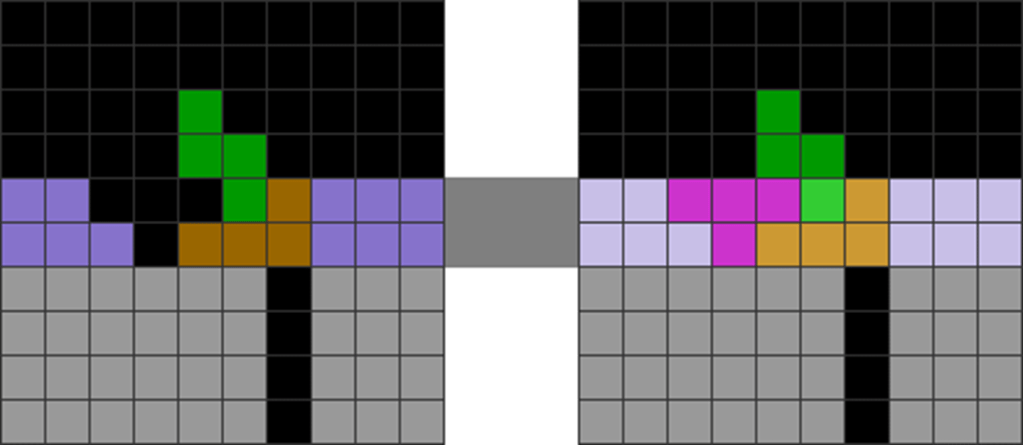
Set 7-3 shows one that is formed partially from garbage. Set 7-4 shows a T-spin heavily upstacked with colored lavender blocks. Both are DT Cannons.
Which is more efficient?
The former is more efficient because more of its rows consist of garbage lines. Every line upstacked requires 2.5 pieces to upstack. However, when it is a garbage line, it is like having received a “free” 2.5 pieces.
Hence, if a DT Cannon has 2 lines made of garbage, the game has, in essence, given you 2 free rows (or 5 pieces). This means roughly 30% less time to make a DT Cannon than to make one that is fully upstacked from nothing.
Now, let us consider:
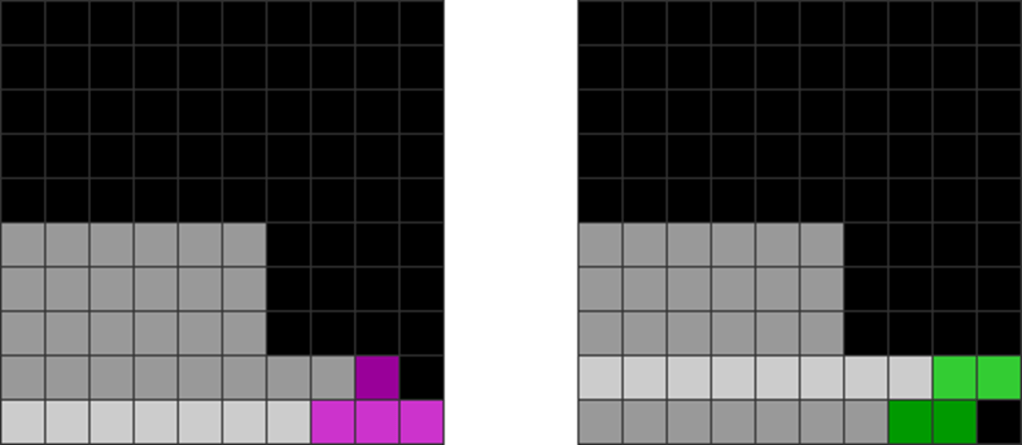
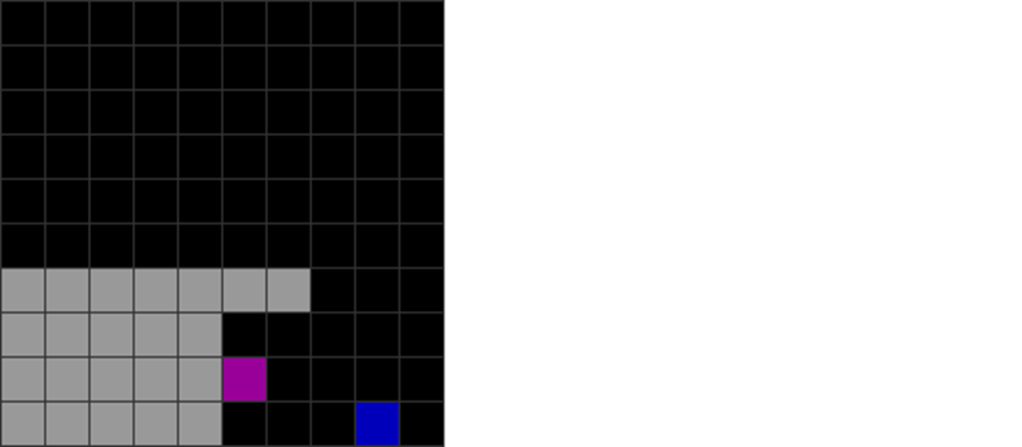
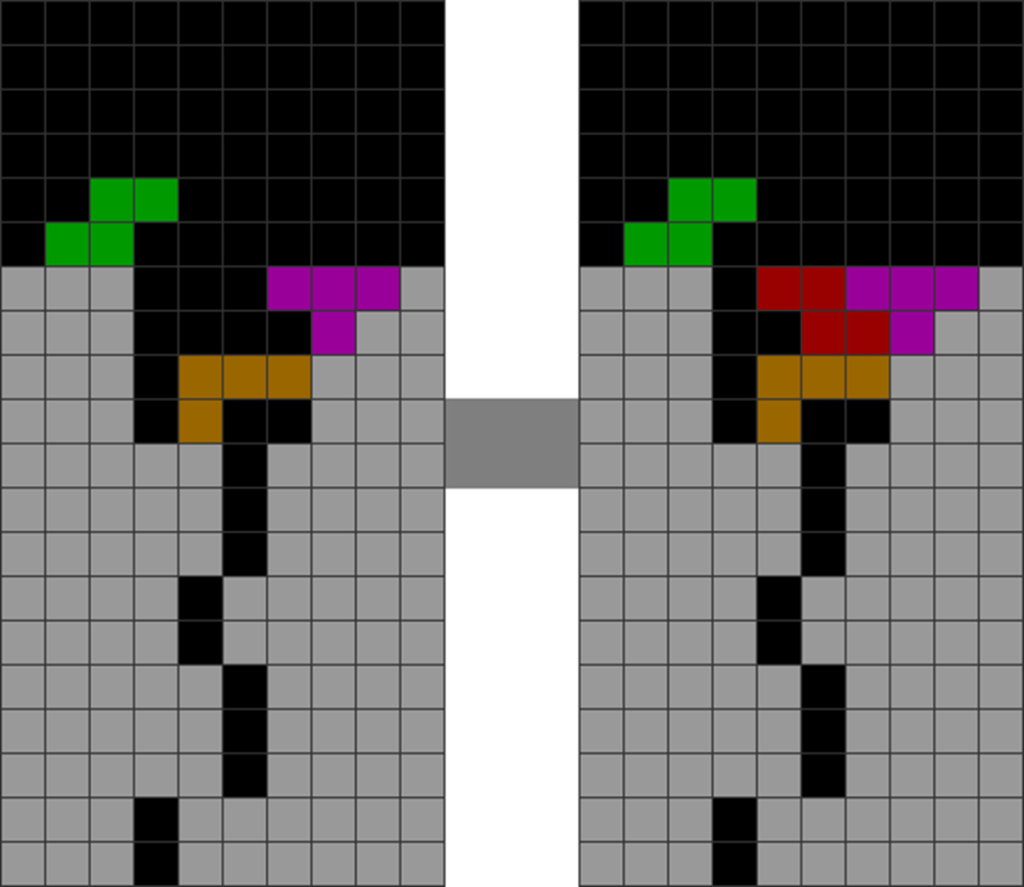
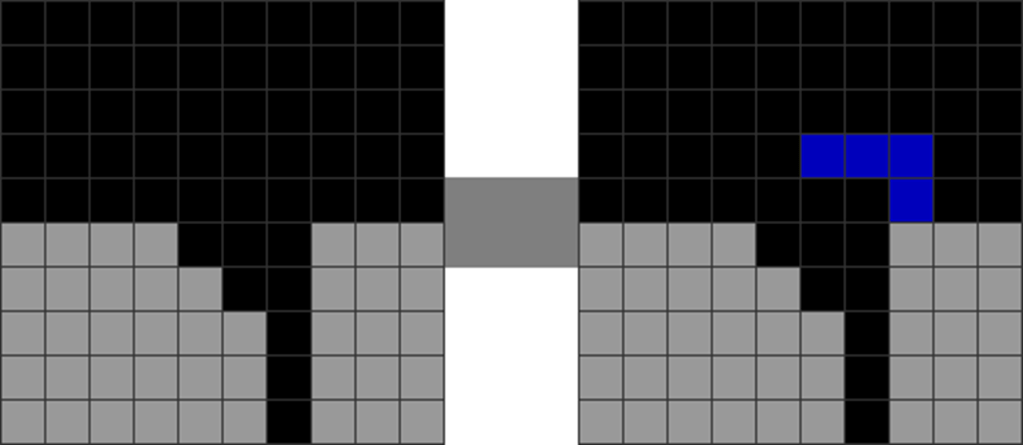
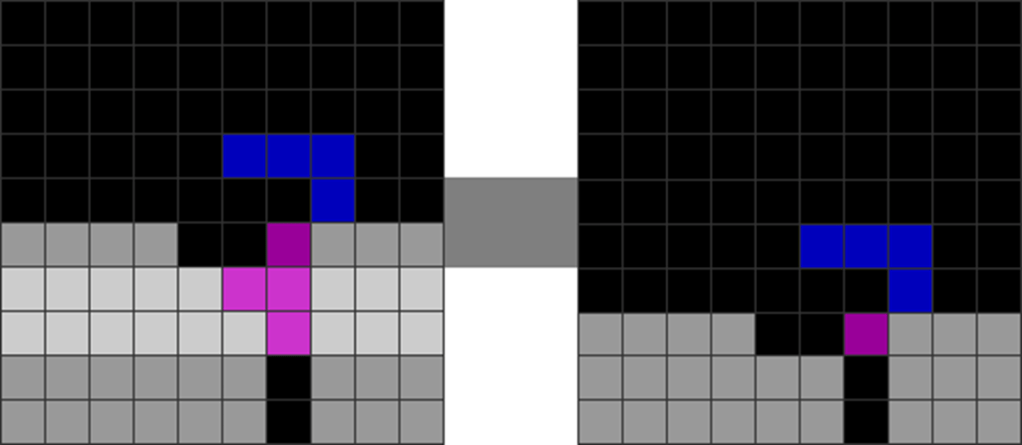
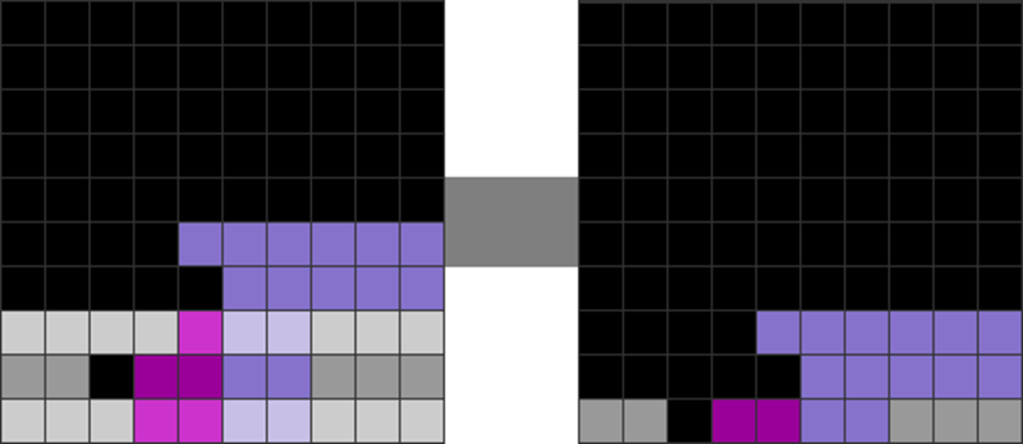
Diagram Set 7-5
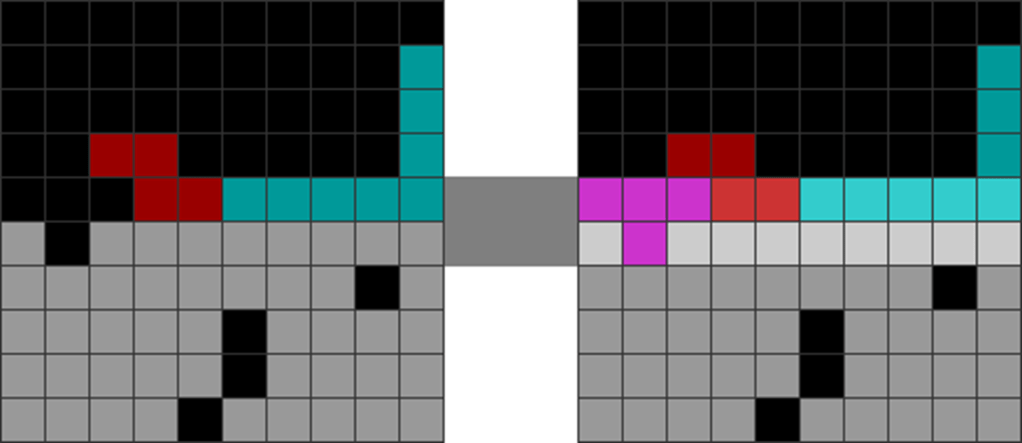
1
2
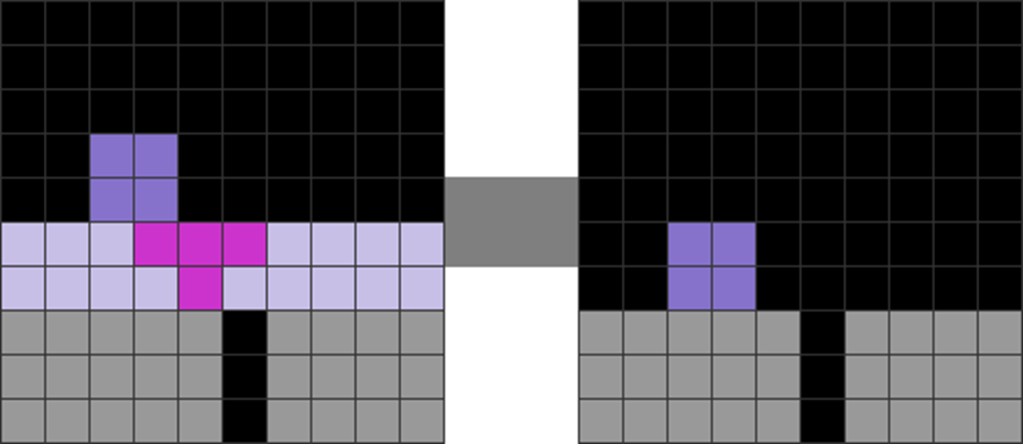
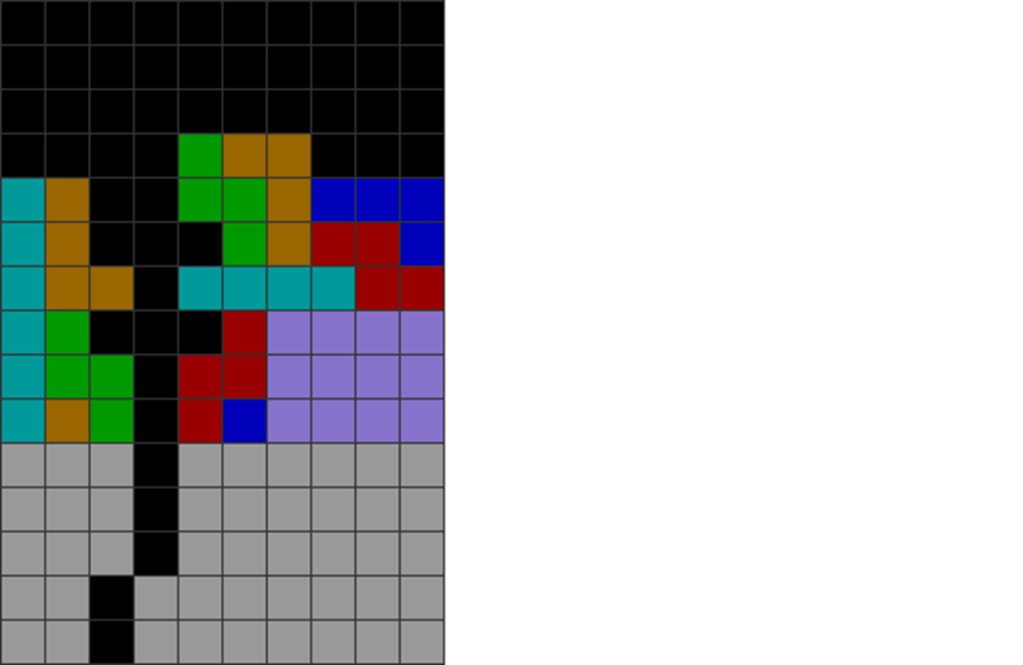
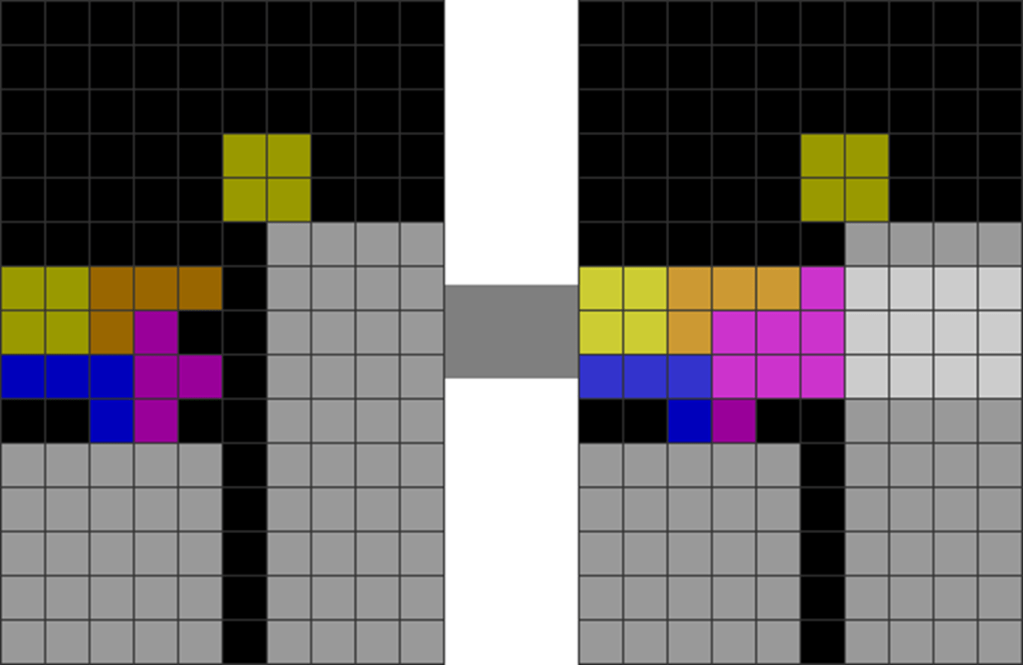
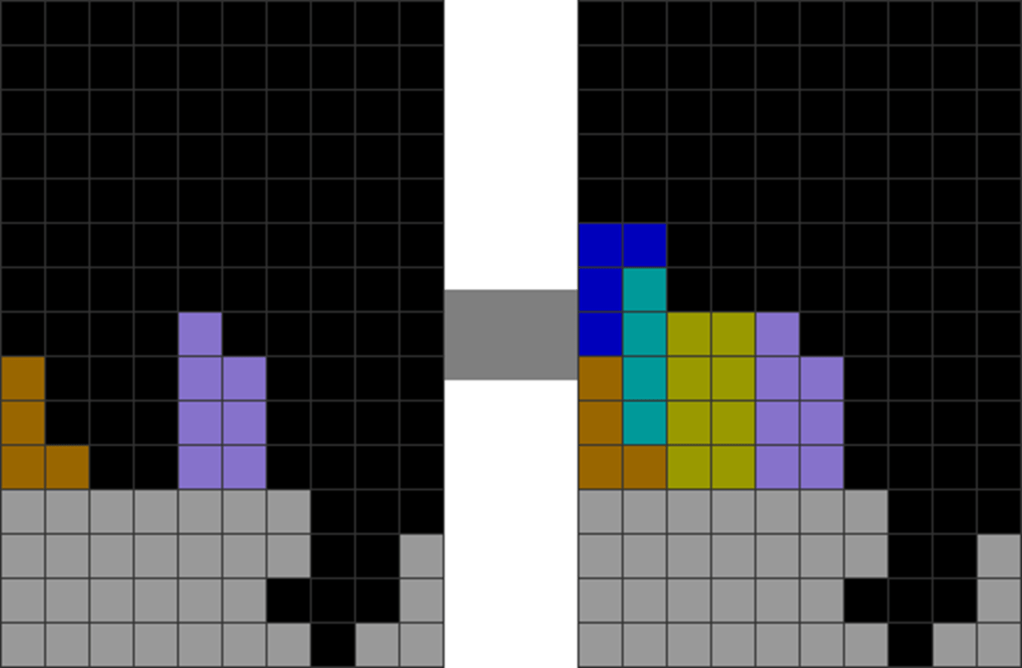
The gray rows are garbage lines. The lavender ones are upstacked blocks.
The player simply places a Z overhang to make the T-spin double. Half of its rows are made of garbage.
These T-spin setups often involve just placing a piece to make an overhang over a hole. The rest are made of garbage.
By staying close to the garbage line, you can more easily make these kinds of half-garbage T-spins, which boosts your efficiency.
Why are 20 T-spin double (20 TSD) sprints not optimal for training T-spins?
Many mid to high-level players often eulogize and idolize 20 TSD sprints. These are sprints where one must make 20 T-spin doubles as soon as possible, making no other forms of line clears.
Hence, if you accidentally make a non-T-spin line clear, the round is considered to have failed.
20 TSD sprints do not train many kinds of T-spins, such as:
T-spin triples and T-spin singles.
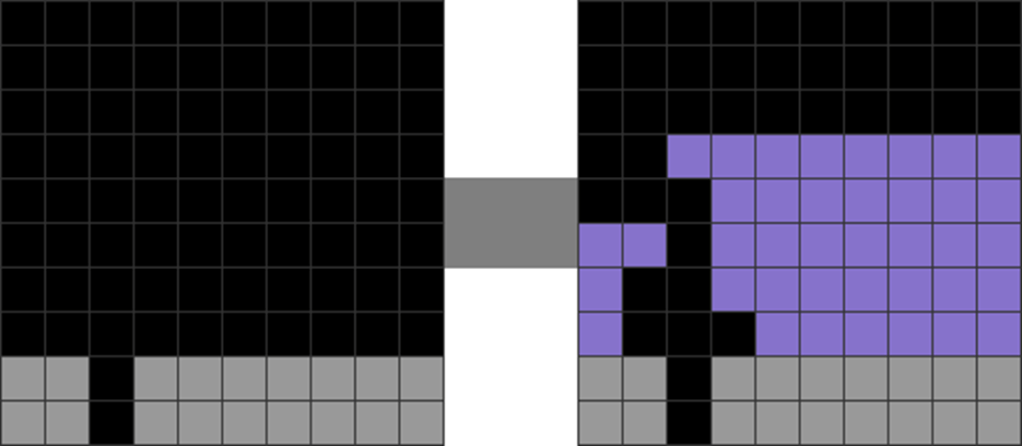
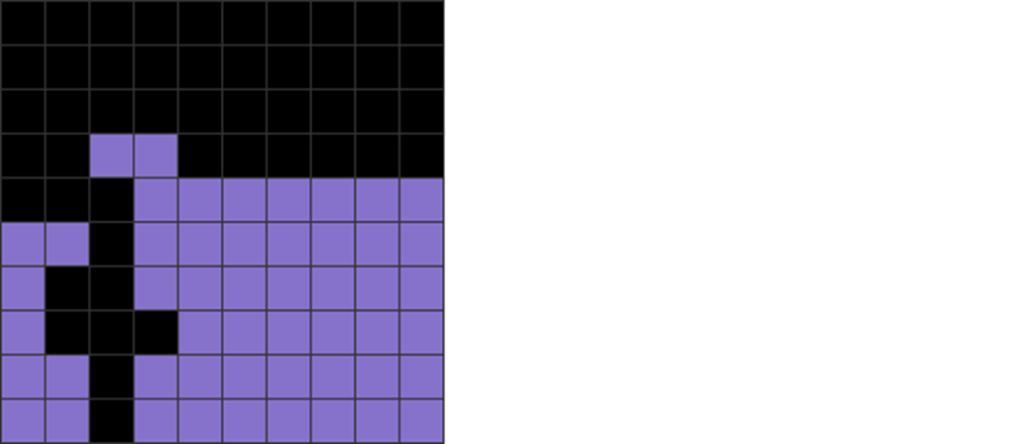
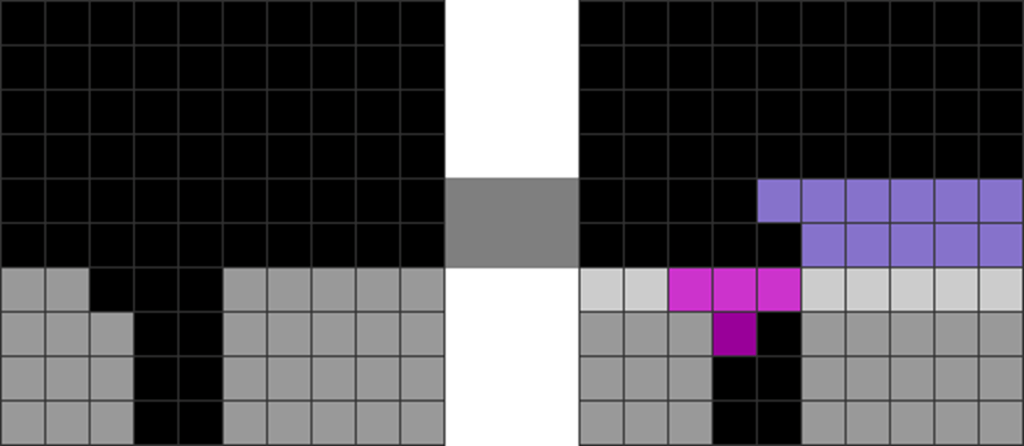
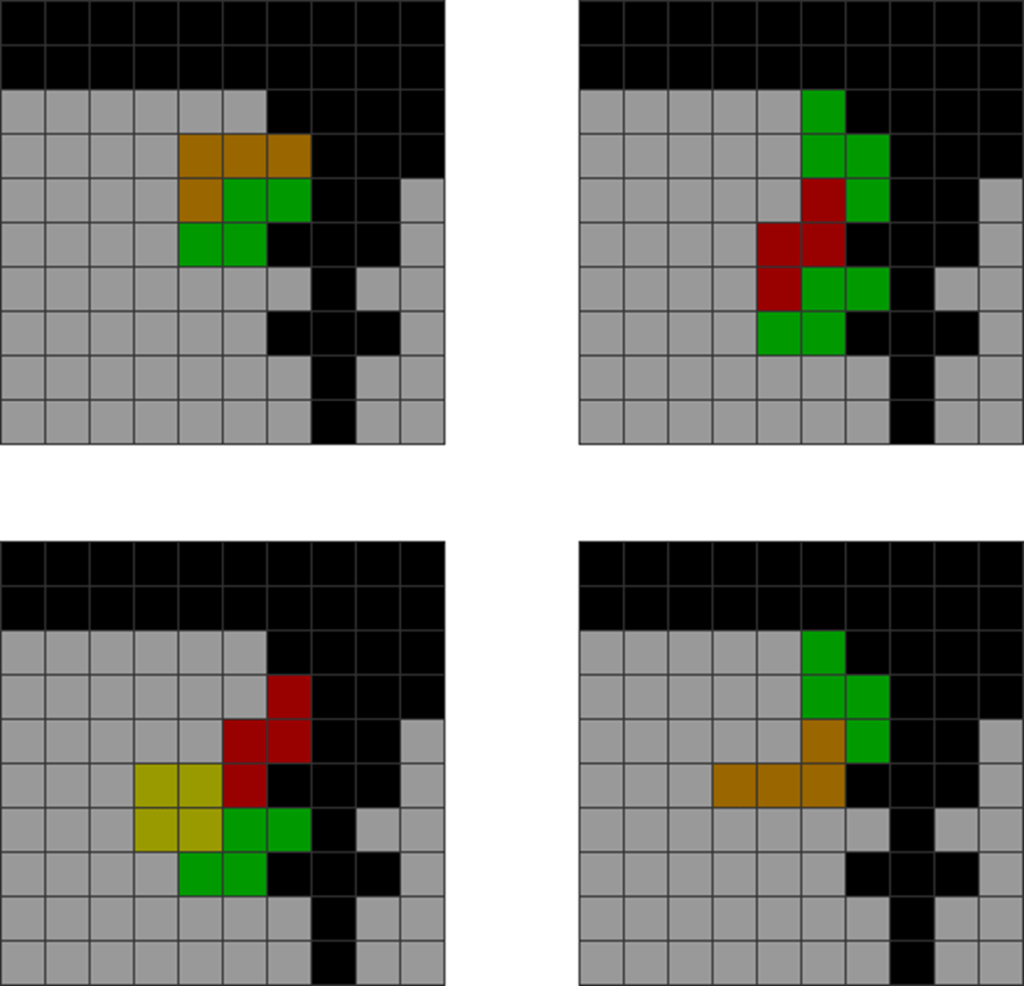
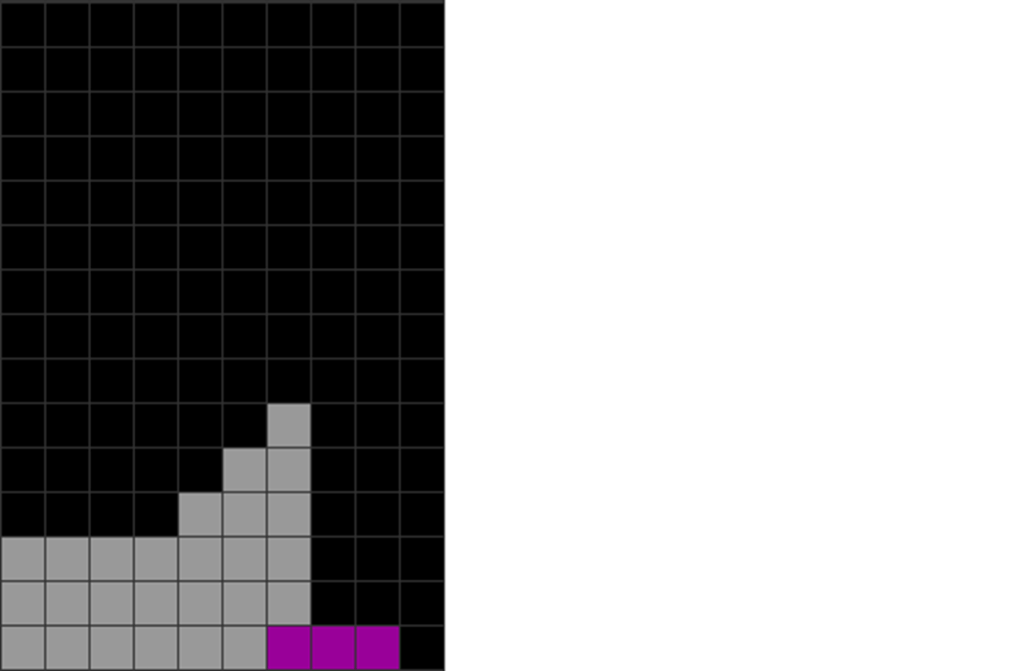
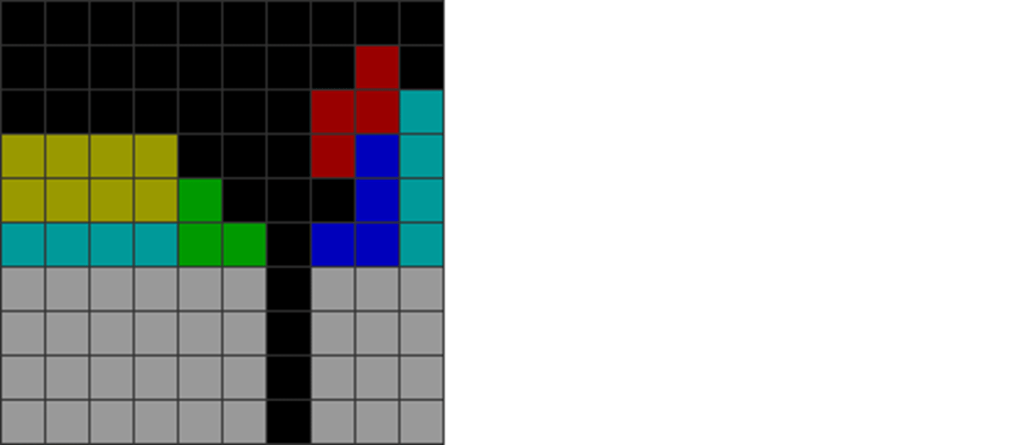
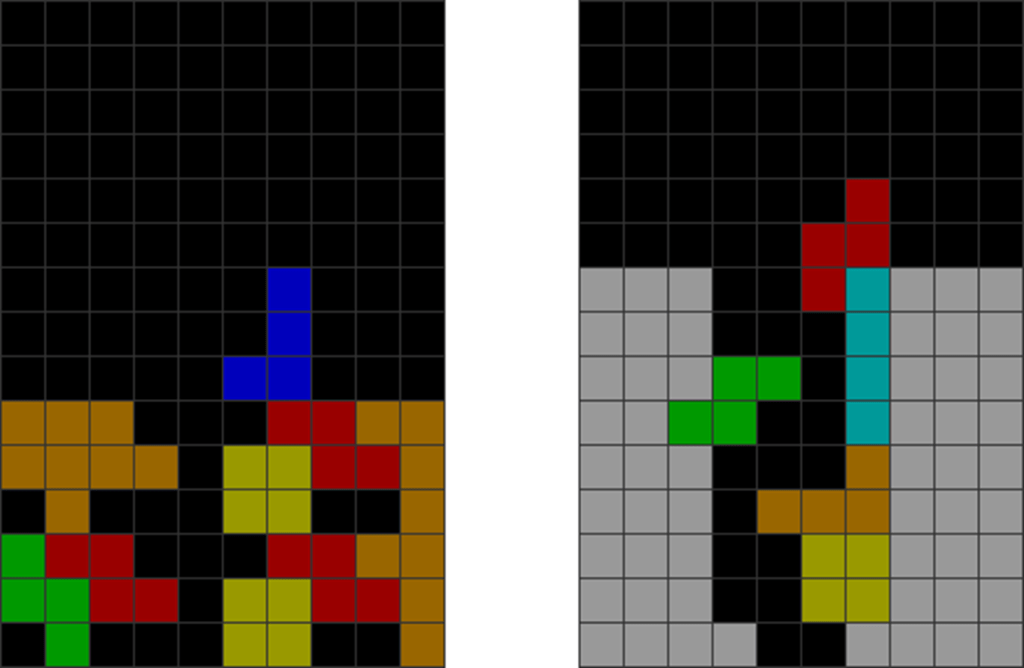
Prophecy T-spins:
Diagram Set 7-6
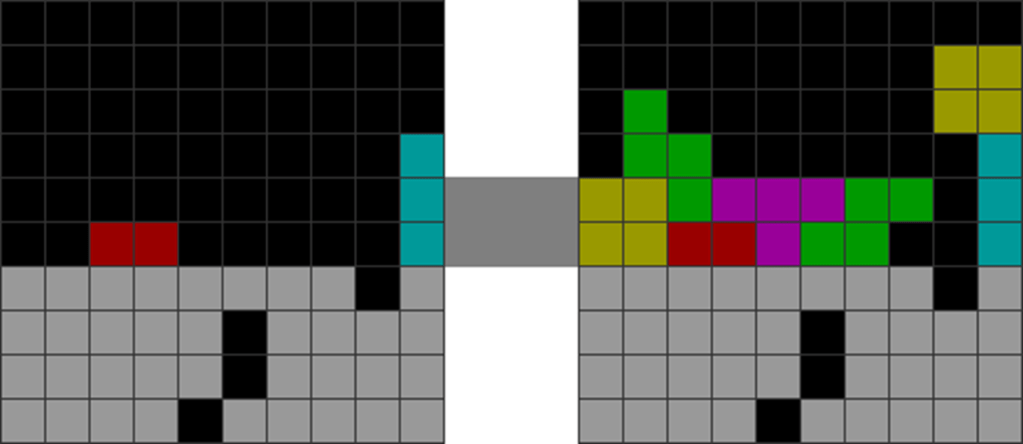
1
2
The player upstacks the lavender part and puts the Z this way.
3
4
After the Tetris quad, the Z piece connects with the bottom garbage hole, creating a T-spin double.
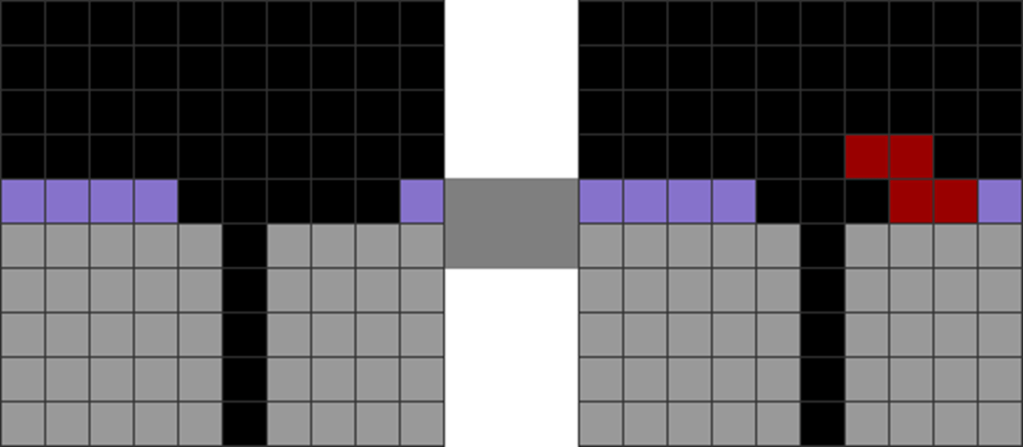
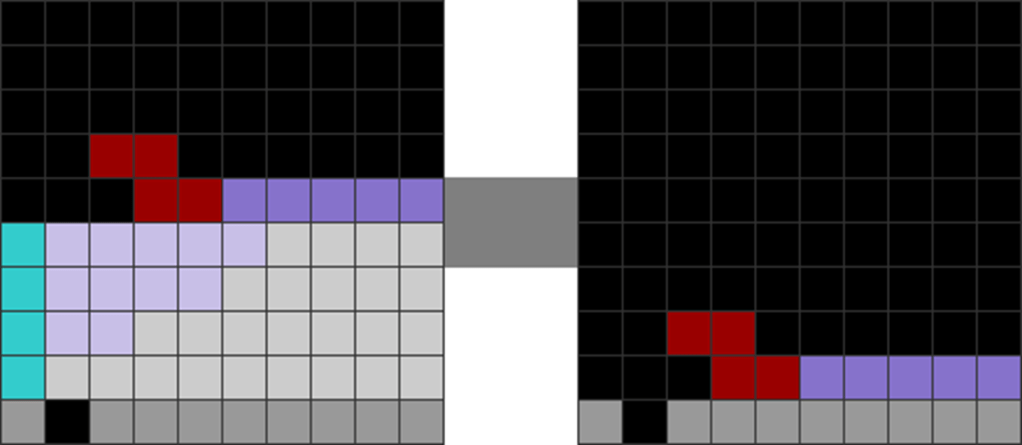
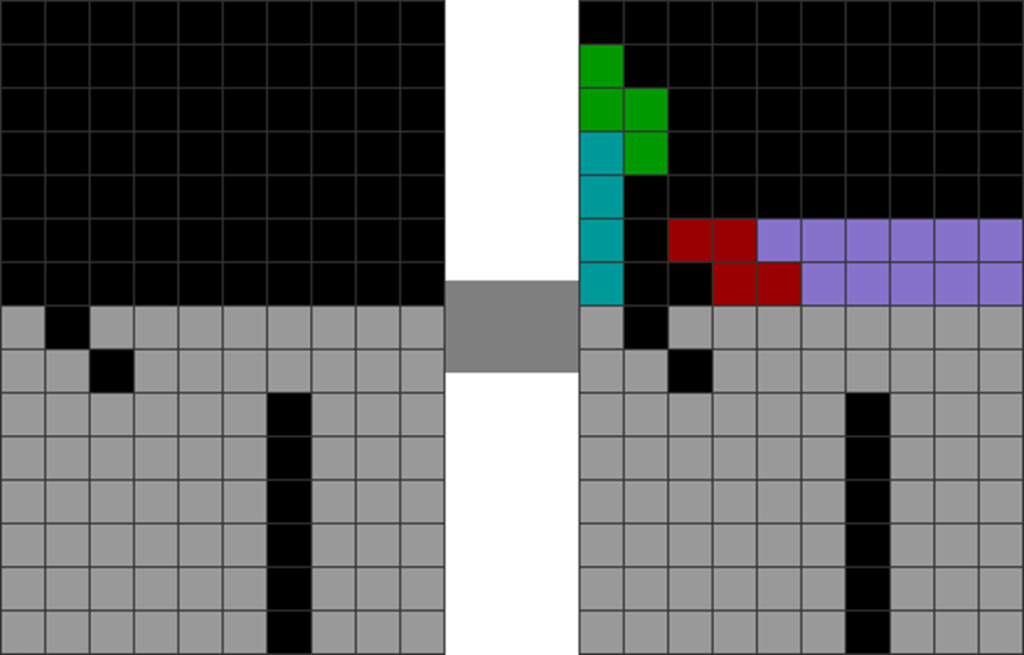
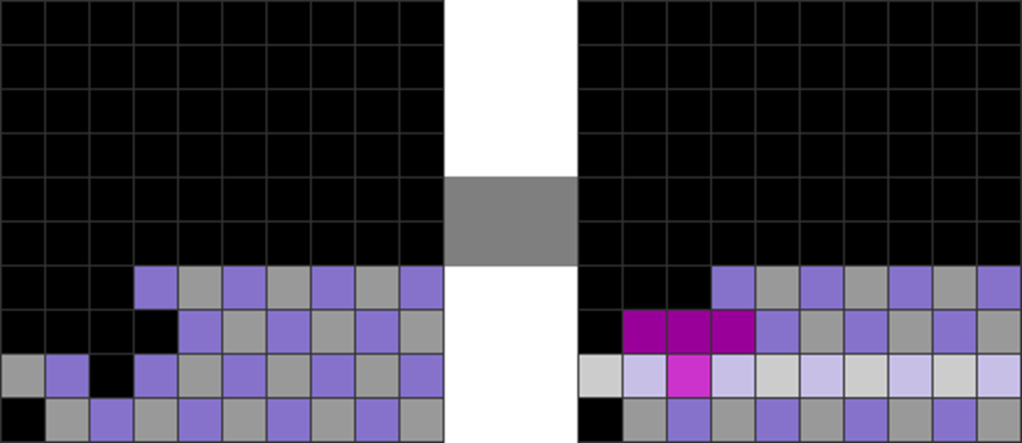
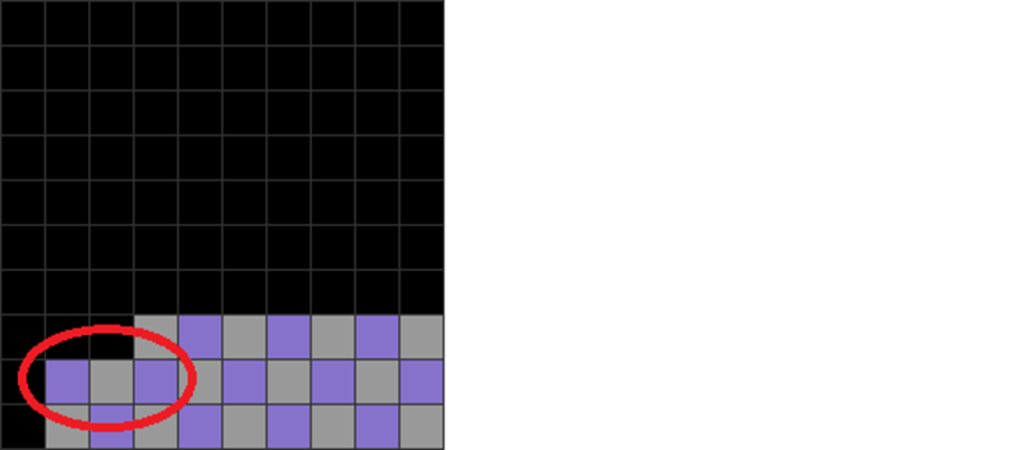
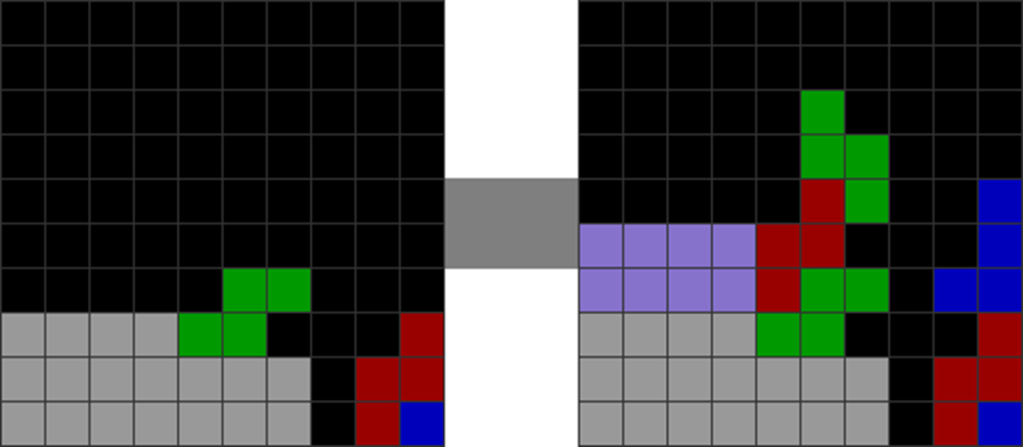
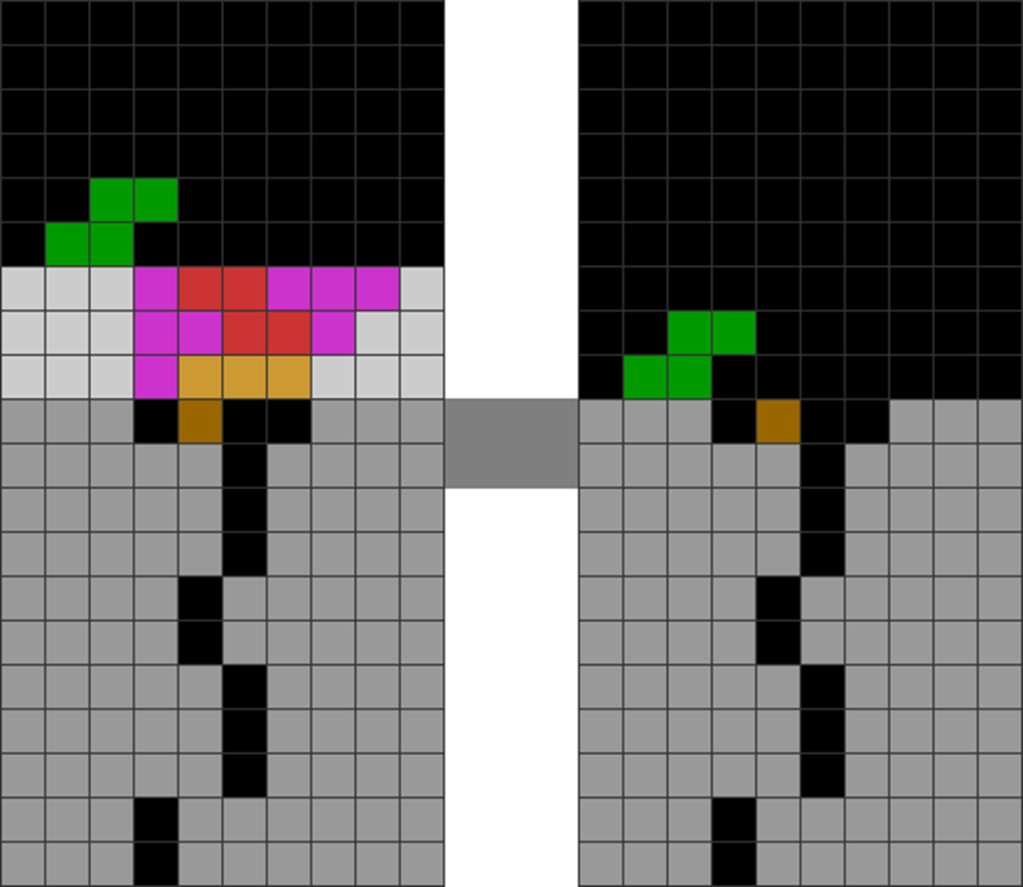
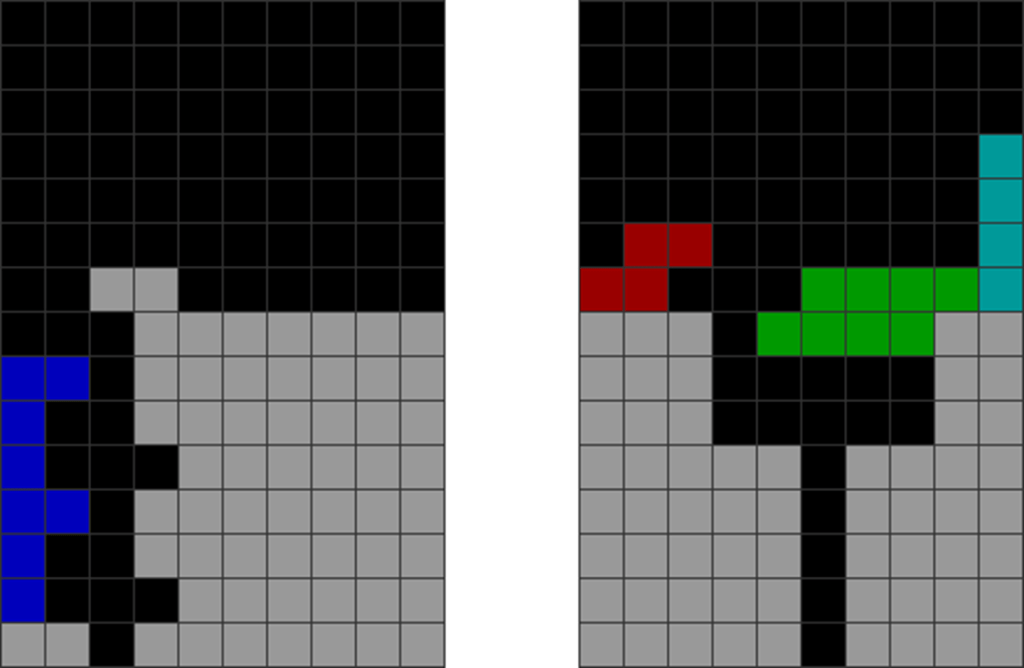
iii. Skims that create T-spins:
Diagram Set 7-7
1
2
A T skim to create an STSD.
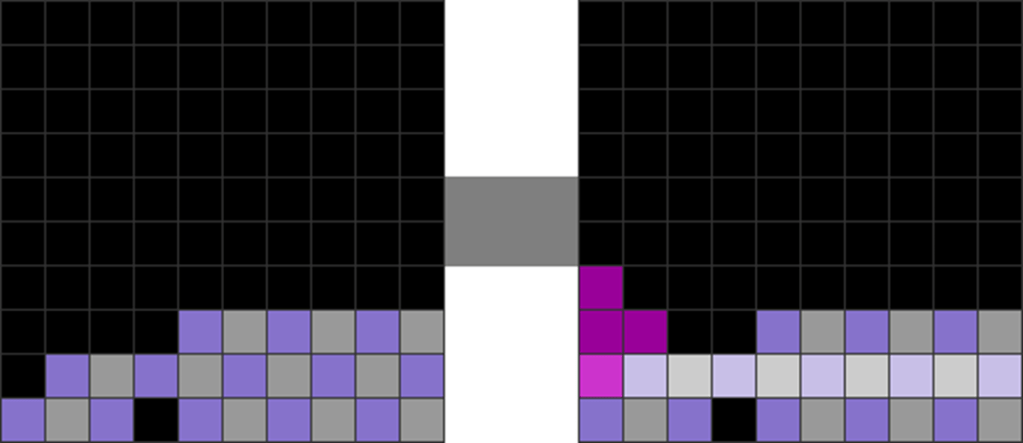
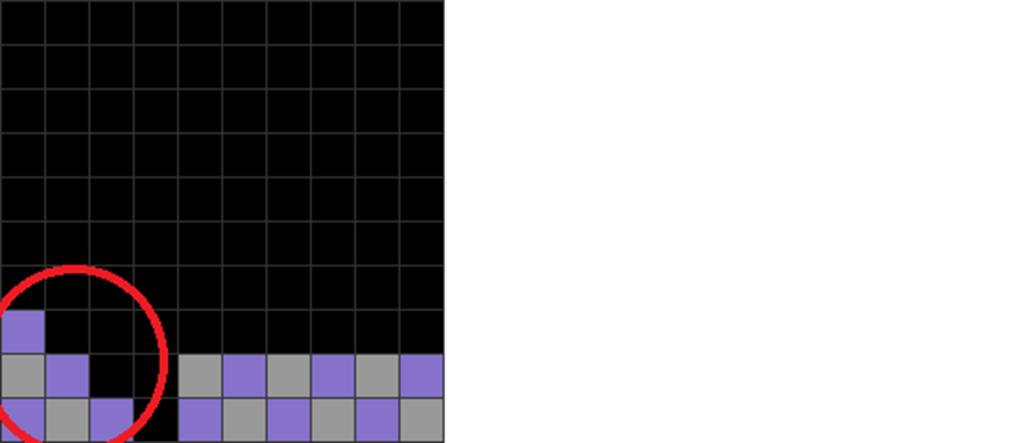
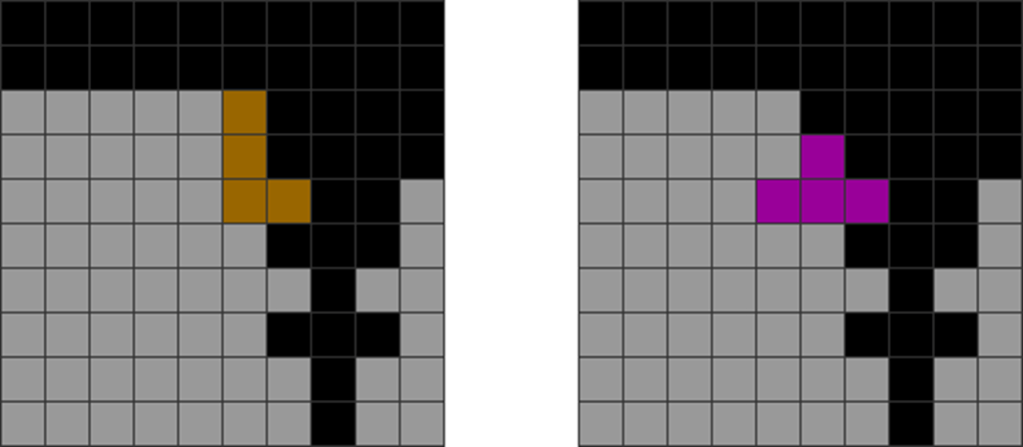
Diagram Set 7-8
1
2
An L-skim to create a T-spin double.
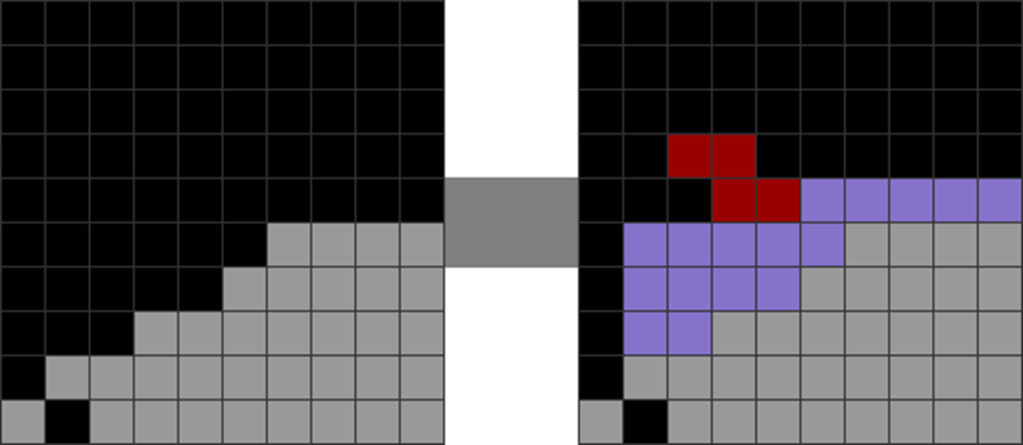
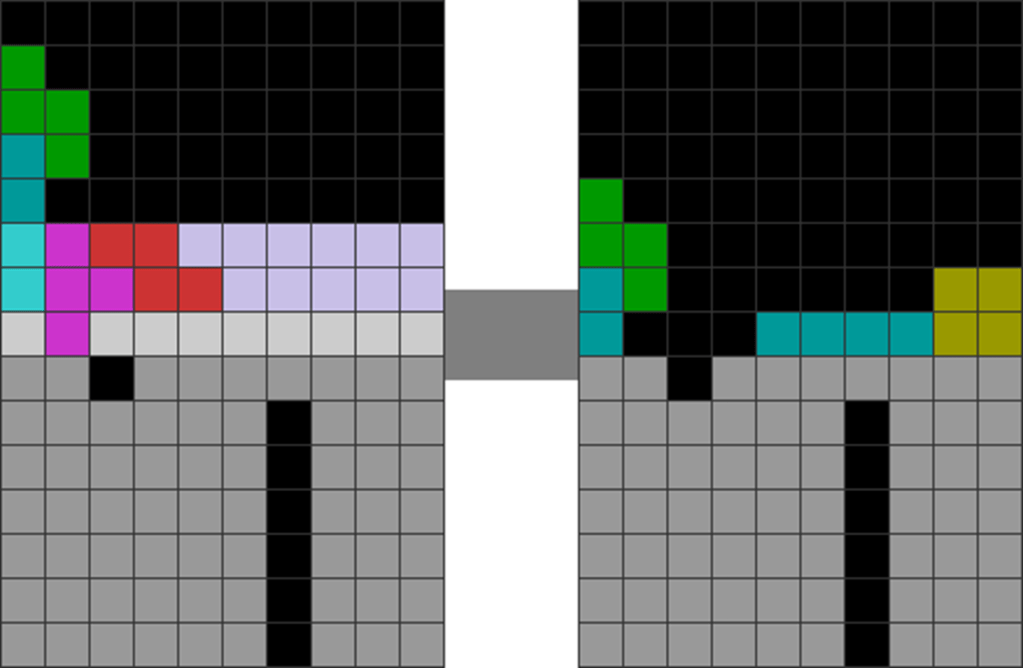
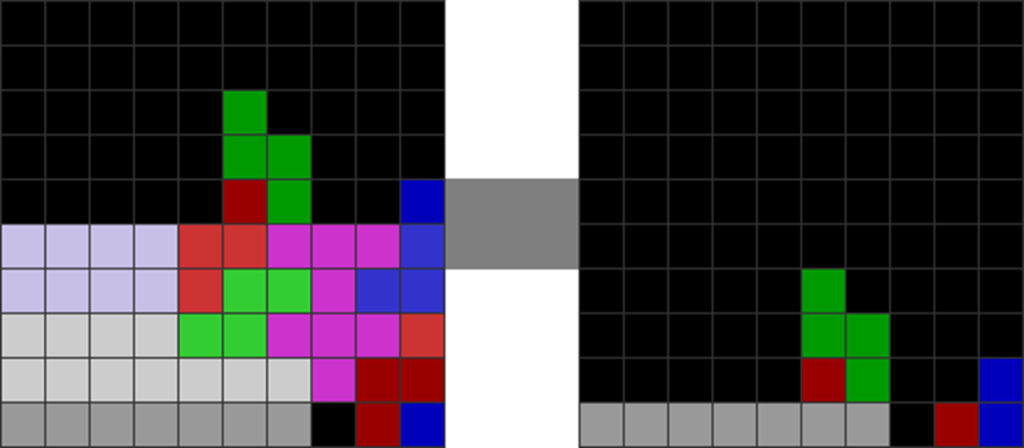
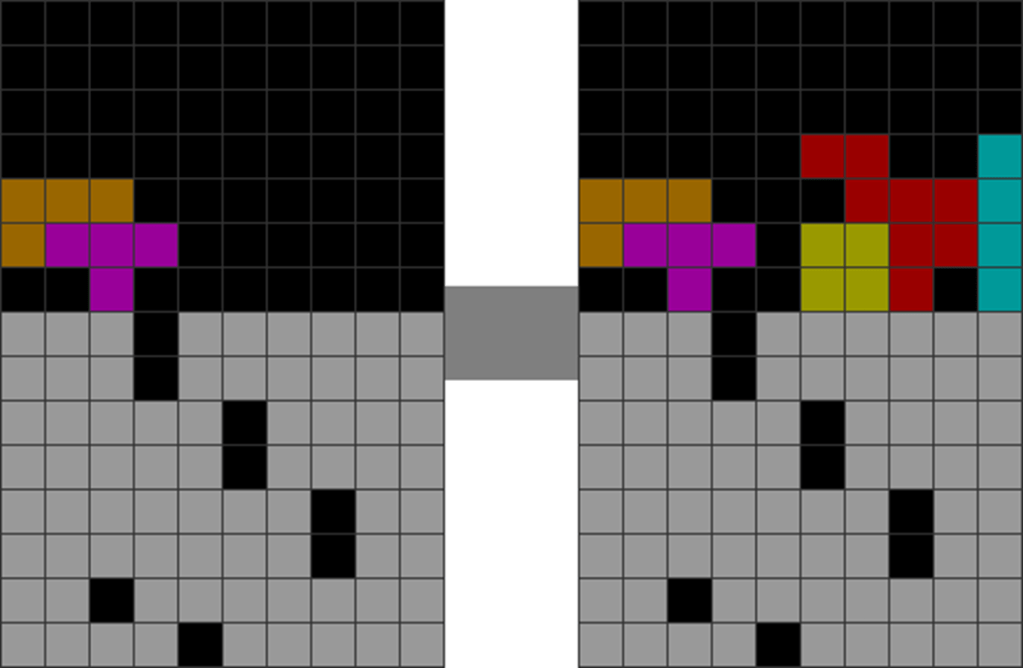
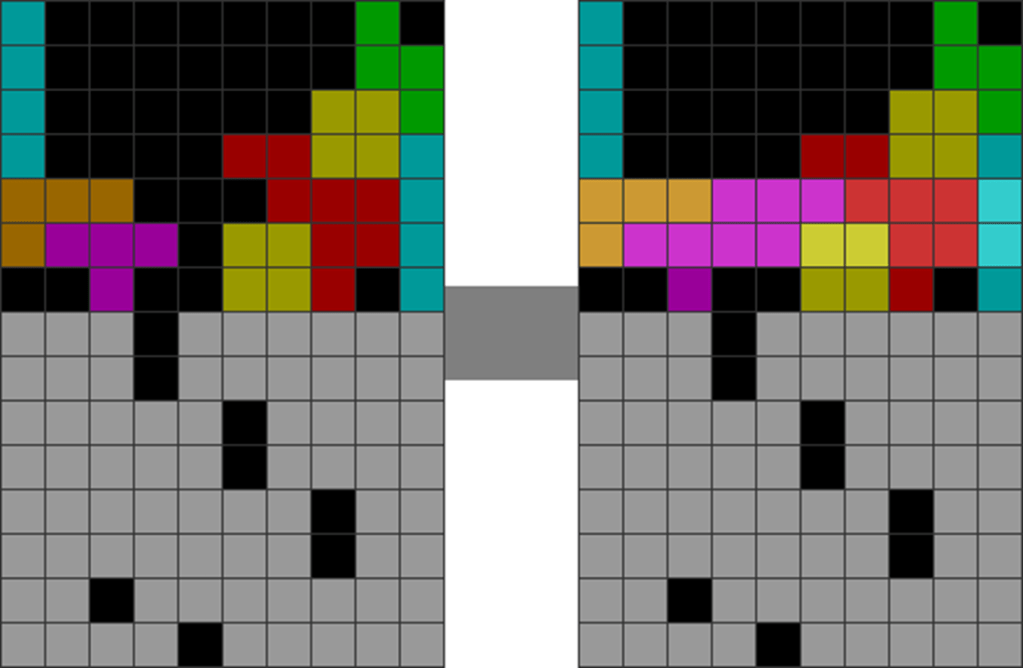
iv. Clean T-spins from garbage:
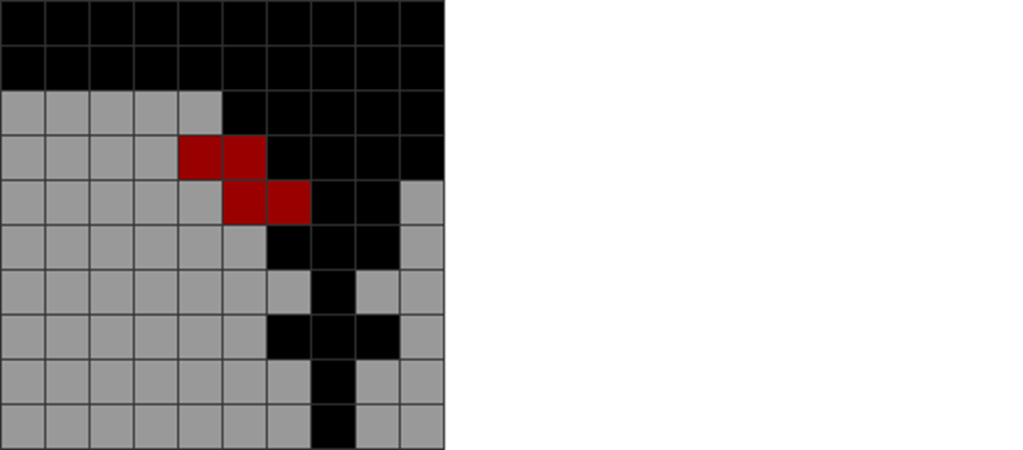
Diagram Set 7-9
1
2
The garbage hole is in column 2. The player makes a C-spin to sustain back-to-back.
3
4
After the T-spin triple line clear, the next T-spin is clean, with a bit of upstacking.
All of the above T-spins can only be trained mid-game during competitive, real matches.
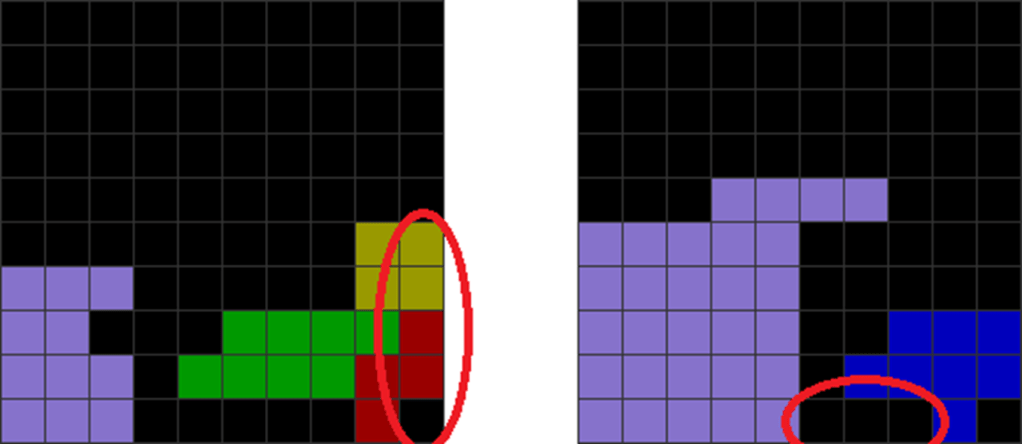
The danger with doing too many 20 TSD sprints is that they may cause you to overtrain and overuse many dirty or overly complex T-spins, such as:
Diagram Set 7-10
A
B
The red-circled parts of these T-spin setups are not clean. B is a polymer Fin T-spin double prop.
These T-spins are sometimes not viable mid-game for competitive setups.
Why do pros prioritize T-spin doubles over T-spin minis, singles, or triples?
Many Tetris experts prioritize T-spin doubles over all other kinds of T-spins. Why is it so?
This is because T-spin minis and singles often lead to several things.
Let us use checkerboxes to analyze parity. The lavender and gray blocks represent even and odd blocks.
Diagram Set 7-11
1
2
16 lavender and 15 gray blocks. The bottom row (row 1) simulates a garbage row with 1 hole.
A T-spin single concludes.
3
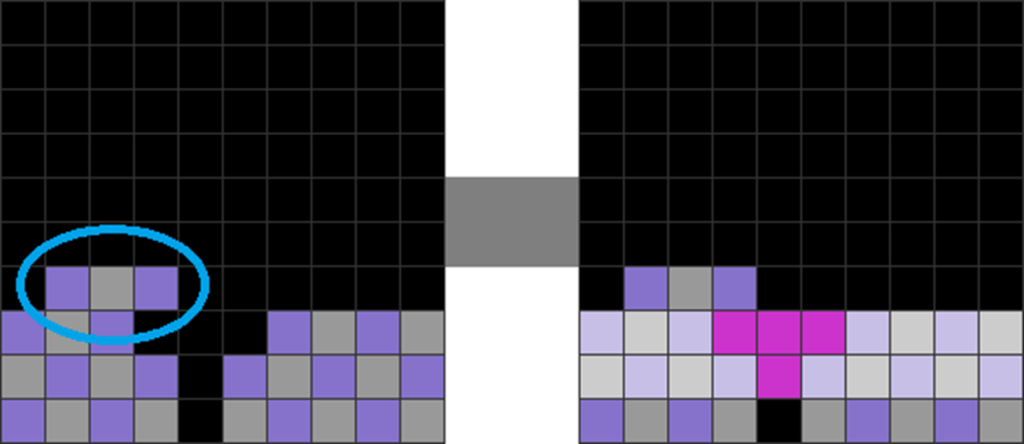
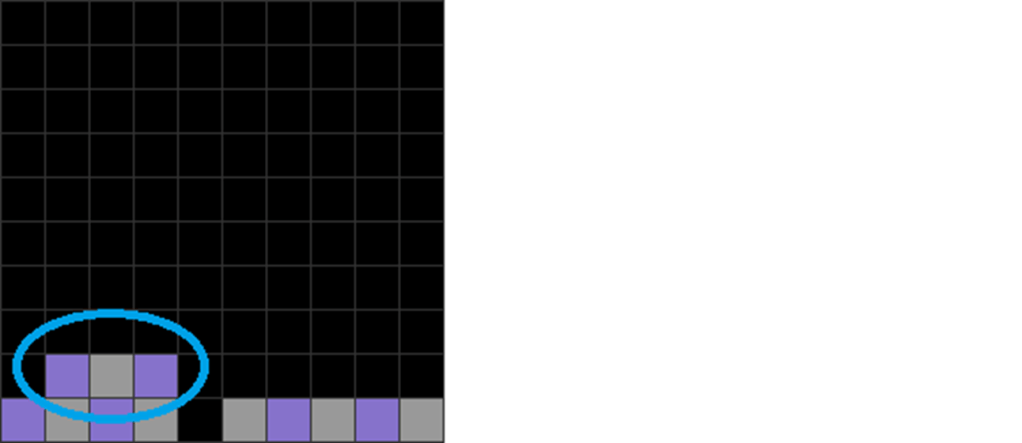
12 lavender and 13 gray blocks. The red circle shows the 3 added purple blocks.
T-spin singles hence add extra residues (the red circle) after the line clear, which causes the stack’s surface to become indeterminate.
In both steps 1 and 3, the difference between the lavender and gray blocks is still 1. Parity is imbalanced and not reset back to normal.
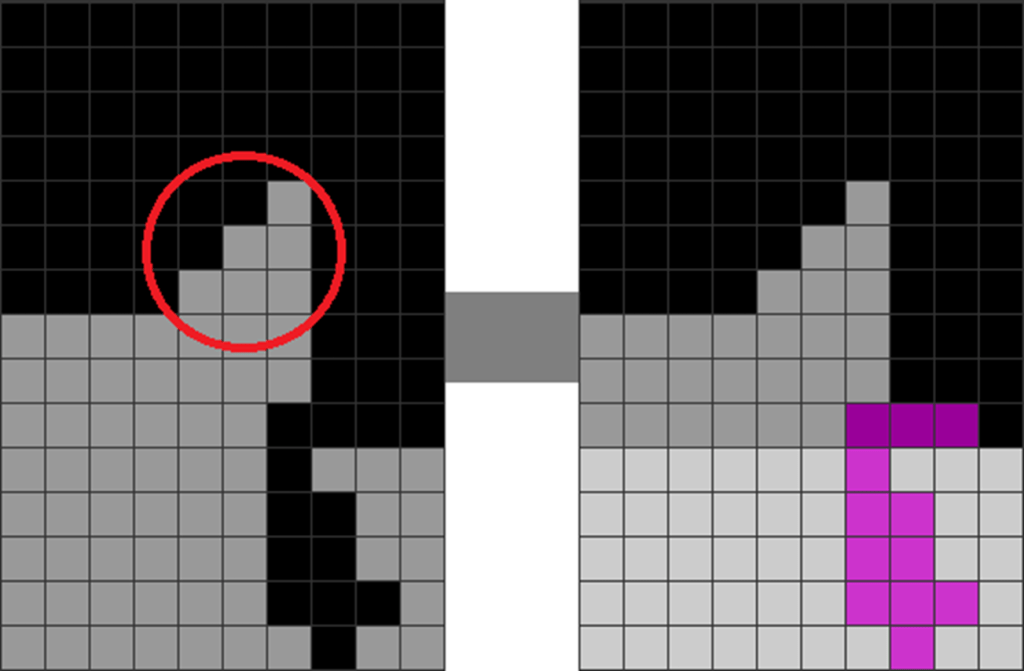
Let us consider T-spin minis:
Diagram Set 7-12
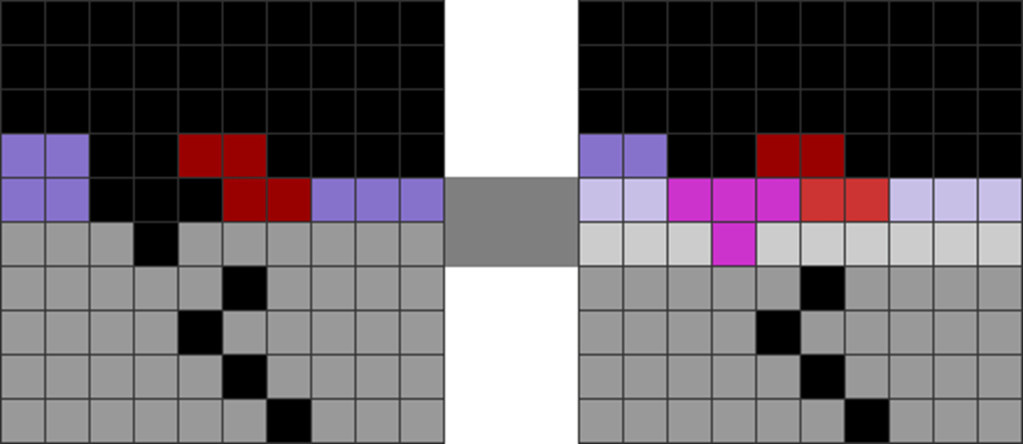
1
2
Starting field.
A T-spin mini concludes.
3
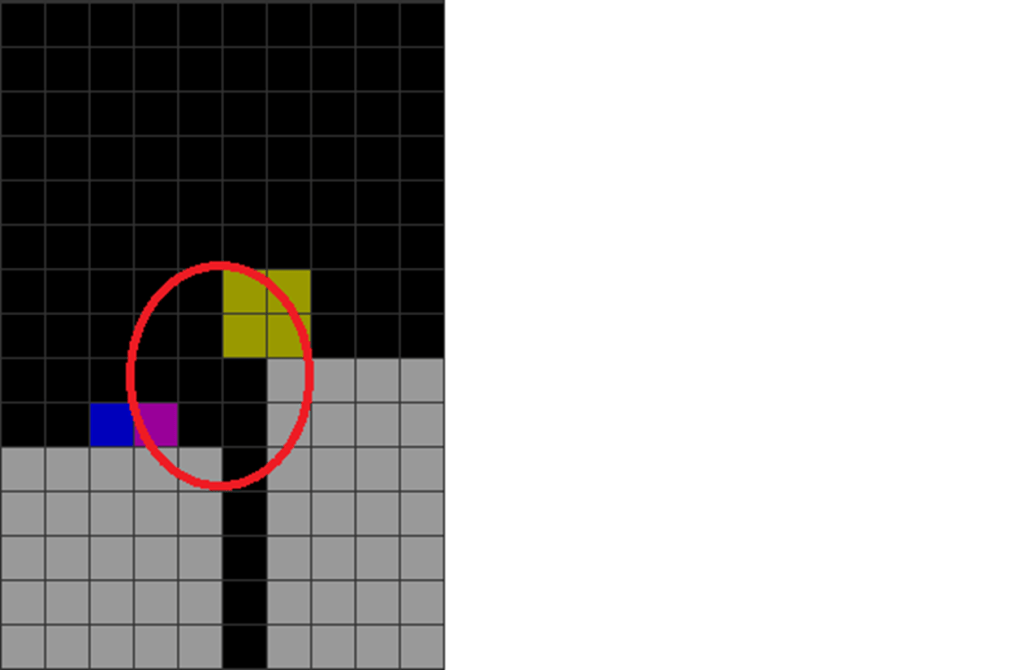
The added 3 purple blocks make the left side of the stack jagged (its local parity in the red circle is imbalanced).
Adding the 3 new purple blocks in step 2 makes the field jagged (red circle).
Hence, T-spin singles and minis could sometimes upset the field’s local parity, turning a parity-balanced field into a parity-imbalanced one or vice versa. This could make it jagged and lead one into dead ends. They also add residues that make the field unpredictable to manage.
Second, they are weak, since they only clear a single line and send fewer garbage lines.
What about T-spin triples?
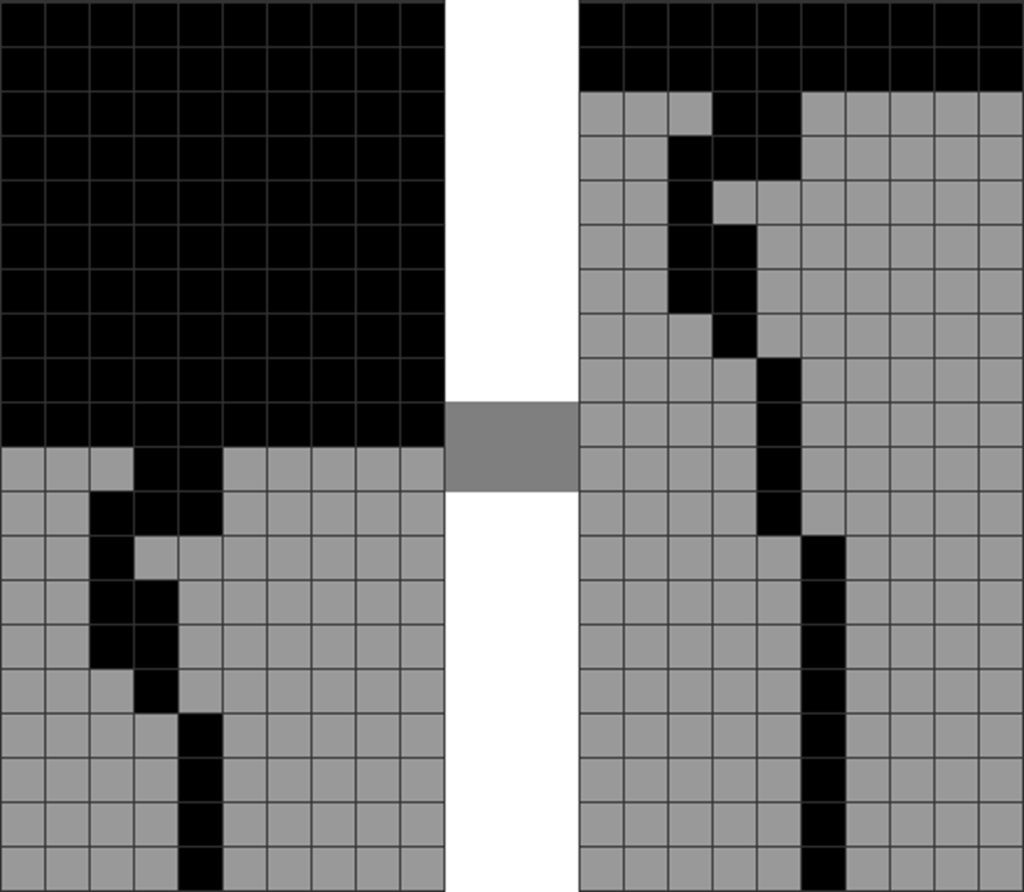
Diagram Set 7-13
1
2
This is a T-spin triple setup.
The player slides and rotates in the T piece to make a T-spin triple line clear.
3
The outcome leaves this unclean cavity with an overhang.
They are less optimal than T-spin doubles, as they often leave an unclean overhang or aftermath shape that is difficult to handle.
One must often skim off the overhang or spend long soft drops to manage the aftermath shape. This upsets or destroys T-spin continuations.
So, what is so good about T-spin doubles?
Standard T-spin doubles are exceptionally clean:
Diagram Set 7-14
1
2
A T-spin double line clear finishes.
Exactly 2 rows (20 blocks) are removed. No extra residue blocks are added above the cleared rows.
Only non-standard T-spin doubles, like polymer T-spins, have unclean follow-ups.
Let us consider parity using checkerboards:
Diagram Set 7-15
1
2
The blue-circled area is flat (parity-balanced).
A T-spin double finishes. This clears exactly 2 rows.
3
No new residues are added. The blue-circled area’s structure is intact.
Notice how the blue-circled area is not disrupted? This is because regular T-spin doubles always remove 2 rows and do not add any residues.
This makes the top, stacking surface more predictable. Imagine if you add 1, 2, 1, and 2 blocks over 4 consecutive line clears. The first may upset the field’s local parity, while another resets it back, and so forth, making it chaotic.
Hence, T-spin doubles are overall cleaner and safer compared to other kinds of T-spins.
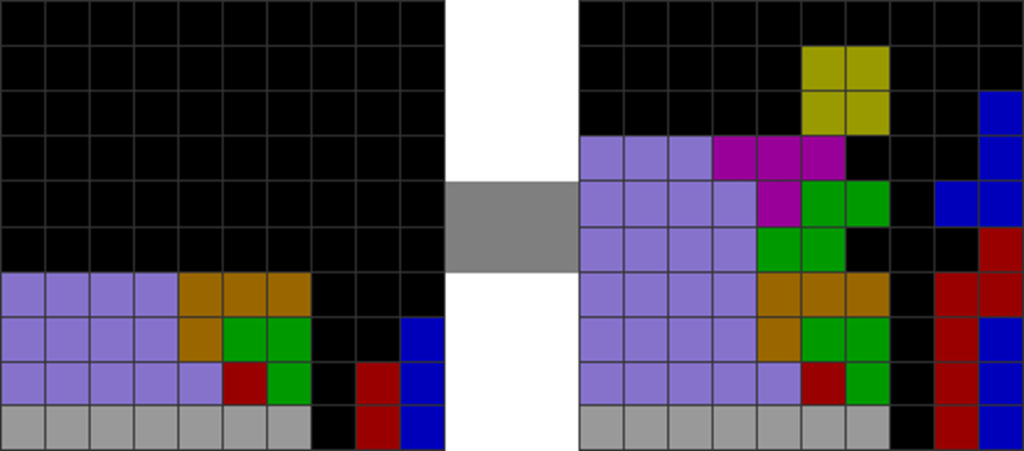
Why stack for T-spin continuations?
T-spin continuations refer to methods that stack the field in a way that leads to more T-spins beyond the first, such as this:
Diagram Set 7-16
1
2
The player created specific patterns like this L and J symmetric placement using Z as an overhang. This creates a T-spin double.
The T-spin double line clear concludes.
3
The player continues to make a Fractal.
Here, the player’s stacking makes it such that, after the initial T-spin, the field is relatively even, allowing one to add a simple T-spin overhang for a second T-spin.
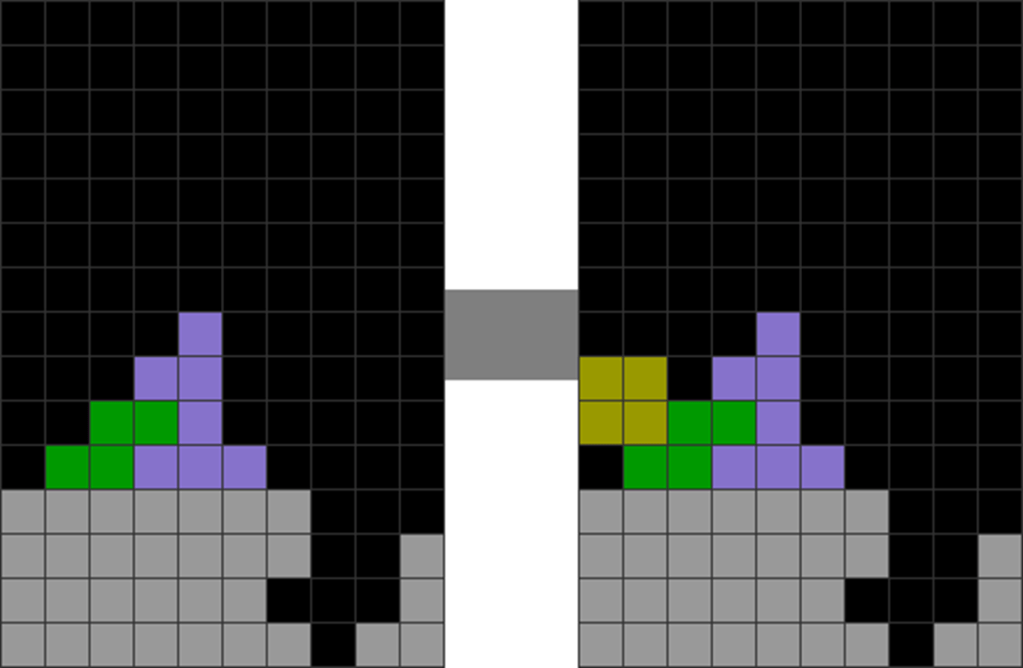
In more advanced settings, you can do this:
Diagram Set 7-17
1
2
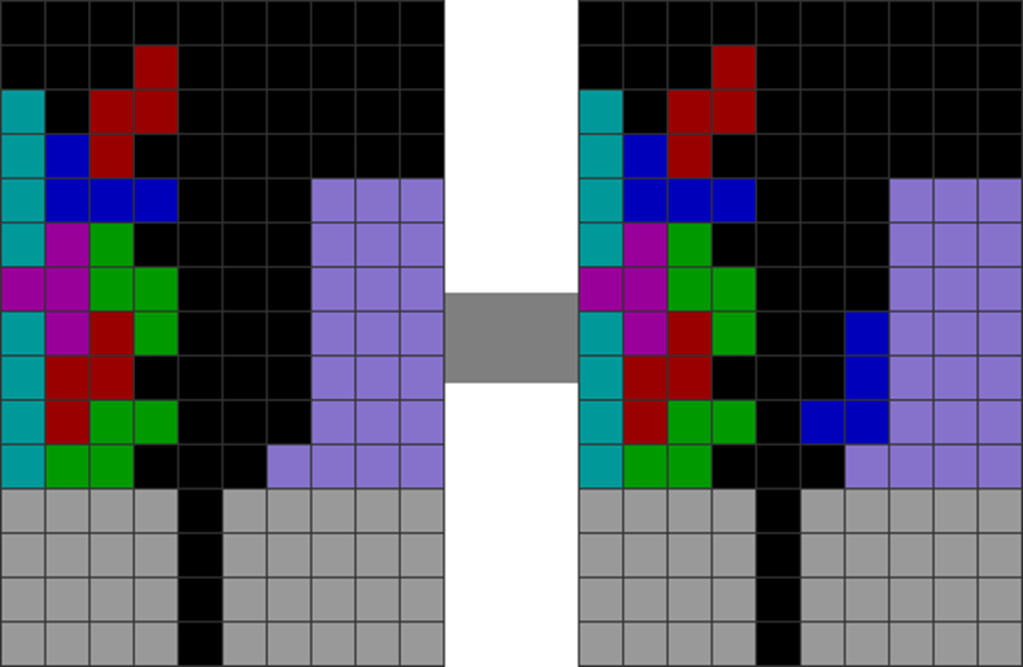
Leaving gaps between overhang block thicknesses of 2, 1, 2, 1, 2, etc. leads to mid-game LST stacking, which is highly efficient (as shown in the second step), resulting in quick, easy T-spins.
This is an LST stacking continuation, which leads to 2 to 3 more T-spins after the initial ones.
Stacking to ensure that your field leads to more T-spins enhances your long-term pressure.
It is not enough to simply make 1 T-spin; one should create a chain of T-spins to maximize firepower in the long run.
Why do pros often go for familiar stacking forms and simple T-spin donations mid-game?
By “familiar stacking forms,” I mean the following:
Diagram Set 7-18
A
B
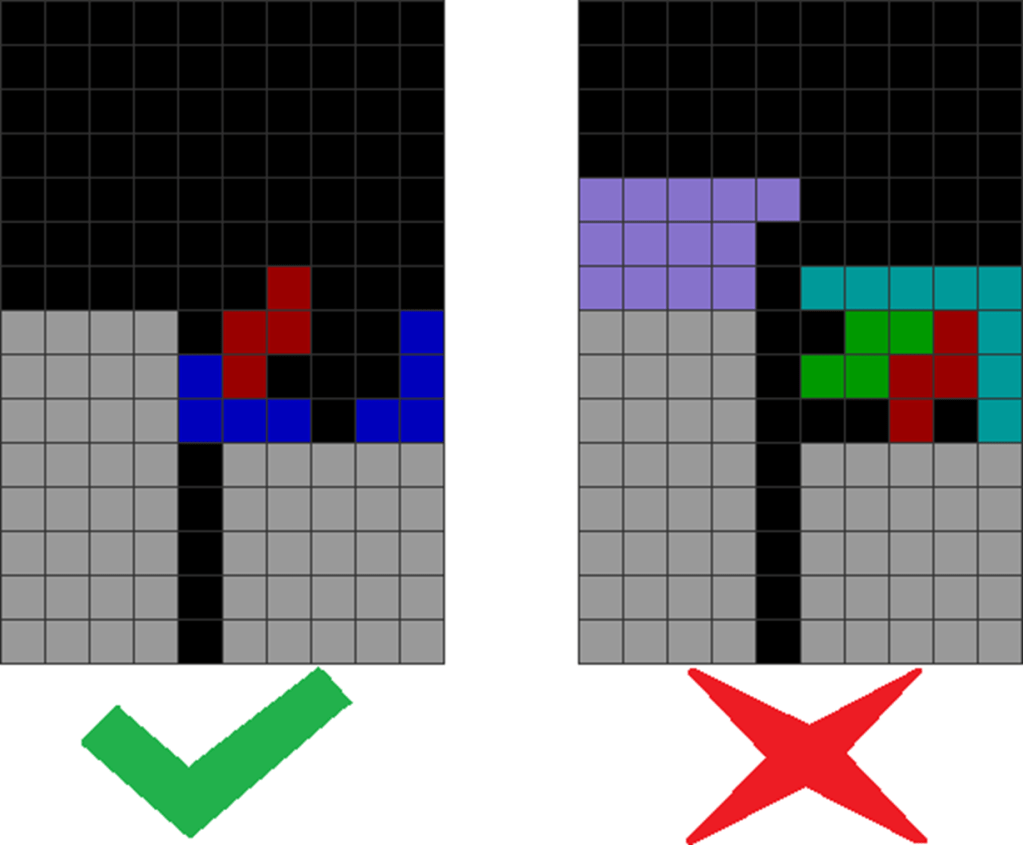
Normal stacking along a line for T-spin doubles and Tetrises.
Balancing both sides of the stack for more T-spins.
These are common stacking forms that can be repeated or alternated mid-game.
One should also make simple T-spin donations that lead to maximal and easy T-spin follow-ups or continuations:
Diagram Set 7-19
1
2
3
4
Step 1’s initial ZJ prop leads to a clean T-spin double sequence.
Using such repeatable methods is key to consistency in high-level Tetris. It is more important to master a few core methods well than to spread your attention across a thousand obscure ones.
Conversely, a player who uses many obscure methods may face many issues:
Diagram Set 7-20
1
2
A complex T-spin triple prop.
The T-spin triple line clear finishes.
3
You get this red-circled dirty cavity that is challenging to fix.
Here, a player uses a very obscure and complex T-spin triple donation. It has many specific piece dependencies and requires a lot of time to think. It also leaves a terrible shape after the T-spin line clear that has almost no decent follow-ups or continuations to quickly make another T-spin.
Hence, when a player prioritizes a thousand and one obscure methods with unfamiliar or unpredictable follow-ups, he will become terribly inconsistent.
When a player simply uses the familiar mid-game stacking forms as far as possible, he becomes more consistent. He can then interweave these with the occasional simple T-spin donations for more firepower. To summarize this point visually:
Diagram Set 7-21
A
B
A is ideal and clean. B is dirty and chaotic to follow up cleanly. It breaks the stack balance between the 2 sides for more quick T-spin doubles.
Why should one make clean T-spin overhangs?
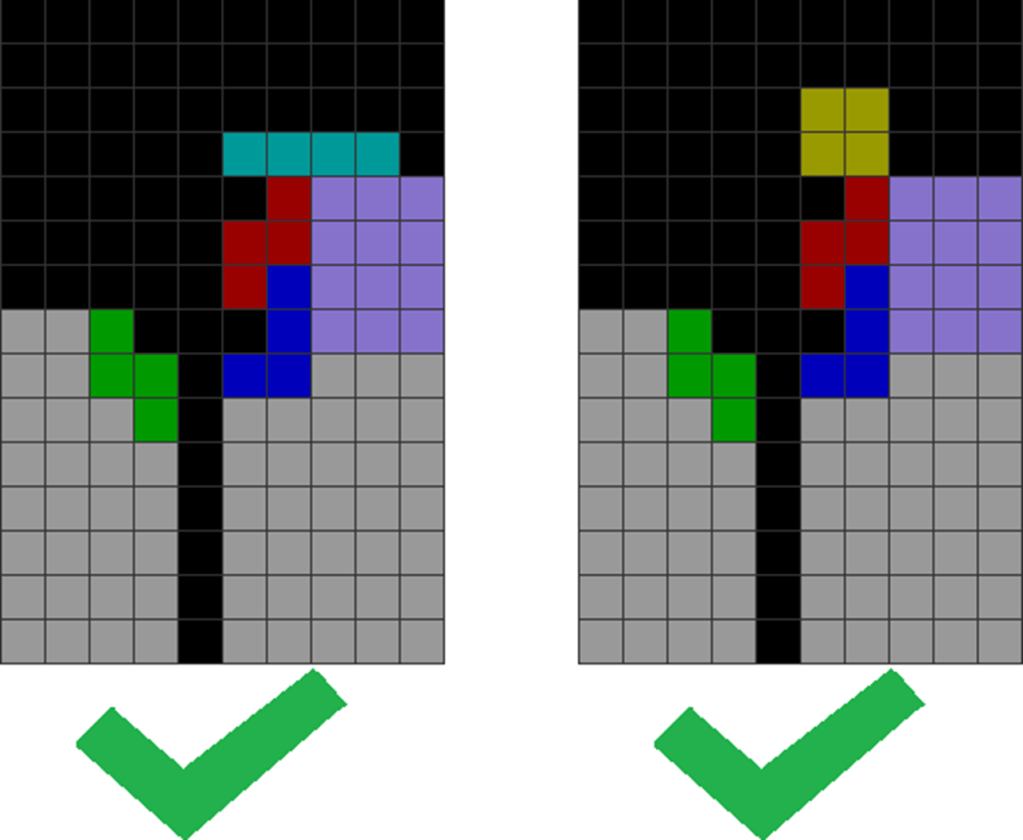
Clean T-spin overhangs allow for quick setup follow-ups:
Diagram Set 7-22
1
2
A clean T-spin double.
The T-spin double line clear finishes.
3
4
The next garbage hole is exposed cleanly.
The player continues making a T-spin triple without triggering a line clear delay from a skim.
These T-spin overhangs are clean, as after the T-spin line clear, the overhangs do not block the next garbage hole. One can also easily transition to handling the next hole to create a new setup, such as an easy back-to-back T-spin. Conversely, dirty T-spins do this:
Diagram Set 7-23
1
2
An unclean T-spin double.
The T-spin double line clear finishes.
3
4
The red blocks obstruct the next garbage hole.
The player expends a hefty skim and line clear delay to cleanse it off.
Their overhangs block the next garbage hole after the Tetris line clear. The result is that you typically have to skim off the overhangs to expose the next hole.
This breaks the back-to-back bonus and is inefficient. Every skimmed-off line could otherwise have been upstacked to make an attack. Since every line takes an average of 2.5 pieces to upstack, skimming them off wastes 2.5 pieces!
Therefore, clean overhangs minimize this inefficiency, allowing you to continue attacking without line clear delay penalties.
How do some experts sustain LST stacking so consistently?
LST stacking refers to the following spammable and repeatable T-spin chaining method:
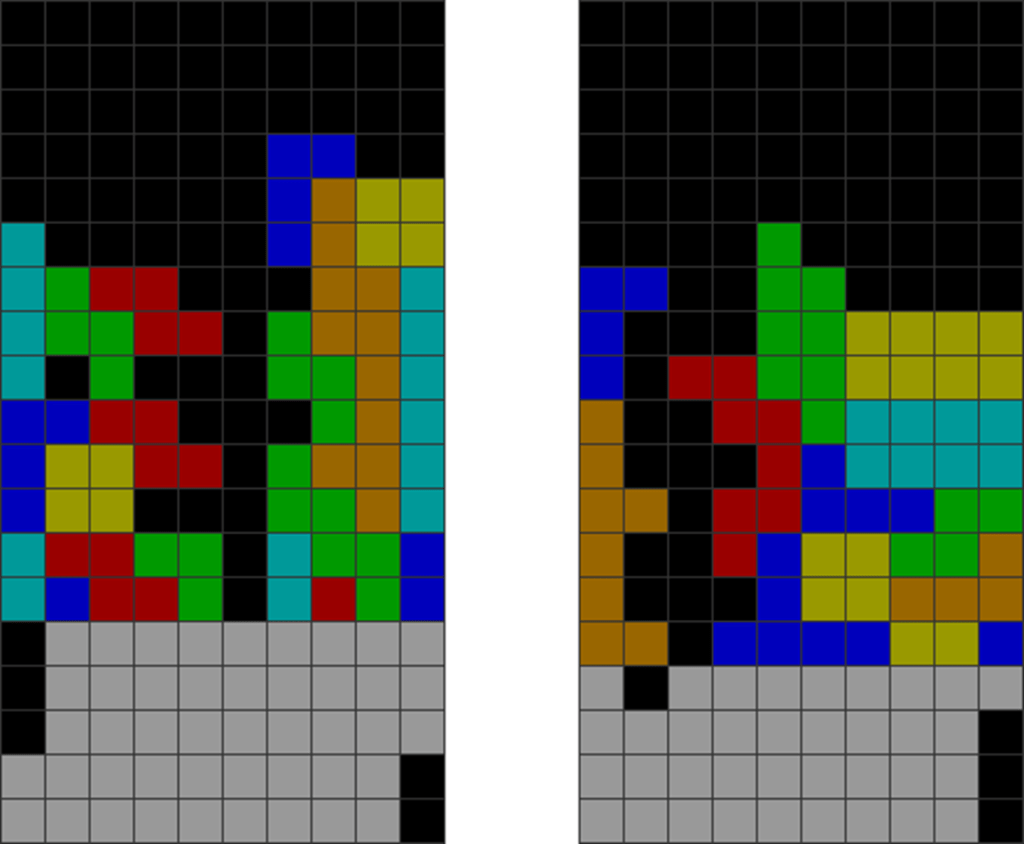
Diagram Set 7-24
1
2
This is the starting field.
You make a Fractal here.
3
4
You conclude the Fractal’s 2 T-spin double line clears.
You get this pattern.
5
6
You make another Fractal.
You conclude the Fractal’s 2 T-spin double line clears.
7
8
You get this repeating residue.
You freestyle and get another Fractal, repeating the process.
Here, the player sustains a chain of back-to-back T-spin doubles and Tetrises easily.
Doing this is incredibly difficult, as you must ensure that (i) the LST stacking cavity area is followed up correctly (columns 6 to 10 in the above set), and (ii) the broad stacking area is stacked properly (columns 1 to 5 in the above set).
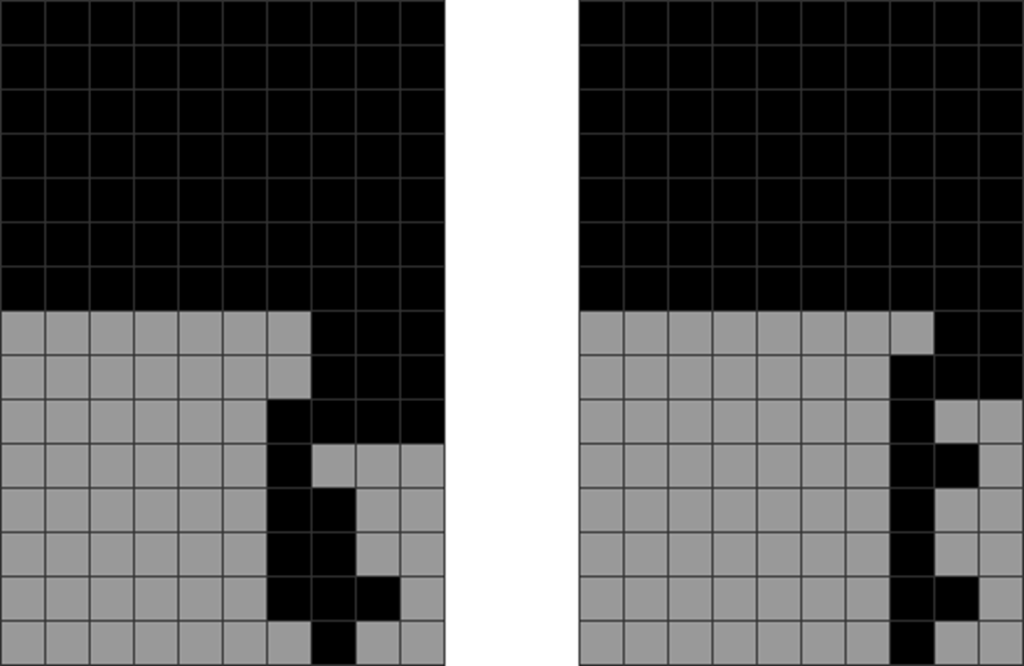
The former is easy to train consistently, as there are only limited stacking forms to do and those to avoid:
Diagram Set 7-25
Here are some freestyling methods to construct the Fractal to continue LST stacking.
Here is what not to do:
Diagram Set 7-26
In these 3 examples, the overhang heights discontinue LST stacking. No piece placement continues it.
By using consistent stacking placements and avoiding dead ends, one can maintain consistency in this part of the LST stacking.
However, the other factor (of stacking the “broad side”) is difficult for most people. Many guides do not cover this part deeply enough.
The key is to prioritize certain vertical piece placements:
Diagram Set 7-27
1
2
The player stacks with a horizontal S, resulting in a jagged pattern.
This jagged pattern cannot accommodate Os cleanly.
Here, the player goes for horizontal placements of certain pieces, leading to jagged or limited stacking follow-ups.
Instead, a player can do this:
Diagram Set 7-28
1
2
The player prioritizes vertical Z placements.
This leaves more room to accommodate inflexible Os.
Diagram Set 7-29
1
2
The player prioritizes vertical L placements.
This leaves more room to accommodate inflexible Os. He then prioritizes some vertical I and J placements.
Here, a player prioritizes the vertical placements of S, Z, I, L, and J, allowing the remaining area to accommodate O pieces.
Since O pieces cannot be rotated, they are incredibly inflexible. Hence, proper LST stacking involves stacking them in a way that accommodates them.
When you master these, LST stacking can become far more consistent.
Why are some basic spliced T-spin setups dangerous?
Some of the basic, “canonical” T-spin setups, such as Trinities or the back-to-back T-spin triple tower, can be dangerous:
Diagram Set 7-30
A
B
A Trinity. This has 3 T-spin doubles.
A back-to-back T-spin triple tower. This has 2 T-spin triples.
First, they require too many T pieces to complete the setup. When you have finished upstacking them, you could get spiked while waiting for the required T pieces:
Diagram Set 7-31
1
2
The player builds a Trinity setup. This is a spliced T-spin setup, with 3 T-spins.
The greedy player quickly uses the first T piece to line clear the first T-spin double.
3
4
The player discovers he has no incoming T piece to complete the last 2 T-spins.
This makes him vulnerable to being spiked or attacked and carries a significant risk of being topped out. Surely enough, he gets spiked with massive garbage here, nearly topping out.
You could then have no choice but to place the incoming pieces in terrible places, or even abandon the setup.
Second, you are vulnerable while upstacking. Because of how large these structures are, you may need to upstack as many as 6 or more rows before they can be completed.
During this interval, you can be spiked and get topped out.
Third, such setups can cause you to overstack some parts of the stack, destroying further T-spin continuations:
Diagram Set 7-32
1
2
The player stacks a Trinity, but overstacks the red-circled parts.
The player completes the 3 T-spins.
3
The remaining aftermath shape makes it difficult to make a quick T-spin follow-up.
After the Trinity is finished, you get an imbalanced field that cannot continue T-spin chaining easily. Whereas this can likely be done with a simpler setup, such as LST stacking.
Fourth, some players stack in an imbalanced manner. This may cause the “stacking side” of the setup to be mishandled:
Diagram Set 7-33
1
2
The right side of the stack has not been upstacked. However, the player first recklessly upstacks the King Crimson pattern on the 4 columns on the left.
The player messes up his stack because the wrong pieces came. This forces a player to upstack over holes. The player here also wastes many T pieces in the stack, disrupting parity and requiring even more T pieces to restore it.
Therefore, the moral of the story is to minimize such greedy setups unless you really need to make them.
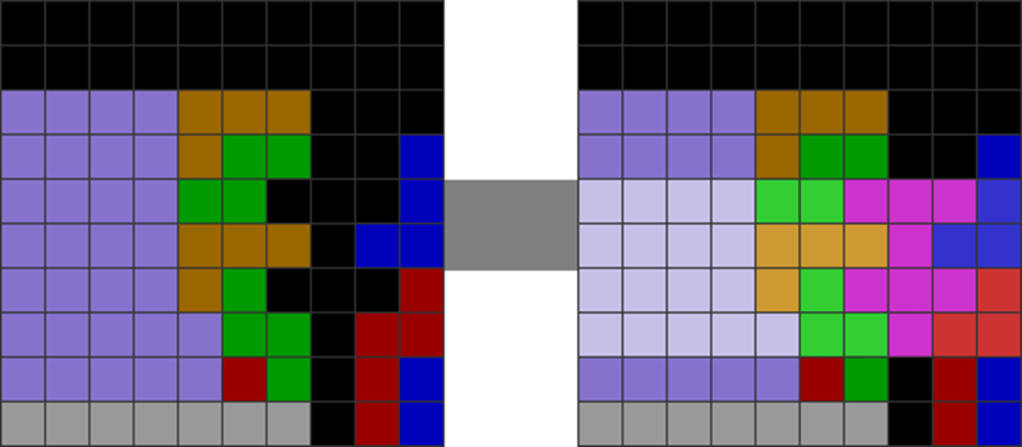
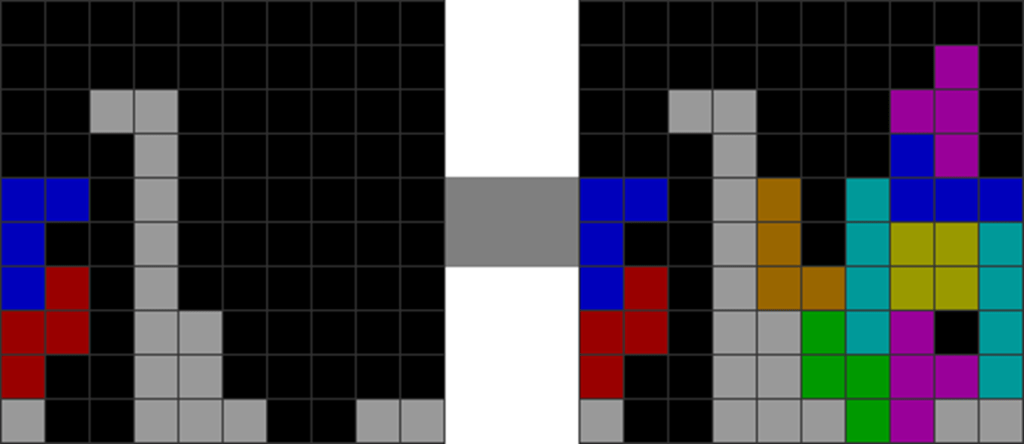
Why are ultra-advanced spliced setups and props dangerous?
By “ultra-advanced” spliced setups, I mean the following:
Diagram Set 7-34
1
2
The player upgrades a Cut-copy by stacking lavender areas to form a Milky Way. This gives 3 T-spins.
These have been covered extensively in my Tetris guidebook series, Book 3.
These setups often feature 3 or more T-spins. Some may have 4 or 5.
These are incredibly dangerous, as they share all the problems and risks of the previous question.
Furthermore, they are compounded with the following extra issues:
Some innately destroy T-spin continuations:
Diagram Set 7-35
1
2
The player makes a Fin T-spin double prop.
The player completes the T-spin double.
3
The player gets a terrible aftermath that prevents a quick, clean T-spin follow-up.
The above polymersetup, for instance, lacks a decent follow-up shape that allows easy T-spin double chaining. Hence, you may shoot off a barrage of quick T-spins in the short term, but lose momentum in the long term.
ii. They stack way too dangerously high:
Diagram Set 7-36
An advanced composite T-spin setup with many T-spins imbued.
Some setups stack way too high because they incorporate way too many T-spins. Even just a spike from some random player can top you out if you are not careful.
A triple T-spin double (spliced Trinity) with a Boomerang L-spin.
The above setup happens so rarely mid-game that most players would not have the opportunity to master it. Hence, if they force the setup mid-game, they could slow down just to plan it out. This creates an opening for one’s opponent to take you down if you use it.
Why are too many complex and fancy T-spin donations discouraged in high-level competitive gameplay?
If you watch the matches of high-level players, they often make simple T-spins most of the time.
If they make T-spin donations, the vast majority are simple. They only use complex ones when they are the most optimal at the right place and time.
This is because simple donations are easy to manage:
Diagram Set 7-38
1
2
3
Step 1’s LS donation is easy to follow up cleanly with another T-spin double.
Their follow-ups are often cleaner and easier to predict. One can follow up on them properly with more T-spin or Tetris continuations.
However, complex ones may not be the case:
Diagram Set 7-39
1
2
3
4
The player makes a high-piece-dependency T-spin triple prop, leaving a dirty stack afterwards.
Here, an overly complex T-spin triple prop leads to an aftermath pattern, after the line clear, which cannot be filled properly. You must then skim off the strange pattern.
When you make too many such tall, overly complex setups, you become vulnerable. You may keep getting into aftermath shapes that are too challenging to follow up, slowing you down and making you susceptible to an opponent’s attack.
Even far worse are Yakine-style T-spins like these:
These complex setups take too long to plan. They also leave holes you cannot stack over while waiting for the T pieces to arrive. Hence, your stacking area is reduced, causing you to possibly overstack or be forced to put pieces over the props’ holes:
Diagram Set 7-41
1
2
The player recklessly makes an LT prop when a simpler T-spin is apparent.
He completes the T-spin double suspension prop.
3
4
The T does not arrive! He is forced to put incoming pieces dirtily.
The T-spin double concludes when the T finally arrives, at an enormous cost.
Hence, for competitive T-spins, less is more.
Why are polymer T-spins discouraged mid-game?
By polymer T-spins, I mean the following:
Diagram Set 7-42
A
B
A Fin T-spin double.
A Neo T-spin double.
These setups often require a “ceiling kick,” in which a player kicks a T piece off the ceiling into a cavity. This then leads to a T-spin line clear.
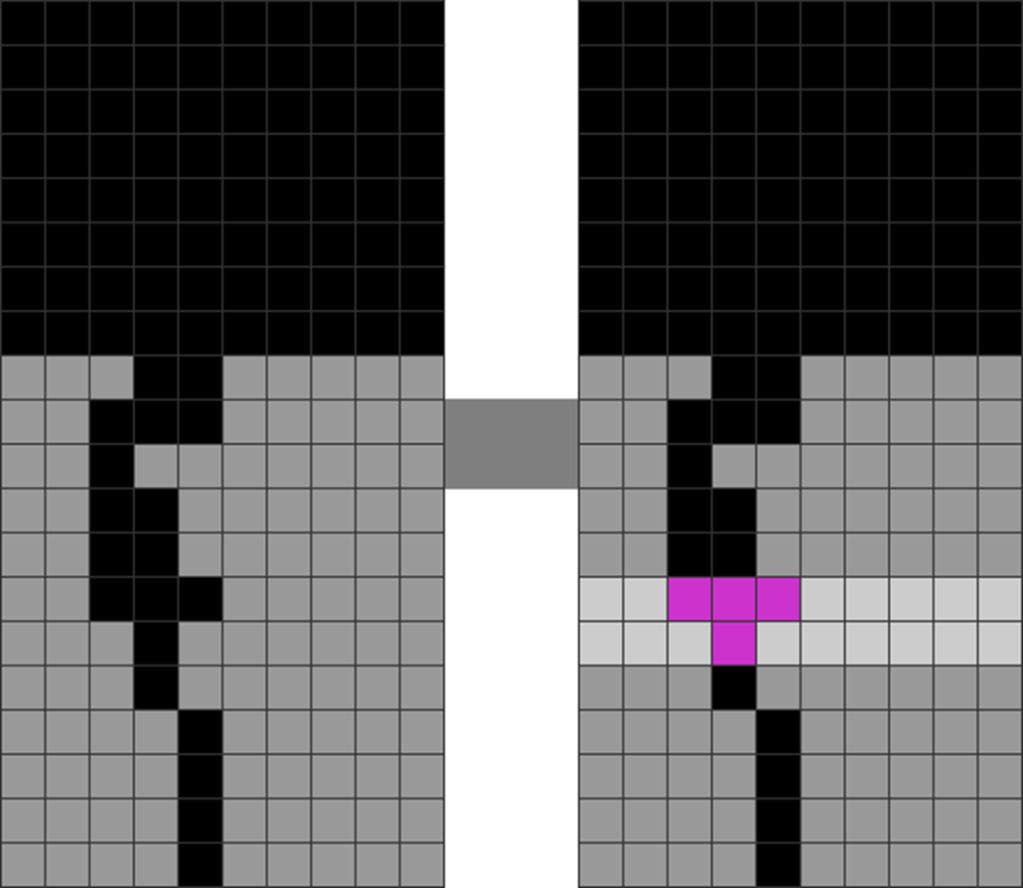
These methods are generally discouraged because of their dirtiness and unclean aftermath:
Diagram Set 7-43
1
2
3
4
This Fin T-spin double is unclean because, in step 4, the resultant shape’s “ceiling” from the J overhang and the remaining purple block obstruct the next garbage hole in column 7.
Here, a player often has to skim off the dirty residue left behind from a polymer T-spin. They may also need to expend a long soft drop to insert a piece under the cavity.
This reduces efficiency.
Furthermore, polymer T-spins can lead to erratic follow-ups that destroy or reduce T-spin continuations:
Diagram Set 7-44
1
2
A Neo polymer T-spin double’s aftermath.
The player makes a freestyle partial T-spin triple.
3
4
The T-spin double concludes.
You get a terrible shape that cannot be easily followed up with more T-spins.
Hence, polymers should only be used when there are few better alternatives.
Why should one be careful about making too many all-spins?
In games like TETR.IO, where all-spins grant back-to-back bonuses, one would sometimes make many T-spins to charge up their surge meters for more damage output.
The longer the back-to-back chain, the more damage bonus one receives.
However, making too many all-spins can be dangerous because of 2 reasons:
They are not as strong as T-spins.
Sometimes, making a string of T-spins and Tetrises grants more firepower than all-spin chaining. This is because all-spins are not granted the same damage bonus as T-spins or Tetrises.
ii. Too many all-spin singles mess up the field’s parity.
Please observe:
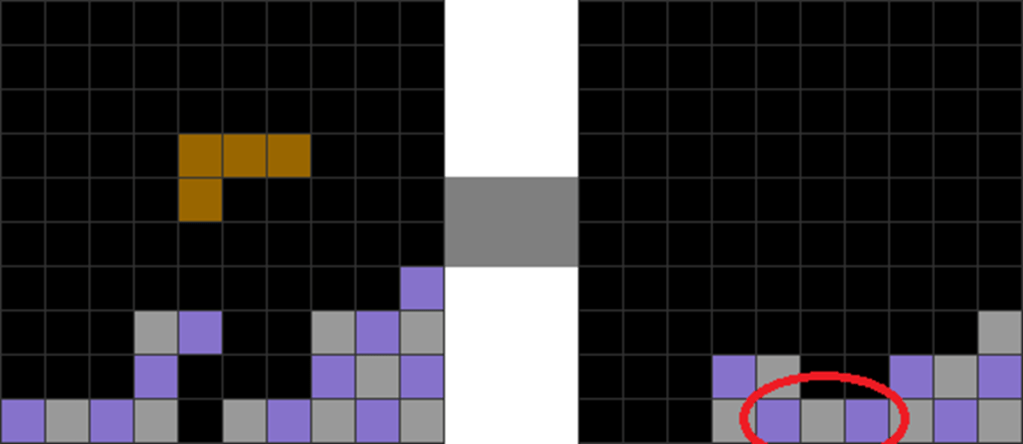
Diagram Set 7-45
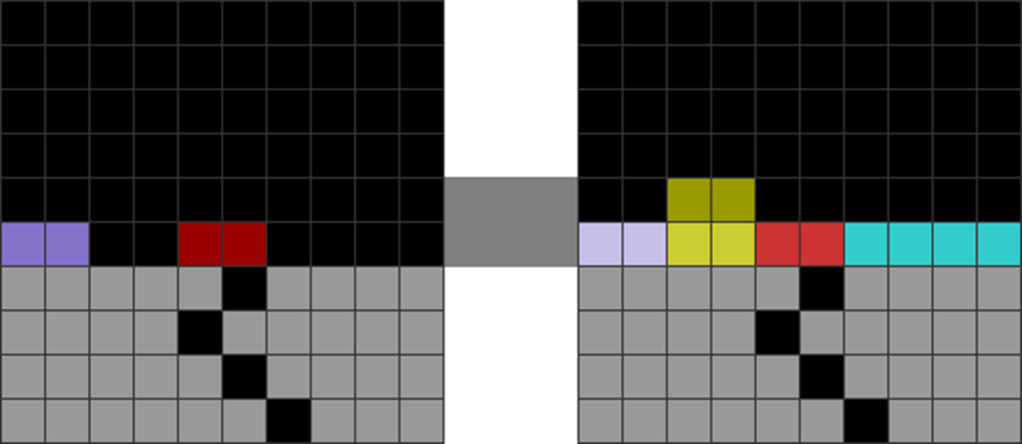
1
2
Starting field.
After the L-spin single finishes, you add 3 residue blocks (in the red circle) from the L piece.
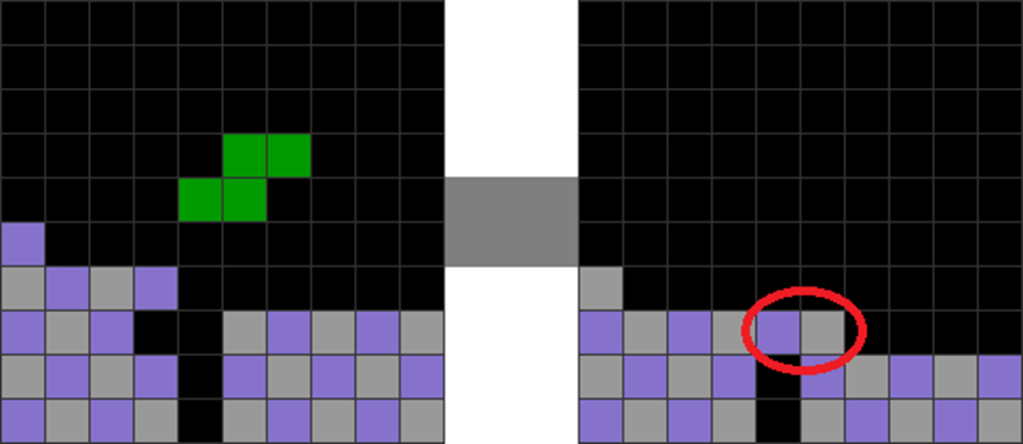
Diagram Set 7-46
1
2
Starting field.
After the S-spin single finishes, you add 2 residue blocks (in the red circle) from the S piece.
Here, a player makes too many all-spin singles. The field’s parity is constantly jumbled. More residues are added to the top of the stack (the red circles). Adding more residues to a stack’s top layer introduces more chaos that could occasionally jumble the field’s local parity. This sometimes makes it jagged and reduces stacking follow-ups.
See the question on “Why do pros prioritize T-spin doubles over T-spin minis, singles, or triples?” earlier in this chapter.
Contrast this with clean regular T-spin doubles that always remove 2 rows (20 blocks) during the line clear and do not add any residues to the stack’s top layer (see diagram set 7-15).
Therefore, one should balance between all-spins and other kinds of attacks in games that award all-spins with back-to-back bonuses.