Questions about stacking up to a 4-block-tall Tetris. Tetrises, or quad line clears, are the most fundamental attacks in the game.
Questions
Why is 6-3 stacking better than 9-0 stacking for 40-line sprints?
To answer this question, let us first clarify what the terminology means:
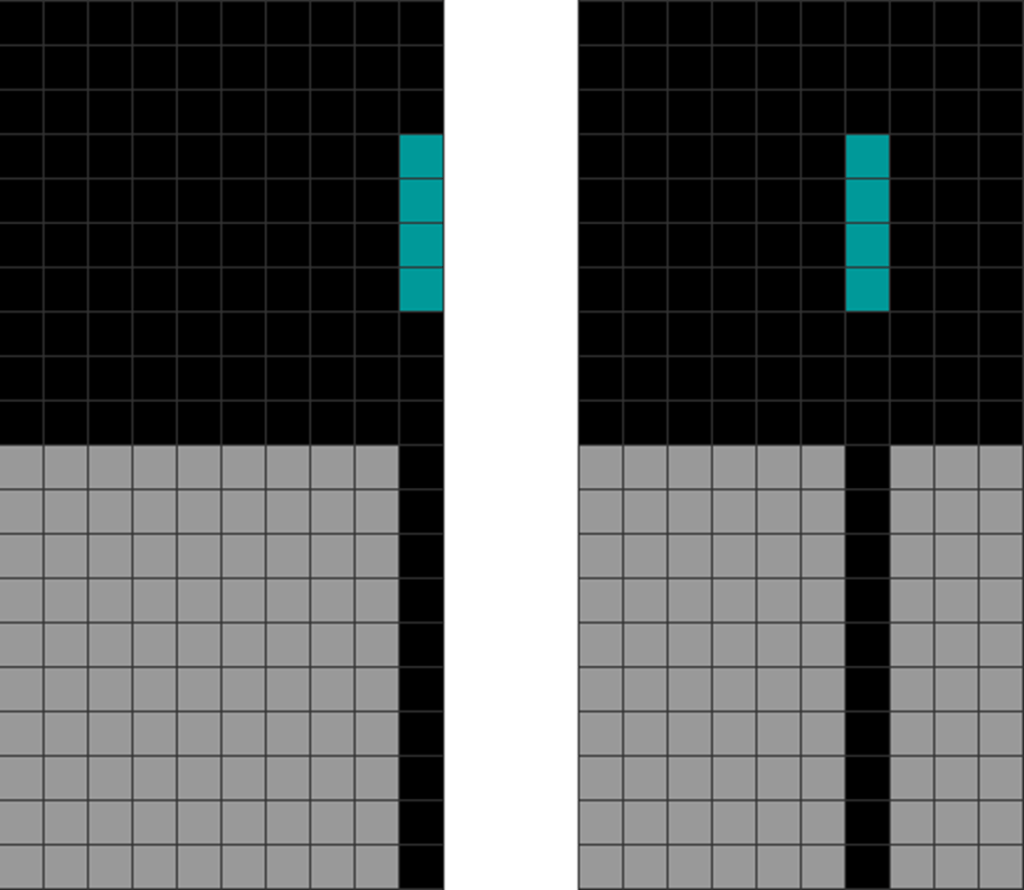
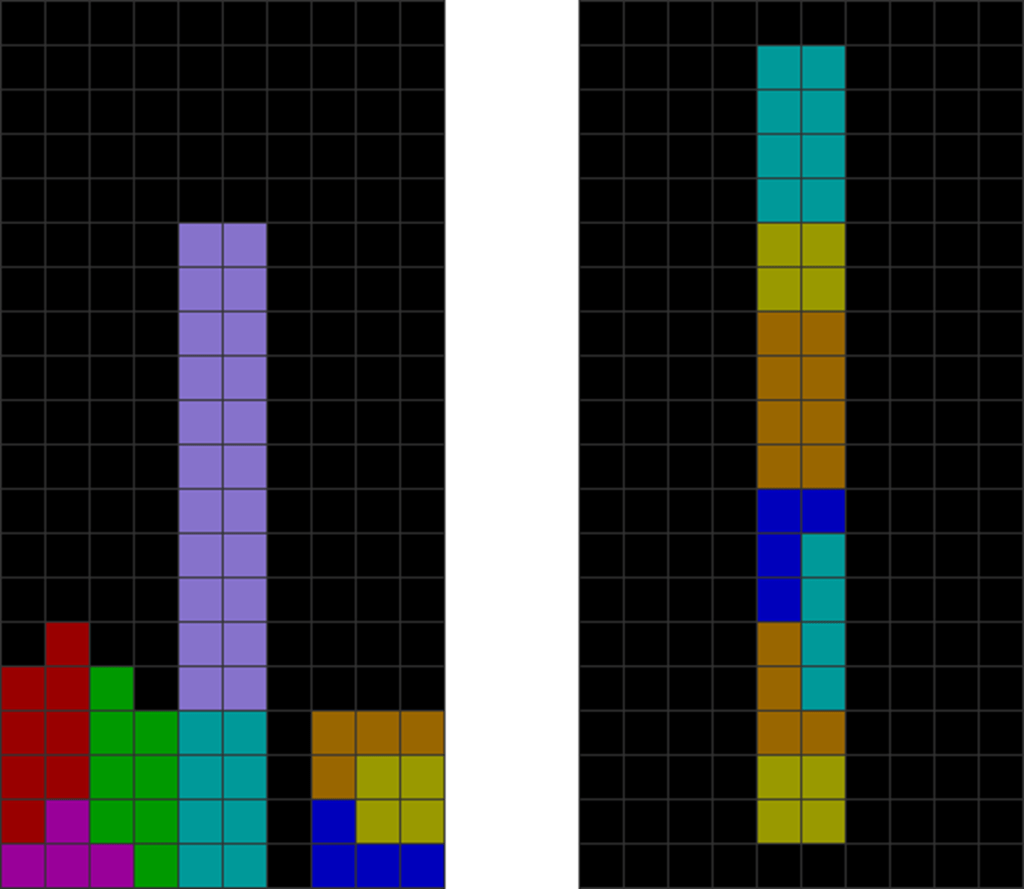
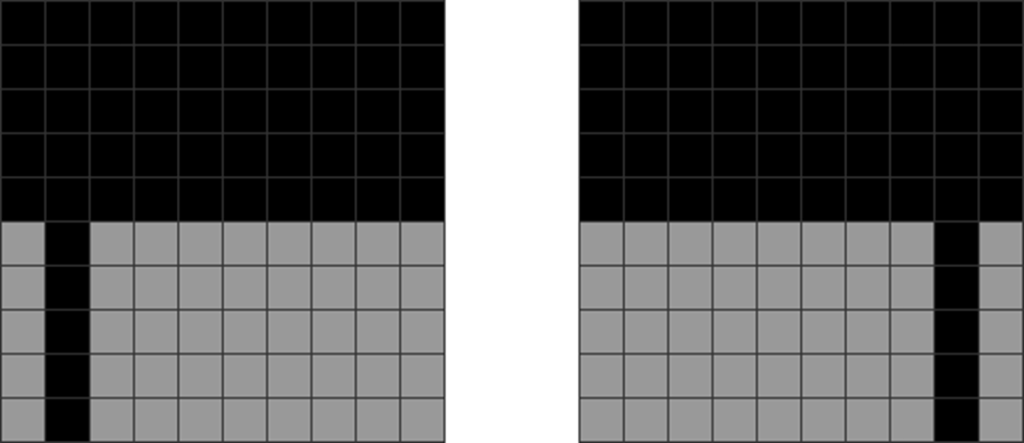
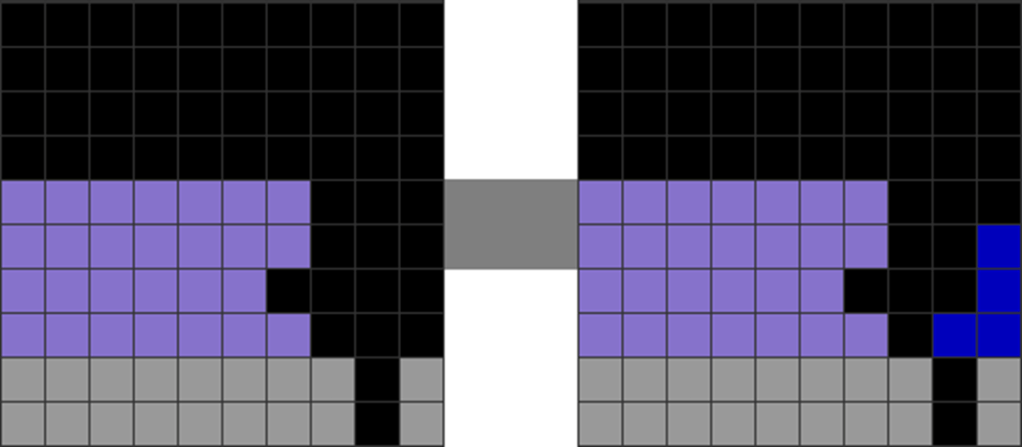
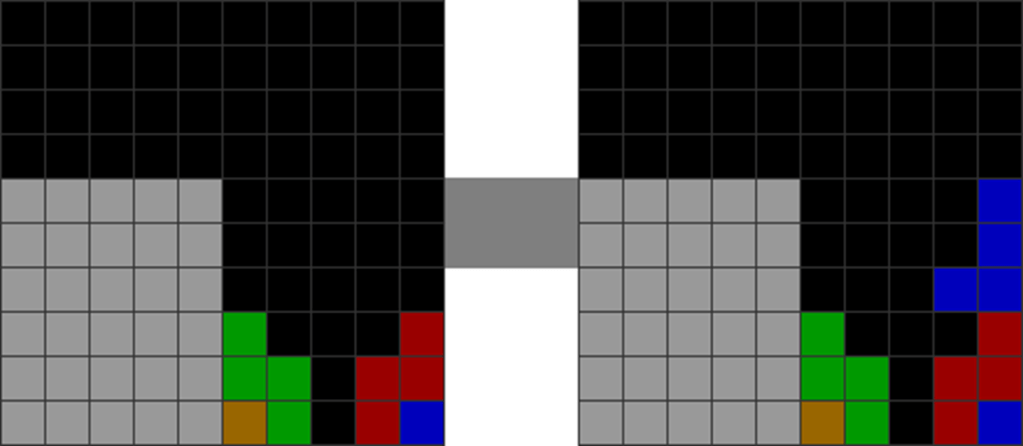
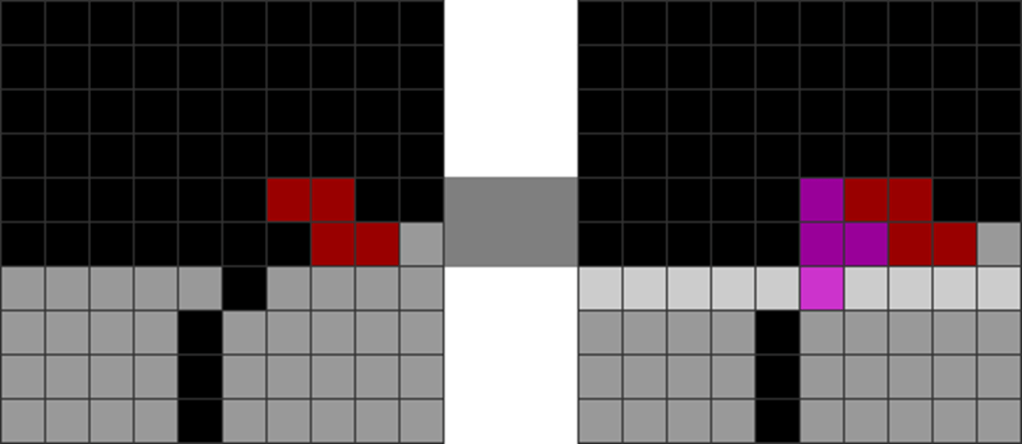
Diagram Set 6-1
9-0 Stacking
6-3 Stacking
The empty hole is in the 10th column for the Tetris.
The empty hole is in the 7th column.
9-0 stacking is simply any stacking form where the main Tetris hole is in the extreme columns (columns 1 or 10).
6-3 stacking is any stacking form where the central Tetris hole is in columns 4 or 7.
The central Tetris hole is then spammed with I pieces to create quad line clears (known as Tetrises, where 4 rows are eliminated simultaneously).
9-0 stacking is considered the traditional approach to 40-line sprints. It is simple, straightforward, and maximizes stacking continuations by maintaining an entirely unified, joined stack on one side.
6-3 stacking, however, divides the field on purpose, reducing stacking continuations and possibilities.
Why is it better? I illustrate:
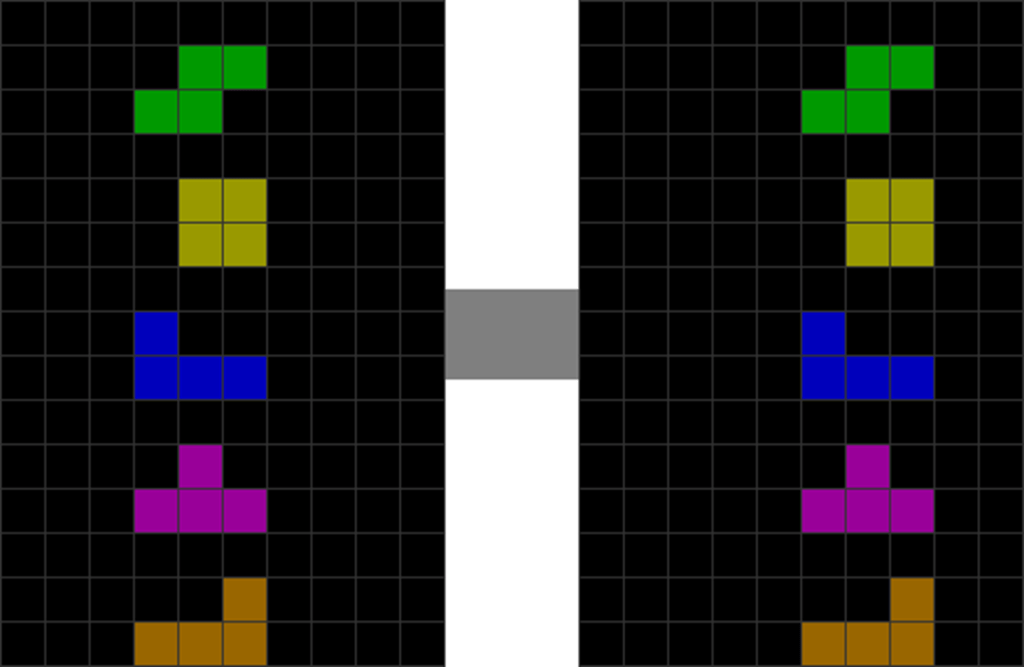
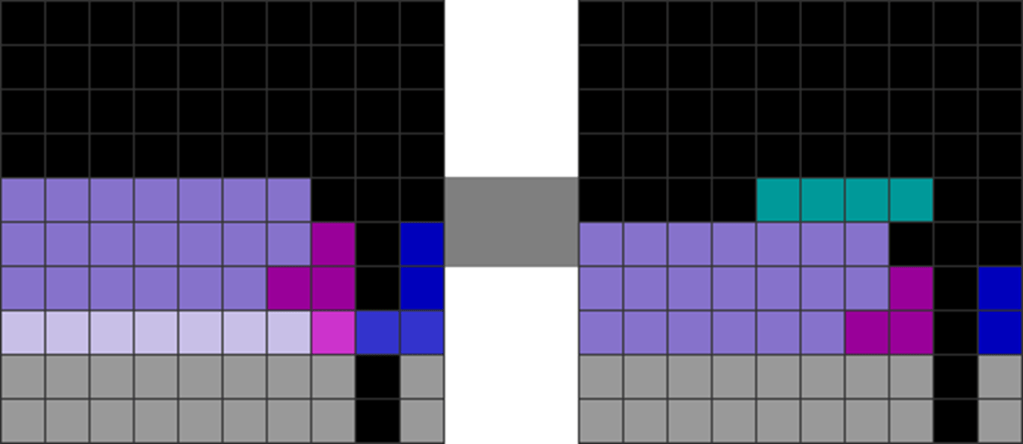
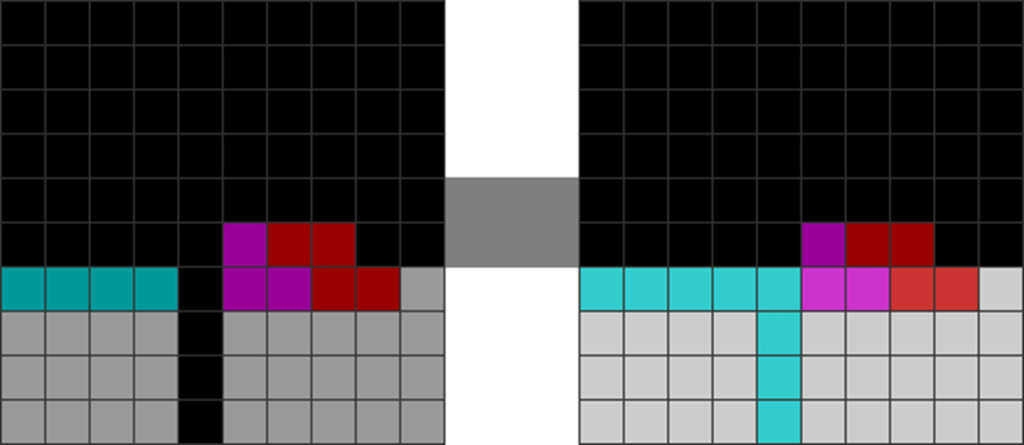
Diagram Set 6-2
1
2
These pieces spawn in these columns.
To move them to these positions, you must press “move right” twice.
In 9-0 stacking, you often have to place pieces in certain columns on the right by double-tapping. This means pressing “move right” twice.
However, in 6-3 stacking, these placements are minimized or, in many cases, fully eliminated. This hence gives you a slight speed boost compared to 9-0 stacking.
Furthermore, there are memorizable 6-3 stacking “cheats,” such as the following:
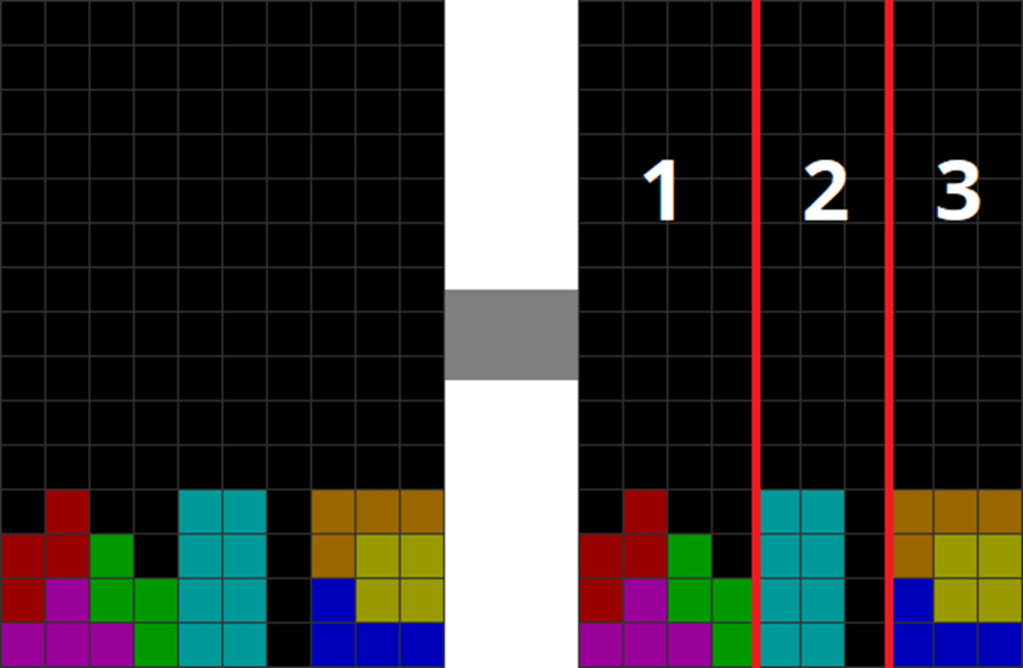
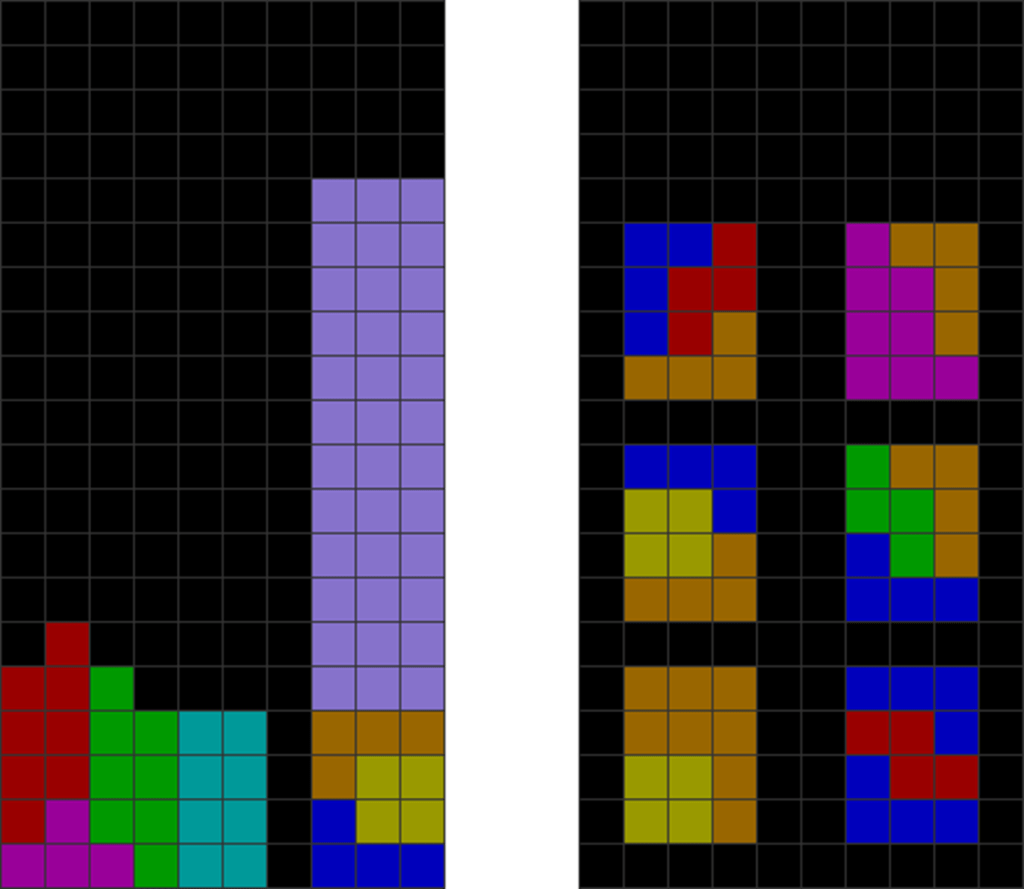
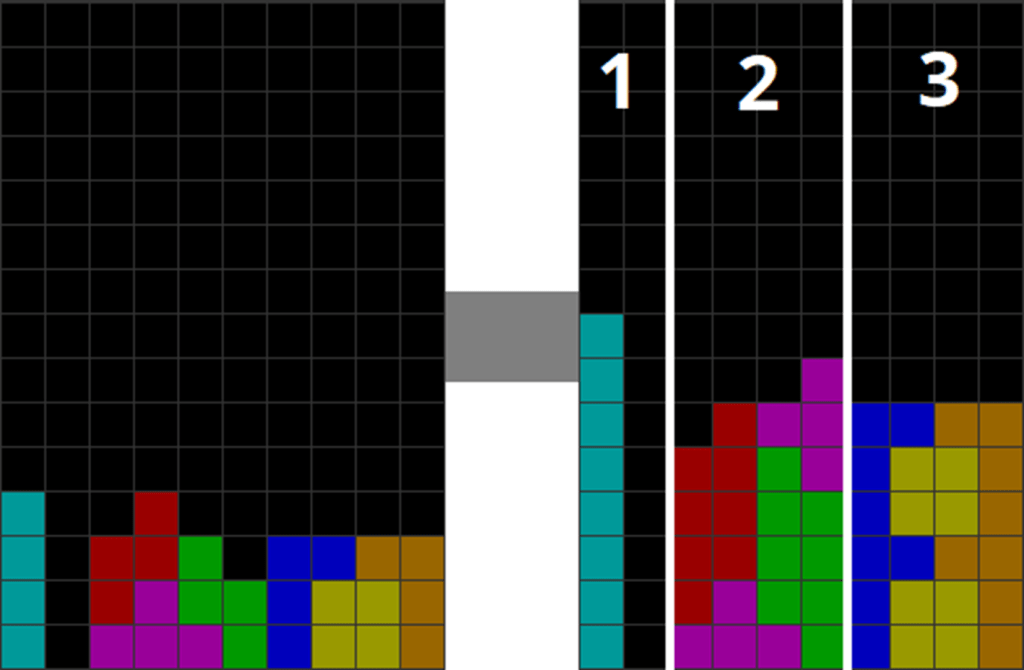
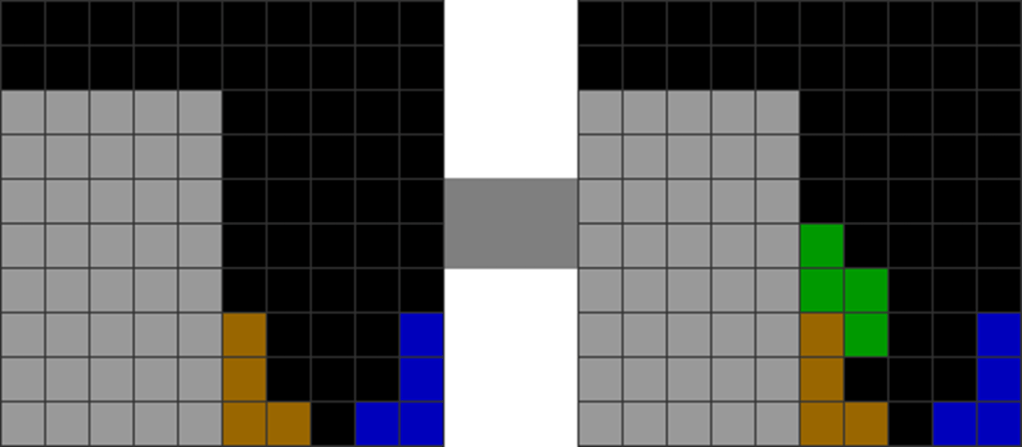
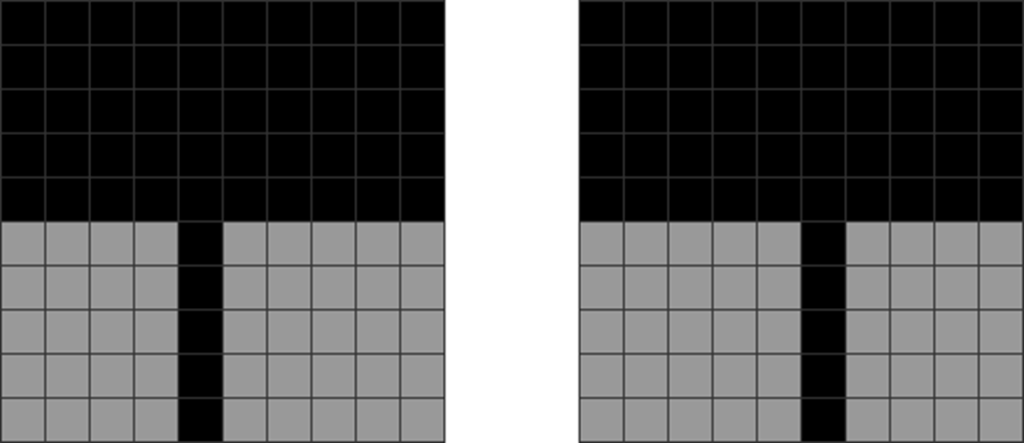
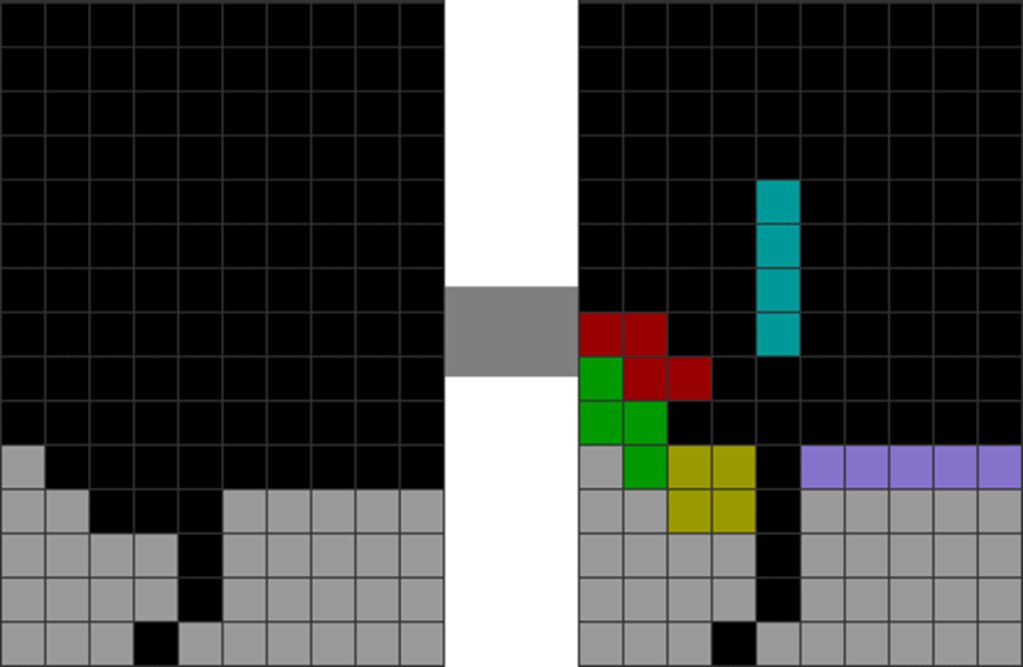
Diagram Set 6-3
1
2
The first bag of 7 pieces and an additional I piece have been placed.
Divide the field into regions 1, 2, and 3, divided by the red lines.
Here is how to stack area 1:
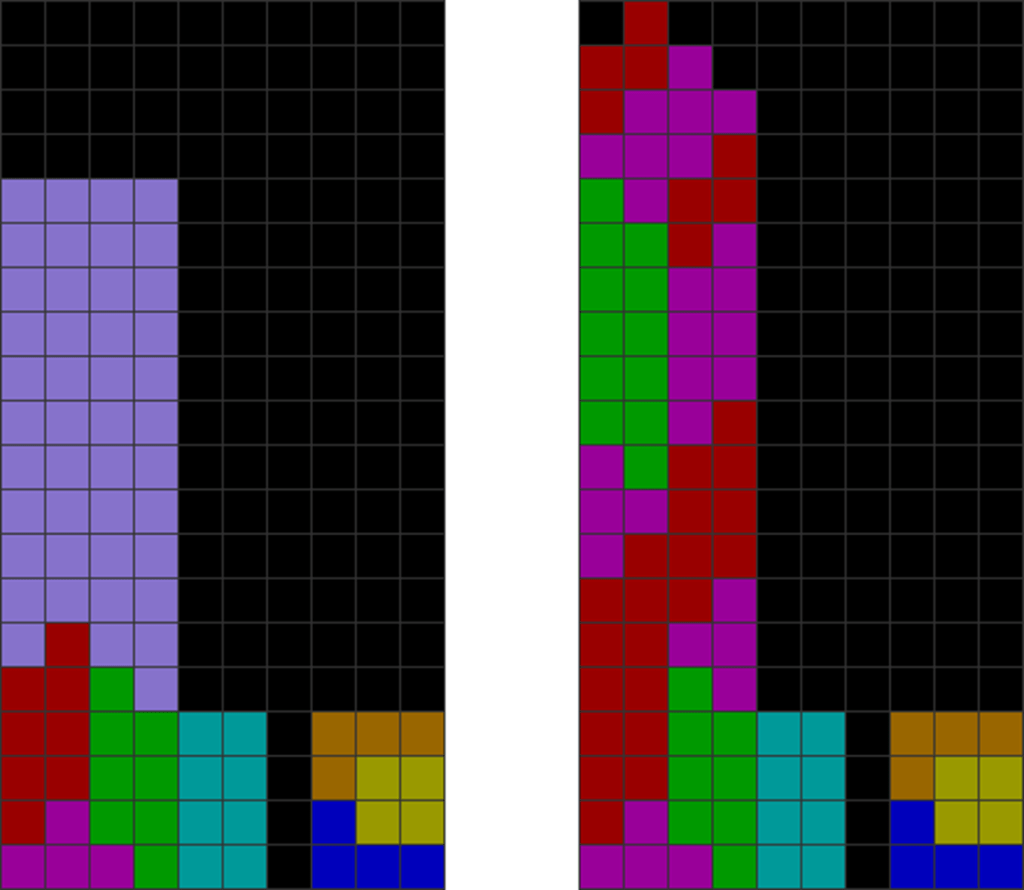
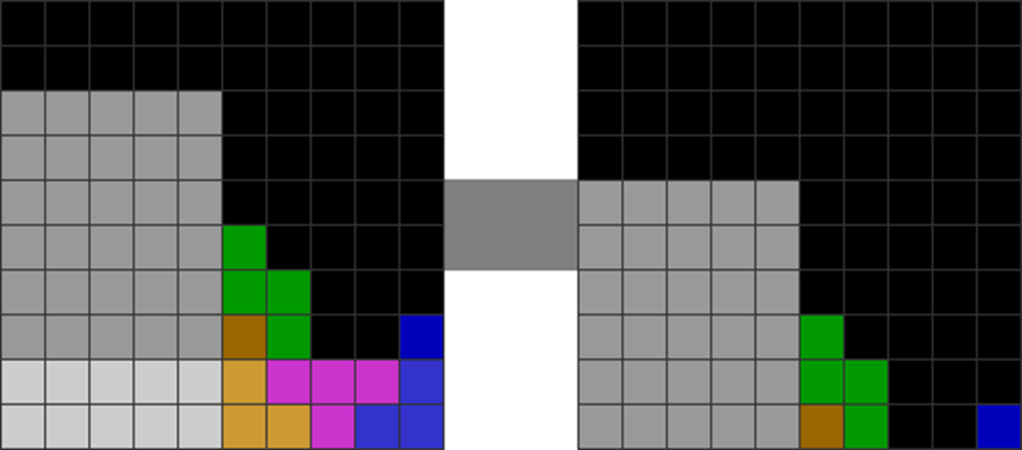
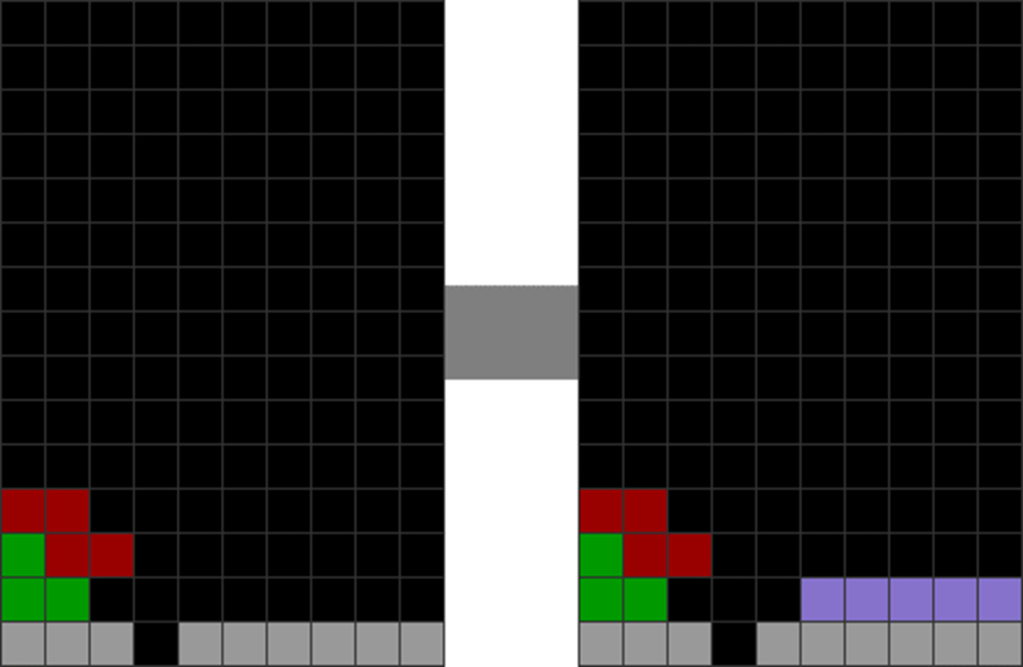
Diagram Set 6-4
A
B
You want to properly stack the first 4 columns (lavender blocks).
This can be done using S, Z, and T pieces in the configuration here.
Here is how to stack area 2:
Diagram Set 6-5
A
B
The middle 2 lavender columns (columns 5 and 6) can be stacked as shown in B.
See how O, L, J, and I can be stacked into a spammable, repeatable pattern.
Here is how to stack area 3:
Diagram Set 6-6
A
B
The patterns on the far right’s 3 most columns comprise pieces that make 3×4 rectangles like LOJ. You can stack them in the lavender areas.
Here are 6 ways to configure 3 specific pieces to make 3×4 rectangles each.
Here, a player can divide the field into 3 parts and fill each with a memorizable configuration as long as possible, until they break, forcing one to eventually freestyle.
Hence, a player can memorize this quickly and sprint at peak speed.
Furthermore, with the garbage hole not at the extremes, one can adapt the method to make T-spins, such as:
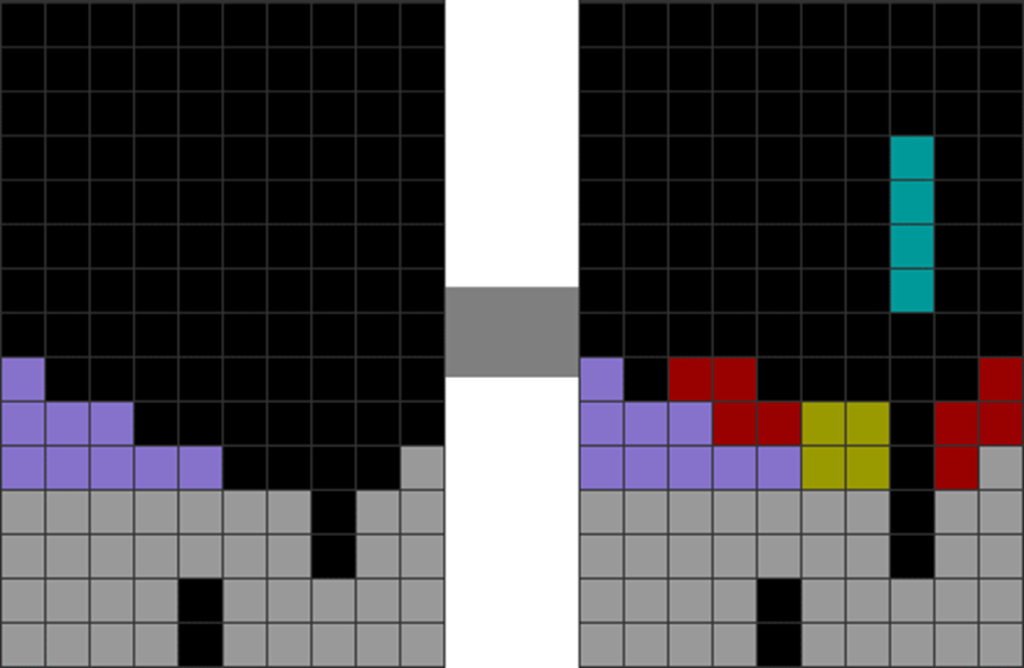
Diagram Set 6-7
1
2
Start the field with stacked and forecasted overhangs on the right side. You then make a T-spin in step 2.
Note the repeating patterns on the far right, which are made of JO, SL, and LO chunks. Repeat these patterns and stack them on the right.
3
Put an S to continue mid-game ST stacking.
Here, the player can ST stack, creating an endless barrage of T-spins.
Hence, because of 6-3 stacking’s greater versatility, it is generally “better” than 9-0 stacking.
Why is 8-1 stacking not so viable for sprinting?
To answer this question, let us first clarify what 8-1 stacking is:
Diagram Set 6-8
A
B
1-8 stacking.
8-1 stacking.
8-1 stacking is any stacking in which the central Tetris hole is in columns 2 or 9. 1-8 and 8-1 stacking are often used interchangeably.
It is not viable for 40-line sprints, because of the severe I-piece dependency at the extreme columns:
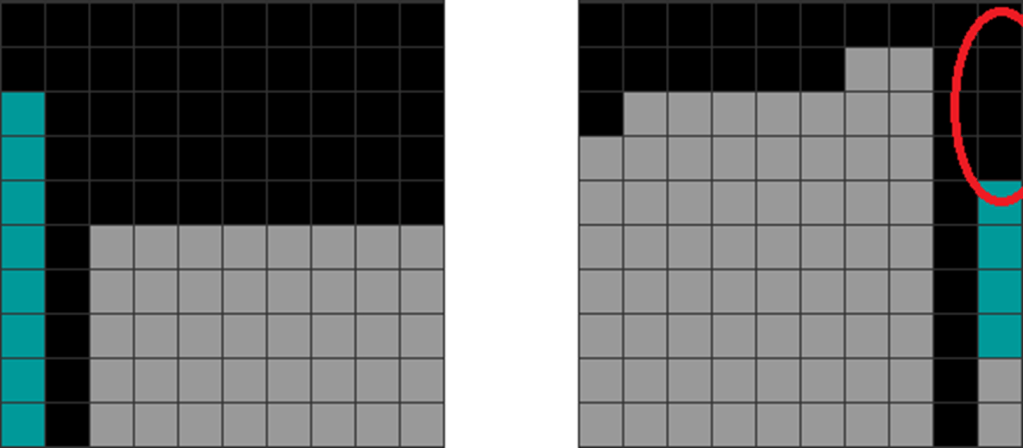
Diagram Set 6-9
A
B
Double-stacked Is in column 1.
Severe I-dependency in the red circle.
However, some players have used memorizable patterns for 8-1 stacking, such as:
Diagram Set 6-10
1
2
Place the first 7 pieces like this.
Stack every 7 pieces in nearly repeating patterns in areas 1, 2, and 3.
However, because of the corner’s I-piece dependencies, you will likely overstack and waste many I pieces in the stack. Hence, you may not get enough I pieces to downstack. After a while of stacking with the above stacking form, you may get the following dead-end:
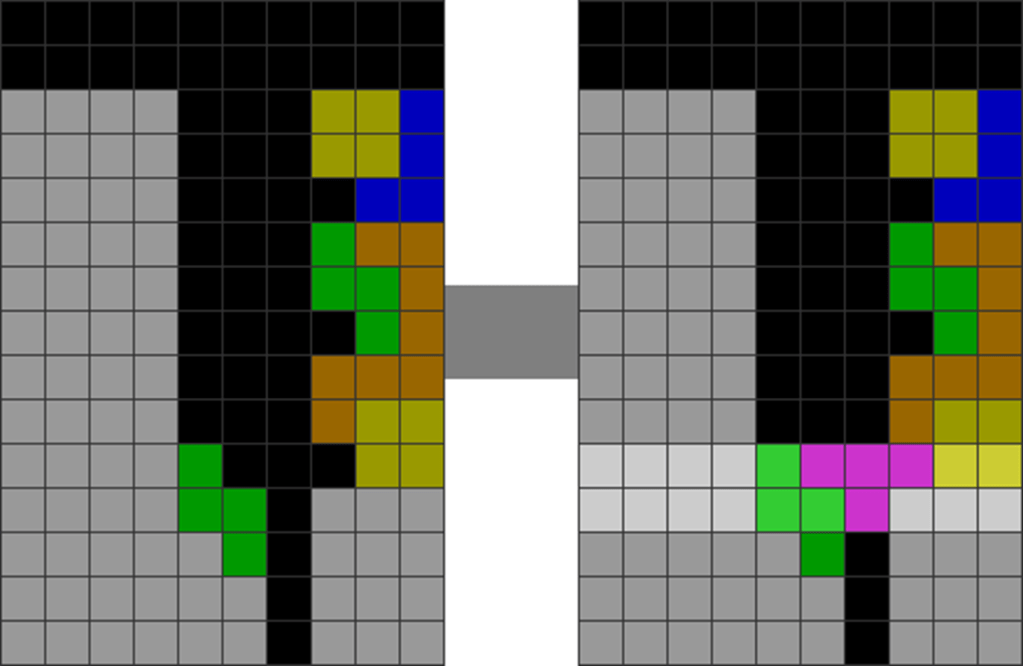
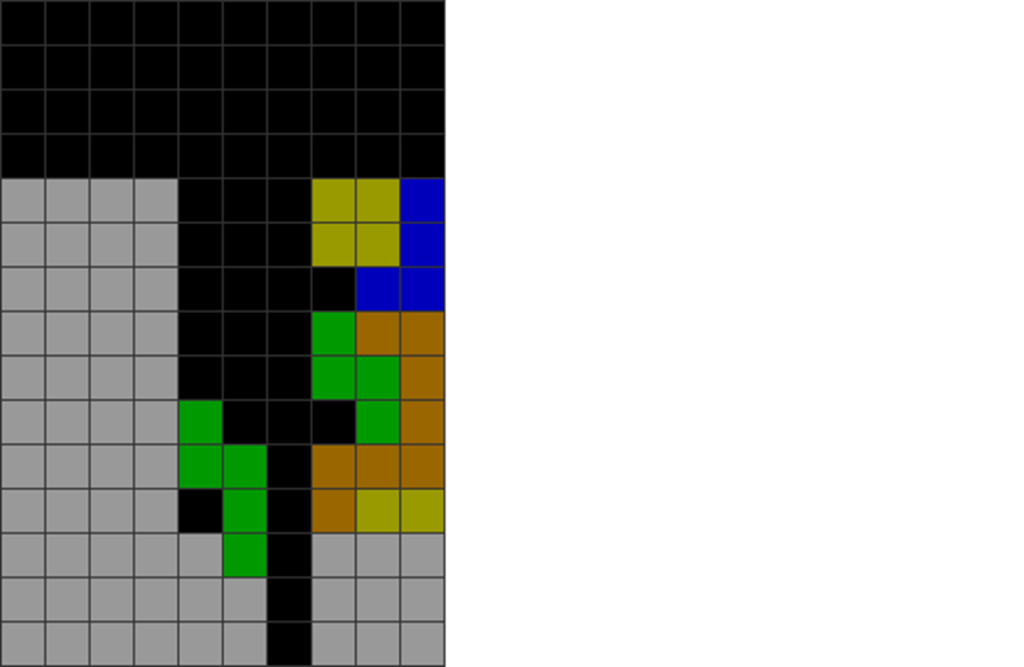
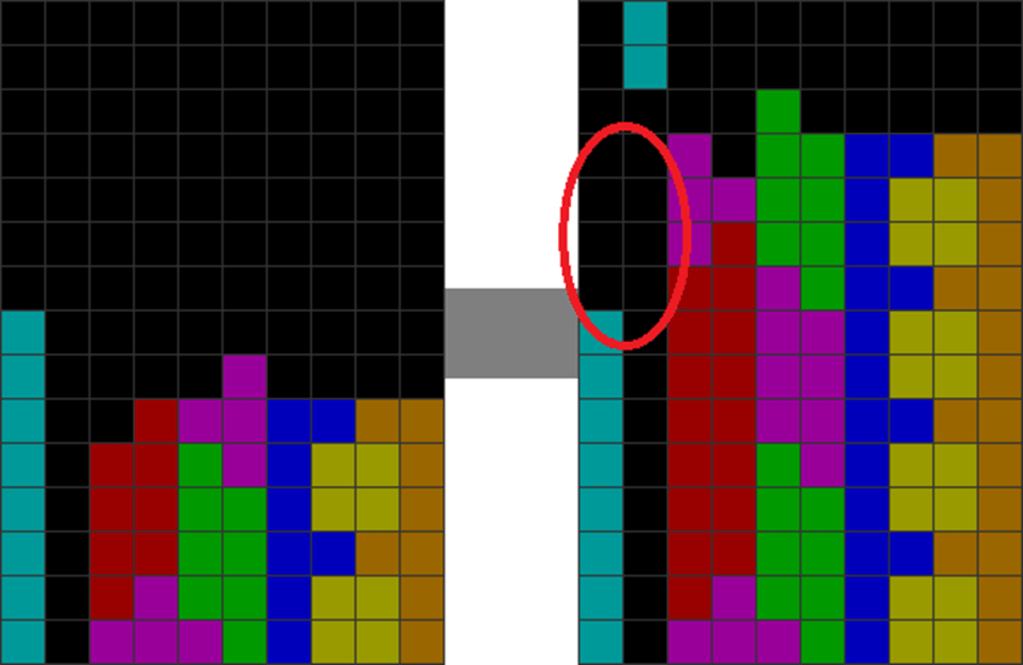
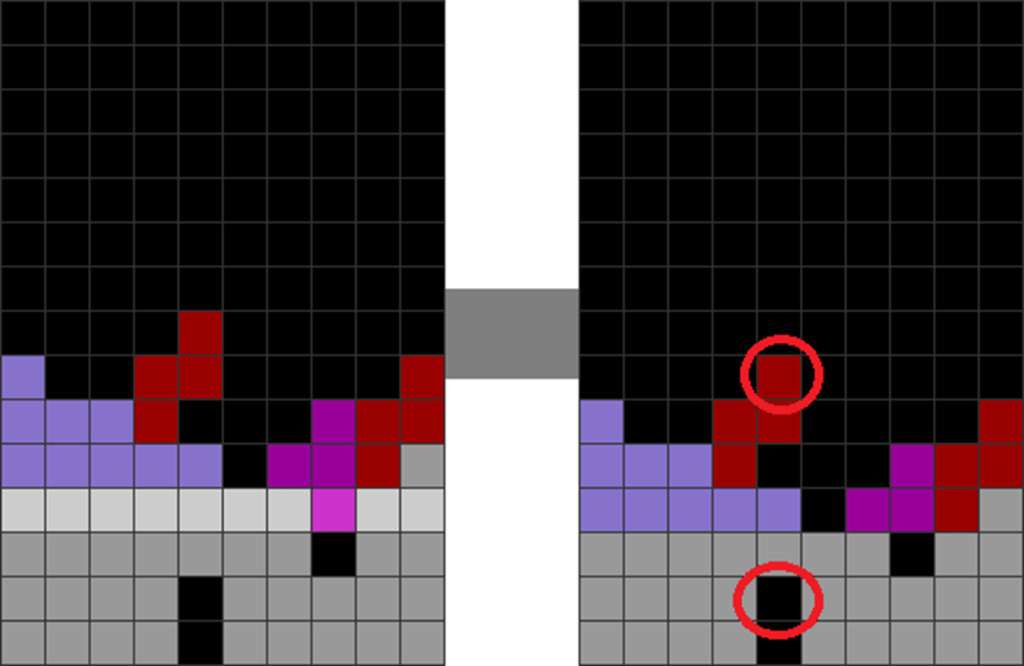
Diagram Set 6-11
1
2
Continue upstacking.
After a while, you have to use the Tetris to line clear. However, doing so leaves an I-dependency in the red circle.
Here, you must resort to inefficient non-Tetris skims to get down, which incurs heavy line clear delays in official guideline Tetris games. This slows down your sprint time.
For non-sprint-related aspects, 8-1 stacking has the lowest T-spin efficiency among all stacking forms.
You will typically have to use Parapet methods to sustain back-to-backs like this:
Diagram Set 6-12
1
2
Starting field.
The player uses Parapet. The J is placed first as a base.
3
4
The player spins the T vertically into the cavity to create a T-spin single.
The leftover pattern has the stacks on either side of the column being even. It is easy to make a second T-spin using an I overhang.
However, because many involve a T-spin single, your efficiency is not as good as the spamming of T-spin doubles during more efficient methods like LST stacking during 7-2 stacking:
Diagram Set 6-13
1
2
Place L and J vertically this way in a 5-block-wide area.
Put an overhang with an S piece to make a T-spin overhang (Z if mirrored).
3
4
Complete the T-spin double.
You will get this leftover pattern.
5
6
Put a vertical Z on the far right as a base. Top it with a J overhang to create another T-spin.
Is 5-4 stacking for Tetris viable?
To answer this question, let us first clarify what 5-4 stacking is:
Diagram Set 6-14
A
B
4-5 stacking. The central hole is in column 5.
5-4 stacking. The central hole is in column 6.
5-4 stacking involves stacking when the central Tetris hole is in columns 5 or 6, directly in the middle. Both 5-4 and 4-5 stacking are referred to as the same thing by most players.
5-4 stacking sprint methods exist, such as:
Diagram Set 6-15
1
2
Place the first 7 pieces this way.
Spam them in a repeatable pattern like this and score Tetrises.
With this form, it is easy to memorize certain piece combinations. On the left side, one can stack S, Z, I, and T pieces together. On the right side, one can stack L, O, J, and I pieces together.
Repeating them allows you to sprint quickly, making 5-4 stacking somewhat viable.
However, it is not as efficient as 6-3 stacking because it does not eliminate extra double-tap placements on the right side.
Are Tetrises Practical for Versus Matches?
If T-spins are roughly twice as efficient as Tetrises, why should one even spam Tetrises?
The answer: they are clean and serve as powerful fillers to sustain back-to-backs or pressure. I illustrate:
Diagram Set 6-16
1
2
Step 2 fills the starting field with O and Z pieces to make a perfect Tetris. This exposes the garbage hole easily.
The following alternative setup continues from the last diagram set’s step 1:
Diagram Set 6-17
1
2
Not recommended
The player uses a T-spin mini to make a T-spin double cavity. In step 2, he uses a vertical Z in columns 4 and 5 to make the T-spin double overhang. However, the resultant overhang (top red circle) will later cover the bottom garbage hole (bottom red circle).
Here, the alternative placements of using T-spins may leave an overhang after the T-spin line clear. Tetrises serve as a clean alternative that exposes the next garbage hole cleanly after the quad line clear.
Tetrises also give you an extra tool to sustain back-to-backs (on top of T-spins) mid-game:
Diagram Set 6-18
1
2
A T-spin single is ready.
Make the T-spin single this way.
3
4
This exposes the Tetris hole.
Make a back-to-back Tetris quad.
Here, the player interweaves Tetrises gracefully in between T-spins, sustaining back-to-backs. This is unlike diagram set 6-17, which causes the player to over-spam unclean T-spins, leading to unnecessary and inefficient skims.
Clean Tetrises also let one make many prophecy T-spins after the Tetris quad line clear:
Diagram Set 6-19
1
2
Here, a simple O (with help from an S) forms a perfect Tetris in step 2.
3
4
After the Tetris, you get a T-shaped cavity. In step 4, you fill the right side to upgrade it to a T-spin double.
Here, the player forecasts a T-spin overhang. After the quad line clear, the overhang joins the next garbage hole, creating a prophecy T-spin.
Hence, Tetrises are extremely practical and necessary mid-game.