Most T-spin guides commit the error of simply documenting T-spin methods. They compile and show dozens of methods without showing readers the nuances of T-spin usage that can improve one’s consistency and success rates.
This results in players who mindlessly memorize and create T-spins unthinkingly without caring about their repercussions. This may include not caring about the cleanliness or parity management of a stack, thus resulting in failed T-spin attempts or a dirty field.
This chapter addresses these issues by showing you a no-nonsense approach to experience-tested T-spin guidelines.
There are several important factors to consider while making T-spins. I have compiled a list of to-dos and don’ts below to help you quickly assimilate the information.
A)Safety and Consistency First!
Good T-spins should be safe: clean, compact, consistent, sustain back-to-back bonus, and not mess up the stack.
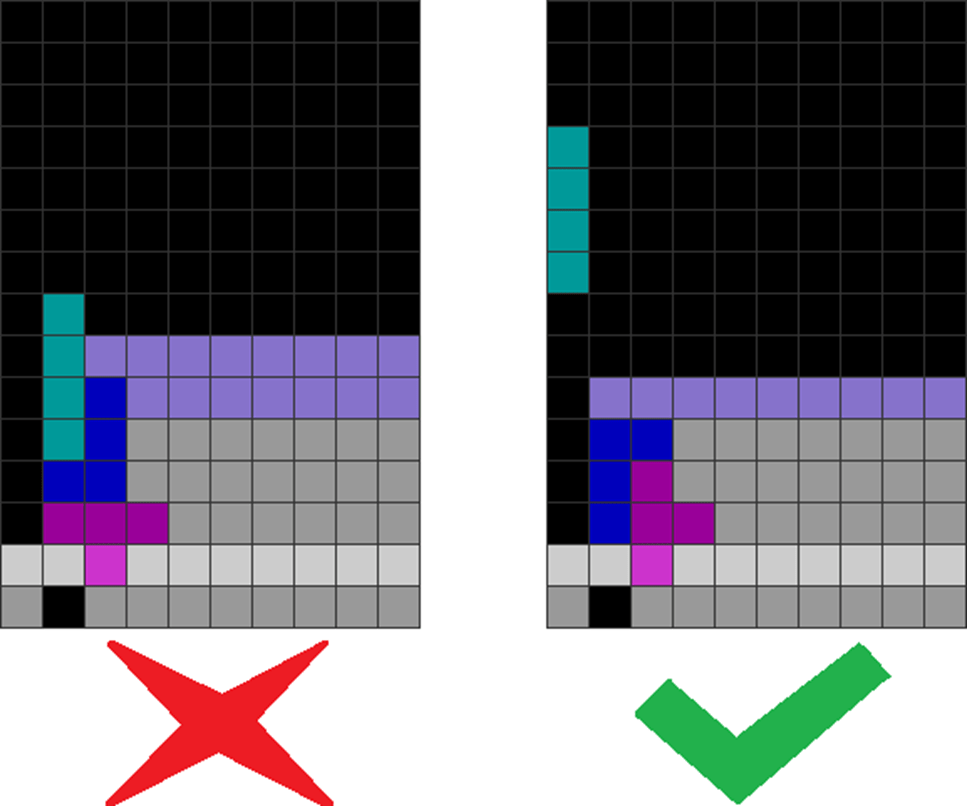
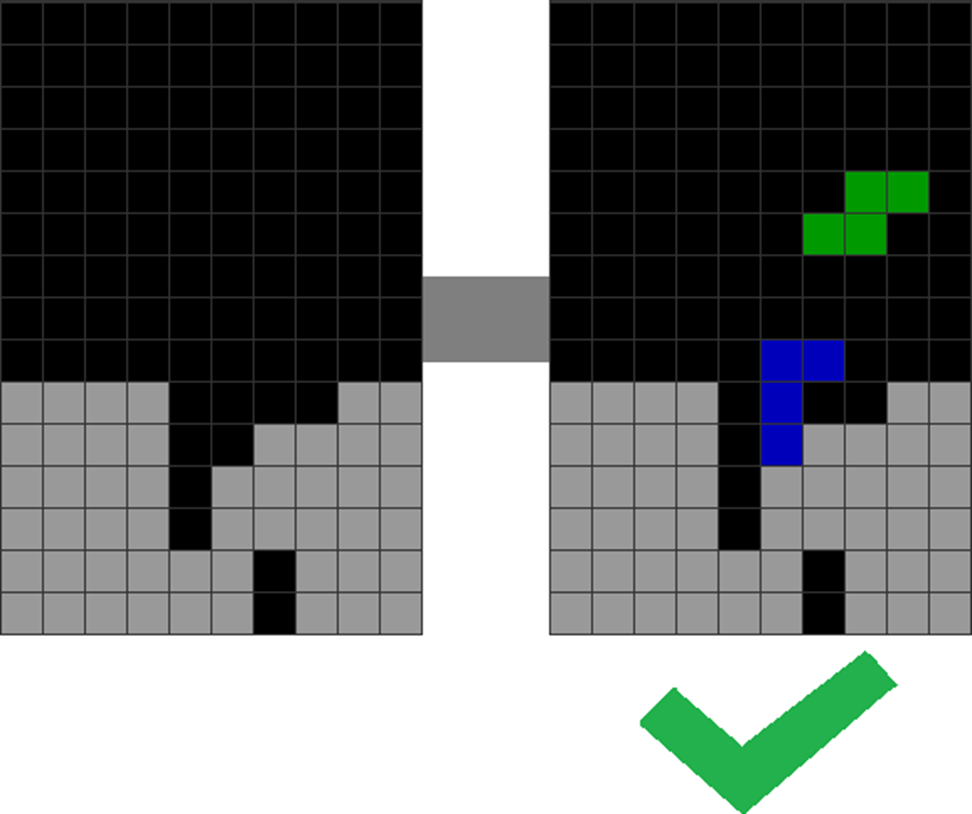
1) Going for Clean T-spins
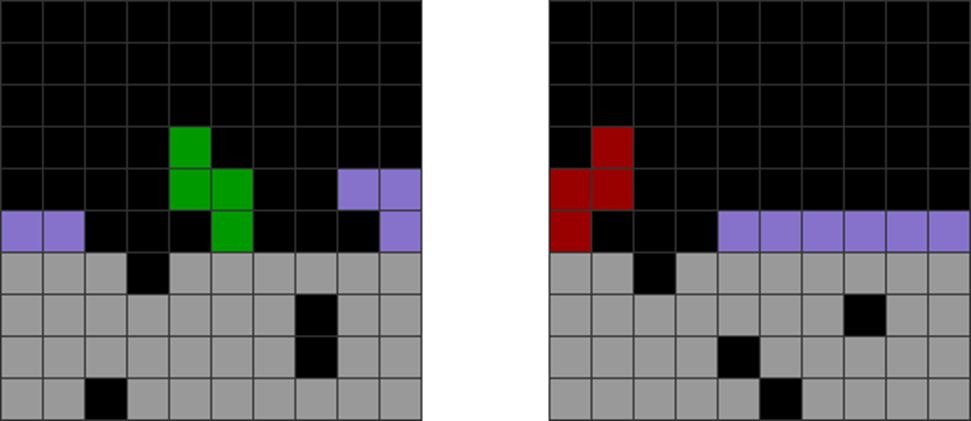
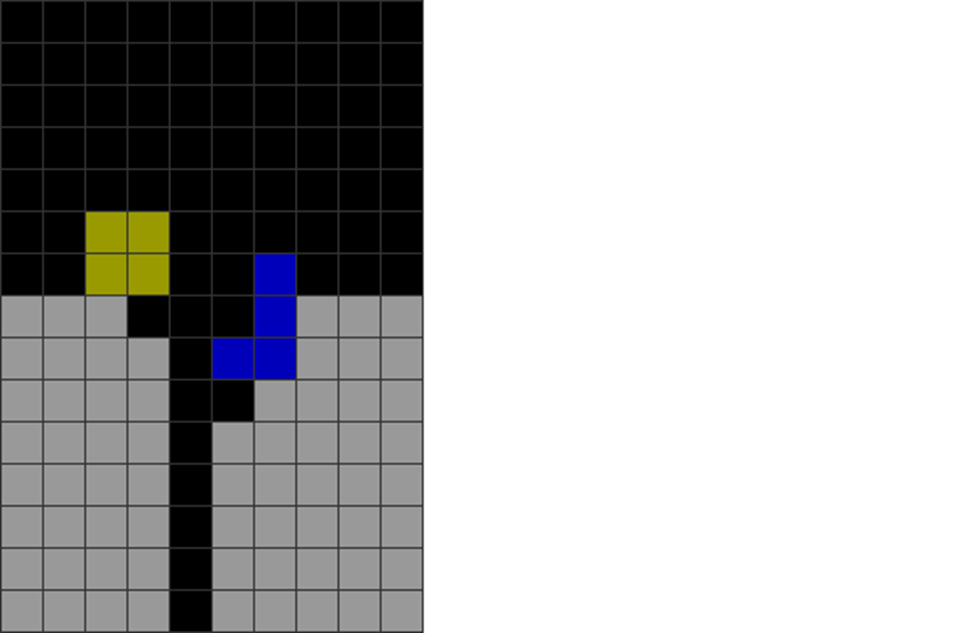
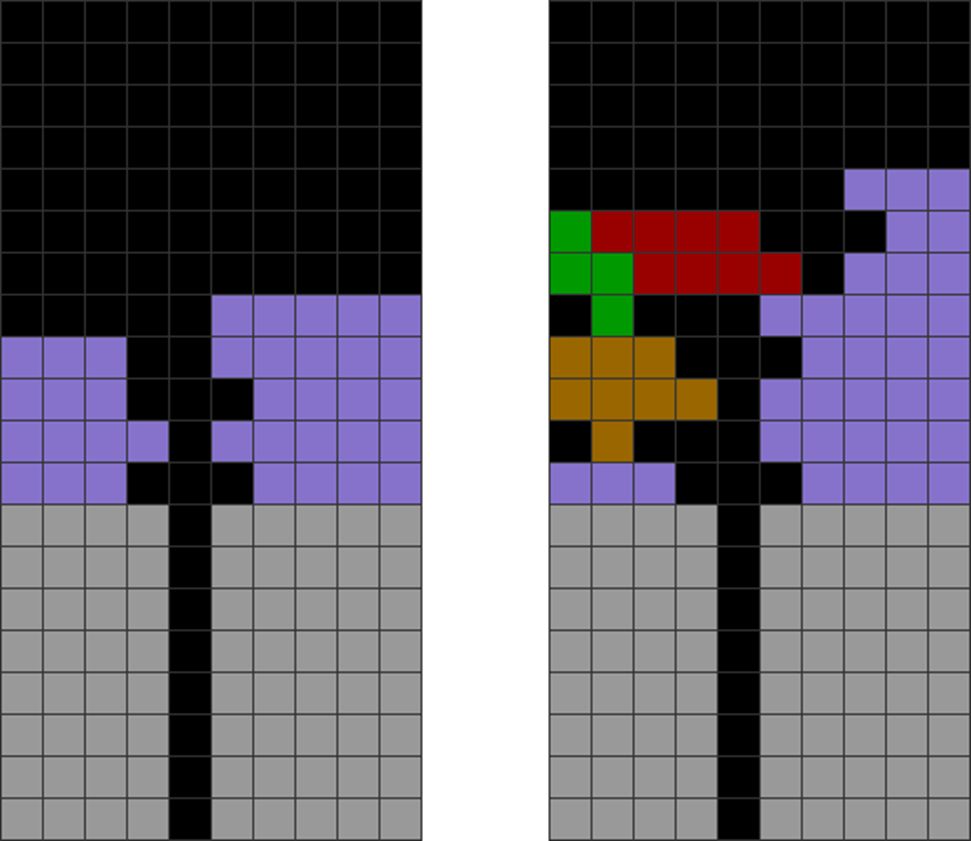
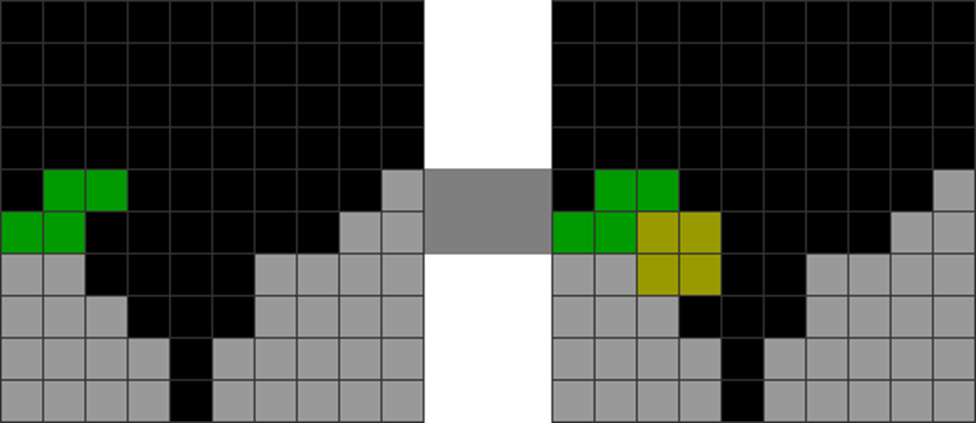
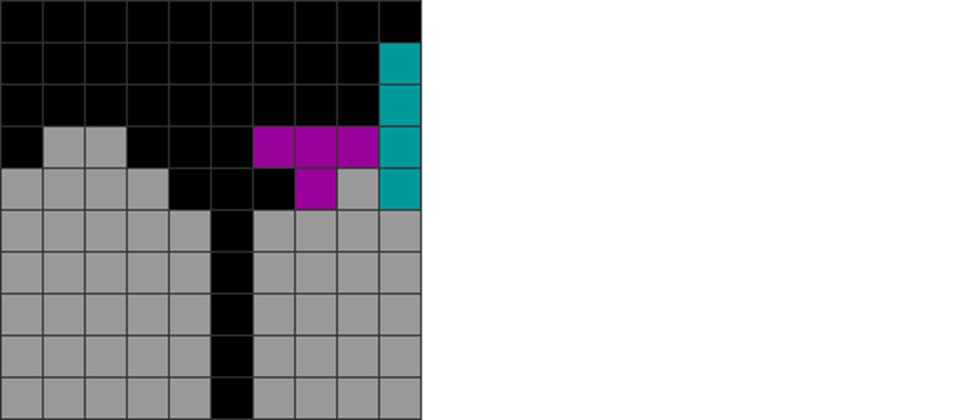
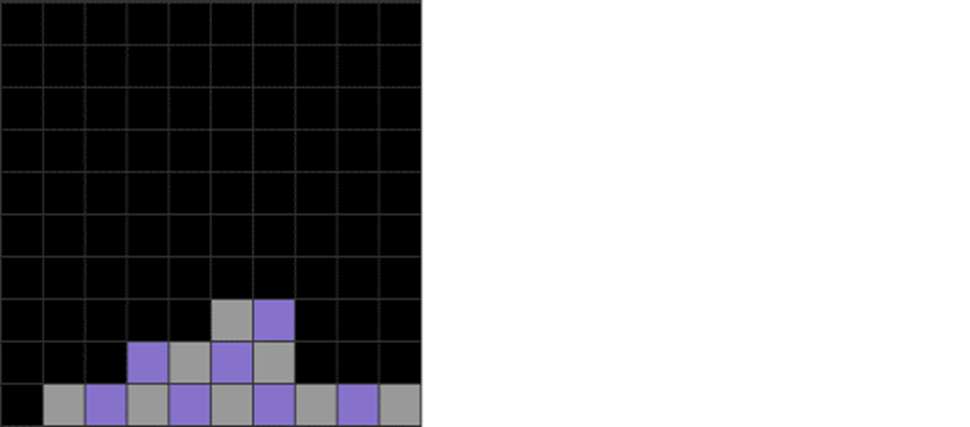
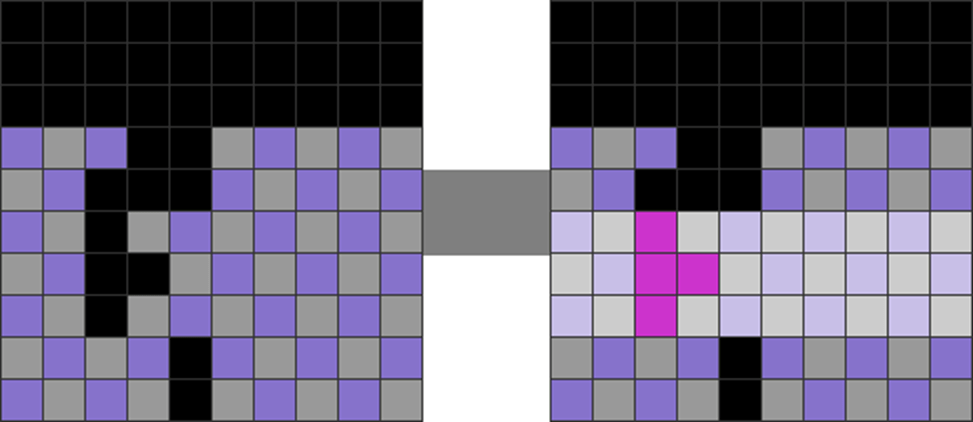
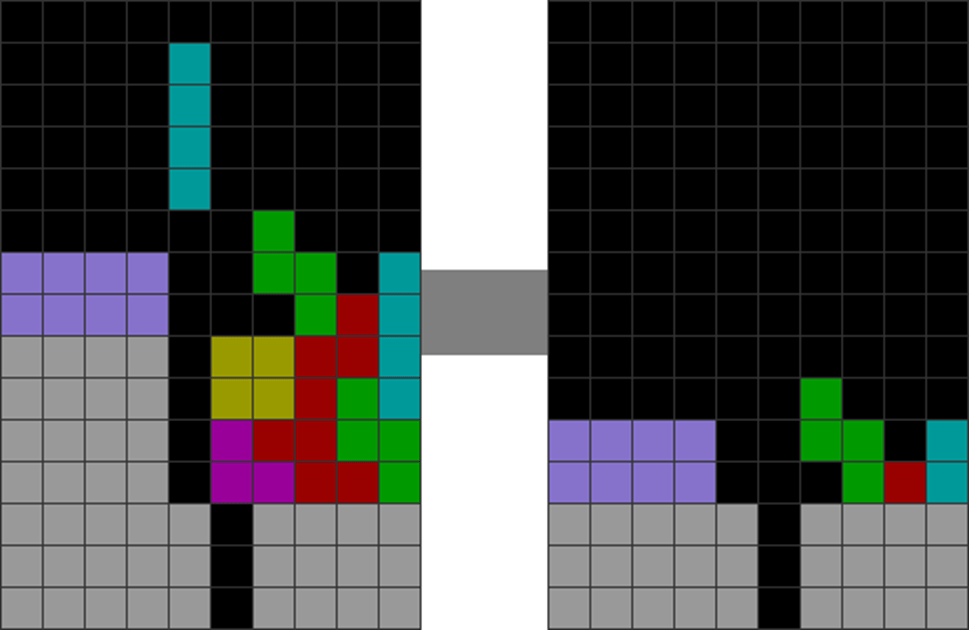
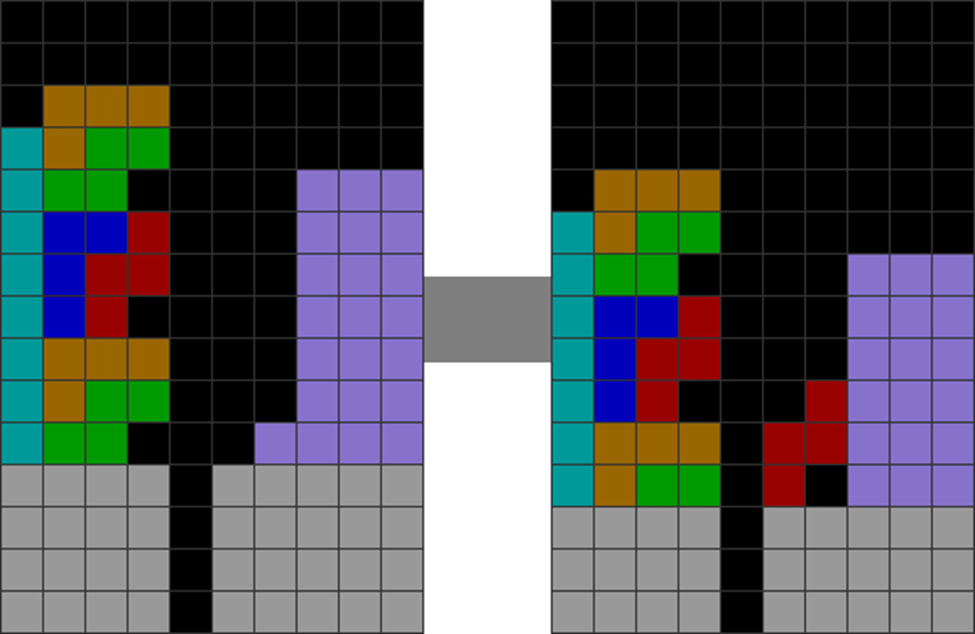
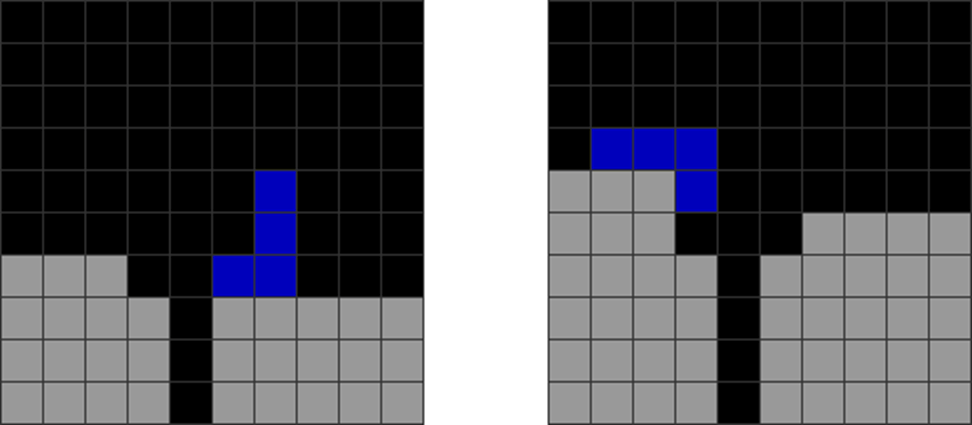
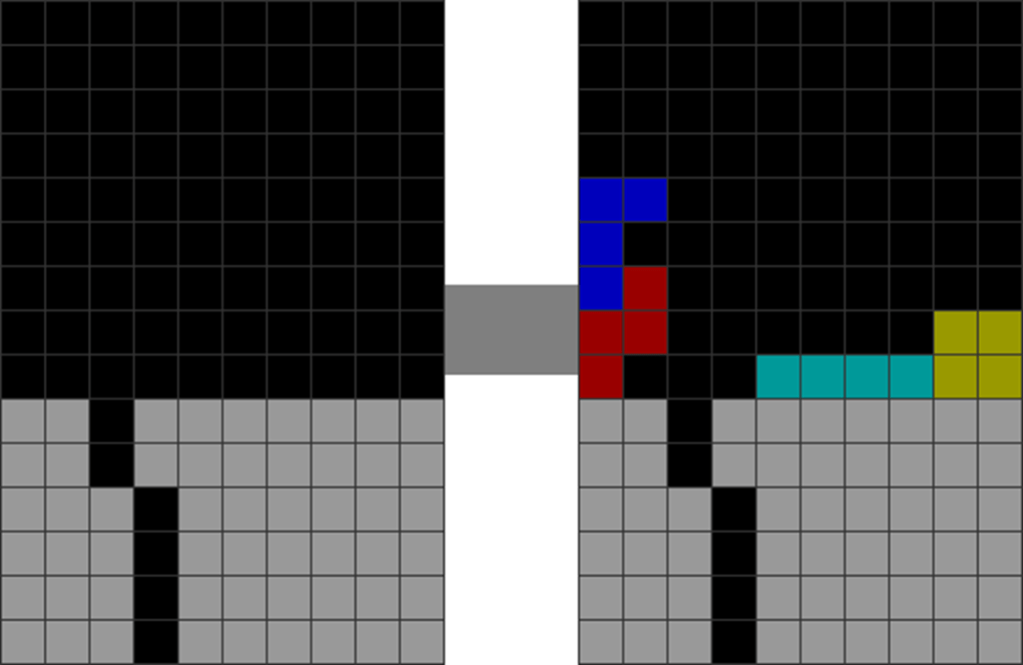
A T-spin should, as far as possible, be clean. This means its overhang does not upstack over the next colored or garbage hole:
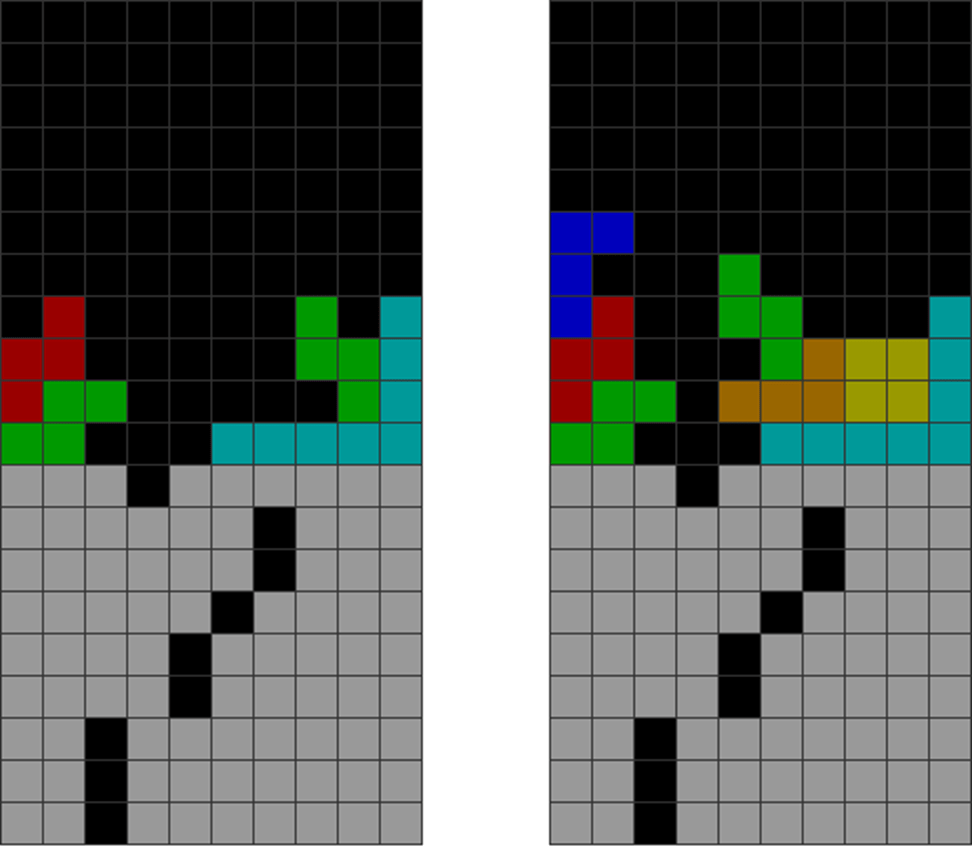
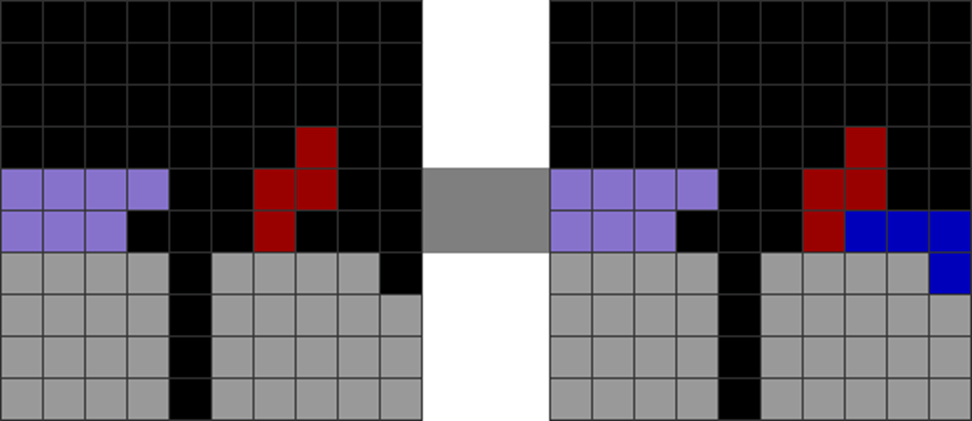
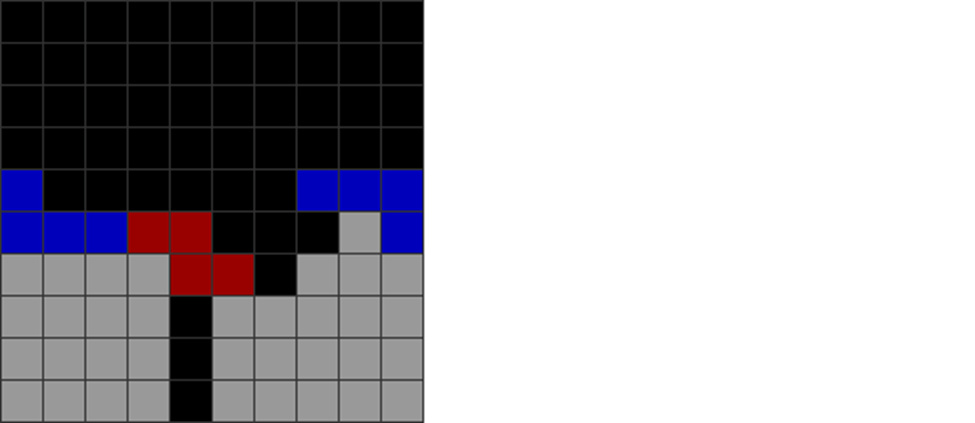
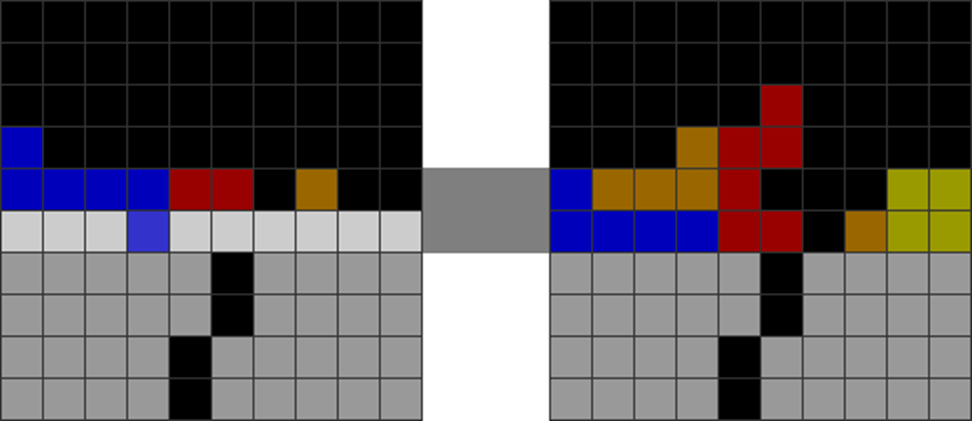
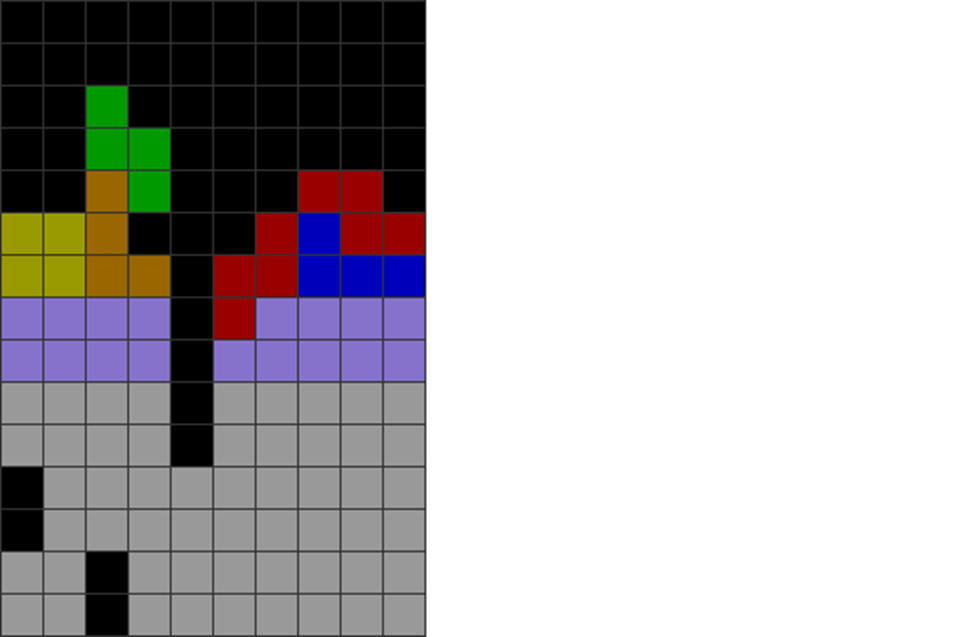
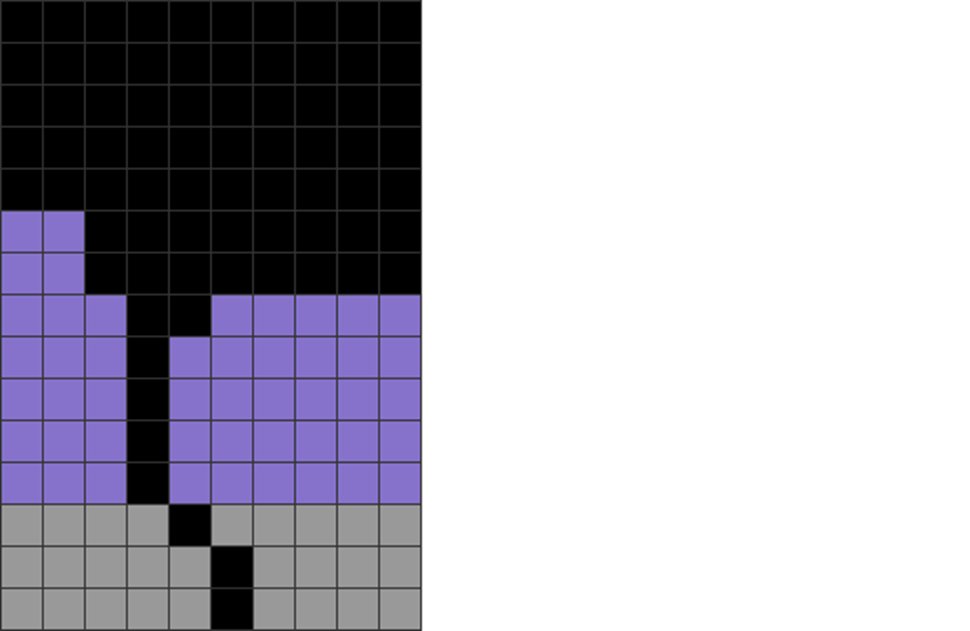
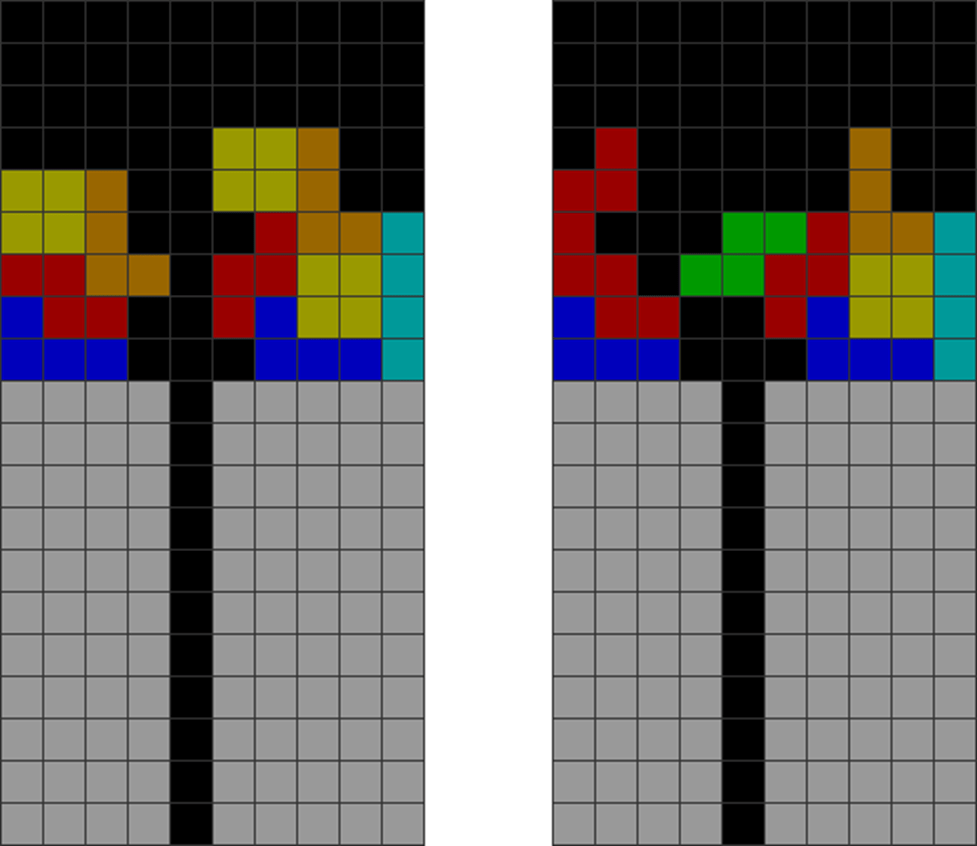
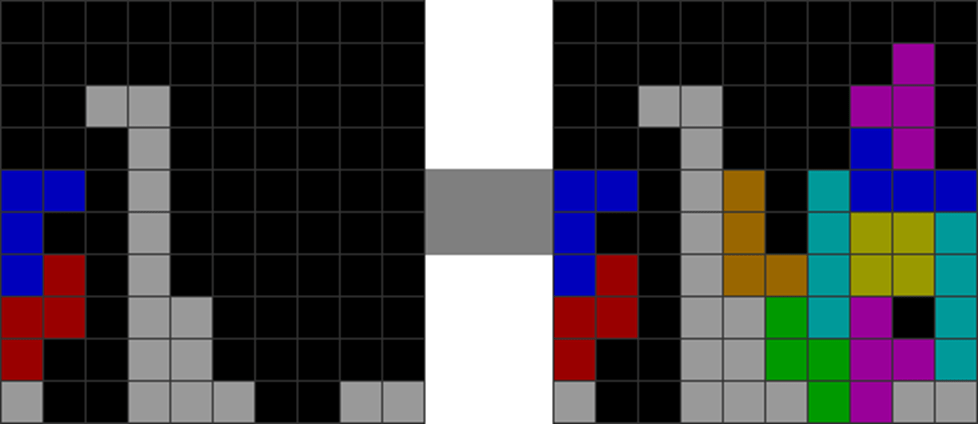
Diagram Set 9-1
A
B
A T-spin single leads to a forecasted T-spin single (right side of the field) once the former is cleared.
This is a T-spin double that, once cleared, exposes the next garbage hole.
C
This shows a clean T-spin triple that reveals the next garbage hole once cleared. All of them are thus clean.
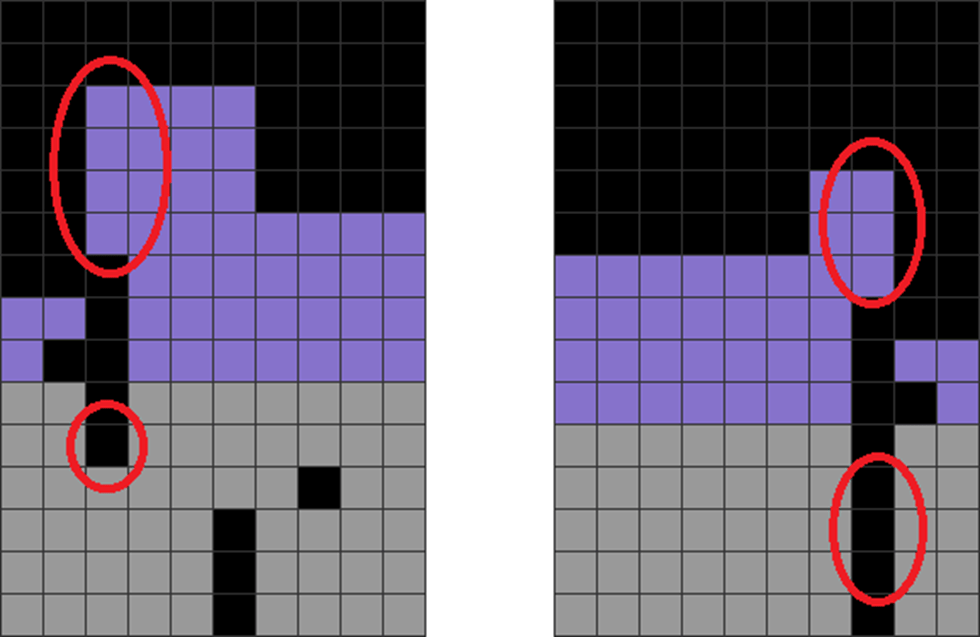
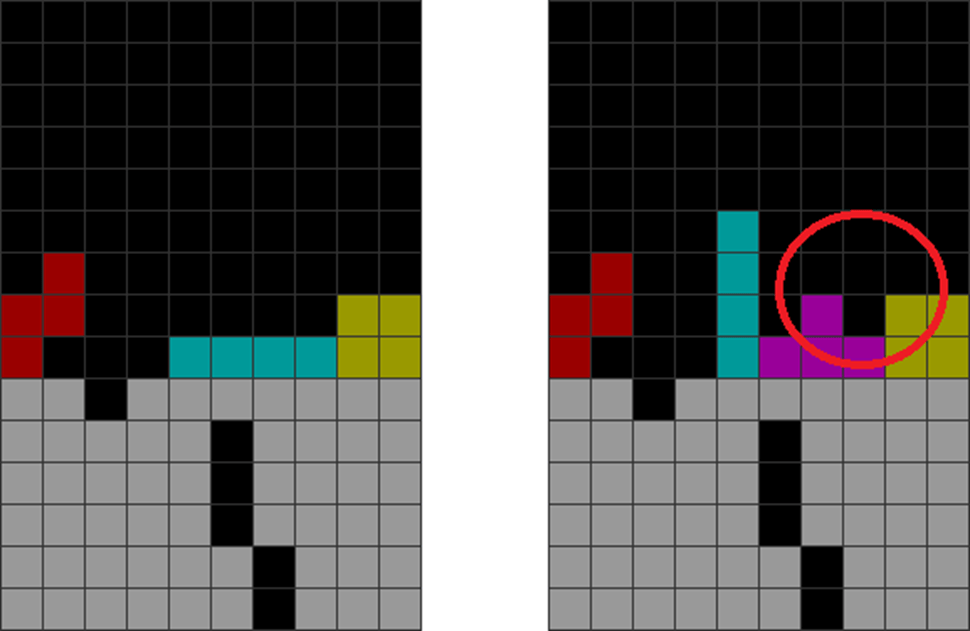
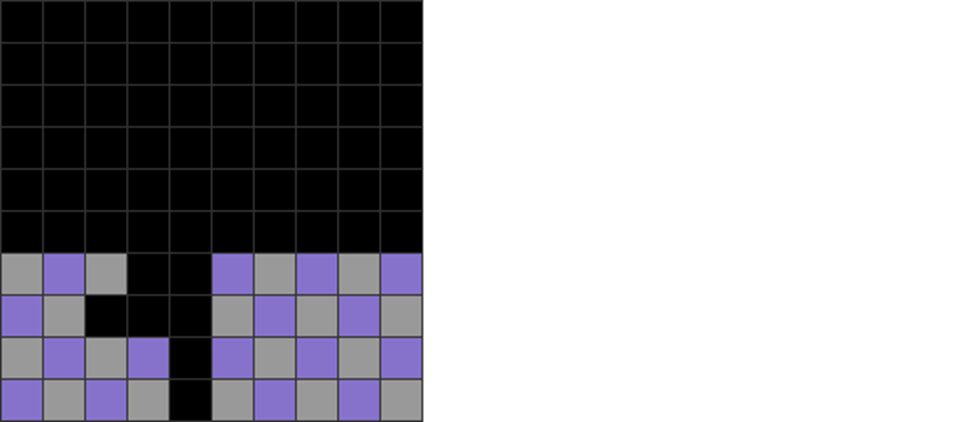
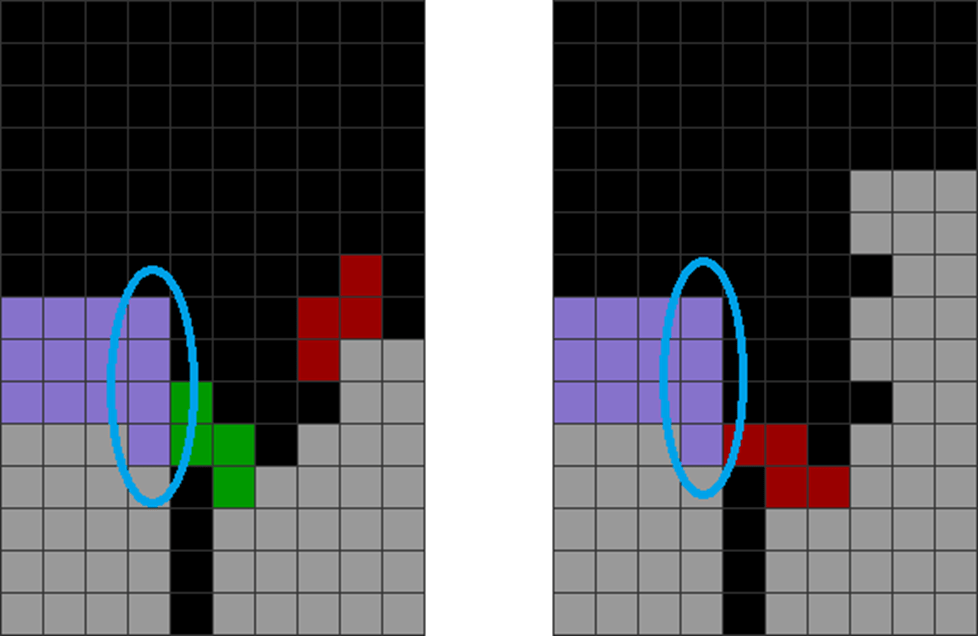
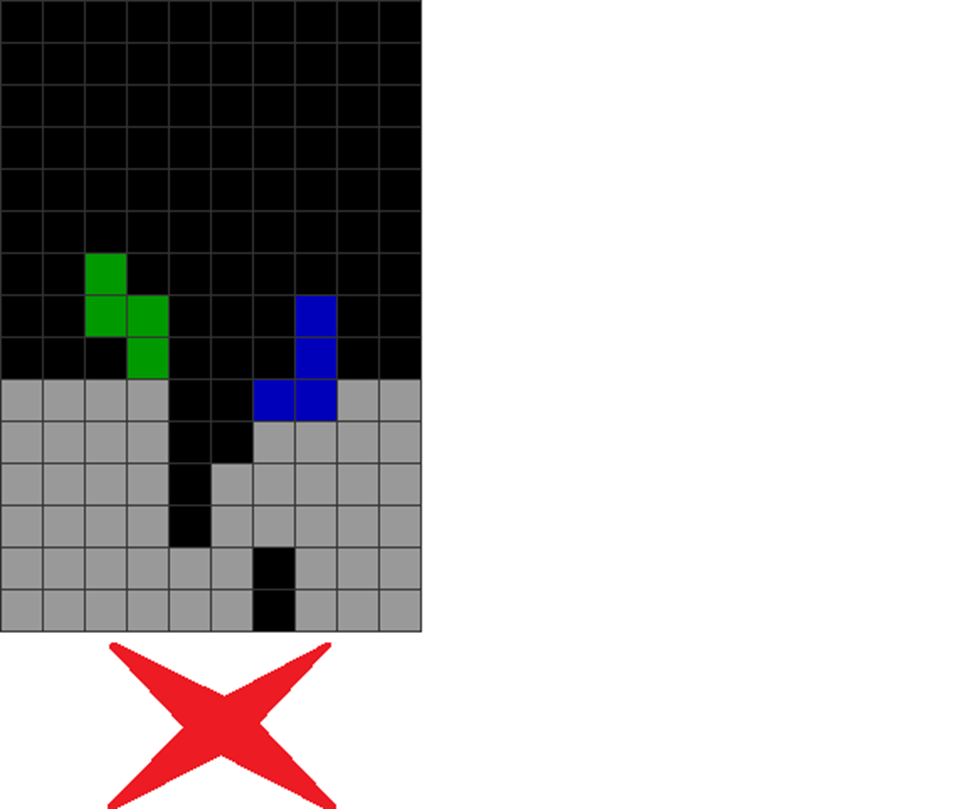
What happens if your T-spins are unclean with many messy overhangs? Well, this happens:
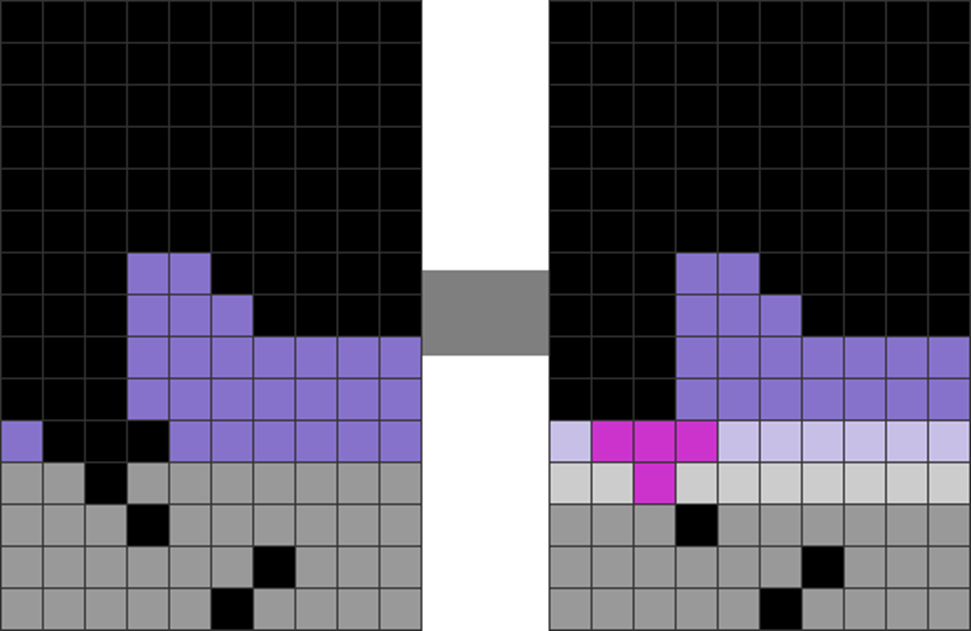
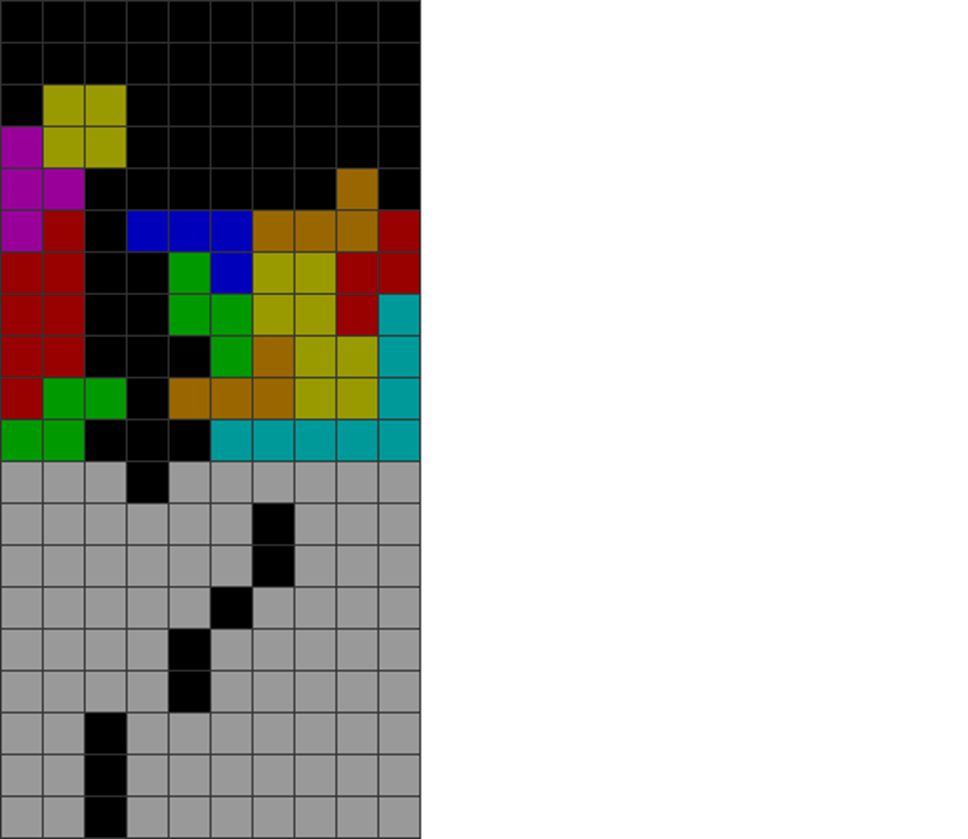
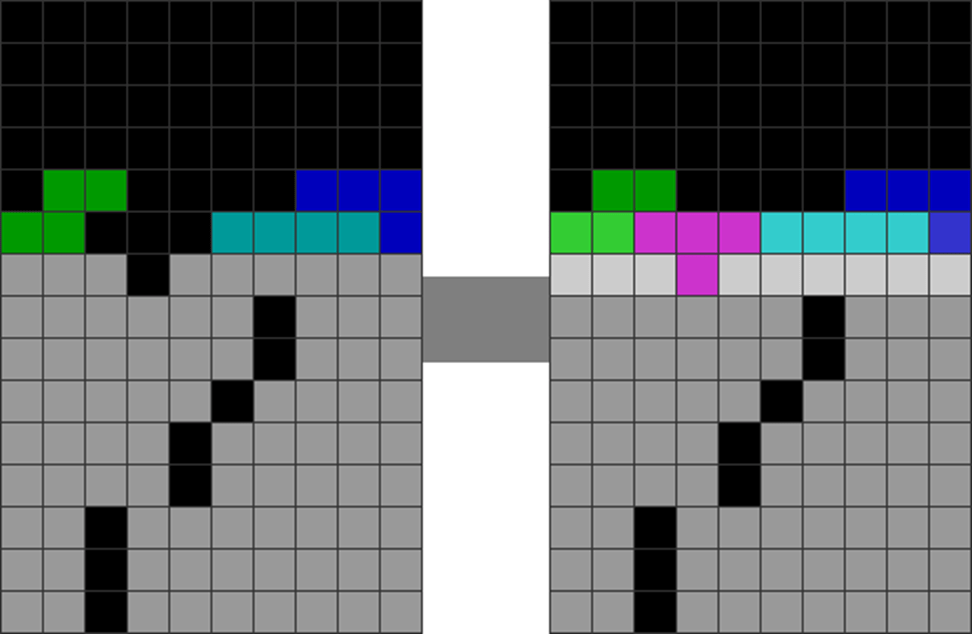
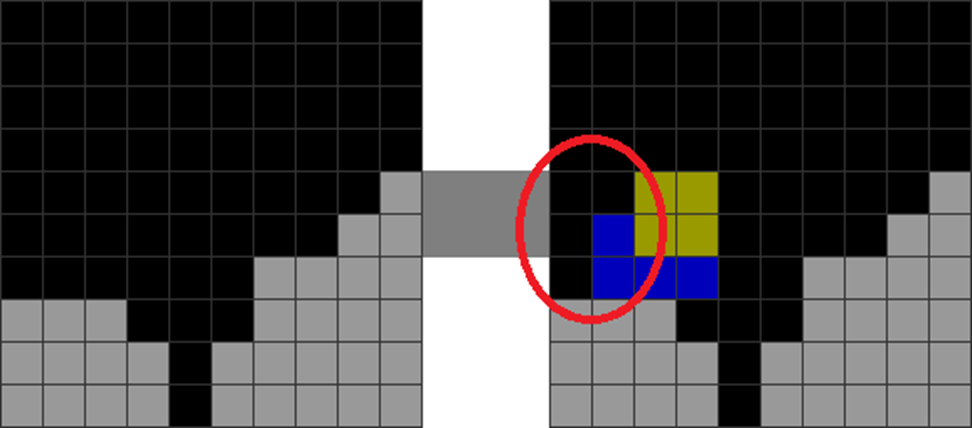
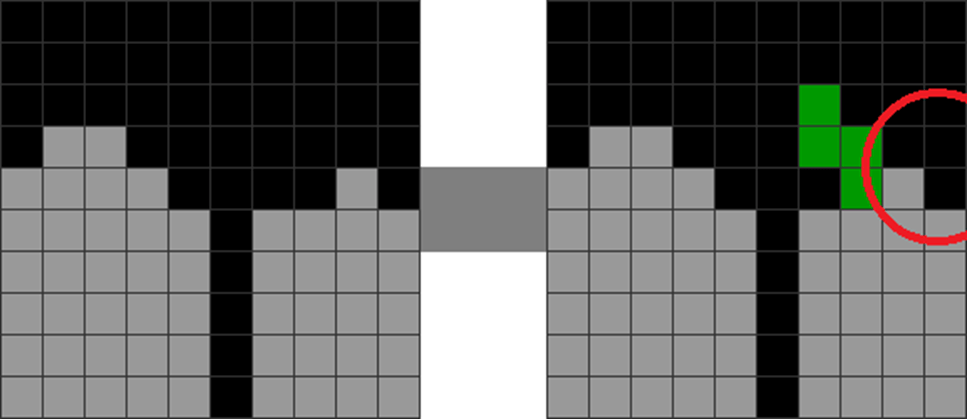
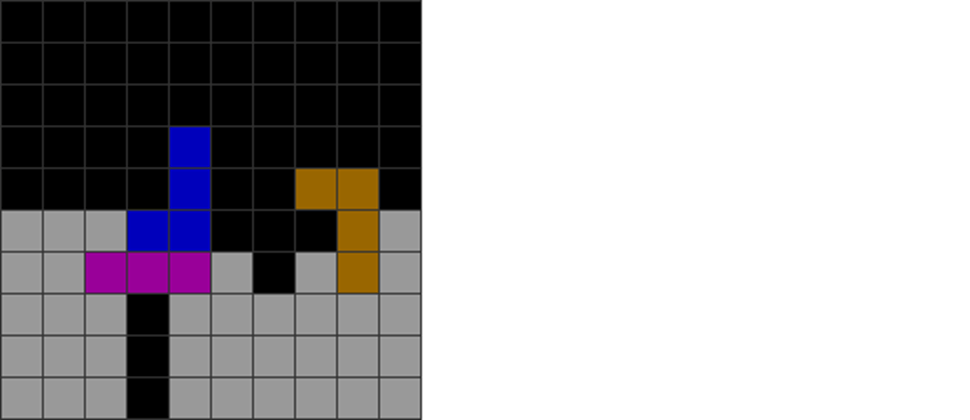
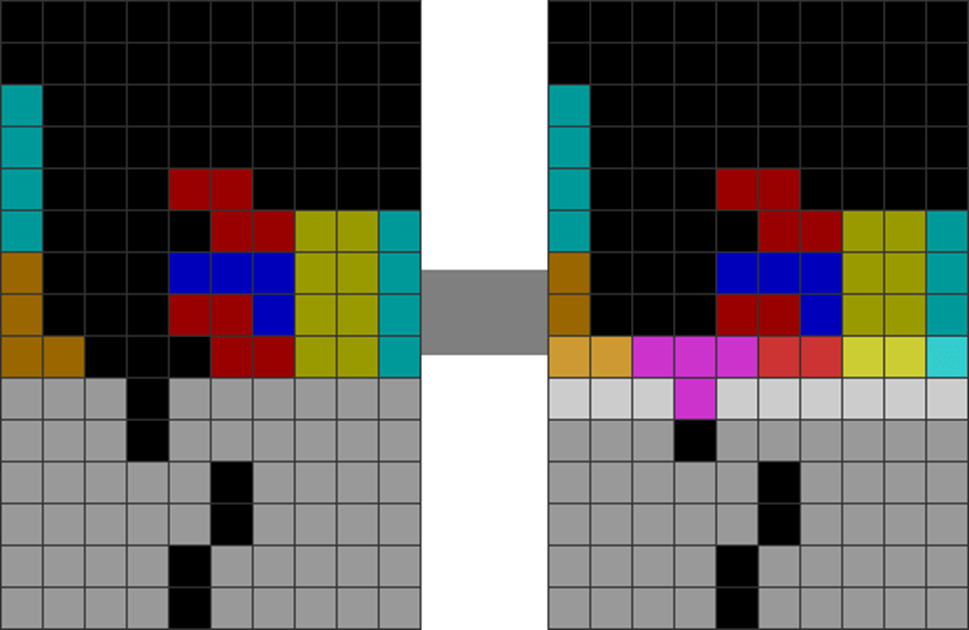
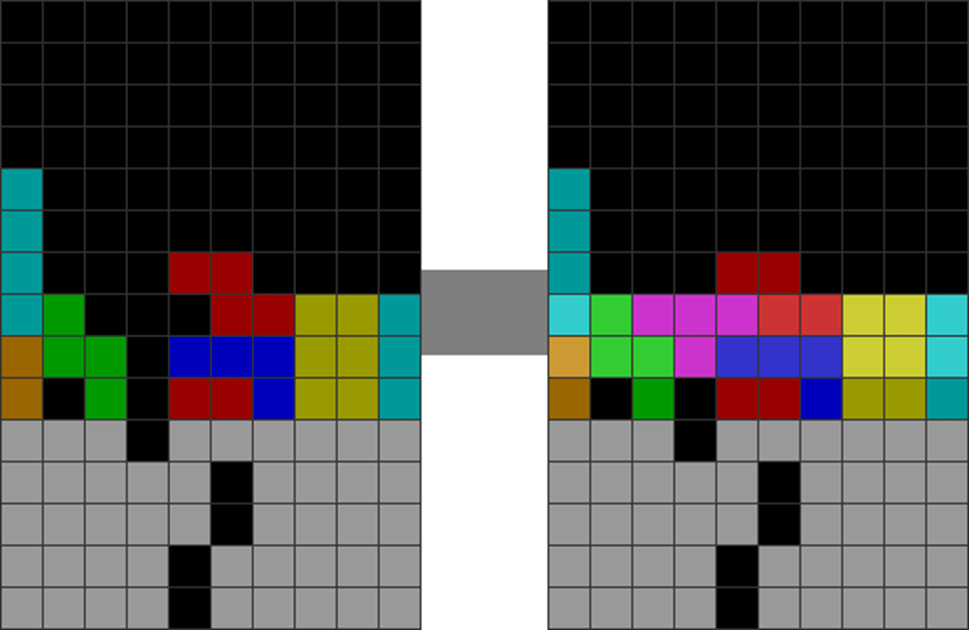
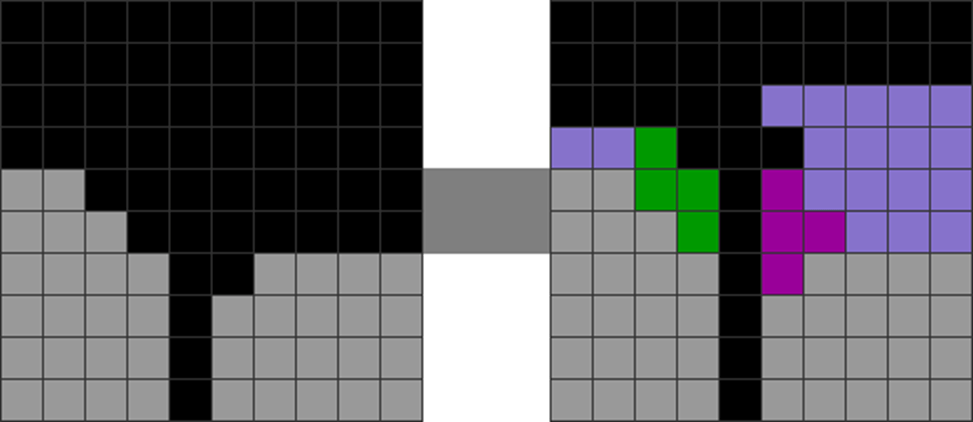
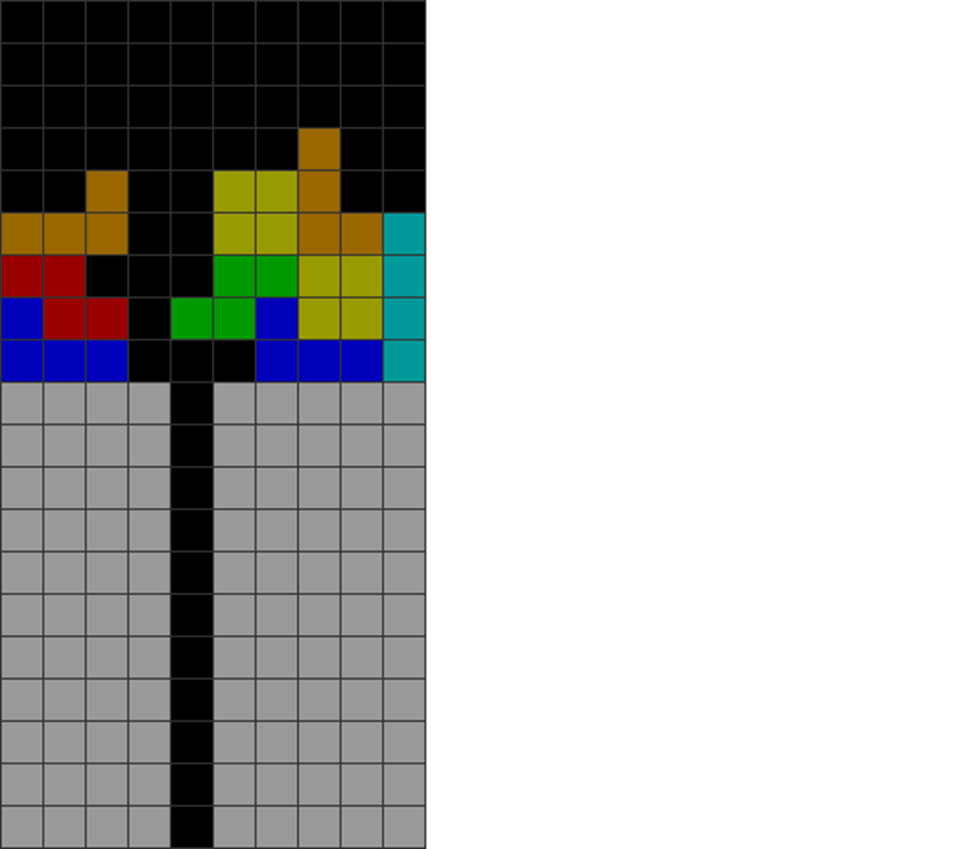
Diagram Set 9-2
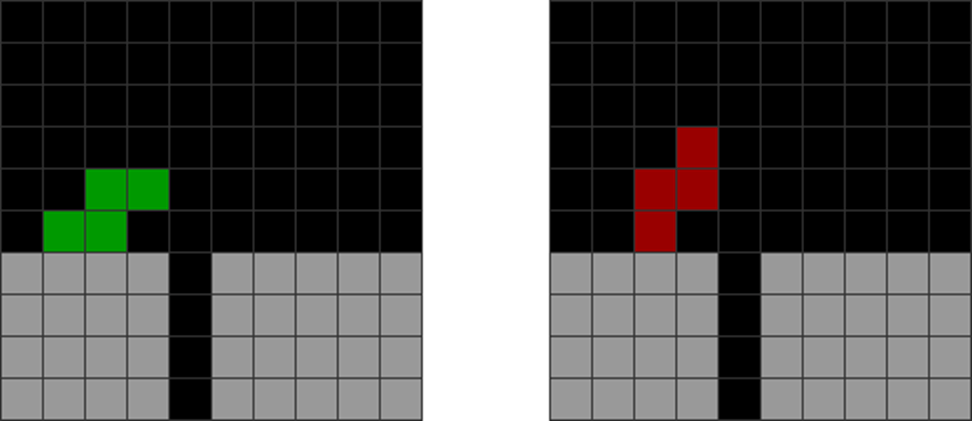
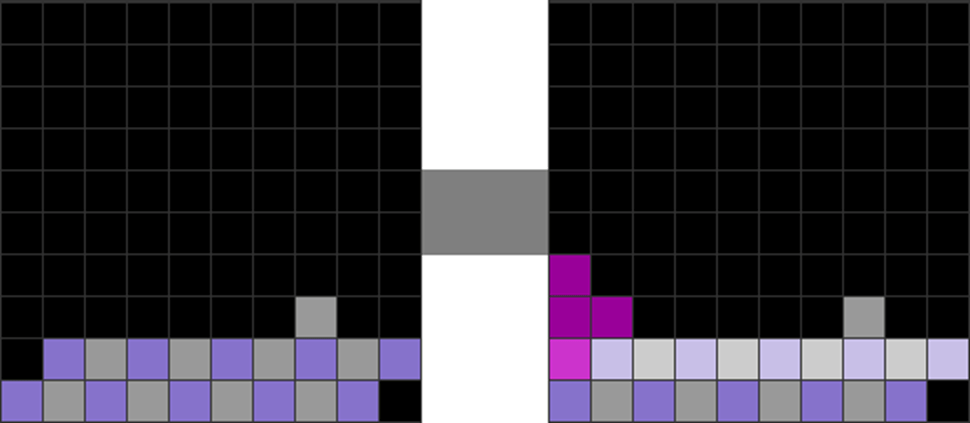
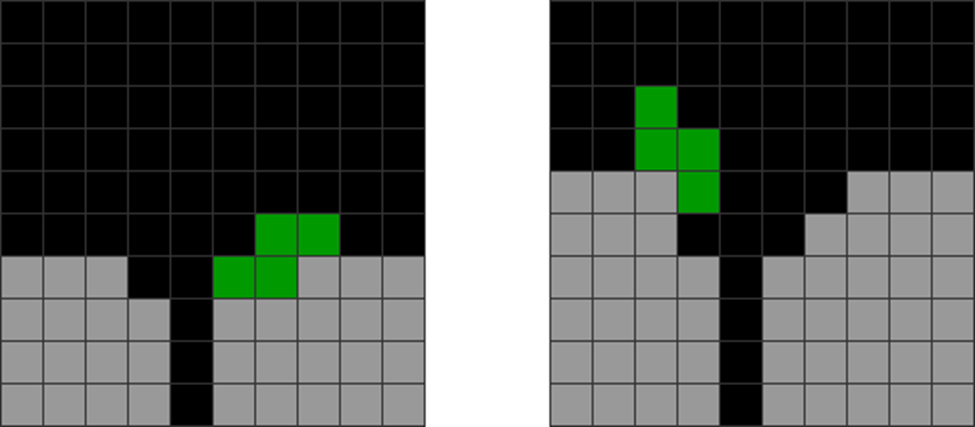
1
2
The player creates a T-spin double setup.
The T-spin double line clear concludes.
3
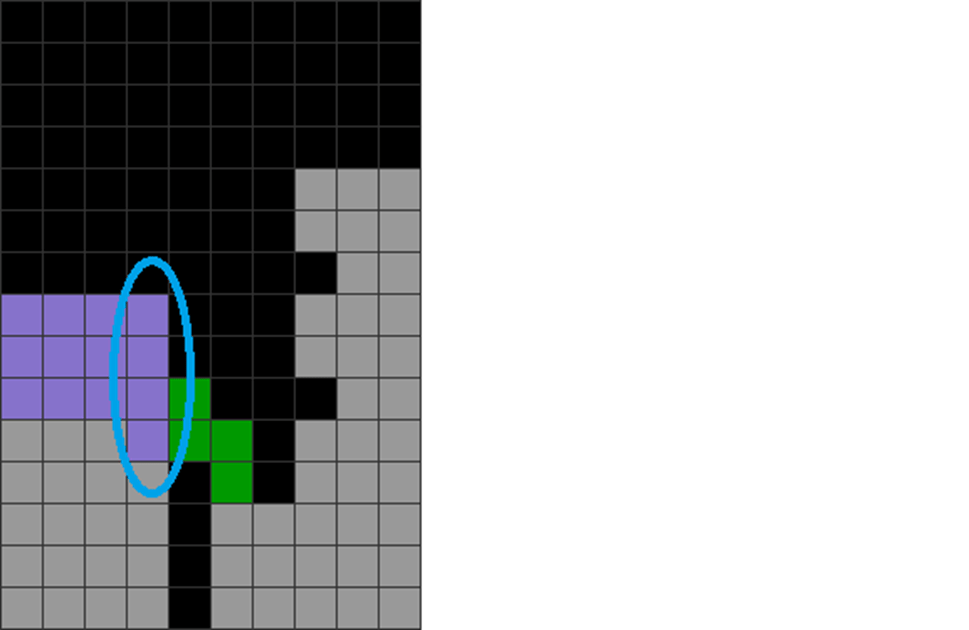
The overhang blocks the incoming hole after the T-spin double line clear, as shown in the red circle.
To continue downstacking, a player must skim off the overhang first. This is inefficient as it breaks back-to-back bonuses and, thus, reduces your garbage output by 1 per T-spin or Tetris. Every non-Tetris and non-T-spin line skimmed without initiating downstack combos is costly: they incur a line clear delay and waste an average of 2.5 placed pieces.
Therefore, I strongly recommend mostly clean T-spins if possible.
In these, the clean overhangs do not block the incoming holes, letting you sustain back-to-back bonus and downstack more easily. Note that it’s not always possible to make clean T-spins because the preview pieces may not allow it. If that is the case, upstack quickly and don’t slow down.
Another critical key is prioritizing regular T-spin doubles over T-spin minis, singles, and triples.
Why? Because they are the cleanest way of making T-spins as they:
(i) Do not alter the parity of blocks above the line clear.
(ii) Clear precisely 20 blocks (equal to 5 pieces), which do not create extra residues above the line clear.
Please refer to the Parity Management chapter to revise this.
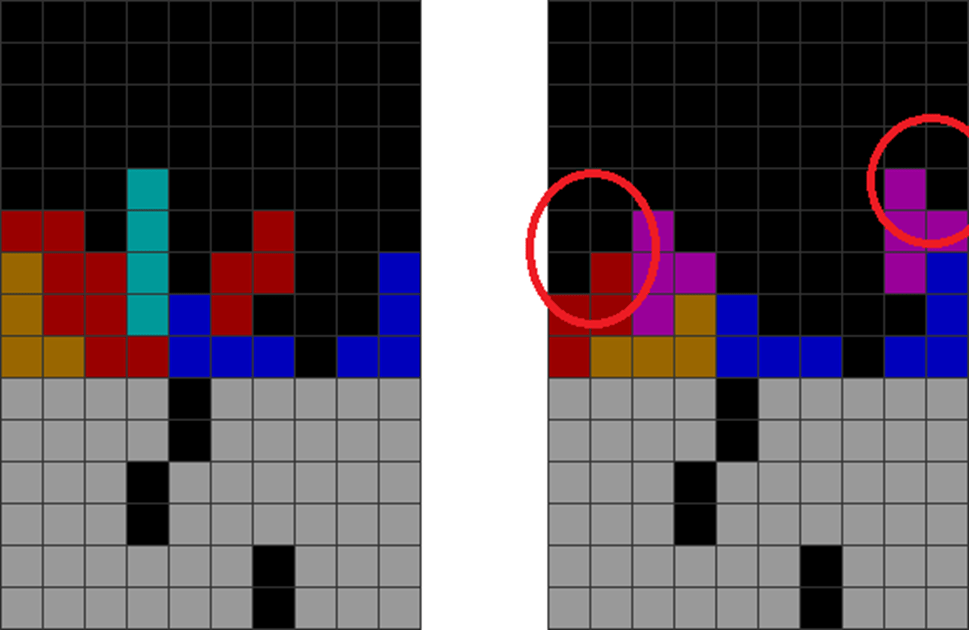
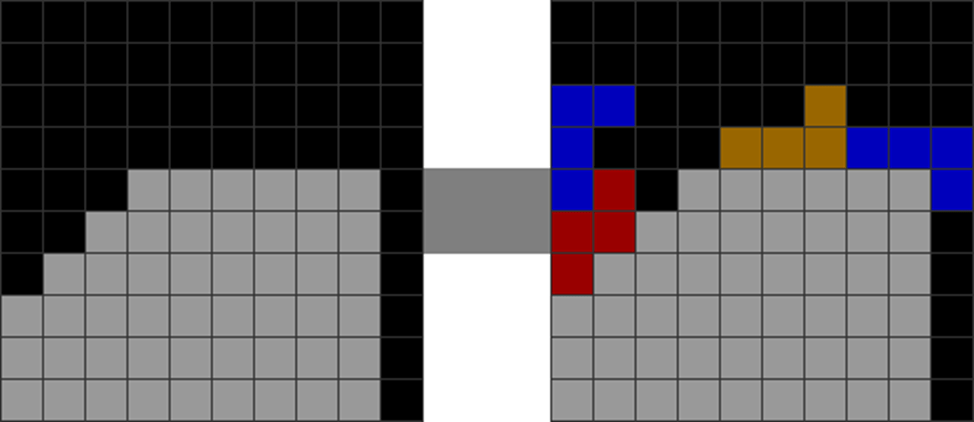
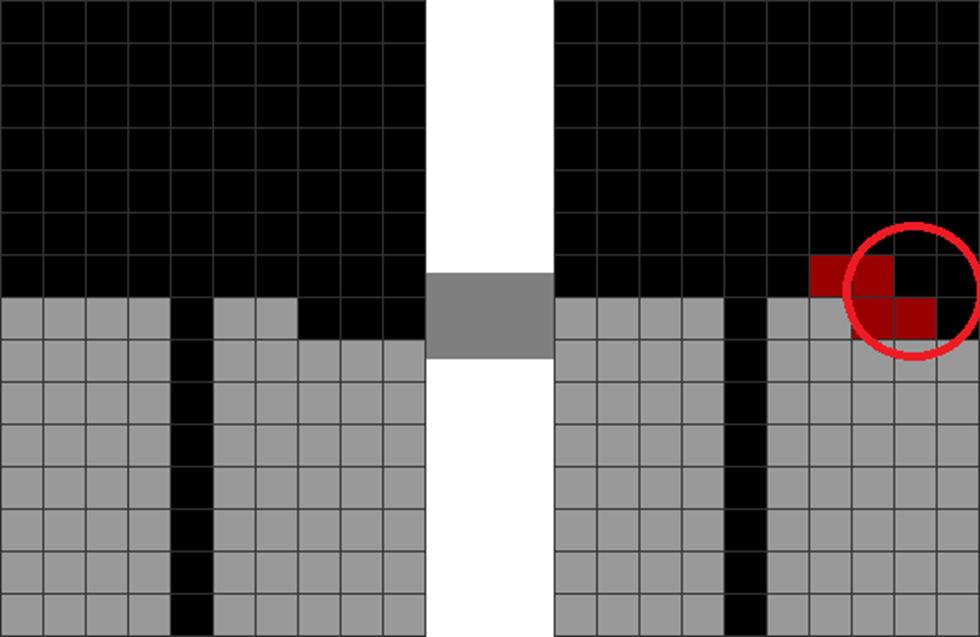
Another guideline in T-spinning is to mainly take T-spins that make a clean and stable stack:
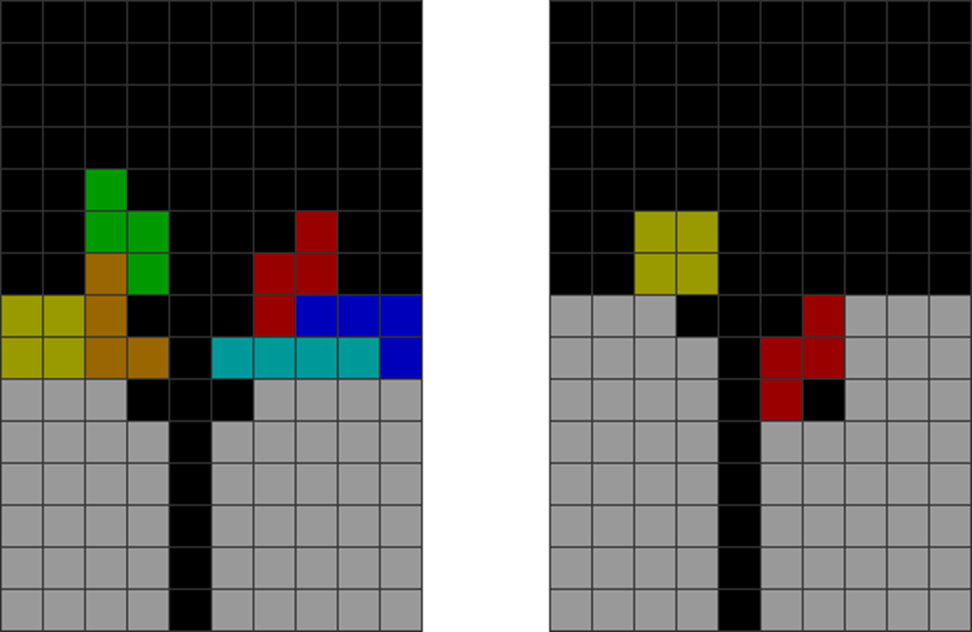
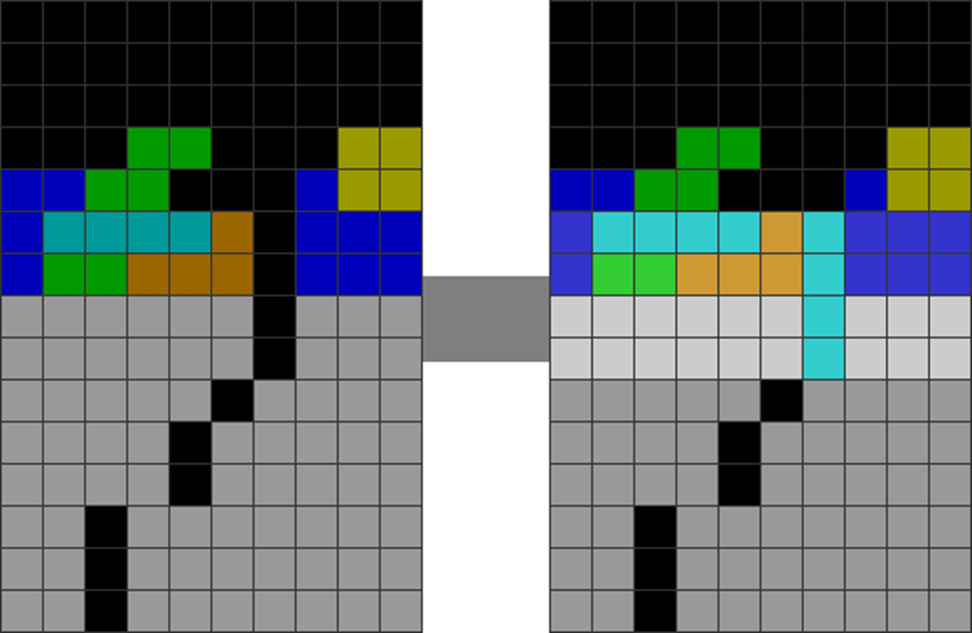
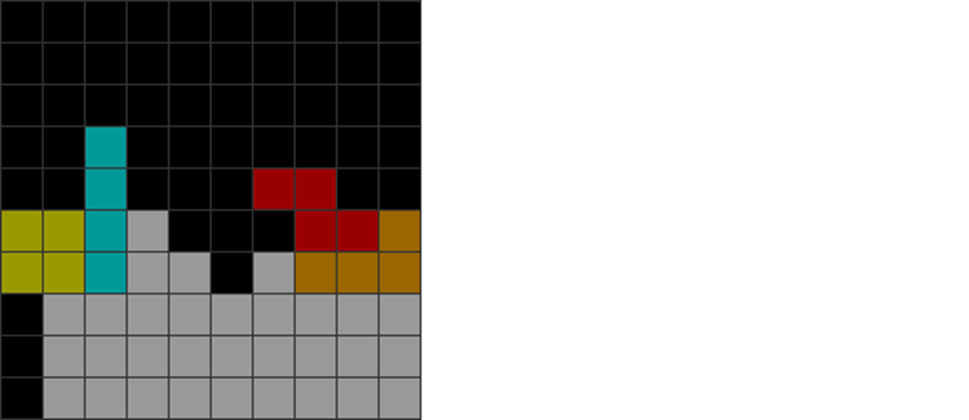
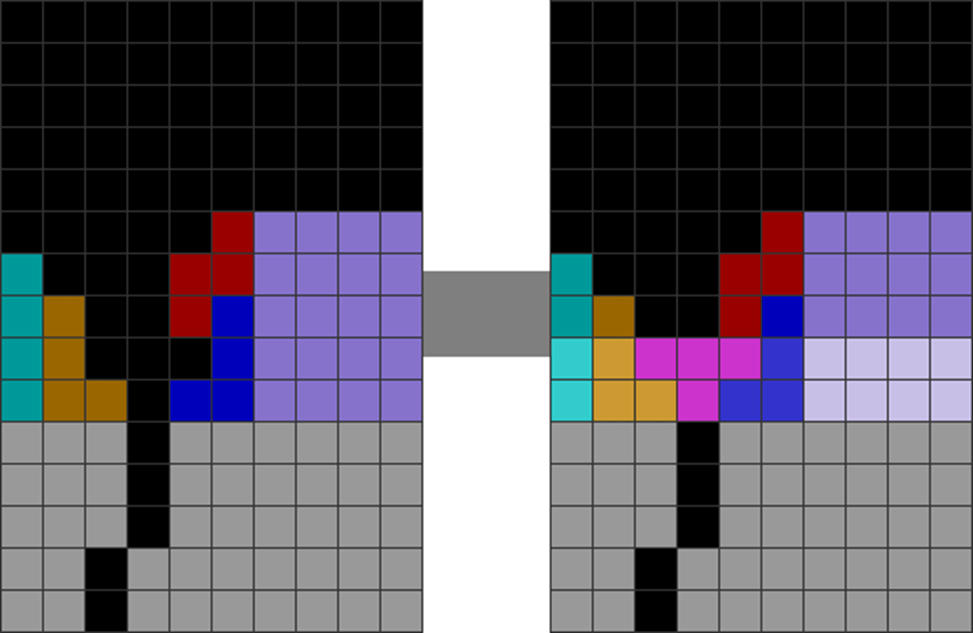
Diagram Set 9-3
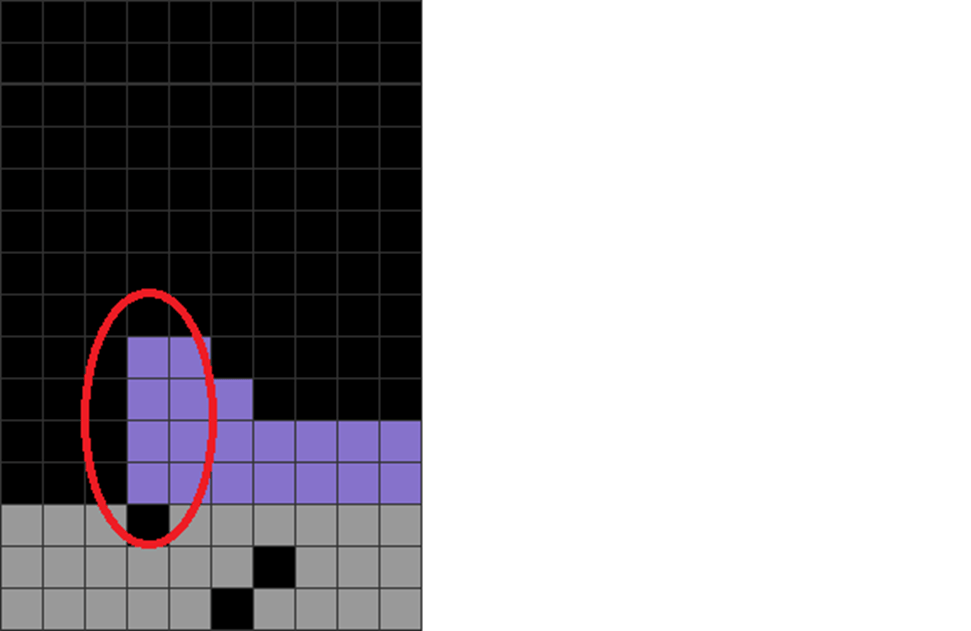
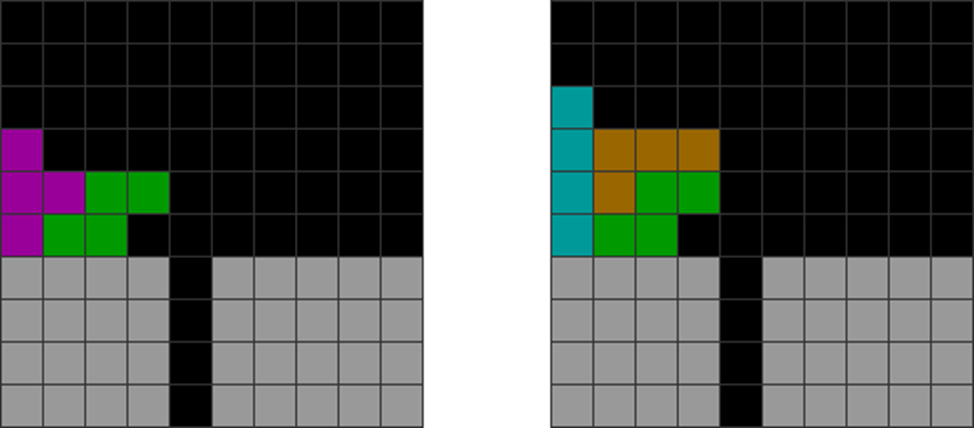
1
2
This initial stack has parity issues on the left stack.
The player goes for the T-spin. However, this causes the red-circled areas to become jagged and unstable.
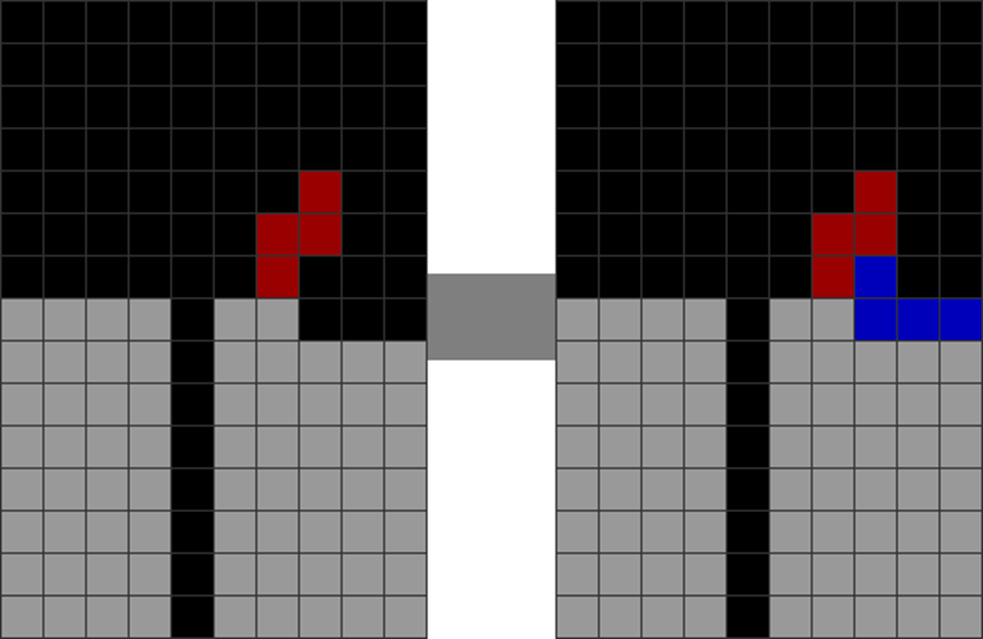
Alt. A
A player can do this with the same pieces, which avoids both issues. Here, the player masterfully uses the T-spin single to resolve local parity on the left side.
However, suppose Alt. A is not possible. In that case, a player can consider giving up a T-spin if it messes up the stack too badly and upstack to a Tetris instead.
2) There is Grace in Simplicity
Here’s a mantra to abide by to create the highest T-spin continuations: Be simple and direct – nothing too fancy.
Never go for a more complex T-spin when a clean, more straightforward one is available. It’s so important that I can’t consider it a recommendation. Instead, it’s a fundamental imperative.
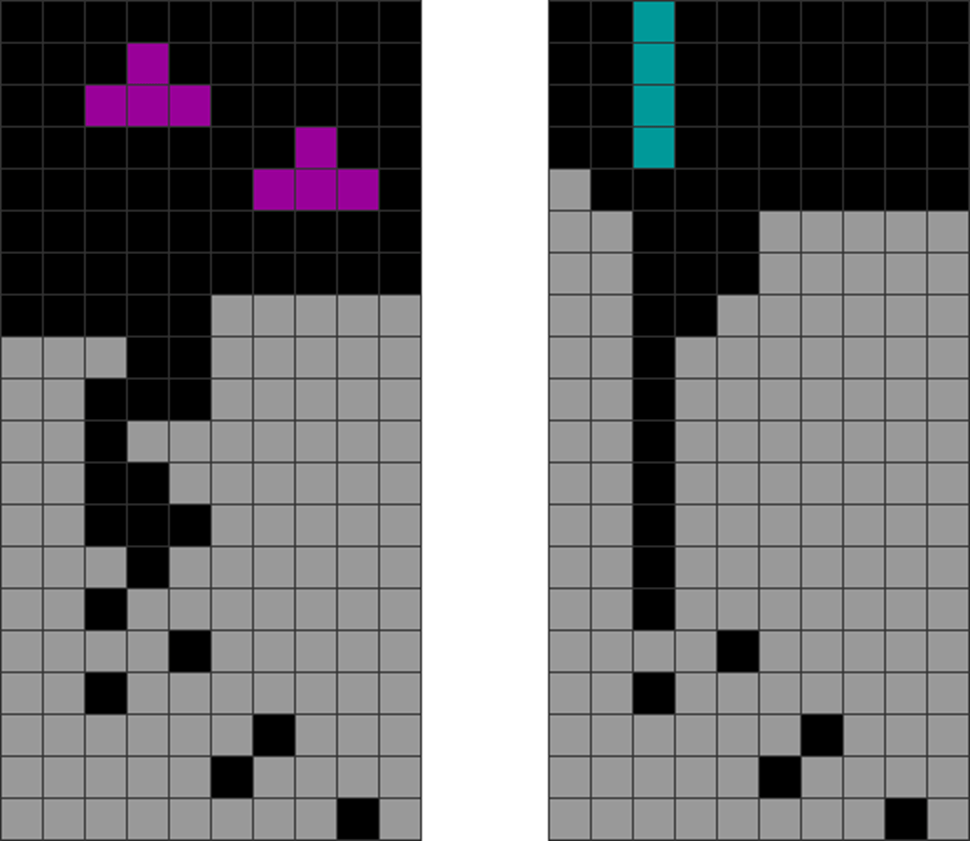
Compare the three T-spin sequences below:
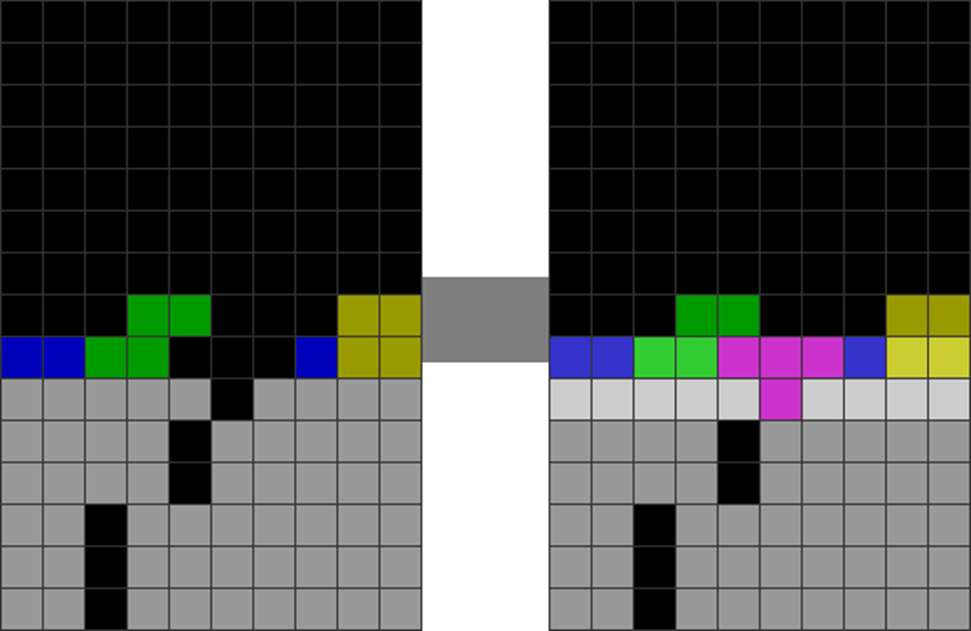
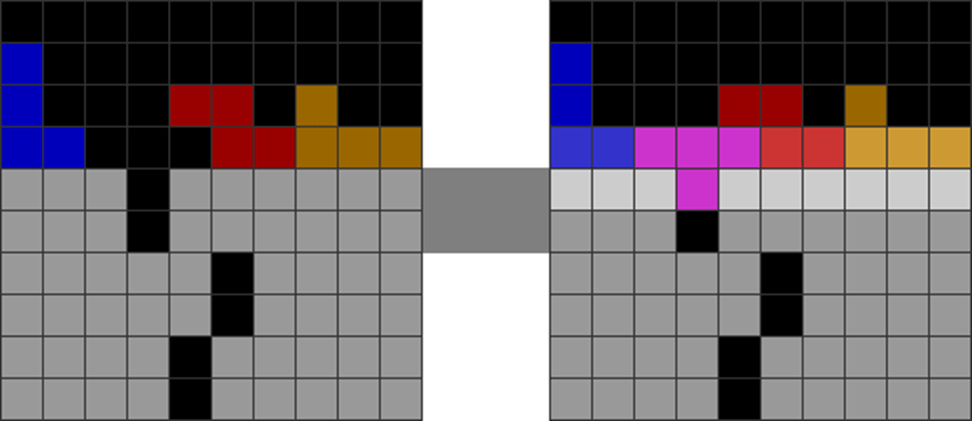
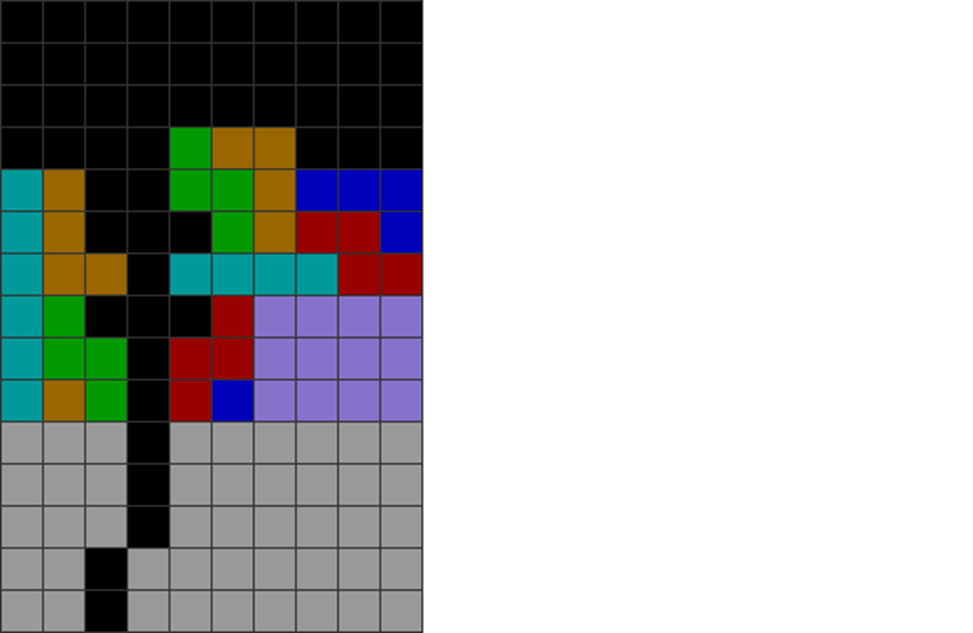
Diagram Set 9-4
Do you notice something? Here’s an exercise: rank the three T-spins by beginner, intermediate, and expert level.
Many may think they are chronologically ranked as beginner, intermediate, and expert. However, this is where I must disagree strongly. It’s the opposite. The expert is in the first picture, while the beginner is in the last.
This is because the third picture’s T-spin wastes many Ts in the stack and is upstacked too high. It also requires too many T dependencies to complete the T-spin. However, the first one doesn’t waste any T in the stack. It goes for the simplest T-spin that takes the least brainpower and thinking time to create. And that’s mastery.
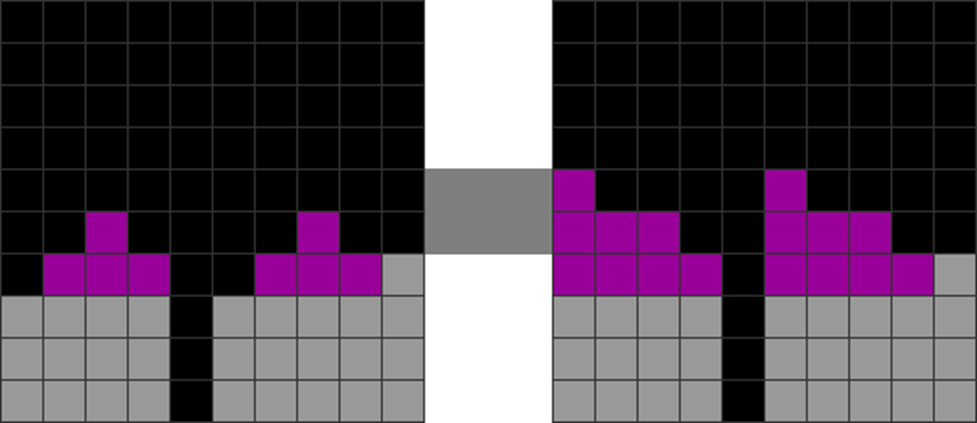
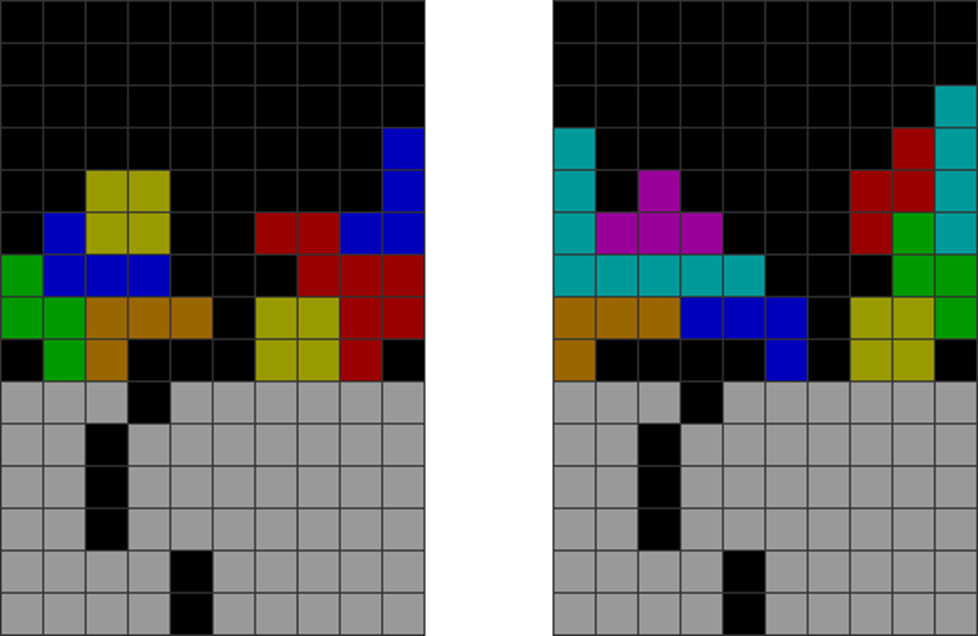
The most direct way to make T-spins is to stack along a line to make Tetrises and T-spin doubles:
Diagram Set 9-5
The player goes for simple T-spins in all these examples, trying nothing fancy. Note how clean they are. The garbage hole is exposed after the first T-spin double, letting you Tetris as a defense.
This method is very safe. If you manage the height differences in the overhang between both sides of a stack, you can quickly get a string of T-spin doubles. This can be from mid-game ST stacking, LST stacking, Fractals, C-spins, or freestyle stacking (to be covered in Chapter 14).
Once you get a chain of continuations with such, you can attack quickly with back-to-back T-spins and Tetrises. With the central hole left open, you can do both back-to-back T-spins and Tetrises simultaneously. This increased attack frequency allows you to shield yourself from incoming attacks rapidly.
Therefore, consider the extremely over-the-top fancy T-spin sequence below:
Diagram Set 9-6
1
2
The player goes for too many exotic and complex T-spins.
The first T-spin double line clear concludes.
3
4
You are left with this dangerous stack. Without an early T, you may be forced to place pieces over the SZ prop (left) and IJ prop (right) messily.
Fortunately, an early T arrives, concluding the second T-spin double line clear.
This sequence can be dangerous as complex T-spins take a lot of time to plan. They also need many piece previews to create, thus increasing their piece and field dependencies. Beginner and intermediate players should never do these kinds of T-spins.
The following sequence shows the same situation but with cleaner, simpler setups:
Diagram Set 9-7
1
2
This starting field has the same garbage patterns as the first step of the last diagram set. The player goes for a simple, flatter T-spin.
The first T-spin double line clear concludes.
3
4
He upstacks for a prophecy Tetris to T-spin double.
The Tetris quad line clear concludes.
5
6
The overhang joins the garbage, creating a clean second T-spin double.
The next T-spin concludes.
This setup is cleaner. While slightly less efficient, this sequence is safer, cleaner, and takes less planning time. The T-spins are also more compact, which is far safer.
With less time to set up and fewer previews needed, your chances of creating them are maximized. This improves your consistency.
It’s crucial to use T-spins that are as compact as possible. This means using T-spins that have minimal cavities. Here’s an illustration:
Diagram Set 9-7
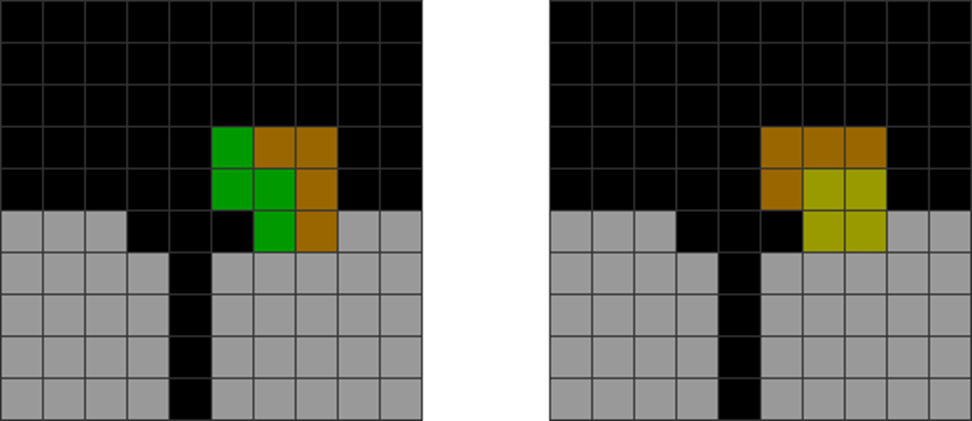
1
2
Here, A’s T-spin is solid and compact, while B leaves many holes in between.
While both are clean setups, I advise using the first over the latter type. This is because the latter can lead to situations like these:
Diagram Set 9-9
Using less compact T-spins can lead to involuntary stacking over the holes if you run into a lousy preview sequence (note the forced placements of the I, S, and L pieces).
This is not an issue for compact T-spins. Compact ones are slightly more efficient.
Last, simpler, flatter T-spins are recommended over complex and tall ones. Latter ones, like DT cannons, require five lines to upstack. This results in more entropy in constructing it, surpassing the 4 to 6 previews available. This may unintentionally cause some parts of the structure to stack over a future garbage hole. Conversely, simpler, shorter T-spin doubles can be made clean, resulting in easier downstacking later.
Summary: Be simple! Do nothing too fancy!
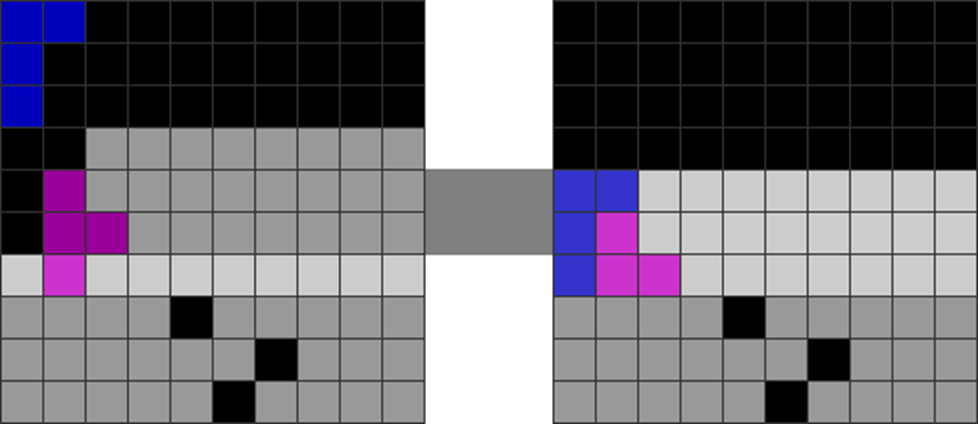
3)Overcoming Poor Overhang Choices
It helps to understand each piece’s properties to combine them for optimal stack stability while making T-spin overhangs. The two situations below with the S and Z pieces are sometimes not optimal. Why?
Diagram Set 9-10
A
B
The S placement leaves a jagged area on the left side, which sometimes needs to waste T or I pieces to even out the jaggedness on the bumpy side.
This Z placement needs an O piece to stabilize the stack on the left side.
Wasting Ts and Is is terrible since you need them to cancel out garbage for defense unless there is no other option.
Therefore, note that S and Z pieces usually must go with others to flatten the stack, such as the ones below, like LS or JZ:
Diagram Set 9-11
See how much flatter the respective ST, SLI, and ZJI piece combinations make the overhangs?
That’s right! Make joined overhangs that minimize field division! Doing so allows for better stacking continuations over the overhang later, improving consistency.
Here are more examples of why joined overhangs sometimes provide a better alternative:
Diagram Set 9-12
A
B
A shows a disconnected overhang, leading to the red-circled parity-imbalanced area.
C
D
B, C, and D show joined ones, which prevent local parity imbalances.
Make the overhangs create as little jaggedness and piece dependency as possible. This allows for easier stacking later and avoids dead-ends or overstacking caused by parity issues above it.
From my experience, below is another way to stack using non-linear stacking:
Diagram Set 9-13
1
2
You can place Z and J out of order. In this example, Z is placed first.
The J is soft dropped and spun into the cavity.
Doing such non-linear stacking increases stacking opportunities, letting you choose better stacking placements than without.
Here are some actual gameplay choices:
Diagram Set 9-14
1
2
The player can make an overhang immediately with the J piece. Still, the protruding part juts out, resulting in a parity-imbalanced stack.
Alt. A
As an alternative, the player uses a soft drop to construct non-linearly to increase the chances of success by tucking the L under the J.
Diagram Set 9-15
1
2
This JO overhang creates a piece dependency in the red-circled area.
Alt. A
Alt. A reduces piece dependencies.
Set 9-16 below results in a flatter stack and allows you to create T-spins where you otherwise could not, thus increasing T-spin output.
Overhang construction can thus be flexible and non-chronologically made. The same is true for the base.
To further illustrate non-linear overhang construction, we have the following:
Diagram Set 9-16
1
2
The player soft drops and tucks a J under the Z to make a T-spin double.
Diagram Set 9-17
1
2
Same, with an O under the S.
These soft-dropped options provide a cleaner method of creating a T-spin.
The following exercises are left to the reader to create the T-spin overhangs based on the incoming pieces:
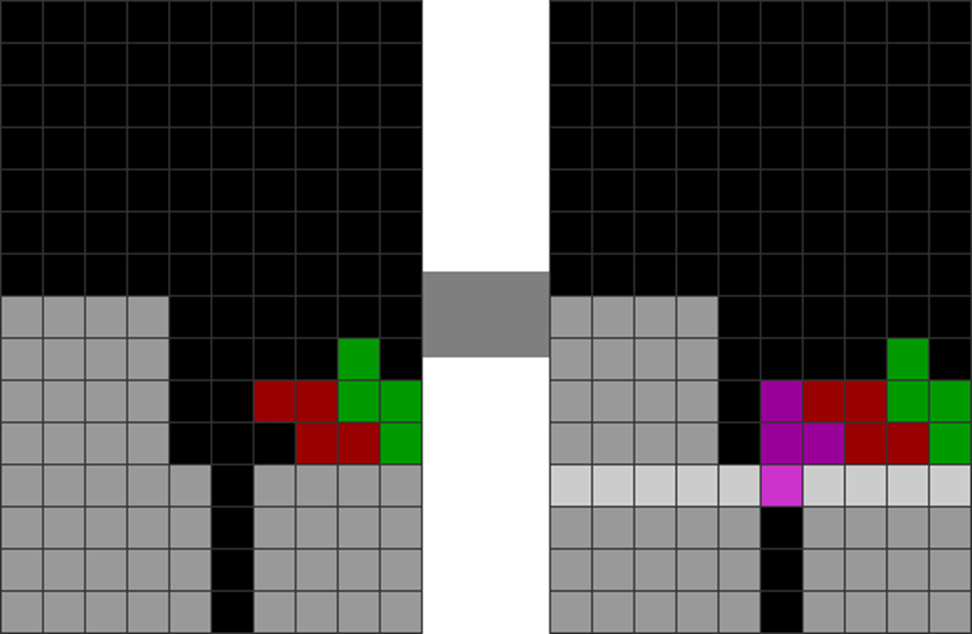
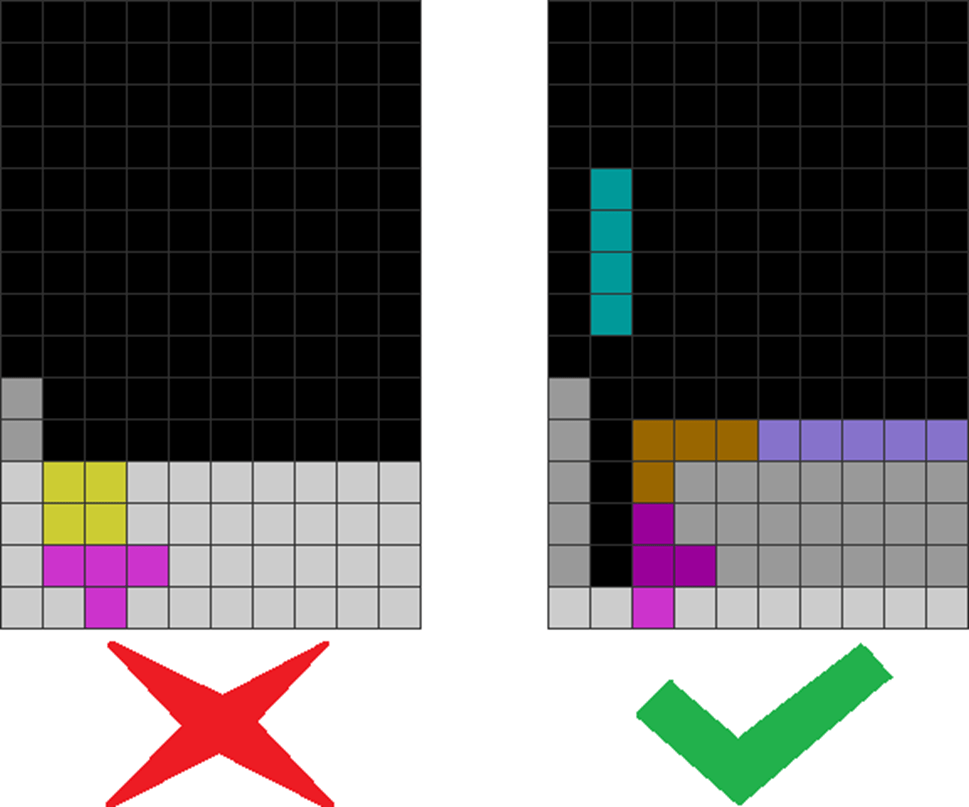
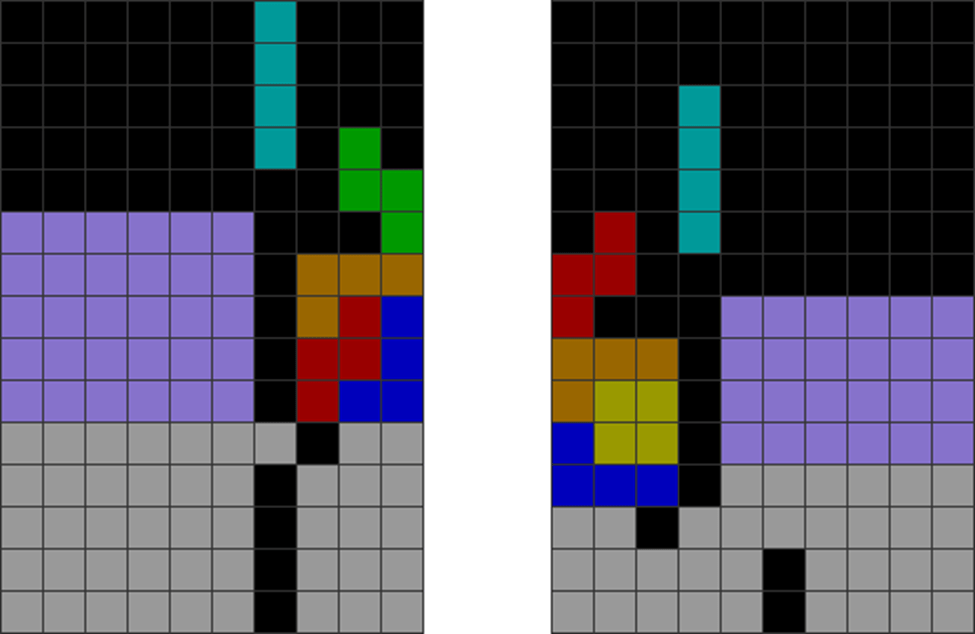
You often hear the dangerously popular meme: “Don’t waste Ts in the stack!” I’m afraid that’s not right. Sometimes, suppose your overhang causes extreme jaggedness (because of a parity imbalance), like in the cases below:
Diagram Set 9-18
1
2
This field has minor parity imbalances on the right stack.
The S overhang to make the T-spin double further accentuates the red-circled local parity issue.
Alt. A
The player uses a T as an overhang. It resolves local parity and makes a T-spin double, which is better so you can stack better later (preferably if you have spare Ts).
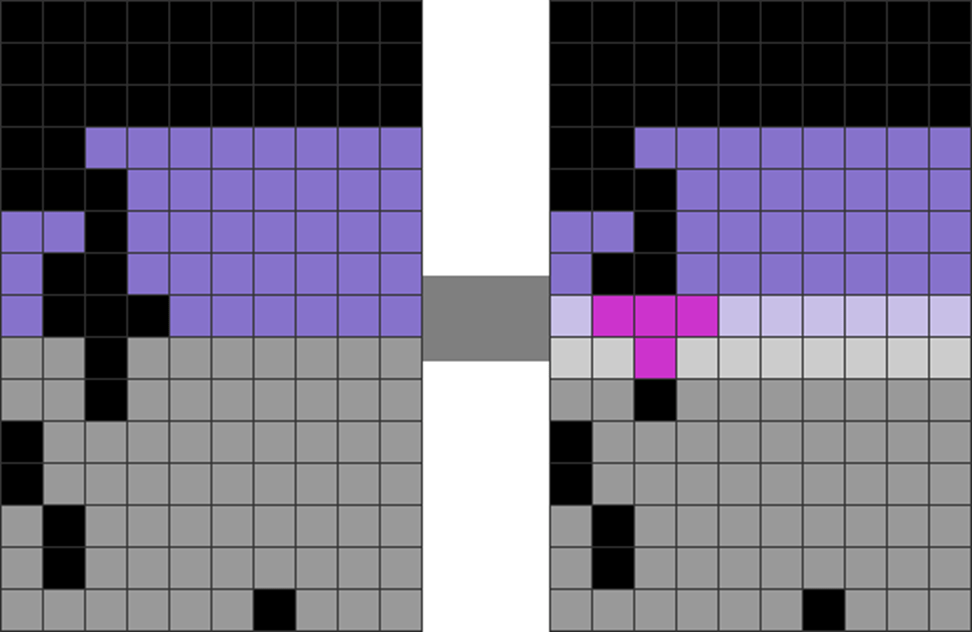
Some T-spin triples are optimally best aborted if their overhang is too high, over a future garbage hole, or breaks back-to-back T-spin and Tetris continuities. This is because the overhang blocks the primary garbage hole and displaces it:
Diagram Set 9-19
A
B
The overhangs for both T-spin triples are dirty. The red-circled overhangs will upstack over the garbage holes immediately below them later.
Therefore, be careful not to over-rely on T-spin triples, as they are primarily unclean and are hard to clean up. Even experts rely most heavily on T-spin doubles as they are much cleaner.
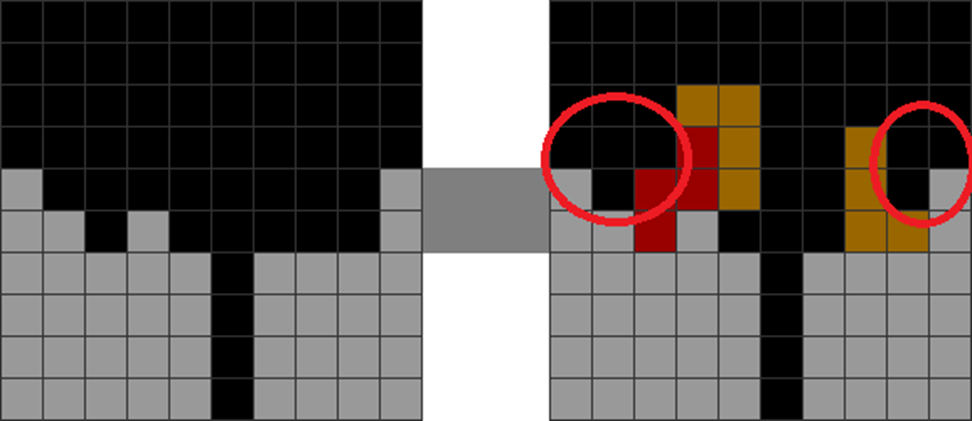
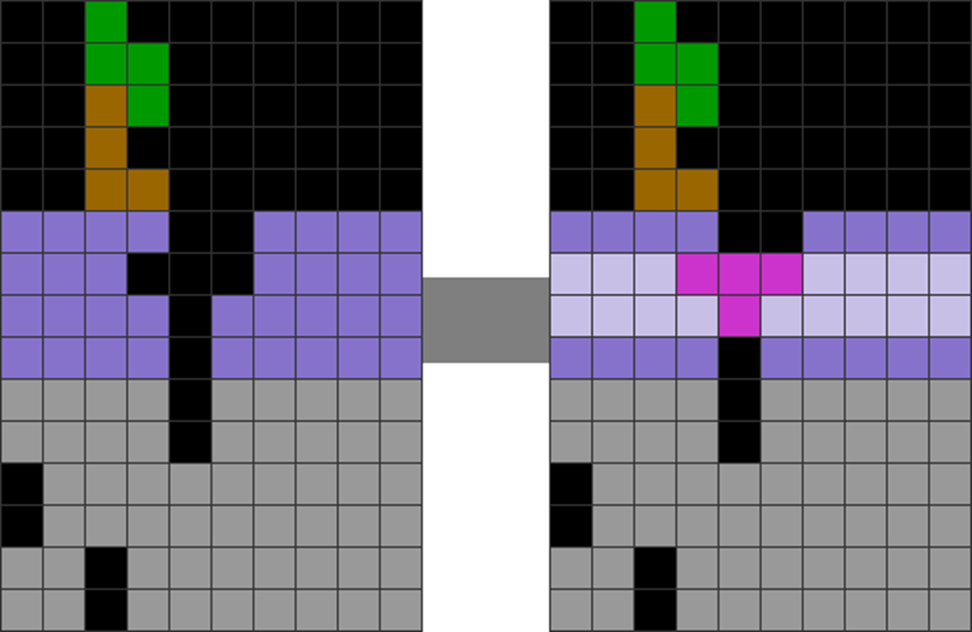
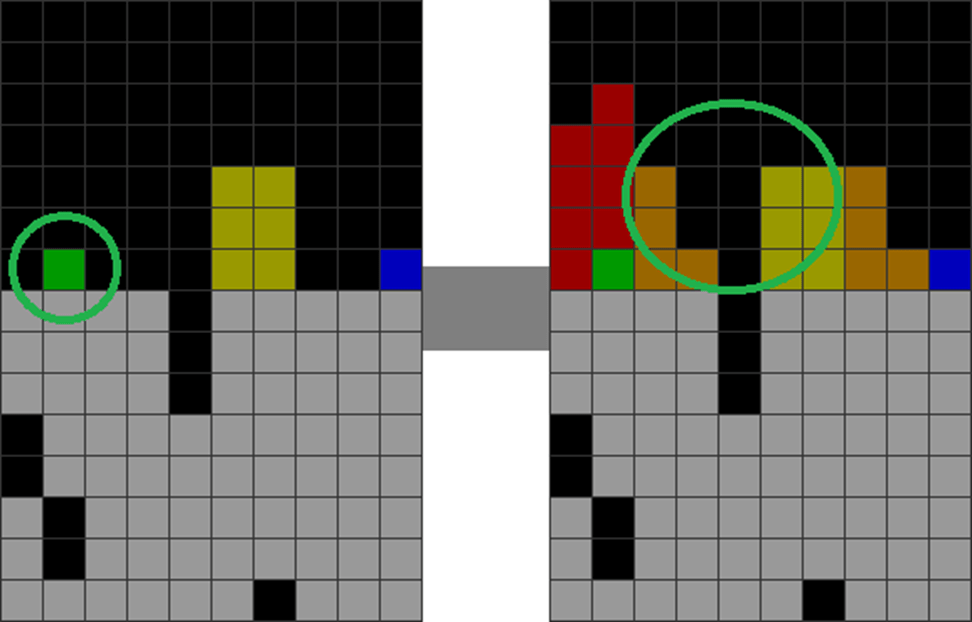
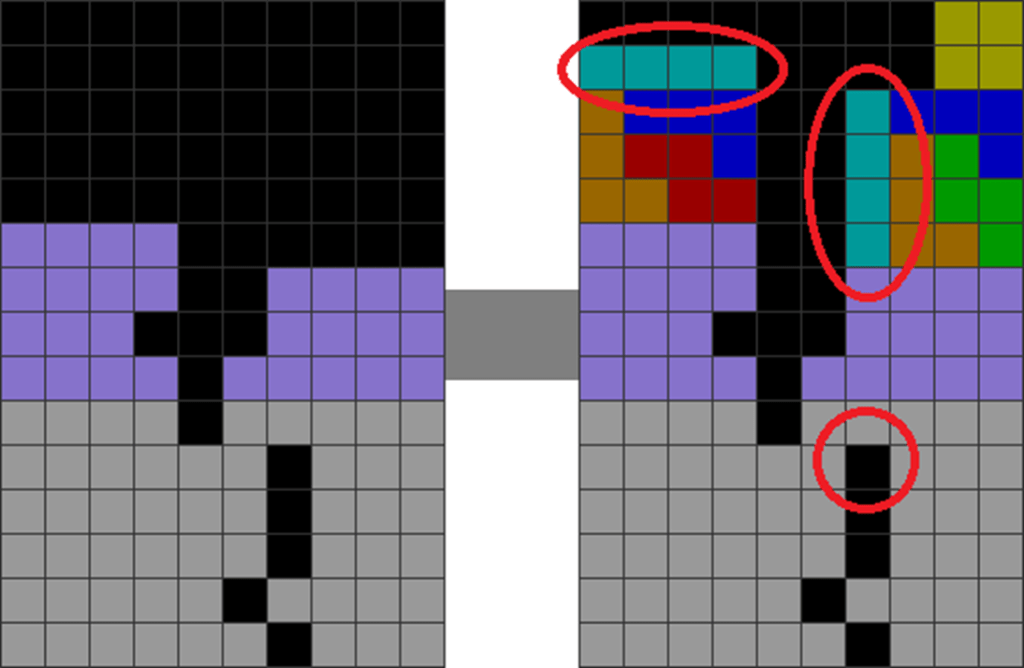
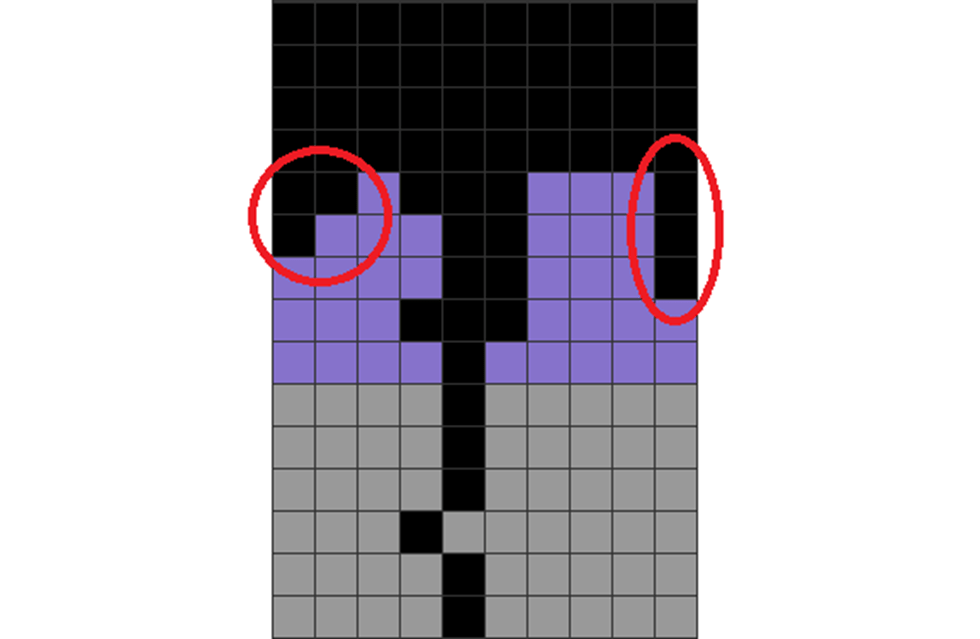
It is essential to watch the overhang type of your T-spin setup. Many T-spin setups, such as T-spin triples and Imperial Crosses, shift the garbage hole’s location by one piece. This blocks it and prevents you from making T-spin continuations or following with a Tetris afterward:
Diagram Set 9-20
1
2
This is a dirty Imperial Cross, as the top overhang blocks the garbage hole in the fifth column (green circle).
The first T-spin double line clear concludes.
3
The garbage hole is shifted to the fourth column in the aftermath, second T-spin double.
I prefer to use simple setups that do not change the overhang positioning. This includes STSDs, C-spins, or Fractals, which are the safest ones I know of.
4)Stacking for Proper Parity Management
A good T-spin should rarely mess up parity or stacking. Here are a few examples to illustrate:
Diagram Set 9-21
The left three pictures handle T-spins remarkably well. The player wastes no T in the stack, which is pretty flat and clean. The player can then follow up a sequence of more T-spins easily. However, the T-spins disrupt successive and consequent T-spin chaining in the three pictures on the right. The player places odd numbers of Ts in some stacks and messes up parity. The T-spins also create a remarkably jagged stack (red-circled parts) and are challenging to follow up easily.
The second trio’s field division causes one to slow down as it takes more brainpower to resolve the poor stacking residues left behind.
It’s also essential to manage T pieces and local parity on both sides of a stack, as shown below:
Diagram Set 9-22
1
2
If you, for instance, mess up your parity on both sides by putting a T like this above on both sides, you will typically have a parity issue on both sides.
This often means you eventually must put Ts on both sides to even them out.
Because there are two stacks on the left and right of the column (in the fifth column) to manage, please be careful about parity imbalances on either side.
In such cases, if you are forced to waste many Ts in the stack, give up the T-spins unless you can make donations. It is best to clean up with a Tetris. However, with proper decision-making and experience, much of it can be avoided, thus freeing up Ts for the T-spinning.
The key is to manage parity by minimizing T wastage: typically, put your Ts in pairs on only one side. This makes parity management easier as only one side must be solved for parity imbalances.
Fixing Local Parity Issues with T-spin Line Clears
One may feel that placing another T in the stack to resolve parity may lead to losing firepower and efficiency. They are right to think this way. However, there’s a handy way to preserve firepower while resolving parity simultaneously.
Expert Tetris players like Kazu have an intuitive ability to do the following:
Diagram Set 9-23
1
2
In step 2, instead of putting a non-line-clear T in the stack to fill that depression in the fourth column to resolve parity, a top player makes an overhang for a future T-spin. The first T-spin single line clear concludes.
3
The player fills up the right side to make a T-spin double donation.
Doing this is the same as putting a T in a stack to resolve parity. Still, it also turns the second T into an offensive T-spin double.
It’s easy to do these things when you spot jagged areas in your stack and make overhangs for a T-spin resolution later.
Here’s a real game example:
Diagram Set 9-24
1
2
In step 1, the player purposely creates an imbalanced parity in the above T-spin. This has two T-spin cavities.
3
The player fills two lines cleanly to use a second T-spin to resolve the parity-imbalanced stack.
Here are more examples:
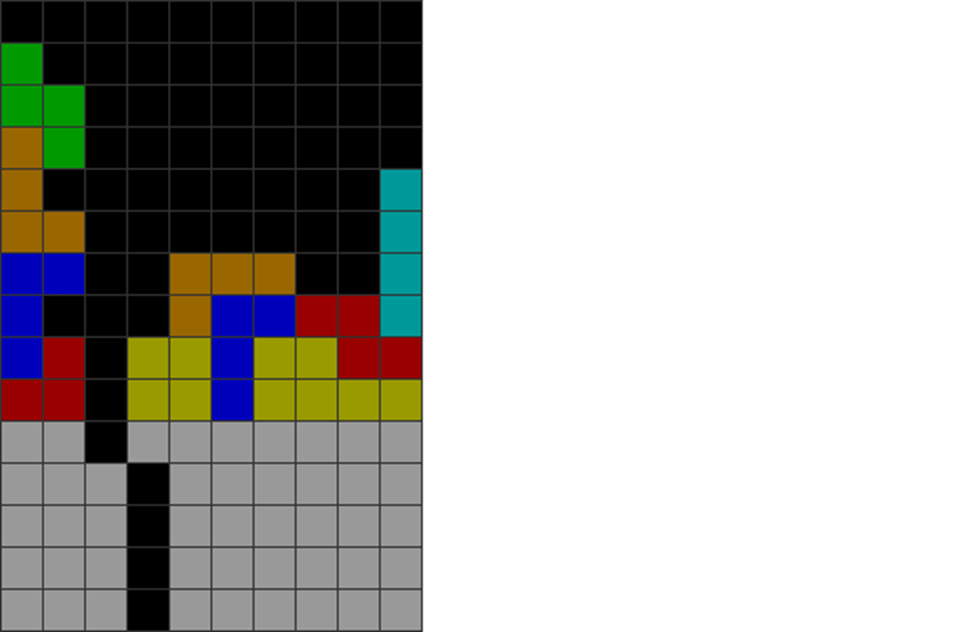
Diagram Set 9-25
1
2
3
Diagram Set 9-26
1
2
3
Diagram Set 9-27
1
2
3
The last 3 diagram sets involve seeing a parity imbalance above your current T-spin. They then stack the T-spin overhang over that area. Once the first T-spin is finished, the three sequences show a player filling the lines to ensure the subsequent T-spin is clean. They then make the second T-spin later.
I sometimes give these up to minimize inconsistencies, as you may not get the parity-resolving T-spin because of some factors, such as urgency.
Another essential understanding is that T-spin minis and singles affect local parity. T-spin triples leave irregular shapes. Only regular T-spin doubles leave local parity relatively undisturbed.
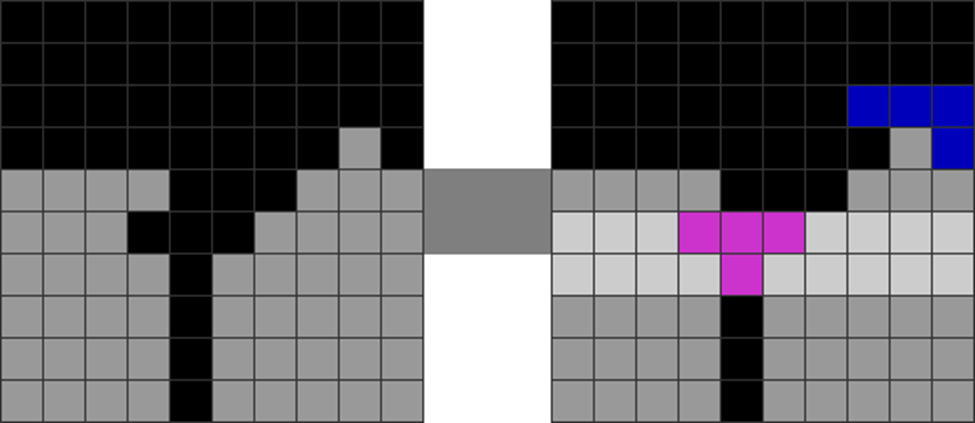
Let us consider T-spin singles. We calculate local parity above the line clear row:
Diagram Set 9-28
1
2
Above row 2, there are 2 lavender and 1 gray block.
T-spin single. Row 1 is assumed to be garbage.
3
Above row 1, there are 3 lavender and 3 gray blocks.
Before the line clear, the local parity above it is the lavender minus the gray blocks, which is 1. After that, it is 0.
Local parity above the cleared line has changed. This is because (i) a single line clear reverses the lavender and gray blocks above the line clear, and (ii) the T-spin single adds three purple, non-line-cleared blocks above the line clear. Now for T-spin minis:
Diagram Set 9-29
1
2
Above row 2, there is 1 gray block.
T-spin mini. Row 1 is assumed to be garbage.
3
Above row 1, there are 3 lavender and 1 gray block.
Local parity before the line clear is -1 (above the line-cleared row), and after that is 2. Thus, it has changed for the same two reasons as the T-spin single case. Now for T-spin doubles:
Diagram Set 9-30
1
2
Above row 3, there is one lavender and one gray block.
T-spin double. Row 1 is assumed to be garbage.
3
Above row 1, there is one lavender and one gray block.
Local parity before and after the line clear is unchanged above the cleared row. This is because two lines cascade down, causing lavender and gray blocks to remain as themselves as they touch the bottom line. Also, the T-spin double adds no purple residue as they are all cleared.
Finally, we consider T-spin triples:
Diagram Set 9-31
1
2
Above row 5, there are 8 lavender and 7 gray blocks.
The T-spin triple concludes. Rows 1 and 2 are assumed to be garbage.
3
Above row 2, we have 7 lavender and 8 gray blocks.
The difference between lavender and gray blocks before and after the line clear above the cleared row is the same (albeit from 1 to -1). All 4 purple blocks are cleared, and do not add residues above the cleared row.
T-spin triples typically do not change local parity. However, the shapes left behind (like step 3) are sometimes irregular, making T-spin triples less clean than regular T-spin doubles. Non-regular T-spin doubles include polymers, which will be covered in the next book.
To conclude, it’s crucial to understand that T-spin minis and singles can alter local parity because they add residues, and their odd-numbered line clear flips lavender and gray blocks after the line clear.
T-spin triples do not add residues, but being an odd-numbered line clear, can sometimes shape the field unpredictably.
However, regular T-spin doubles are always clean. They do not alter local parity above the line clear much. They also do not add residues from uncleared purple blocks, making the area above the cleared row more predictable and less chaotic. Adding residues (from a T’s purple blocks) can add chaos and local parity changes, which disrupt stacking.
Hence, many experts mainly use T-spin doubles because they are clean.
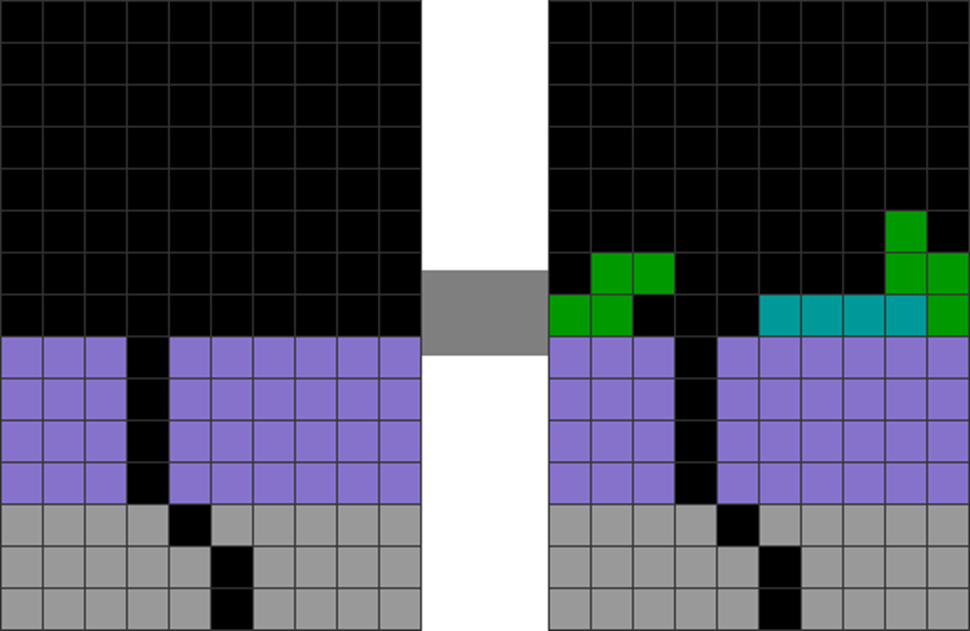
Here’s another typical pattern I get mid-game below to use parity imbalances to create T-spin opportunities.
Diagram Set 9-32
1
2
This is a common and infamous mid-game jagged pattern.
You can put a Z piece, then top an overhang with a J piece to make a T-spin.
I have done this several times, and it helps to prevent a T piece wastage.
5) Going for Back-to-back T-spins
Ideally, most T-spins should sustain back-to-back bonus. Why is breaking back-to-back bonus unrecommended? It is because many beginner and intermediate players break this bonus, which makes their next T-spin and Tetris lose a 1-garbage attack bonus.
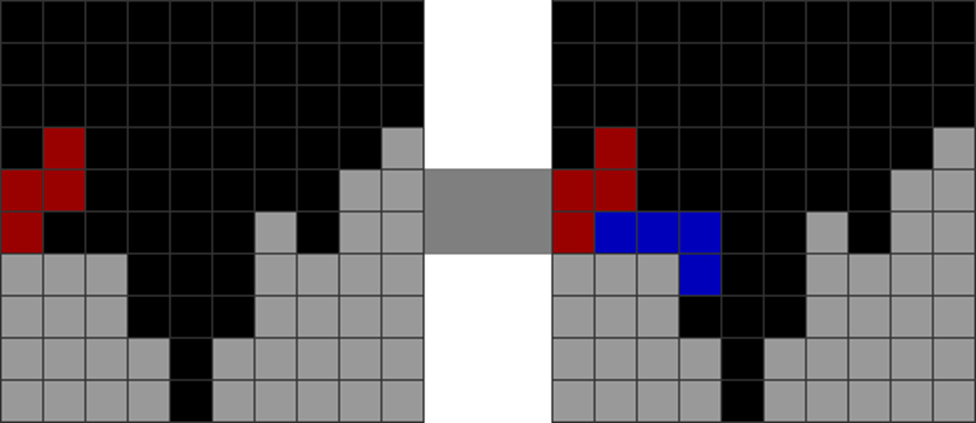
Diagram Set 9-33
1
2
The player makes a T-spin double.
The first T-spin double line clear concludes.
3
4
He then skims and breaks back-to-back bonus with a J piece.
He constructs a second T-spin double with a Z overhang.
5
6
The second T-spin double line clear concludes.
He skims and downstacks with an I and J, but the red block from the second T-spin double’s overhang still blocks the next garbage hole.
This incurs massive line clear delay penalties and wastes many pieces per non-damage line skim.
However, what if you can sustain back-to-back T-spins in the same garbage pattern situation?
The below assumes a different incoming preview sequence for pedagogical purposes to illustrate my point. It has set 9-33’s starting condition.
Diagram Set 9-34
1
2
3
4
Here, every piece sustains back-to-back bonus while making clean T-spins.
Let’s do a damage calculation, assuming Puyo Puyo Tetris 2’s combo tables.
Set 9-33: 8 garbage and 4 line clear delay penalties
Set 9-34: 9 garbage and 2 line clear delay penalties
There you go: set 9-34 does more garbage in less time with fewer inefficient skims.
That’s why I strongly recommend sustaining the back-to-back bonus as much as possible. However, you sometimes must skim and break this bonus for safety and downstacking reasons. Thus, it’s not always appropriate to sustain it all the time.
6) The Most Efficient T-spins
The most efficient T-spins are those which are partly constructed out of garbage.
For the picture below, the lavender blocks represent upstacked, colored blocks. The gray ones are garbage.
Diagram Set 9-35
A
B
Half of the T-spin is garbage, which saves 2.5 pieces to upstack. It can thus be made faster.
2 out of 5 lines of the C-spin (a T-spin triple and T-spin double setup) are made of garbage! This makes it freakishly efficient!
Therefore, prioritizing such T-spins lets you turn your garbage lines into fuel for attack, increasing efficiency!
B) Planning Ahead for More T-spins
Outstanding players avoid T-piece wastage by stacking for more T-spin continuations. One can follow up quickly with simple, repeatable patterns with more T-spins. Doing so increases one’s efficiency.
1) Rotating T-Spins for Better Follow-ups and Stacking
Rotate your T piece during a T-spin in a way that allows for the best follow-ups – such as sustaining back-to-back bonus or allowing pieces to be placed cleanly later while minimizing skims or uncleanliness. Here’s how:
Diagram Set 9-36
1
2
The player makes a T-spin double.
The player purposely denies the T-spin double by making a T-spin single instead.
3
4
He upstacks cleanly with an O over it to make a perfectly clean 4-high rectangle. He also builds an overhang with an S piece for a prophecy T-spin double.
After the Tetris line clear, the overhang connects with the garbage to create a T-spin double.
All three attacks are clean and sustain back-to-back bonus.
Below are common optimizations:
Diagram Set 9-37
1
This is an extremely common mid-game situation.
Alt. A
Alt. B
This shows how many less inexperienced players always skim with an O after the T-spin double concludes, breaking back-to-back bonus.
This choice shows how a more seasoned player denies the T-spin double to upstack to a clean Tetris.
Diagram Set 9-38
1
This is another extremely common mid-game situation.
Alt. A
Alt. B
This involves taking the T-spin double. The player tries to make a clean Tetris, but the wrong incoming pieces make an imperfect non-4-high rectangle.
The player makes a perfect 4-high rectangle after denying the T-spin double for a single instead. See how he places the J.
Therefore, a player should cultivate piece awareness and see if denying a T-spin double for the single is suitable, given the incoming previews.
Sometimes, denying the T-spin double also allows for easier downstacking. I sometimes deny the T-spin double and get the single, so it starts off garbage blocking and leads to a downstack combo:
Diagram Set 9-39
1
2
Here, denying the T-spin double for a single makes a subsequent J piece fit into the J-shaped cavity perfectly, enabling a quick downstack.
2) Prioritize T-spins with Good, Familiar Follow-ups and Opportunities
It’s not enough to make one T-spin. Excellent players stack for the follow-up and opportunity after the T-spin, enabling more T-spins to be created from the aftermath pattern.
Here are several T-spins with good, easy-to-create, and easy-to-recognize follow-ups:
Diagram Set 9-40
1
2
3
4
A DT Cannon leads to a C-spin follow-up.
Diagram Set 9-41
1
2
3
This shows a T-spin double leading to another T-spin double.
These above T-spins are exemplary because the follow-ups have few piece or field dependencies. They can be easily used, leading to many more T-spins.
Conversely, using too many exotic T-spin props like the sequence below can lead to many issues:
Diagram Set 9-42
1
2
This is an exotic and complex T-spin setup.
The first T-spin double line clear concludes.
3
4
Thisleads to an aftermath with many jagged patterns that are hard to fill (green circle).
The player tries to stack cleanly, but this leads to a well-like situation that is best avoided in the green circle.
This sequence can take time for the brain to process and creates terrible aftermath patterns that can’t easily make a T-spin. The green-circled parts in steps 3 and 4 destroy T-spin follow-ups.
Therefore, minimizing T-spin setups with poor continuations is sometimes advised.
Four Easy Tricks
I have found that creating T-spins is most straightforward and takes less thinking time if one stacks for opportunities first.
Here are three general methods I use:
i) Stack for Flatness
Stacking flatly lets you use the prophecy Tetris to T-spin double method:
Diagram Set 9-43
A
B
The clean Tetris leads to T-spin doubles in the above two examples. Note how some pieces like LJZ (A) and LOJ (B) combine to make perfect rectangles.
I do this a lot in my Tetris gameplay. Doing so lets you quickly put an overhang like an S or Z on top of it to make a T-spin double after the line clear.
ii) Stack for Even Sides
An even field around a central hole makes it easy to make T-spins by creating an overhang:
Diagram Set 9-44
1
2
The player stacks the lavender blocks evenly.
This makes it easy for the player to make a quick T-spin double, as the base is even around the hole in column 4.
Alt. A
Conversely, if a player stacks such that the two sides of the stack are imbalanced (columns 3 and 5) around the hole, creating an immediate T-spin with a simple overhang is harder.
Evening both sides is an art. When you see the situation below, you sometimes waste a T to balance it out:
Diagram Set 9-45
1
2
The left and right stacks of the garbage hole are imbalanced.
The player puts a vertical S on the left side to increase its height by two blocks and a vertical T on the right to increase it by 3. This evens out both sides of the stack to make an easy T-spin double.
The placement below shows one example of how it’s essential to be mindful of piece combinations:
Diagram Set 9-46
A
B
This placement of J (red circle) causes the left and right sides to be imbalanced.
The red-circled part typically makes it harder to follow up with easy T-spin doubles. Both sides are imbalanced by an odd number, which results in an unfortunate shape.
iii) Stack for Continuations
One can place pieces to maximize T-spin continuations beyond the current one:
Diagram Set 9-47
1
2
The player created specific patterns like this L and J symmetric placement using Z as an overhang. This creates a T-spin double.
The T-spin double line clear concludes.
3
The player continues to make a Fractal.
This repeating L and J patterns, topped with a Z overhang to make repeatable T-spin doubles, is called LST stacking, one of the most consistent mid-game T-spinning methods. The below example uses ST stacking. I will cover these methods in The Easiest T-spinning Methods chapter.
Be mindful of what distances between gaps (to make overhangs) should be made to continue T-spinning:
Diagram Set 9-48
1
2
Leaving 1-block gaps between 2-blocks-high T-spin overhangs is normally good as it leads to mid-game ST-stacking, which is easy to sustain.
Diagram Set 9-49
1
2
Leaving gaps between overhang block thickness of 2, 1, 2, 1, 2, etc., leads to mid-game LST stacking, which is highly efficient, as shown in the second step, leading to quick, easy T-spins.
Doing all these creates opportunities that are easily built upon for T-spins. It also reduces mental effort and over-thinking, letting you play fast.
iv) Avoid Dead-end Patterns that End T-spin Chaining
Some dead-end patterns end T-spin chaining. ‘Well’ situations involve creating a middle depression that usually prevents T-spin doubles from forming.
While 6-3 and 5-4 stacking, it is common to make the following “well” situation:
Diagram Set 9-50
Here, one reaches a well-like dead-end and can’t T-spin chain further as a well is in the middle.
But if you are forced to do so, some ways exist to escape it. You have two options to continue the above chart’s scenario:
Diagram Set 9-51
A
B
This stacking destroys T-spinning continuations by building a well-like depression in the middle.
This is a better alternative. Here, a player uses a Z piece to make a Kaidan donation to get out of the dead-end.
A second fix involves creating an artificial wall like this with the following follow-ups:
Diagram Set 9-52
By making an artificial wall to ‘hug’ against (blue-circled areas) in these three examples, you can easily make horizontal S and Z placements as the T-spin base to continue T-spin double chaining.
The above methods are called ST and Hamburger stacking, to be covered in chapter 14. This is one of the easy tricks to T-spin chain during 6-3 and 5-4 stacking.
Sometimes, the best way to fix dead-end situations is to avoid them entirely. Some patterns entirely end back-to-back T-spin situations like these:
Diagram Set 9-53
1
2
3
Alt. A
Using a J overhang on the field’s right side leads to an imbalanced aftermath pattern on both sides of the stack. This prevents T-spin doubles from being quickly followed up. Alt A’s J overhang, however, resolves this problem.
Diagram Set 9-54
1
2
3
Alt. A
The player suffers the same fate. Alt. A resolves this.
3) Avoid Stacking too Close to the T-Spin Stacking Side
Stack away from the parts which you intend to make T-spin continuations. This will allow you to build the overhang or base later:
Diagram Set 9-55
A
B
In these two examples, the player makes two errors that break back-to-back T-spin chaining: (i) he stacks around the edges and (ii) overstacks them.
Diagram Set 9-56
A
B
The player stacks away from the edges. This allows for easy LST and ST stacking, which I will cover in The Easiest T-spinning Methods chapter later.
Incorporating this habit into one’s gameplay opens up more T-spin continuations.
4) Using All-spins to Improve Stacking Options
All-spins refer to the spins of all other non-T pieces. There can be S, L, or I spins. Use these to enable placements like the ones below:
Diagram Set 9-57
1
2
Alt. A
This L spin under the I is better than Alt. A, which is very jagged and tall.
Diagram Set 9-58
1
2
Alt. A
This S spin under the J is flatter than the jagged Alt. A, which needs more soft drops under the S cavity to resolve.
These allow you to place problematic pieces flatly, such as the I piece. All spins open up more stacking options. However, please be careful when using too many soft drops because of the soft drop penalty.
C) Important T-spinning Micro-decisions
This section shows the core T-spin micro-decisions after my four years of practice.
1)Developing an Intuition Not to Waste T Pieces
Some intermediate players have asked me how to avoid the following situation:
Diagram Set 9-59
1
2
The player overstacks the sides (creating a 2-wide tall well in the middle) just to get a T-spin double.
3
It gets into a dead-end stack with no T-spin continuations.
Step 1 occurred because the T took too long to arrive, forcing the player to put pieces to the sides of the well. This is a common issue that many beginner and intermediate players face.
To avoid them, there are several ways:
Develop the Intuition for T Pieces
One can roughly sense when a T piece will come when one has played enough. A T is likely imminent when there has been a substantial T drought.
Outstanding players have a rough sense of the number of pieces having passed in the 7-piece randomizer. For instance, if 2 Ts come consecutively, one might have to wait for at least six more pieces before the next T.
Stack T spins
Diagram Set 9-60
These three examples show how T-spins can be stacked on each other while waiting for the extra Ts to arrive.
The above uses Sky props, STMB caves, or other complex T spin splicing setups when the player suffers from a T drought. This way, none or only a few of the T pieces will be wasted when they finally arrive.
Minimise T placements in the stack
When a field is parity imbalanced, you need another T to even it out. Thus, in a parity-balanced field, you must put pairs of Ts in the stack. This typically happens when:
Diagram Set 9-61
1
2
This stack is relatively parity-balanced.
The player puts a horizontal Z piece, which leads to a jagged local parity-imbalanced area in the red circle.
3
Resolving this mandates a T placement.
Here’s a suggested alternative placement:
Diagram Set 9-62
1
2
The player puts a vertical Z like this.
He then soft drops and spins a J under the cavity.
This creates an area where the local parity is balanced and non-jagged. This, thus, doesn’t need a T to be wasted in the stack.
Thus, with proper stacking and some all-spin knowledge, you can stack to avoid such patterns and prevent T wastage. The key is to stack to minimize jagged placements and avoid T placements.
2) Complex T-spins and Stacking Up Prerequisites
Here’s a fancy T-spin sequence that is almost too tempting for some Tetris fans to pass up:
Diagram Set 9-63
1
2
The player creates a King Crimson. It is a triple T-spin setup with an initial T-spin triple followed by two T-spin doubles. In step 2, the first T-spin triple line clears.
3
4
The next T-spin double line clear concludes.
The final T-spin double line clear concludes.
Now, is there anything wrong with it? In the above diagram, there isn’t much wrong. However, the one below may pose an issue:
Diagram Set 9-64
1
2
The right side of the stack hasn’t been upstacked. However, the player first recklessly upstacks the King Crimson pattern on the four columns on the left.
The player messes up his stack because the wrong pieces came. This forces a player to upstack over holes. The player here also wastes many T pieces in the stack, which messes up parity and mandates even more T pieces to resolve parity.
Step 1 is dangerous as you are vulnerable to being spiked while doing so. It would help if you stacked up the left side first before attacking. Players can attack you during this time; there’s no way to negate garbage.
More importantly, you may not have the right pieces to fill the left side of the stack. Step 2 can sometimes happen.
Therefore, greedy setups such as King Crimson should only be used if one side is stacked. Why? It takes only a few pieces to fill the right side. In set 9-63, putting Z and J creates the King Crimson – just two pieces.
Thus, I recommend going for greedy setups only when they are opportunistic.
3) Knowing When to Abort Some T-Spins, Back-to-backs, and Instead Repair
Too many T-spins mess up the field.
I sometimes get off very fancy T-spins in the game, like the ones below. The gray part has been pre-stacked.
Diagram Set 9-65
A
B
This T-spin setup (a double T-spin setup) is sometimes bad as it may cause severe piece dependency – it may take up to 12 pieces for the right piece to show up. It is even more if you need two particular pieces (2 Ts here).
This shows a safer alternative with a Tetris to wean off this double T dependency.
These greedy T-spin setups are rare and endanger oneself because of the extreme piece requirements. Setups with three or more T-spins within them aren’t recommended for frequent use. You are sometimes forced to give them up, as you may not have enough T pieces fast enough to carry them out.
One way to bypass this is to look for alternatives by building so you do not have to depend on a specific piece. The following example is flatter and more recommended:
Diagram Set 9-66
1
2
The player uses a J and Z skim to create a T-shaped cavity in step 1. In step 2, he tops an overhang to make a functioning T-spin double.
This builds in a way where alternatives are possible, which the reader should do.
This includes knowing emergency skimming methods to cleanly abort T-spin setups, if you can, like this STSD here (a Super T-Spin Double with two T-spin doubles in it):
Diagram Set 9-67
1
2
This is an STSD with 2 T-spin doubles ready. But no Ts arrive.
Thus, the player spins a J into the STSD, which converts it into a T-spin double.
This is a Boomerang, whose J-spin line clear makes the setup no longer block the garbage hole for the Tetris, making it safer. The method exposes the T-spin double immediately.
Extreme methods also require heavy upstacking, making you vulnerable to spikes. Extreme donation methods are like these:
Diagram Set 9-68
These props are dangerous as they restrict stacking.
They may force you to upstack over bottom holes like this:
Diagram Set 9-69
Here, the player couldn’t get the T in time and is forced to place incoming pieces over the holes as there’s nowhere else to put them.
Thus, minimize extreme or greedy T-spins. Keep low and go for simple T-spins.
The above extreme setups are okay for me as I’m highly experienced. However, even I will give them up most times and instead stack them for safety if I don’t feel secure.
4) When to Go on T-Spin Chaining as an Offensive
The choice to downstack defensively or go for heavy, offensive T-spin chaining is a matter of preference (depending on one’s aggression level) and situation awareness. However, suppose one sees a sizable T-spin chaining opportunity, and survival is not urgent. In that case, I typically choose a T-spin chain instead. Here’s what I mean:
Diagram Set 9-70
1
2
In step 2, instead of downstacking, the player makes this T-spin double. The J overhang on the left is forecasted for a second T-spin double.
3
The first T-spin double line clear concludes.
This continuation leads to an aftermath pattern that is easy to make T-spinning chaining.
Please see the following three subsequent options after step 3 below:
Diagram Set 9-71
A
B
LST stacking.
ST stacking.
C
Freestyle stacking.
The aftermath terrain is so advantageous for T-spinning chaining that it’s sometimes hard for one to pass up.
I can easily use the mid-game LST stack, ST stack, or freestyle T-spin doubles and Tetrises along a line in all three cases above. With enough practice, one can chain ten or more T-spins and maybe five or more Tetrises, all back-to-backs, in such situations. If I had instead skimmed down, I would get a pattern that can’t be easily T-spin-chained.
I usually do this in Tetris 99 and Puyo Puyo Tetris because it provides a chance for maximal offensive power against an opponent. Also, your offense becomes your defense because you effectively and quickly chain T-spins and Tetrises. You can send around a T-spin or Tetris every three to six seconds, letting you offset garbage while you upstack to attack.
This should, however, cease, and one should downstack once one has reached a critical height. When the T-spin chaining breaks, revert to a defensive playstyle again.
5) Don’t Force T-spin Setups
Sometimes, if you do not get the right pieces, do not force a setup. Forcing a setup that the immediate previews don’t allow causes you to “fish” for pieces. You wait for the incoming piece, which can take up to 12 pieces. This is far worse with two or more piece dependencies, which may take many more pieces!
Many players sometimes get into such situations:
Diagram Set 9-72
1
2
The player forces a T-spin double setup when no immediate Ts are in the stack.
The player is forced to place pieces on the left and right sides of the field. This causes overstacking in the top red-circled parts. The overstacked parts cover the next garbage hole in the lower red-circled area.
Since you do not get a T, giving up a T-spin and downstack is better. Remember, every piece before a desired piece must be placed first.
Likewise, many new players get into the situation below:
Diagram Set 9-73
The player stacks in a way that creates many T and I dependencies. In this diagram, the left red-circled area needs Ts to stabilize. In the right red-circled area, a player needs Is.
In such cases, they end up ‘fishing’ for both the I and T pieces. All pieces that come while waiting for them must be placed, which sometimes leads to overstacking.
Summary and Conclusion
A large part of good Tetris gameplay comes not from what one does but from what one does not do in T-spins.
When one watches top Tetris players play, we are often wowed by how well they play. They know where to put pieces in the correct areas. However, what is taken for granted are the decisions they ignore. Sadly, many beginner to intermediate players ignore these untold and unseen decisions.
Concept
Summarized Rules-of-Thumb
Flow
Always go for a simpler, quicker T-spin over a more complex one. Sustain back-to-backs as much as possible unless they’re unsafe. Maximize T-spin continuations instead of just making the first T-spin. Stacking flatly maximizes T-spin chances and consistency. Avoid well-like dead-end situations that end T-spin chaining. Shorter, flatter T-spins are mostly better than taller ones like King Crimsons. Don’t force impossible T-spin setups, which may lead to piece wastage in the stack.
Form
Always go for the cleanest, safest T-spin over a risky, dirty one. Ensure your T-spin overhang is clean. A good T-spin should not disrupt parity too much. T-spins can fix parity and be made out of parity imbalances.
Balance
Give up T-spins if it’s better to downstack or make Tetrises. Minimize T-piece wastage in the stack while T-spinning. Never make a T-spin if Ts don’t arrive.